Frozen Greek Yogurt Peanut Butter Bites
There’s something profoundly magical about the process of creating a treat that marries simplicity with indulgence, and that’s exactly what we’re diving into today with these Frozen Greek Yogurt Peanut Butter Bites. Imagine, if you will, a warm afternoon where the sun kisses your skin, and the air is filled with the laughter of children enjoying their playtime. You reach into your freezer and pull out these delightful bites that are not only creamy and rich but also packed with goodness. Each bite is a lovely revelation—a balance of sweet and nutty flavors, a little bit tangy from the yogurt, and a hint of salt that elevates the experience to something truly extraordinary. These bites are more than just snacks; they are a celebration of wholesome ingredients coming together to create joy.
As I’ve always been captivated by the idea of healthful eating without sacrificing pleasure, this recipe became an instant favorite in my home. The beauty lies in its ability to satisfy cravings while offering a nutritious twist. It’s perfect for busy parents looking for quick snacks or anyone who craves something sweet yet healthy. With just five simple ingredients, you can whip up these bites in no time! They’re freezer-friendly too—so you can prepare them ahead of time and have a deliciously cool treat at your fingertips whenever you need it. Trust me when I say that once you make these Frozen Greek Yogurt Peanut Butter Bites, they’ll become your go-to snack.
Frozen Greek Yogurt Peanut Butter Bites: A Creamy Delight That Will Make You Smile
In this recipe, we’ll combine creamy Greek yogurt with natural peanut butter for an utterly intoxicating flavor profile that’s both satisfying and nutritious. This dish is not just about making something delicious; it’s about creating memories—imagine serving them at family gatherings or packing them as after-school treats for your little ones. They’ll be begging for more! So grab your mixing bowl and let’s embark on this delightful culinary adventure together!
Ingredients:
Before we get started on our Frozen Greek Yogurt Peanut Butter Bites, let’s talk about our key players—the ingredients! Each one plays a vital role in crafting bites that are not only tasty but also nourishing.
- 1 cup plain Greek yogurt. This creamy marvel is what gives our bites their delightful texture and adds a healthy dose of protein—about double what regular yogurt offers! When choosing Greek yogurt, look for brands that contain live cultures; this adds probiotics, which are beneficial for gut health. The tanginess of the yogurt beautifully complements the sweetness of honey or maple syrup we’ll add later, creating a symphony of flavors that dance on your palate.
- 1/2 cup natural peanut butter. Ah, peanut butter—the childhood classic transformed into a sophisticated ingredient! Opt for natural varieties that contain only peanuts (and maybe salt), avoiding those loaded with sugars or hydrogenated oils. This luscious nut butter brings richness to our bites while being packed with healthy fats and protein, keeping you satisfied longer. Remember to stir it well before measuring if it has separated; we want all that liquid gold incorporated into every bite!
- 2–3 tbsp honey or maple syrup. Here’s where we introduce sweetness! Honey adds floral notes of flavor while maple syrup contributes its unique caramel-like essence. Both options provide natural sugars without refined additives found in processed sweets. Adjust to your taste preference—some may like it sweeter than others—but remember that too much can overpower the delicate balance we’ve created!
- 1/2 tsp vanilla extract. This ingredient is absolutely paramount—vanilla acts as a flavor enhancer here, elevating all other components in our mixture to new heights! Choose pure vanilla extract over imitation for maximum impact; you’ll notice the difference in depth and aroma as you mix everything together.
- Pinch sea salt. Salt might seem counterintuitive in a sweet treat, but trust me on this one! Just a pinch will amplify all those flavors and create an irresistible contrast against the sweetness of honey or maple syrup and the creaminess of peanut butter. A carefully measured amount can turn an ordinary snack into something extraordinary!
- Optional: chocolate chips or melted dark chocolate. If you want to take these bites over-the-top decadent (and who wouldn’t?), adding chocolate chips or drizzling melted dark chocolate before freezing transforms each bite into a dessert experience! Choose high-quality dark chocolate for an added depth of flavor—trust me; it’s worth it!
Equipment You’ll Need:
Now that we’ve gathered our ingredients let’s talk tools—having the right equipment makes all the difference when preparing our Frozen Greek Yogurt Peanut Butter Bites! While they may not be ingredients per se, these essential partners will help ensure that everything goes smoothly.
- Mixing bowl – A sturdy mixing bowl is your best friend here; choose one that’s large enough to comfortably accommodate all those delicious ingredients while allowing room for stirring without spills.
- Silicone spatula – This tool is perfect for scraping down edges and incorporating everything thoroughly without leaving any sweet goodness behind. Silicone spatulas are also heat-resistant if you ever decide to bake with them!
- Baking sheet – We’ll line this beautiful tray with parchment paper later on; it’s crucial because it prevents sticking during freezing while making cleanup effortless afterwards.
- Scoop or tablespoon – For portioning out those enticing little bites evenly (and neatly!), using either an ice cream scoop or tablespoon will ensure uniformity—no one wants uneven sizes when sharing such delectable treats!
Now we’re ready to roll up our sleeves and get started on preparing these amazing Frozen Greek Yogurt Peanut Butter Bites!
Step 1: Mixing Up the Magic
First things first—we need to bring together all those wonderful ingredients in one harmonious blend! Start by placing your cup of plain Greek yogurt into your mixing bowl—it should be thick yet scoopable, giving you that luscious base we’re aiming for in these bites. Next comes half a cup of natural peanut butter; don’t forget my earlier tip about stirring it well if it has separated! As you add this into the bowl alongside two to three tablespoons of honey or maple syrup depending on how sweet you like things, take a moment to breathe in those aromas—the nutty scent combined with hints of sweetness makes my heart sing every time.
Now grab your silicone spatula (or wooden spoon) and mix everything until it’s smooth and creamy—a process known as blending—which ensures even distribution throughout your mixture so every bite will taste equally delicious! You’ll want to watch closely as colors meld together beautifully; aim for a consistency that’s thick yet pliable—think softened ice cream rather than runny batter!
Step 2: Preparing Your Freezer Tray
With our mixture ready, let’s prepare the baking sheet so we can freeze these gems into bite-sized morsels! Take a moment now to line your baking sheet with parchment paper—it’s an important step because trust me when I say nothing ruins excitement faster than having sticky treats stuck firmly onto metal pans after freezing! Parchment allows easy release later on while ensuring each piece maintains its shape perfectly intact.
Once lined up nicely—make sure there are no wrinkles or creases—you’re all set up for success! Now let’s move onto scooping out portions from our creamy mixture onto this prepared sheet.
Step 3: Scooping Out Delight
Using either an ice cream scoop or tablespoon (whichever feels more comfortable), begin portioning out small dollops onto the baking sheet spaced apart evenly so they have room to expand slightly during freezing without touching each other too much—around two inches apart works well here! Don’t rush this step; taking time ensures uniformity across all bites which means fewer arguments when sharing among loved ones later on—they’ll be grateful too!
As you scoop each delightful mound onto the tray watch how effortlessly they hold their form—the thick consistency from both yogurt & peanut butter helps maintain structure beautifully during freezing allowing us full enjoyment come serving time!
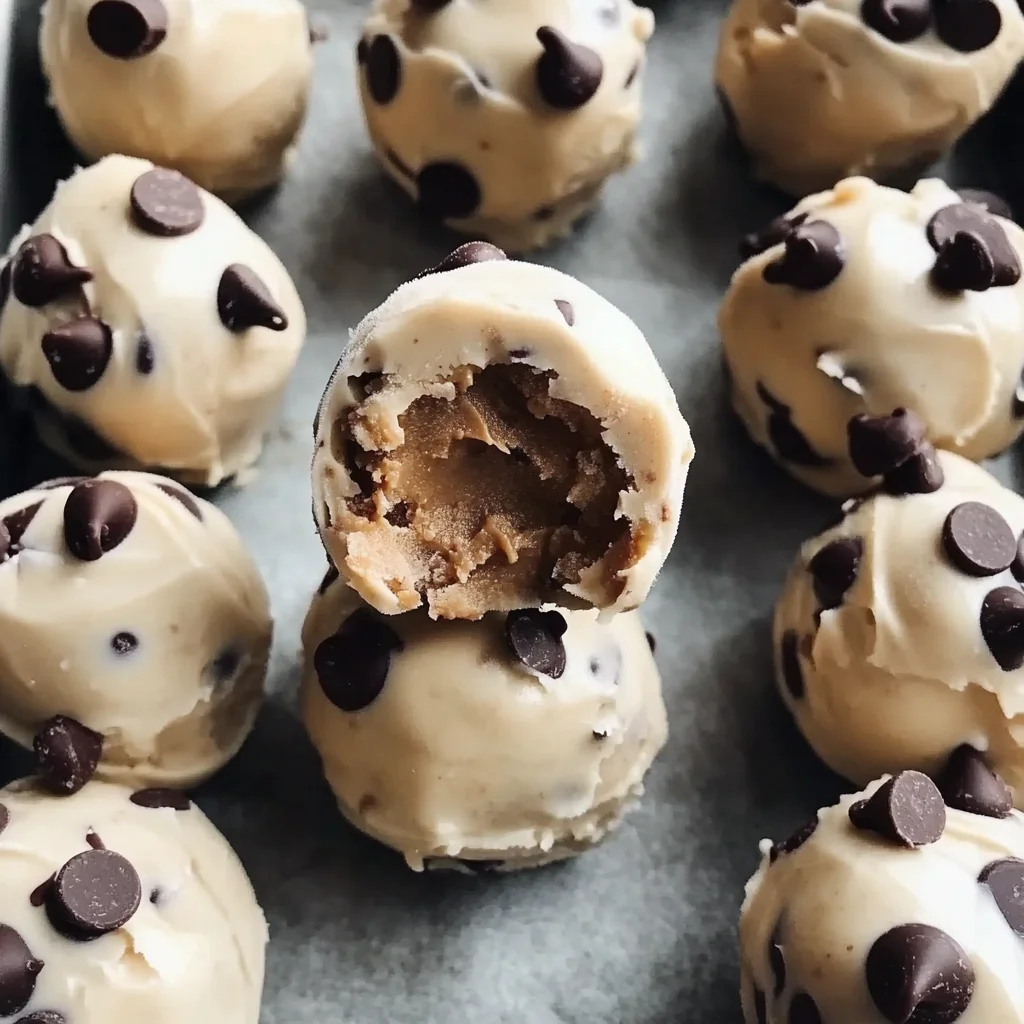
Step 4: Adding Your Chocolatey Touch
Now comes my favorite part—adding optional chocolate chips or drizzling melted dark chocolate over each frozen bite before freezing solidly creates layers upon layers of flavor bliss! If using chips simply sprinkle them atop scoops directly after scooping them onto prepared tray OR melt some dark chocolate gently first then drizzle generously above each scoop using either spoon/fork technique until they look enticingly decadent (and perhaps slightly messy).
This added step isn’t just about taste—it elevates visual appeal while making every bite feel like dessert instead of mere snacks—what could possibly be better? Once done decorating simply place baking sheet into freezer until firm enough which usually takes around 2–3 hours depending upon how cold yours runs & size chosen so keep checking back often until perfect texture achieved!
By following these steps carefully I promise you will end up with something truly special—there’s magic waiting inside every single bite once ready!
Step 5: Freeze to Perfection
Now, let’s dive into the magical moment where our creamy mixture transforms into delightful bites. After you’ve scooped those small portions of the heavenly peanut butter-and-yogurt blend onto your lined baking sheet, it’s time to play the waiting game—yes, patience is key here! You want to freeze these beauties for about 2 to 3 hours. This duration is absolutely paramount; it allows the flavors to meld beautifully while firming up the texture. If you rush this step, you might end up with a mushy mess instead of those delightful little nuggets of joy.
During this freezing period, something wonderful happens: the Greek yogurt solidifies while maintaining its creamy consistency, and the peanut butter adds that luscious richness that we all adore. The honey or maple syrup will also help bind everything together and create a slight sweetness that balances perfectly with the subtle tang of yogurt. So, as you wait, maybe brew a cup of tea or catch up on your favorite show! Just remember to check in around the 2-hour mark; if you notice they’re firm enough to hold their shape but still slightly soft in the center, then you’re in business. Trust me on this—these bites will be worth every second of anticipation!
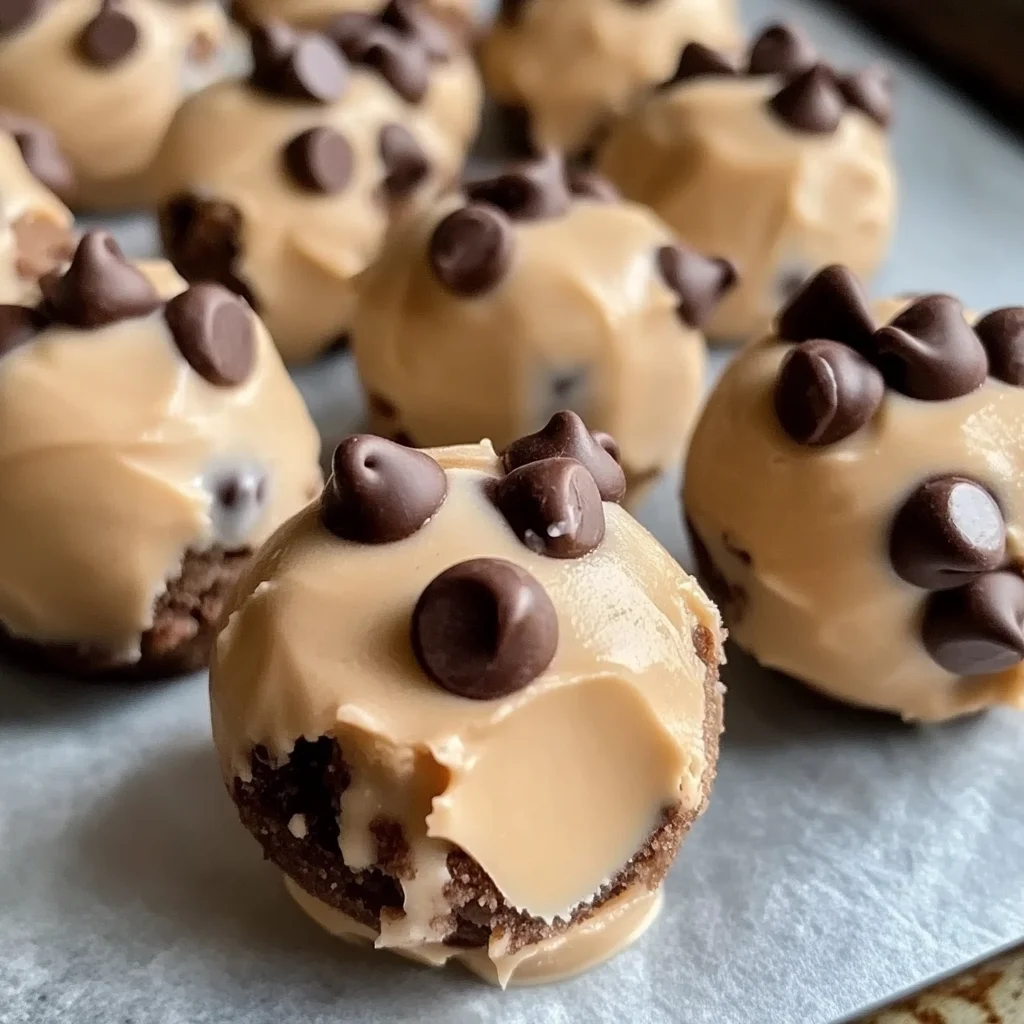
Step 6: The Sweet Drizzle (Optional but so Worth It!)
If you’re feeling a bit indulgent (and who wouldn’t?), this step is where you can elevate your Frozen Greek Yogurt Peanut Butter Bites to pure bliss with a chocolate drizzle! Once they are beautifully frozen and firm, pull them out of the freezer and take a moment to admire your handiwork. This is where you can melt some dark chocolate gently in a microwave-safe bowl or over a double boiler until it’s smooth and glossy—a process known as tempering. This technique not only makes your chocolate look stunning but also ensures it has that perfect snap when bitten into.
After melting your chocolate—allow it to cool slightly so it doesn’t melt your yogurt bites—grab a fork or spoon and drizzle it over each bite like an artist painting their masterpiece. The addition of melted chocolate not only makes these treats look aesthetically pleasing but also adds an utterly intoxicating layer of flavor that harmonizes beautifully with the peanut butter and yogurt beneath. And if you’re inclined to throw on some mini chocolate chips before the chocolate sets, go for it! Just imagine taking that first bite—the sweet crunch complementing the creamy inside, creating a symphony of flavors that dances on your palate. This step isn’t just about looks; it’s about creating an experience that elevates these bites from delicious snacks to extraordinary treats.
Step 7: Storing Your Treasures
Now that you’ve drizzled those mouth-watering bites with chocolate goodness (if you chose to), it’s time for another crucial phase: storage! Carefully transfer your Frozen Greek Yogurt Peanut Butter Bites into an airtight container—this is non-negotiable if you want to keep them fresh and free from freezer burn. You may want to layer them with parchment paper in between so they don’t stick together; believe me, there’s nothing worse than having your delectable creations become one giant clump!
Store them back in the freezer where they’ll remain happy and healthy for up to two weeks—though I doubt they’ll last that long once you share them with family or friends! Whenever you’re ready for a snack or dessert, simply grab one (or more!) straight from the freezer—they’re perfect frozen! The coolness will instantly refresh you while delivering a rich burst of peanut butter flavor combined with creamy yogurt. Just remember: no need to thaw; enjoy them as is for a truly satisfying treat!
Step 8: Enjoying Your Frozen Greek Yogurt Peanut Butter Bites
Finally, let’s talk about enjoying these little gems! When you’re ready to indulge, simply reach into your freezer and pull out one (or several) of these creamy delights. As you take that first bite, allow yourself to savor every moment—the initial chill followed by the velvety smoothness melting in your mouth is nothing short of euphoric. These bites are perfect as an after-school snack for kids or even as a late-night treat when you’re craving something sweet yet healthy.
What makes these Frozen Greek Yogurt Peanut Butter Bites so special is not just their taste but also how versatile they can be—you can easily customize them based on what you have on hand or what flavors excite you at any given moment. Perhaps toss in some chopped nuts for crunch or sprinkle some cinnamon on top for warmth; trust me when I say that this flexibility allows everyone in your family to enjoy them according to their unique preferences.
So there you have it—a simple yet profoundly satisfying recipe that’s sure to become a staple in your home. Each bite is packed with protein and made from wholesome ingredients, making them not just delicious but also nourishing. I promise you these will bring smiles all around—and isn’t that what cooking is all about? Now grab those ingredients and make magic happen; I can’t wait for you to experience these incredible Frozen Greek Yogurt Peanut Butter Bites!
Storage and Enjoyment Tips for Your Frozen Greek Yogurt Peanut Butter Bites
Now that your delightful Frozen Greek Yogurt Peanut Butter Bites are nestled in the freezer, it’s time to dive into how to savor every last morsel of this creamy goodness. I can almost hear the joyous exclamations from friends and family as they indulge in these utterly satisfying snacks! These bites are not just a treat; they are a testament to simplicity and nutrition combined. So, let’s ensure you store them properly so that every bite remains as tantalizing as the first!
Storing Leftover Frozen Greek Yogurt Peanut Butter Bites
To keep your Frozen Greek Yogurt Peanut Butter Bites at their best, transfer them to an airtight container after they’ve set in the freezer. This step is absolutely paramount because it prevents any pesky freezer burn from ruining their creamy texture and rich flavor. I recommend using a sturdy plastic or glass container, but if you want to go the extra mile, wrapping each bite individually in wax paper before placing them in the container can help maintain their incredible taste. If stored correctly, these little gems can last up to two months in the freezer—although trust me, they won’t last nearly that long once you share them! After storage, you’ll find that they retain their smoothness and delectable peanut butter flavor, creating a refreshing experience with each bite. For serving suggestions, simply take out however many you desire and let them sit at room temperature for about 5-10 minutes for the ideal texture; this slight thawing enhances their creamy indulgence.
Freezing Components for Later
If you find yourself wanting to prepare a larger batch of these delightful treats ahead of time (which I wholeheartedly encourage!), freezing components is an excellent strategy for future snacking bliss. You can easily freeze the mixture itself before scooping it onto the baking sheet; just place it in an airtight container and pop it in the freezer! This method keeps your ingredients fresh for up to three months. When you’re ready to whip up another batch of Frozen Greek Yogurt Peanut Butter Bites, simply thaw the mixture overnight in the fridge or on your countertop until it’s soft enough to scoop. The convenience of having this nutritious snack ready at your fingertips is absolutely exhilarating! Not only does this save time on busy days, but it also ensures that you’re just moments away from enjoying something truly extraordinary whenever those cravings strike.
Frozen Greek Yogurt Peanut Butter Bites
Indulge in these creamy Frozen Greek Yogurt Peanut Butter Bites—an easy, healthy snack that’s kid-approved! Try this delightful recipe today!
- Prep Time: 15 minutes
- Cook Time: 0 minutes
- Total Time: 15 minutes
- Yield: Approximately 12 bites 1x
- Category: Dessert
- Method: Freezing
- Cuisine: American
Ingredients
- 1 cup plain Greek yogurt
- 1/2 cup natural peanut butter
- 2–3 tbsp honey or maple syrup
- 1/2 tsp vanilla extract
- Pinch of sea salt
Instructions
- In a mixing bowl, combine Greek yogurt and peanut butter until smooth.
- Add honey or maple syrup, vanilla extract, and sea salt; mix well until fully combined.
- Line a baking sheet with parchment paper.
- Scoop small dollops of the mixture onto the prepared sheet, spacing them about two inches apart.
- Optionally, drizzle melted dark chocolate on top or sprinkle with chocolate chips.
- Freeze for 2-3 hours until firm.
- Store in an airtight container in the freezer for up to two weeks.
Nutrition
- Serving Size: 1 bite (30g)
- Calories: 90
- Sugar: 5g
- Sodium: 30mg
- Fat: 6g
- Saturated Fat: 1g
- Unsaturated Fat: 5g
- Trans Fat: 0g
- Carbohydrates: 8g
- Fiber: 1g
- Protein: 3g
- Cholesterol: 0mg