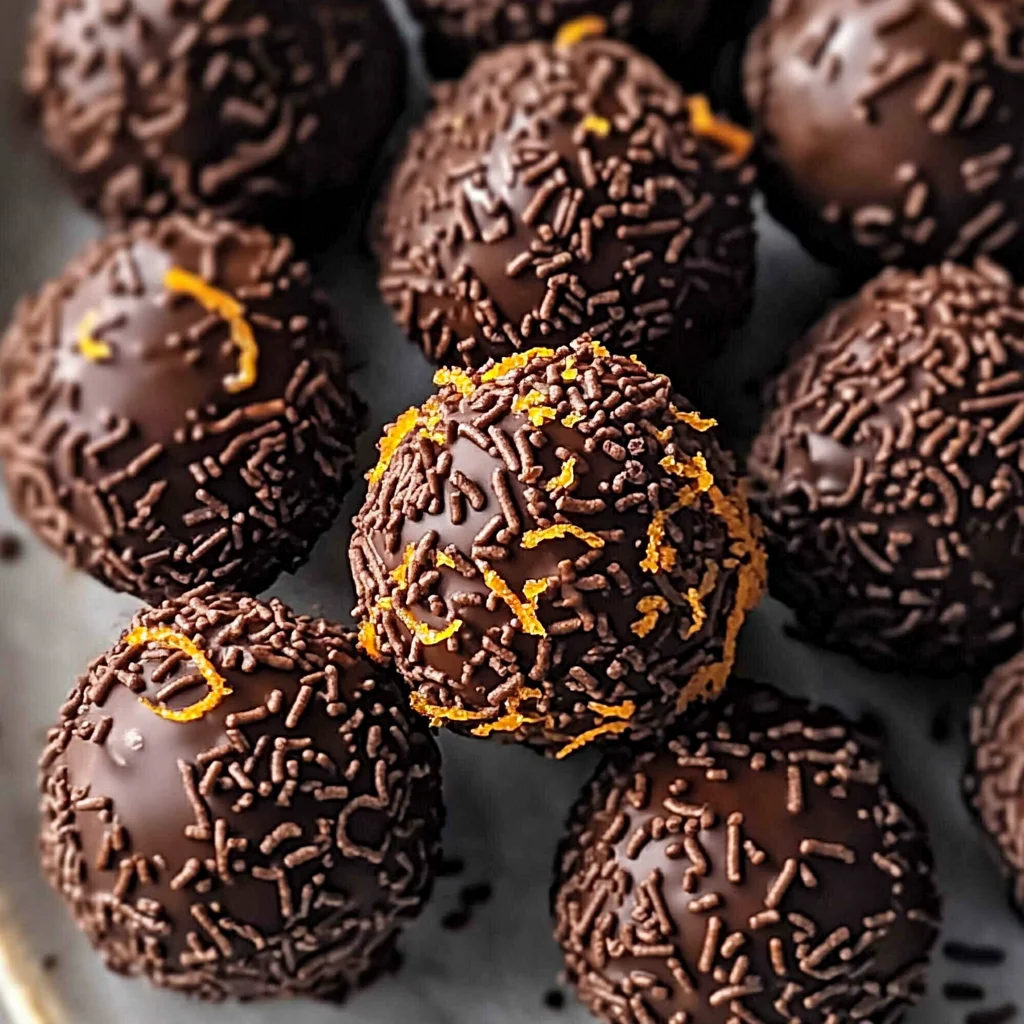
Juicy Orange Chocolate Christmas Truffles
Hello, friends!
There’s something truly magical about the holiday season that brings people together, and what better way to celebrate than with a sweet treat that embodies the warmth and joy of Christmas? Today, I’m absolutely thrilled to share my beloved recipe for Juicy Orange Chocolate Christmas Truffles. These delightful little bites are more than just a dessert; they are an experience wrapped in chocolatey goodness and zesty orange brightness. Imagine biting into a rich, velvety chocolate shell that gives way to an utterly intoxicating filling, infused with the freshness of oranges. Each truffle is like a gift from me to you, reminding us of the beauty that comes from blending tradition with innovation.
As we dive into the process of making these luscious truffles, I want you to know that this recipe holds a special place in my heart. It draws on my childhood memories of festive gatherings where sweet treats were plentiful, but these truffles always stood out as a favorite. The combination of dark chocolate and orange is nothing short of a symphony of flavors that dances on your palate, perfect for holiday celebrations or cozy evenings by the fire. So grab your apron, roll up your sleeves, and let’s embark on this delicious culinary journey together!
Juicy Orange Chocolate Christmas Truffles: A Festive Delight for Every Palate
These Juicy Orange Chocolate Christmas Truffles are not only quick and easy to make but also incredibly rewarding. With just a handful of ingredients, you can create a stunning dessert that will impress your friends and family. Trust me when I say that once you take your first bite, you’ll understand why these truffles have become a cherished part of my holiday traditions.
Ingredients:
To start our sweet adventure, let’s gather the essential ingredients that will bring our truffles to life. Each component plays a vital role in crafting the perfect balance of flavor and texture.
- 90 ml (around 1/3 cup plus 2 teaspoons) heavy cream. This ingredient is absolutely paramount for achieving the rich and creamy ganache filling we desire in our truffles. Heavy cream adds depth and smoothness, creating that luscious mouthfeel we all crave. When heated gently with the chocolate, it melts into liquid gold—an essential step for marrying our flavors beautifully. Do choose high-quality heavy cream; it makes all the difference. If you’re looking for alternatives due to dietary preferences, coconut cream can be an excellent substitute while still providing that indulgent richness.
- 200 g (7 oz) dark cooking chocolate (40% cocoa), finely chopped. When it comes to chocolate, quality is non-negotiable! The dark cooking chocolate forms the foundation of our truffle’s outer layer and inner filling. A higher cocoa content provides a more intense flavor profile which pairs scrumptiously with the bright notes of orange zest we’ll add later on. Be sure to chop it finely; this ensures it melts evenly when mixed with warm cream, creating a silky ganache without any lumps or graininess.
- 1 teaspoon finely grated orange peel. Ahh, here’s where we awaken those senses! The zest from fresh oranges adds an extraordinary zing to our truffles—it’s like capturing sunshine in every bite! This fragrant addition enhances the complexity of flavors by bringing brightness and vibrancy against the richness of chocolate. When grating your orange peel, try to avoid the white pith beneath as it can introduce bitterness; we want only that lovely aromatic skin!
- 1/3 cup chocolate sprinkles. These delightful little gems will coat our truffles and add an irresistible crunch! Not only do they provide visual appeal with their shiny exterior, but they also create an exciting texture contrast when combined with the creamy center. Feel free to swap them out for crushed nuts or shredded coconut if you’re feeling adventurous—each variation tells its own story!

Equipment You’ll Need:
Now that we have our ingredients ready, let’s chat about the tools you’ll need along this delightful journey—the right equipment makes all the difference in ensuring success!
- Mixing bowl – A good-quality mixing bowl is essential for combining our ganache ingredients smoothly without any mess or spillage. Opt for one that’s large enough so you can whisk vigorously without worrying about splashes—trust me; no one wants melted chocolate on their shirt!
- Whisk or spatula – You’ll need either a whisk or spatula for stirring together your melted chocolate and cream until perfectly combined into a glossy mixture. I personally love using a spatula as it helps scrape down the sides efficiently while folding everything together beautifully.
- Baking sheet lined with parchment paper – This handy tool will serve as your staging area while shaping your delectable truffles! The parchment paper prevents sticking and allows for easy cleanup afterward—a total win-win situation!
- Melon baller or small scoop – For uniformity in sizing (and because who doesn’t love perfectly round truffles?), having a melon baller or small scoop can really help shape each piece consistently while making things easier on your hands during this process.
With all these essentials at hand, we’re set up for success as we dive into preparing our Juicy Orange Chocolate Christmas Truffles!
Preparing the Juicy Orange Chocolate Christmas Truffles
Step 1: Infuse Your Cream with Flavor
Begin this enchanting process by pouring your heavy cream into a small saucepan over medium heat—not too high now! We want to warm it gently until small bubbles form along the edges rather than boiling it vigorously; remember that simmering is key here! As you watch it closely (this is where patience pays off), take in those wonderful aromas wafting through your kitchen—the warmth releases such inviting scents! Once it’s reached just below boiling point—a soft simmer—immediately remove it from heat and pour it over your finely chopped dark cooking chocolate in your mixing bowl.
Step 2: Create Your Ganache
Now comes one of my favorite parts—the melding of flavors! Allow this heavenly mixture to sit undisturbed for about two minutes; during this time, you’ll see how beautifully those chocolate pieces soften under the warm embrace of cream—it’s truly mesmerizing! After two minutes have passed, gently stir using your spatula until everything is fully combined into a luscious ganache without any lumps remaining—this step is crucial because we want that smooth texture throughout every single bite! If there are stubborn bits refusing to melt away completely after stirring diligently (which can happen sometimes), don’t hesitate to place it back onto low heat briefly while continuously stirring.
Step 3: Add Your Zest
Once you’re rewarded with velvety ganache perfection (seriously—I could eat just this!), it’s time to bring forth some vibrant citrus notes by adding in our finely grated orange peel! Stir gently yet thoroughly so every bit is infused throughout—that bright burst will elevate these truffles from delightful to truly extraordinary! At this point—you might find yourself tasting…and tasting again (I totally won’t judge!). However—I promise you—resist diving in just yet; we’ve got some chilling ahead!
Step 4: Chill Your Ganache
Now here comes another important moment: transferring your ganache into another clean bowl if you haven’t already done so—and then cover tightly with plastic wrap directly against its surface so no air gets trapped inside (we don’t want crusty tops ruining our smooth finish!). Place this beauty into the fridge for about two hours until firm enough to scoop yet not rock-solid—that balance between firmness but still pliable is absolutely paramount here so don’t rush this step! Patience leads us toward perfection!
Stay tuned as we continue crafting these divine little treats into something irresistibly beautiful…
Step 5: Melt the Chocolate – The Heart of Your Truffles
Now that we have our heavy cream ready, it’s time to bring the chocolate into the mix. Begin by placing your finely chopped dark cooking chocolate into a heatproof bowl. This step is crucial because the finer your chocolate is chopped, the more evenly it will melt, resulting in a luxuriously smooth truffle filling. Next, take your heavy cream and gently heat it on the stovetop over medium heat until it just begins to simmer—watch for those tiny bubbles forming around the edges. This bubbling indicates that the cream is hot enough to coax the chocolate into melting but not boiling, which can scorch it and ruin that beautiful flavor we’re after.
Once your cream has reached this perfect simmering point, pour it over the chopped chocolate immediately. Don’t stir just yet; instead, let this mixture sit for about three minutes. This waiting game allows the hot cream to envelop each piece of chocolate, softening them beautifully. Patience here is key! After three minutes have passed, grab a spatula and gently stir until you see a glossy, homogenous mixture form—this is what we call ganache. The process of melting chocolate in this manner—known as ganaching—creates a silky texture that will be utterly intoxicating once chilled and formed into truffles. You’ll be captivated by how creamy and rich this mixture becomes!
Step 6: Add Flavors – Infusing Joy Into Each Bite
With our ganache beautifully melted and mixed, now comes one of my favorite parts: infusing it with flavor! Sprinkle in that finely grated orange peel—this ingredient truly transforms your truffles from delightful to extraordinary. The zest adds a bright citrus note that cuts through the richness of the dark chocolate like sunlight breaking through clouds on a winter’s day. Make sure to incorporate the zest thoroughly; you want every inch of that luscious chocolate to be kissed by that fragrant orange essence.
Why is this step so essential? Well, citrus flavors tend to brighten up rich dishes, providing balance and complexity—a symphony of flavors dancing on your palate with each bite! It’s also important not to skip or skimp on this step because adding too much zest can overpower your truffles with bitterness rather than enhancing them. Trust me when I say the goal is harmony here! Once you’ve mixed in the orange peel, give your ganache one final stir until everything feels perfectly blended together.
Step 7: Chill Your Ganache – The Waiting Game
Now comes a moment where patience truly pays off: chilling your ganache. Pour the delightful mixture into a shallow dish or bowl, spreading it out slightly to increase surface area for quicker cooling—it’s all about maximizing efficiency! Cover it with plastic wrap or a lid; we don’t want any unwanted air exposure here. Pop this beauty into your refrigerator for at least two hours or until it’s firm enough to scoop and shape into truffles.
This chilling period isn’t simply downtime; it’s transformative! As the ganache cools, it thickens beautifully and develops richer flavors as those ingredients meld together in their cold environment—think of it as an opportunity for those warm notes of orange to deepen while becoming even more harmonious with the chocolate. If you’re feeling particularly patient (and I encourage you to be!), letting it sit overnight will yield even more intense flavors! Just imagine how utterly satisfying it will be to bite into these perfectly cold truffles later on!
Step 8: Forming Your Truffles – Crafting Little Joyous Bites
Once your ganache has chilled and firmed up beautifully, it’s time for one of my favorite steps: shaping those little treasures into truffles! Start by preparing your workspace with some parchment paper spread out on a baking sheet; this will be where you place each rolled truffle once formed. Now dust your hands lightly with cocoa powder or powdered sugar—this prevents sticking and makes handling easier while also adding an extra layer of flavor.
Using a small melon baller or teaspoon, scoop out about one tablespoon of ganache at a time and roll it between your palms into smooth balls about an inch in diameter—don’t rush through this part; take your time! The warmth from your hands will start softening the ganache slightly as you roll them, creating an invitingly shiny exterior. This technique not only forms uniform truffles but ensures they maintain their delightful shape when coated in sprinkles later on. Place each ball onto your prepared baking sheet without crowding them too closely together since they may slightly expand.
As you roll these little bites of happiness, remember how profoundly satisfying they’ll become once coated and enjoyed by friends and family alike! If at any point during this process you find that your ganache has softened too much from hand warmth, simply return it back to the fridge for another quick chill before continuing.
There you have it—a labor of love turned into delightfully delectable Juicy Orange Chocolate Christmas Truffles ready to steal hearts at any gathering or cozy evening celebration! I hope these little bites bring as much joy and warmth to your home as they have brought mine over countless holiday seasons. Remember—the best moments are often found around shared plates filled with love and laughter! Enjoy every last morsel!
Storage and Enjoyment Tips for Your Juicy Orange Chocolate Christmas Truffles
Oh, my dear friends, we’ve arrived at the most delightful part of our journey together! Your Juicy Orange Chocolate Christmas Truffles are ready to be enjoyed, and I can hardly contain my excitement as I think about the joy they will bring. Whether you’re preparing them for a festive gathering or simply indulging in a cozy night at home, these truffles are truly a treat that will make your heart sing. Now, let’s talk about how to ensure they stay just as delectable even after the first bite.
Storing Leftover Juicy Orange Chocolate Christmas Truffles
To keep your truffles fresh and bursting with that luscious orange-chocolate flavor, it’s essential to store them correctly. I recommend placing them in an airtight container, as this is absolutely paramount for maintaining their rich texture and flavor. You can pop these little gems into the refrigerator, where they’ll stay delicious for up to a week—a perfect time frame if you want to savor these treats slowly! One pro tip I swear by is adding a slice of bread into the container; it helps to keep the truffles from drying out while imparting just enough moisture. When you take one out later, you’ll find it retains that profoundly satisfying melt-in-your-mouth quality. If you’re feeling adventurous, serve them slightly chilled—trust me on this, it’s a game changer!
Freezing Juicy Orange Chocolate Christmas Truffles for Later
Now, if you’re like me and sometimes want to prepare ahead for those unexpected moments of indulgence, freezing your truffles is a fantastic option! To do this properly, simply lay them out on a baking sheet lined with parchment paper until they’re firm; then transfer them into an airtight freezer bag or container. They’ll keep beautifully frozen for up to three months. When you’re ready to enjoy them again, just let them sit at room temperature for 20-30 minutes—this will allow that divine chocolate coating to soften ever so slightly while keeping that juicy orange essence intact. The convenience factor here is absolutely incredible; imagine pulling out a few truffles for a spontaneous get-together or when you need a little pick-me-up during the week!
Juicy Orange Chocolate Christmas Truffles
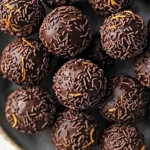
Juicy Orange Chocolate Christmas Truffles are a delightful treat that perfectly embodies the festive spirit. These indulgent bites combine rich dark chocolate with refreshing orange zest, creating a symphony of flavors that dance on your palate. Easy to prepare and visually stunning, these truffles are perfect for holiday gatherings or cozy evenings at home. Each bite offers a creamy ganache center encased in luscious chocolate, topped with colorful sprinkles for added crunch. Whether you’re sharing them with friends or savoring them solo, these truffles are sure to bring joy to your festive celebrations.
- Prep Time: 15 minutes
- Cook Time: 5 minutes
- Total Time: 20 minutes
- Yield: Approximately 12 servings 1x
- Category: Dessert
- Method: Chilling
- Cuisine: Festive
Ingredients
- 90 ml heavy cream (or coconut cream)
- 200 g dark cooking chocolate (40% cocoa), finely chopped
- 1 teaspoon finely grated orange peel
- 1/3 cup chocolate sprinkles (or crushed nuts/coconut)
Instructions
- Warm the heavy cream in a saucepan over medium heat until it simmers. Remove from heat and pour over the chopped chocolate. Let sit for 2 minutes.
- Stir the mixture until smooth and combined, then add the grated orange peel and mix thoroughly.
- Chill the ganache in the refrigerator for about 2 hours until firm enough to scoop.
- Once chilled, use a melon baller or spoon to shape the ganache into small balls.
- Roll each truffle in chocolate sprinkles until fully coated and place on parchment paper.
- Store in an airtight container in the fridge for up to one week.
Nutrition
- Serving Size: 1 serving
- Calories: 90
- Sugar: 7g
- Sodium: 5mg
- Fat: 7g
- Saturated Fat: 4g
- Unsaturated Fat: 3g
- Trans Fat: 0g
- Carbohydrates: 8g
- Fiber: 1g
- Protein: 1g
- Cholesterol: 0mg