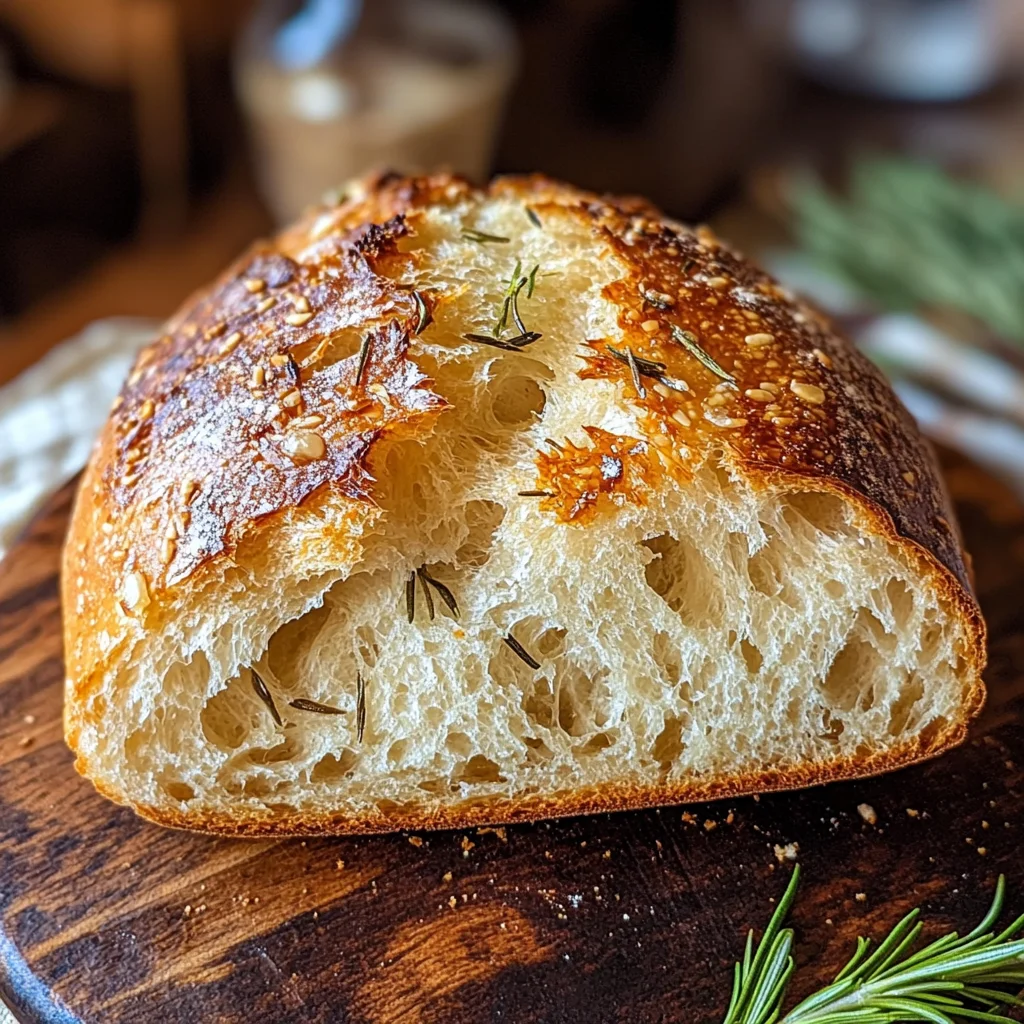
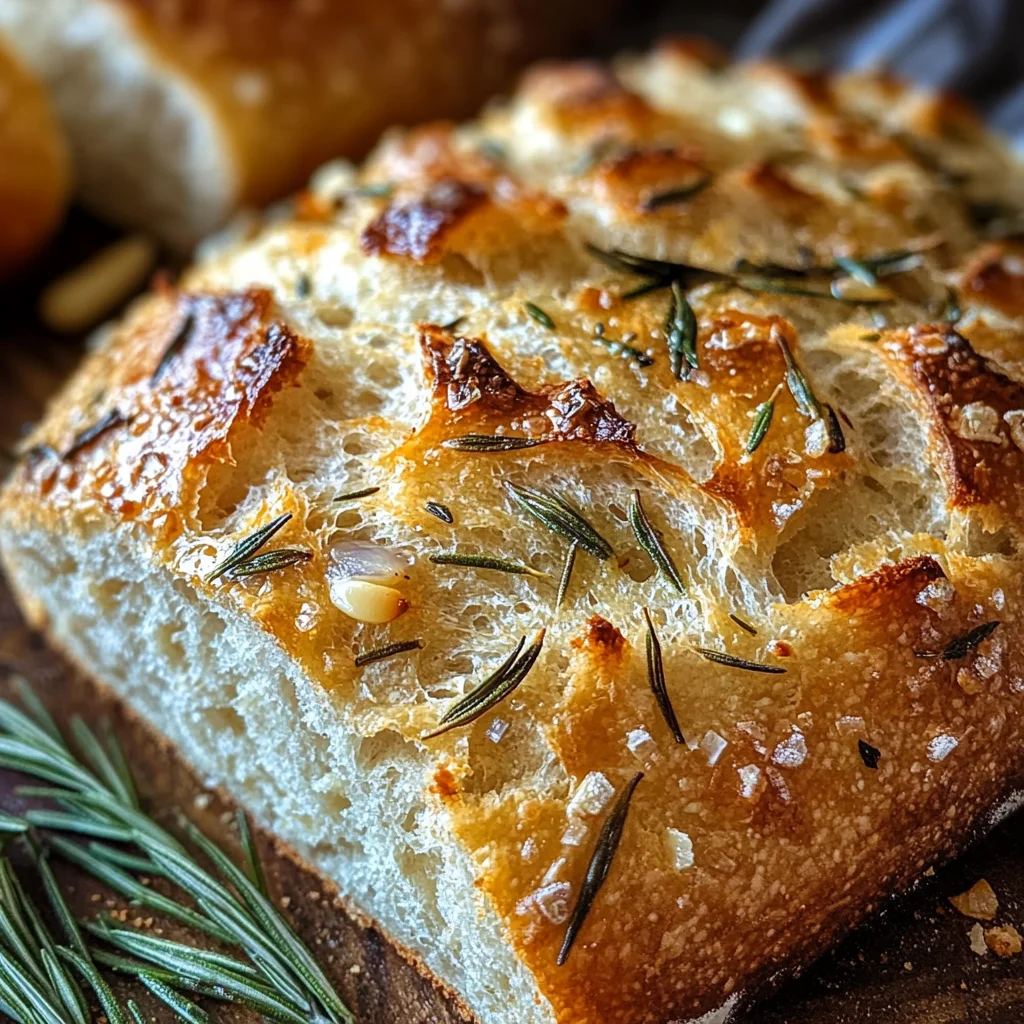
Rustic No Knead Rosemary Garlic Bread
There’s something truly magical about the act of baking bread, a process that transforms simple ingredients into a comforting, golden loaf that fills your home with warmth and tantalizing aromas. When I think of my favorite moments in the kitchen, they are often intertwined with the gentle rise of dough, the soft crackle of a crust being broken, and the profound satisfaction of sharing it with loved ones. This Rustic No Knead Rosemary Garlic Bread is not just a recipe; it’s an invitation to create a fragrant masterpiece that brings everyone together at the table. The infusion of fresh rosemary and garlic elevates it from ordinary to extraordinary, making it an experience that nourishes both body and soul.
What I love most about this bread is its effortless charm. Imagine pulling out a beautifully crusty loaf from your oven, the outside crackling as you slice into it, revealing a soft, chewy interior that holds all that aromatic goodness. It’s artisan-style bread without the fuss—no kneading required! And trust me when I say this: your kitchen will smell utterly intoxicating as the garlic mingles with rosemary, creating an aroma that beckons friends and family to gather around. Whether you’re serving it alongside a warm bowl of soup or just enjoying it solo with a drizzle of olive oil, this bread is bound to become a cherished staple in your home.
Rustic No Knead Rosemary Garlic Bread: The Easiest Way to Artisan Goodness
Welcome to your new favorite bread-making adventure! This Rustic No Knead Rosemary Garlic Bread promises to be an absolute delight with just five minutes of active work. You’ll be amazed at how simple yet incredibly flavorful this recipe is. So let’s dive in and embark on this culinary journey together!
Ingredients:
As we begin to gather our ingredients, think of each one as an essential note in a symphony of flavors coming together to create something truly beautiful.
- 3 cups (about 360 grams) All-purpose flour. This flour is the backbone of our Rustic No Knead Rosemary Garlic Bread, providing structure and that desirable chewy texture we all crave in artisan loaves. Look for high-quality flour without any additives; organic options can offer even richer flavor. If you want to experiment further down the line, feel free to blend in some whole wheat flour for added depth—just remember that whole grain flours absorb more water.
- 3 cloves Garlic, minced. Fresh garlic is absolutely non-negotiable here; the flavor is simply unmatched compared to jarred alternatives. This ingredient not only infuses our bread with its robust essence but also creates those little pockets of savory goodness throughout each slice. Make sure to mince it finely so that its flavor distributes evenly in every bite!
- 1 tablespoon Fresh rosemary, finely chopped. Fresh herbs like rosemary can transform an ordinary loaf into something special! The earthy aroma and slightly piney taste pair beautifully with garlic, creating an unforgettable flavor profile. If fresh isn’t available, you can use 1 teaspoon dried rosemary instead—it won’t have quite the same punch but will still add lovely notes.
- 1 1/4 teaspoons Kosher salt. This ingredient enhances every other flavor in our bread; skipping it would be a big mistake! Kosher salt has larger grains than table salt and dissolves easily into our dough while also helping control fermentation during rising—this means better texture and flavor.
- 3/4 teaspoon Freshly ground black pepper. Just a hint of freshly ground black pepper adds subtle warmth and depth to each bite—trust me when I say it gives this bread an unexpected twist that’s hard to resist!
- 1/2 teaspoon Instant yeast (also known as rapid-rise or bread machine yeast). This type of yeast works quickly, allowing our dough to rise beautifully while keeping things simple for us bakers! There’s no need for proofing here; just mix it right into your dry ingredients for ease.
- 1 1/2 cups Water, room temperature (around 70-75°F works best). Water activates our yeast and hydrates the flour for gluten development—it’s crucial for achieving that perfect texture! Too hot water can kill yeast; too cold won’t activate it effectively, so aim for that sweet spot!
- 2 tablespoons Cornmeal. Sprinkling cornmeal on the bottom of our cast iron skillet helps prevent sticking while adding delightful texture to the crust’s bottom—it’s like giving your loaf its own cozy bed!
- Nonstick spray or olive oil, for greasing your cast iron skillet. A light coat ensures our beautiful creation slides right out after baking—a little precaution goes a long way!
- Extra flour for shaping—as we handle our sticky dough later on, having extra flour on hand will make shaping easier without overworking our tender creation.
Equipment You’ll Need:
Before we get started on making this delicious Rustic No Knead Rosemary Garlic Bread together, let’s talk about some essential tools you’ll want by your side in this endeavor. While they may not be ingredients themselves, having these pieces on hand will make your baking experience smoother and infinitely more enjoyable.
- 10-inch Cast Iron Skillet – This sturdy skillet acts like a mini oven within your oven! Its excellent heat retention creates that beautifully crusty exterior while allowing even cooking throughout—an essential partner in bringing out all those wonderful flavors we’ve discussed.
- Mixing bowl – A large mixing bowl gives us ample space for combining all those glorious ingredients without fear of spills or messes; it’s where all the magic begins!
- Wooden spoon or spatula – Perfect for mixing your wet and dry ingredients together without overmixing—the last thing we want is tough bread! A sturdy wooden spoon allows us to blend everything gently until we achieve that shaggy dough consistency we’re looking for.
- Plastic wrap – Covering our dough tightly during fermentation keeps moisture in and promotes proper rising conditions—an important step toward achieving that airy texture we love in good bread!
Now that we have everything prepared—the ingredients gathered and equipment at hand—we’re ready to start crafting our Rustic No Knead Rosemary Garlic Bread! Are you excited? I know I am!
Step 1: Mixing Our Dreamy Dough
In a large mixing bowl, combine all-purpose flour, minced garlic, finely chopped fresh rosemary, kosher salt, black pepper, and instant yeast well until everything is evenly distributed—a task made easy with just a wooden spoon or spatula! Mix slowly but thoroughly because even distribution here ensures every bite will be bursting with flavor later on! Once combined seamlessly like old friends reuniting after years apart… it’s time for step two.
Step 2: Incorporating Liquid Gold
Next up comes adding room temperature water into our dry mixture—a step filled with anticipation as you pour it in gradually while stirring continuously until you form what looks like wet shaggy dough—it should feel sticky but not unmanageable! Remember: don’t overmix—just about thirty seconds should do since we’re going for rustic charm rather than perfection here! Trust me when I say this wet dough will yield amazing results once fermented properly.
Step 3: Letting Time Work Its Magic
After mixing until combined (and perhaps getting slightly messy—embrace it!), cover your bowl tightly with plastic wrap—it seals in warmth while allowing fermentation magic to happen over time at room temperature between sixty-five and seventy-five degrees Fahrenheit over eighteen to twenty-four hours depending on how bubbly you want things… What happens here? Well…our yeast feasts upon sugars from flour resulting in bubbly surfaces signaling life within as volume expands dramatically—doubling or tripling from where we started!
Step 4: Shaping Our Star
Once time has worked its wonders upon our dough (and oh boy will you smell those intoxicating aromas wafting through), lightly oil your cast iron skillet using either nonstick spray or olive oil before sprinkling cornmeal evenly across its bottom—this prevents sticking while adding delightful texture underneath once baked! Now dust your work surface generously with extra flour before gently turning out our sticky masterpiece onto said floured surface—a little messy still but no worries—you’ve got this! With floured hands (it helps!), shape gently into a round loaf aiming not to overwork—remember…gentleness yields tenderness.
Now we’re ready for rising again before diving into baking bliss… but let’s save those steps for next time as we’ve already laid down quite an exciting foundation today! Keep up this enthusiasm—you’re doing fantastic so far!
Step 5: Shaping the Dough – A Gentle Touch
Ah, here comes one of my favorite parts: shaping the dough! This is where your patience truly pays off—trust me on this. Once your dough has risen, it will be a sight to behold, bubbling and puffed up like a fluffy cloud. Dust your work surface generously with flour; this is crucial as it prevents our sticky masterpiece from clinging to everything in sight. Now, gently turn the dough out onto this floured canvas. You want to treat it with kindness here; remember, overworking it will rob it of that tender crumb we all crave. With floured hands, gently coax the dough into a round shape. You’re not kneading or pressing—you’re merely guiding it into a loaf! This process develops surface tension without disrupting the airy structure created during our long fermentation.
As you shape it, feel that texture—the smoothness and slight stickiness are signs of a well-developed dough. It should feel alive under your fingers! The magic of no-knead bread lies in this gentle handling; by allowing the dough to rise slowly over time and treating it with care now, you’re ensuring a crusty exterior paired with an ethereal interior that will leave everyone swooning. Once you’ve formed your loaf, carefully place it into the prepared cast iron skillet. I love using cast iron because not only does it hold heat beautifully, but it also gives us that artisan-style crust we all adore.
Step 6: The Second Rise – Patience is Key
Now that our loaf is nestled comfortably in its skillet, it’s time for what’s known as the second rise—or proofing. This step is absolutely paramount for achieving that light and airy texture we all dream of when we think of freshly baked bread. Cover your dough loosely with a clean kitchen towel; this helps retain some moisture while allowing air circulation, which is essential for yeast activity. Let the dough rise at room temperature for about 2 hours or until it’s doubled in size and looks puffy. You might be tempted to peek under that towel—go ahead! Watch as your loaf transforms from a humble mound into something magnificent.
During this time, the yeast continues its work, creating carbon dioxide gas bubbles that expand within the dough structure. What makes this step so special is that those little bubbles contribute to the flavor and texture of your final bread—so don’t rush this step! If it’s cool where you are, give it extra time; sometimes, nature needs just a bit longer to perform its miracles. When you check on your dough after two hours and see it has risen beautifully—that’s when you’ll know you’re on the right track!
Step 7: Preheating Your Oven – The Heat Is On!
While your bread is rising to new heights (literally!), it’s time to focus on preheating our oven—a crucial part of our baking journey! About 15 minutes before your second rise completes, crank up your oven to a sizzling 450°F (232°C). Why such high heat? Well, my friend, high temperatures create an initial burst of steam inside the oven that’s fundamental for developing that gorgeous crust while keeping the interior soft and chewy. It’s like giving our bread a warm hug right as it enters the oven!
As you wait for your oven to reach this ideal temperature, take a moment to reflect on how far you’ve come already—you’ve mixed ingredients, waited patiently while they transformed into dough, shaped them with love—and now you’re on the brink of creating something extraordinary! While preheating might seem like just another task in the process, think of it as setting up an environment tailored perfectly for success.
Step 8: Baking Your Rustic No Knead Rosemary Garlic Bread
Once your oven has reached 450°F and you’ve watched that lovely loaf rise even further under its cozy towel, it’s showtime! Carefully place the uncovered skillet in your preheated oven; be cautious because steam will escape upon opening that door—it’s vital for safety as well as enhancing flavor through caramelization. You’ll want to bake your rustic no knead rosemary garlic bread for about 30 to 40 minutes until it’s deeply golden brown and sounds hollow when tapped on the bottom—this hollow sound indicates that our loaf is perfectly cooked through.
As those glorious aromas begin wafting through your home—garlic mingling with rosemary—it’s hard not to feel utterly enchanted by what you’re creating. If you notice any signs of browning too quickly on top (which can happen depending on your oven), don’t hesitate to tent it loosely with aluminum foil; protecting our precious loaf ensures we achieve a beautiful crust without burning any part of it. Keep an eye on those last few minutes—the anticipation builds as you approach bread nirvana!
Final Touches – The Moment We’ve All Been Waiting For!
Step 9: Cooling Your Bread – A Crucial Pause
Ahh…the moment you’ve been waiting for—the smell alone could bring tears to my eyes! As soon as you pull that golden beauty from the oven, let’s give it some much-needed TLC during cooling. Allow your rustic no knead rosemary garlic bread to cool in its skillet for about five minutes; this brief pause allows steam trapped inside to escape while helping set the crust firmly without becoming soggy—a non-negotiable step if you want a delightful crunch when you slice into it later!
Once five minutes have passed in sheer anticipation (you can do this!), transfer your masterpiece onto a wire rack to cool completely for an additional 15-20 minutes before slicing. Trust me on this one—it may feel impossible not slicing immediately because who can resist freshly baked bread? But waiting allows those flavors within to settle beautifully and lets any residual steam escape so each slice showcases both texture and flavor at its best!
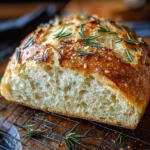
When finally ready to cut into that crusty exterior revealing its soft interior flecked with bits of garlic and vibrant rosemary—it will be nothing short of magical! Whether enjoyed plain or slathered with olive oil for dipping or even topped with fresh tomatoes or cheese—it promises an experience every bit worthy of celebration! So gather around friends or family (or enjoy solo), tear off chunks or slice generously—the joy of homemade rustic no knead rosemary garlic bread awaits you in every bite!
Storage and Enjoyment Tips for Your Rustic No Knead Rosemary Garlic Bread
Now that your kitchen is filled with the intoxicating aroma of freshly baked Rustic No Knead Rosemary Garlic Bread, it’s time to talk about how to preserve this masterpiece so you can enjoy it for days to come—or even longer! As the crust cools to a perfect golden brown, you might be tempted to dive right in. Trust me, I get it! But if you’re lucky enough to have some leftovers, let’s ensure they remain as delicious as the first slice. Proper storage is key to maintaining that delightful crust and soft, airy interior we all adore.
Storing Leftover Rustic No Knead Rosemary Garlic Bread
To keep your bread fresh and flavorful, wrap it in a clean kitchen towel or place it in a paper bag—this allows the bread to breathe while still providing protection from drying out. Avoid using plastic bags, as they can trap moisture and lead to a chewy texture rather than that lovely crunch we cherish. Stored this way at room temperature, your Rustic No Knead Rosemary Garlic Bread will stay happy for about 2-3 days. For those who want to prolong the pleasure even further, try slicing the bread before storing; this way, you can easily grab a piece whenever the craving strikes! The flavors intensify over time, with garlic and rosemary becoming even more pronounced, creating an utterly intoxicating experience each time you take a bite. When you’re ready to enjoy it again, simply pop it in a toaster or warm it in the oven at 350°F for about 5-10 minutes. The result? A warm slice that brings back that just-baked goodness!
Freezing for Later
If you find yourself with more than you can eat within those few days (or if you’re like me and just want to have some stashed away for a future cozy dinner), freezing is an absolutely fantastic option! To freeze your Rustic No Knead Rosemary Garlic Bread properly, allow it to cool completely before wrapping individual slices tightly in plastic wrap or aluminum foil. You can also place them in an airtight container or freezer bag if you prefer. This method keeps your bread fresh for up to three months without losing its amazing flavor or texture. Whenever you’re ready for a taste of home-baked goodness, simply take out what you need and let it defrost at room temperature or warm it straight from frozen in the oven until heated through. It’s like having a slice of heaven waiting for you on those busy weeknights when cooking feels like too much work!
Rustic No Knead Rosemary Garlic Bread
Experience the joy of homemade bread with this Rustic No Knead Rosemary Garlic Bread. This easy, no-knead recipe transforms basic ingredients into a warm, crusty loaf that fills your kitchen with the irresistible aroma of garlic and fresh rosemary. Perfect for enjoying alongside soups, salads, or simply dipped in olive oil, this artisan-style bread is not just a recipe but an experience that brings family and friends together.
- Prep Time: 5 minutes
- Cook Time: 30–40 minutes
- Total Time: 0 hours
- Yield: Approximately 12 servings 1x
- Category: Bread
- Method: Baking
- Cuisine: American
Ingredients
- 3 cups all-purpose flour
- 3 cloves garlic, minced
- 1 tablespoon fresh rosemary, finely chopped
- 1 ¼ teaspoons kosher salt
- ¾ teaspoon freshly ground black pepper
- ½ teaspoon instant yeast
- 1 ½ cups room temperature water
- 2 tablespoons cornmeal (for skillet)
- Nonstick spray or olive oil (for greasing)
Instructions
- In a large mixing bowl, combine flour, minced garlic, rosemary, salt, pepper, and yeast.
- Gradually add water while stirring until a wet shaggy dough forms—about 30 seconds.
- Cover the bowl tightly with plastic wrap and let it rise at room temperature for 18 to 24 hours.
- After rising, dust your work surface with flour and gently turn out the dough. Shape it into a round loaf without overworking it.
- Place the loaf in a greased cast iron skillet sprinkled with cornmeal; cover loosely and let rise for another 2 hours.
- Preheat your oven to 450°F (232°C) about 15 minutes before baking.
- Bake for 30 to 40 minutes until golden brown and hollow-sounding when tapped.
- Allow to cool for five minutes in the skillet before transferring to a wire rack to cool completely.
Nutrition
- Serving Size: 1 slice
- Calories: 150
- Sugar: 0g
- Sodium: 200mg
- Fat: 1g
- Saturated Fat: 0g
- Unsaturated Fat: 0g
- Trans Fat: 0g
- Carbohydrates: 32g
- Fiber: 1g
- Protein: 4g
- Cholesterol: 0mg