Red, White, and Blue Drunken Cherries
There’s something undeniably magical about the combination of vibrant colors, luscious textures, and delightful flavors that create a truly unforgettable culinary experience. I find myself captivated by the simple joy that comes from crafting treats that not only taste incredible but also evoke feelings of celebration and togetherness. That’s why I’m excited to share with you my beloved recipe for Red, White, and Blue Drunken Cherries. These delightful little gems are more than just a dessert; they’re a festive tribute to summer gatherings, family BBQs, and all those moments spent laughing and relishing in the warmth of friendship. So grab your apron and let’s embark on this delicious journey together!
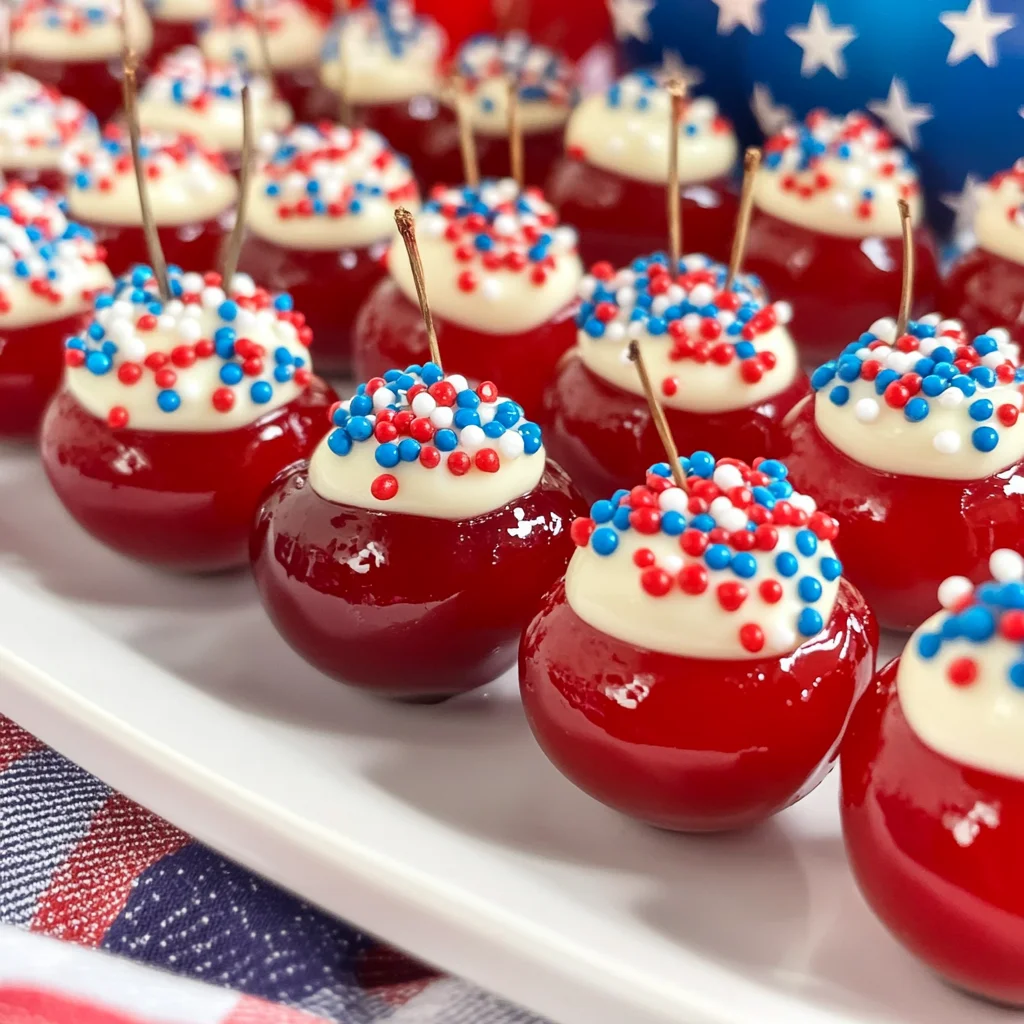
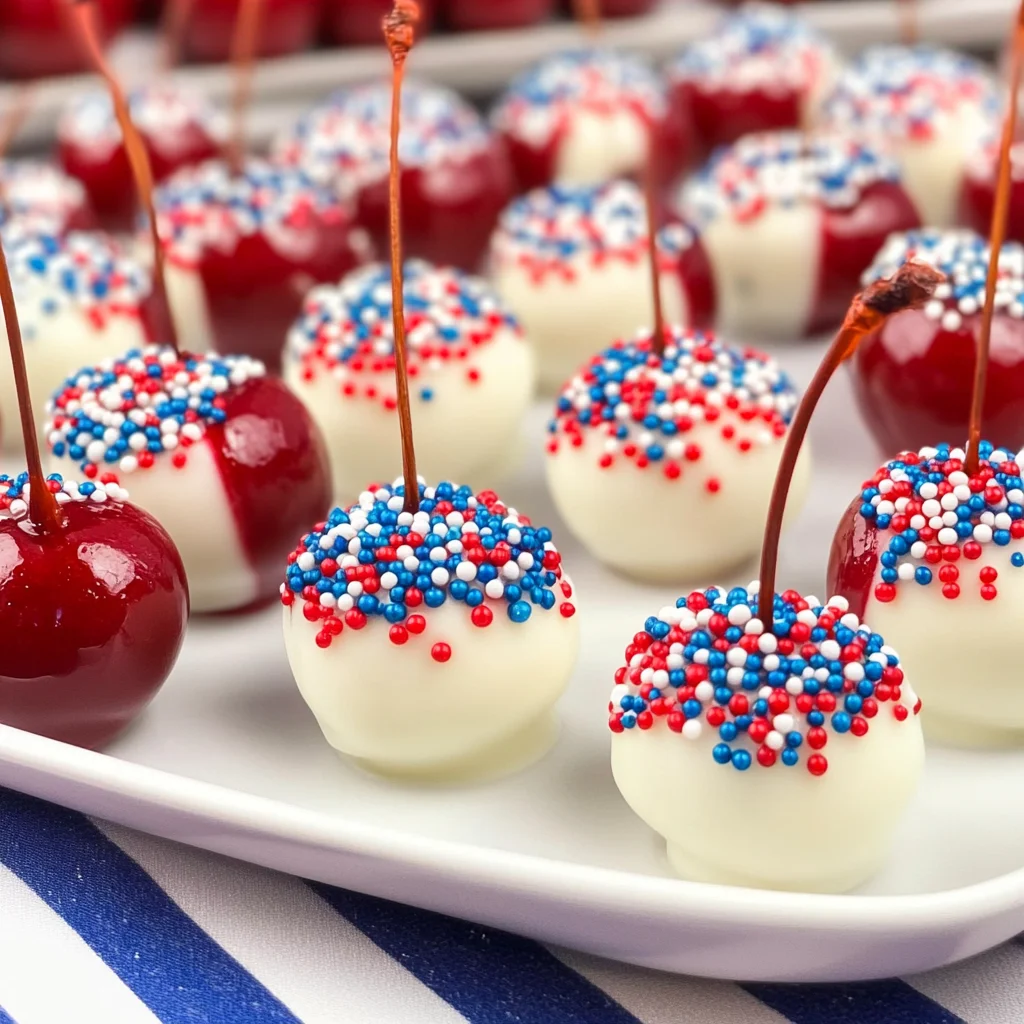
Imagine sinking your teeth into a juicy maraschino cherry, perfectly soaked in whipped cream white grape juice, coated in velvety white chocolate, and adorned with playful red, white, and blue nonpareils. The explosion of flavors dances on your palate like a summer fireworks display. Each bite is a perfect balance of sweet indulgence and celebratory spirit—truly extraordinary! These Red, White, and Blue Drunken Cherries are easy to make with just four simple ingredients, making them an irresistible option for any occasion where you want to add a touch of festivity without the fuss. Trust me when I say they’ll be the highlight of your dessert table!
Red, White, and Blue Drunken Cherries: A Festive Treat for Any Occasion
Let’s dive into these enchanting little cherries that will surely steal the show at your next gathering. Not only do they look stunning with their vibrant colors, but they also bring that refreshing burst of flavor we all crave during those warm summer months. They’re perfect as a sweet treat after dinner or as a fun snack throughout your day. And best of all? You can make them ahead of time—just soak them overnight to let those flavors meld beautifully.
Ingredients:
As we set out on this delightful culinary adventure together, let’s take a moment to appreciate each ingredient that will come together to create these magical Red, White, and Blue Drunken Cherries. Every component plays its part in making this treat not just tasty but utterly unforgettable.
- 2 Jars Maraschino Cherries with Stems (10 ounces each). These cherries are the star of our show! When selecting maraschino cherries, look for jars that feature plump cherries with vibrant color—these beauties will hold up beautifully during the soaking process. The stems are absolutely essential here; not only do they provide a lovely handle for dipping purposes, but they also enhance the rustic charm of our finished product. Plus, their natural sweetness complements the richness of the white chocolate beautifully.
- 12 Ounces Whipped Cream White Grape Juice. This ingredient might sound simple at first glance, but it serves as an important flavorful base for soaking our cherries. The creamy notes combined with fruity sweetness create an enticing flavor profile that transforms ordinary cherries into something truly special. Look for high-quality white grape juice without any added sugars or artificial ingredients; this will ensure that we’re getting pure liquid gold as our cherry marinade.
- ⅓ Cup White Chocolate Chips. Ahh…white chocolate—the smooth operator in our recipe! Its creamy texture is going to coat our cherries in an utterly intoxicating layer of sweetness that pairs perfectly with the tartness of the cherries and the lightness of the grape juice. When purchasing white chocolate chips, opt for ones made with cocoa butter rather than vegetable oil for maximum flavor and meltability; trust me on this—it makes all the difference!
- 2 Ounces Red White and Blue Nonpareils. Now here’s where things get fun! These colorful sprinkles not only add festive flair to our cherries but also provide an extra crunch that contrasts beautifully against the smooth white chocolate coating. Use fresh nonpareils for optimal color vibrancy; you want these little bites of joy to pop visually as well as texturally!
Equipment You’ll Need:
Before we jump into creating our delightful Red, White, and Blue Drunken Cherries, let’s gather some essential tools that will help make this process seamless and enjoyable. Having the right equipment means less stress in the kitchen—and who doesn’t want that?
- Mason Jar – This charming jar isn’t just for storage; it’s going to be our soaking hero! A mason jar allows us to completely submerge our cherries in grape juice while sealing in freshness as they steep overnight. Plus, they’re reusable—making them environmentally friendly too!
- Microwave-Safe Bowl – We’ll use this bowl to melt our white chocolate chips effortlessly without risking scorching them—an absolute game changer! If you don’t have one handy, feel free to use any heat-safe bowl; just keep an eye on your chocolate while melting.
- Parchment Paper – This unassuming sheet is crucial for setting our decorated cherries once they’ve been dipped in chocolate! It prevents sticking while ensuring easy cleanup afterward—a must-have when working with melted sweets!
- Paper Towels – Essential for drying off those soaked cherries before dipping them into chocolate so we get nice clean coatings without any moisture interfering.
Now that we’ve gathered all our ingredients and equipment let’s roll up those sleeves because it’s time to start preparing these delectable Red, White, and Blue Drunken Cherries!
Step 1: Selecting Your Stars
First things first: pour both jars of maraschino cherries into a mixing bowl where you can easily assess their quality. As you sift through them lovingly like you’re picking out treasures from a hidden trove—keep an eye out for any broken ones or those lacking stems; they’ll compromise not only aesthetics but also functionality when it comes time for dipping! Once you’ve handpicked about 36 pristine beauties that are ready to shine in their very own spotlight—transfer them gently into your trusty mason jar.
Step 2: Marinating Magic
With all those glorious cherries nestled snugly inside their jar home now comes one of my favorite parts: pouring over the whipped cream white grape juice! Take your time here—slowly drizzle it over until every single cherry is completely submerged beneath its sweet embrace. This step is absolutely paramount because it allows them ample time to soak up all those delightful flavors overnight—you really don’t want to rush this process! After sealing tightly with its lid (no leaks allowed!), place it delicately in your fridge as if tucking in little sleeping beauties.
Step 3: Patience is Key
The following day—after dreaming about how spectacular these treats will turn out—it’s finally time to drain those cherries! Carefully transfer them from their soaking bath onto paper towels laid out on your countertop; patting them dry is crucial here since excess moisture could hinder how well the chocolate adheres later on (nobody wants slippery cherries!). Gently dab each cherry until they’re just lightly damp—that’s perfect!
Step 4: Melting Bliss
Now we move onto melting our white chocolate chips—a step that’s straightforward yet requires careful attention! Place them into your microwave-safe bowl before popping them into the microwave at medium power in short bursts (30 seconds works wonders). Stir vigorously after each interval until you achieve silky smooth perfection; if lumps remain after about 90 seconds total heating time—don’t panic—just keep stirring gently until everything blends seamlessly together like magic!
Stay tuned because we’ll dive further into this delightful recipe shortly—but aren’t you already feeling inspired? Just imagine serving up these beautiful treats at your next gathering; they’ll be gone before you know it!
Step 5: Melt the White Chocolate to Create a Silky Coating
Now that our cherries have soaked up all that delicious white grape juice, it’s time to elevate them with a luxurious layer of melted white chocolate. Begin this step by placing your white chocolate chips into a small microwave-safe bowl. I can’t stress enough how important it is to use a microwave in short bursts—set your microwave for 30 seconds at a time. After each interval, pull out the bowl and give those chips a gentle stir. What you’re looking for is that silky smooth consistency without any lumps, which should take about 1 minute and 30 seconds total.
Why do we melt the chocolate this way? Well, microwaving in intervals helps prevent scorching, which can happen if you leave it in too long at once. Burnt chocolate is not only an unpleasant sight but also creates a bitter taste that ruins the whole experience! As you stir, you’ll notice the chips begin to melt and blend together beautifully; trust me, the fragrance will be utterly intoxicating. When you reach that perfect smoothness—think liquid gold—you’ll know it’s time to move on.
Step 6: Prepare Your Dipping Station with Nonpareils
While your white chocolate is reaching its creamy peak, let’s prepare for the real fun: the dipping process! Grab a small bowl and pour in those vibrant red, white, and blue nonpareils. These tiny sprinkles are going to add not just joy to each bite but also a delightful crunch that contrasts beautifully with the smooth chocolate coating. Next, lay out a sheet of parchment paper or a plate where you can place your dipped cherries afterward. This setup is crucial because it prevents sticking and makes cleanup a breeze.
Why go through these extra steps? A well-prepared dipping station allows you to work efficiently and keeps your workspace organized—no one wants melted chocolate dripped all over their counter! Plus, having everything set up means you can dive right into dipping without interruptions. I promise you; this preparation will make the process feel seamless and enjoyable!
Step 7: Dip Each Cherry for an Exquisite Finish
Now comes the moment where your beautiful maraschino cherries transform into something truly extraordinary! With one cherry at a time, pick it up by its stem—this not only makes for an easy grip but also adds charm to each piece as they resemble little lollipops! Gently dip the bottom half of each cherry into the melted white chocolate. As you’re doing this, allow any excess chocolate to drip back into the bowl; gently running the bottom of the cherry along the edge helps remove any clumps that could weigh down your treat.
This step is absolutely paramount because it’s where flavor meets texture—a delicate balance between sweet and creamy from the chocolate and tangy from the cherry! Allowing just enough of that luscious white chocolate to coat each cherry ensures every bite will be nothing short of divine. You might find yourself tempted to sneak one at this stage—I know I always do! Once dipped, immediately roll or sprinkle the chocolate-coated part into your bowl of nonpareils so they cling on beautifully.
Step 8: Let Them Set for Perfectly Firm Cherries
After you’ve dipped all your cherries in both delicious white chocolate and festive nonpareils, it’s essential to let them rest for about five minutes at room temperature on that parchment-lined plate or pan. You may be tempted to rush this step because they look so good already; however, trust me on this—patience truly pays off here! Allowing these beauties some time will enable the chocolate coating to firm up completely before indulging.
What happens during this resting period? The melted chocolate cools down and solidifies, locking in all those delightful flavors while creating that satisfying snap as you bite in! If you skip this step or don’t let them sit long enough, you might end up with gooey messes instead of elegant treats—definitely not what we’re aiming for! Feel free to admire your handiwork while waiting; maybe even sneak another taste of leftover cherry juice—it’s utterly delicious!
Final Touches: Enjoying Your Red, White, and Blue Drunken Cherries
And there you have it—the final flourish in creating these festive Red, White, and Blue Drunken Cherries! As they sit there glistening with their colorful nonpareils under soft light, what you’re left with isn’t just a treat; it’s an experience steeped in nostalgia and joy. When you’re ready to serve them up at your next summer gathering or BBQ celebration, watch as friends marvel at these whimsical delights—they are sure to become an instant favorite!
Remember that part of what makes these cherries so special is not just their appearance but also their journey from simple ingredients transformed into something magical. Whether enjoyed individually or shared among friends as part of dessert platters, every single bite promises an explosion of flavors—a delightful reminder of summer celebrations filled with laughter and connection. So go ahead; dive into these little gems knowing you’ve crafted something truly extraordinary that’s bound to bring smiles all around! Enjoy every moment—you deserve it!
Storage and Enjoyment Tips for Your Red, White, and Blue Drunken Cherries
Now that you’ve created these delightful Red, White, and Blue Drunken Cherries, it’s time to bask in the joy of sharing them with friends and family. But what happens if you have a few left over? Don’t worry; these little gems can be stored for later enjoyment without losing any of their charm. Proper storage ensures that every bite remains as luscious as the first one. So, let’s dive into how to keep your cherries fresh and fabulous!
Storing Leftover Red, White, and Blue Drunken Cherries
To preserve your tantalizing Red, White, and Blue Drunken Cherries, simply transfer them into an airtight container. This is crucial because exposure to air can dull their vibrant flavors and textures. I recommend using a glass container if you have one; it not only keeps the cherries fresh but also showcases their beautiful colors! In the refrigerator, these cherries will stay delightful for up to two weeks. Trust me on this: they might even taste better after sitting for a day or two as the flavors meld beautifully together! If you’re looking to maintain their moisture and prevent any potential drying out, consider adding a slice of bread in the container—it’s a little trick that works wonders. When you’re ready to enjoy them again, just take them out and relish in their sweet glory!
Freezing Red, White, and Blue Drunken Cherries for Later
If you’re looking to enjoy these festive treats long after summer celebrations have ended, freezing is a fabulous option! To freeze your Red, White, and Blue Drunken Cherries, start by laying them out on a baking sheet in a single layer before placing them in the freezer. Once they’re completely frozen (after about two hours), transfer them into a freezer-safe bag or container—this helps save space while keeping them protected from freezer burn. They can be stored this way for up to three months! When you’re ready to indulge in these sweet delights again, simply pull out however many you want and let them sit at room temperature for about 10-15 minutes; this way, they’ll regain some of that luscious texture we all adore. This method not only provides convenience but also allows you to have a festive treat ready whenever cravings strike!
Red, White, and Blue Drunken Cherries

Dive into summer fun with delicious Red, White, and Blue Drunken Cherries! Perfect for gatherings—try this easy recipe today for ultimate enjoyment!
- Prep Time: 15 minutes
- Cook Time: 5 minutes
- Total Time: 20 minutes
- Yield: Approximately 12 servings (36 cherries) 1x
- Category: Dessert
- Method: N/A
- Cuisine: N/A
Ingredients
- 2 jars maraschino cherries with stems (10 ounces each)
- 12 ounces whipped cream white grape juice
- ⅓ cup white chocolate chips
- 2 ounces red, white, and blue nonpareils
Instructions
- Pour both jars of maraschino cherries into a mixing bowl and select the best ones. Transfer them to a mason jar.
- Slowly pour the whipped cream white grape juice over the cherries until completely submerged. Seal the jar and refrigerate overnight.
- The next day, drain the cherries and pat them dry with paper towels.
- Melt the white chocolate chips in a microwave-safe bowl in short bursts, stirring until smooth.
- Dip each cherry by its stem into the melted chocolate, allowing excess to drip off before rolling it in nonpareils.
- Place dipped cherries on parchment paper and let them set for about five minutes before serving.
Nutrition
- Serving Size: 3 cherries (45g)
- Calories: 130
- Sugar: 20g
- Sodium: 40mg
- Fat: 7g
- Saturated Fat: 4g
- Unsaturated Fat: 3g
- Trans Fat: 0g
- Carbohydrates: 17g
- Fiber: 0g
- Protein: 1g
- Cholesterol: 0mg