Pistachio Pudding Cookies
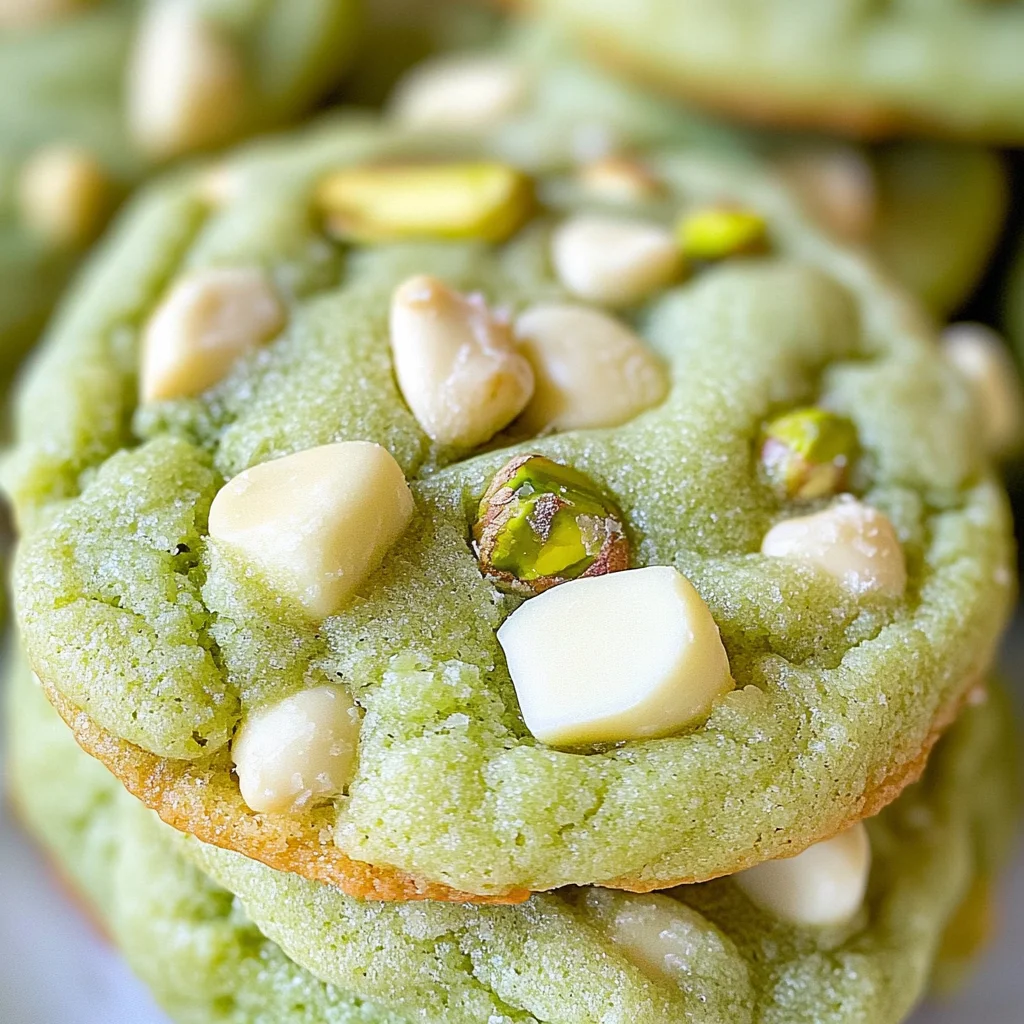
The delightful experience of baking is something I cherish deeply, and when it comes to sharing recipes, there’s nothing that warms my heart quite like the thought of whipping up a batch of Pistachio Pudding Cookies. Imagine stepping into your kitchen and being enveloped by the sweet, nutty aroma wafting through the air as these cookies bake to perfection. The vibrant green hue from the pistachio pudding mix catches your eye, promising a treat that’s not only visually stunning but also utterly delicious. It’s more than just a cookie; it’s an experience that brings people together, whether you’re enjoying them with family during a cozy gathering or sharing them with friends at a casual get-together. I promise you, once you take that first bite, you’ll be captivated by their soft, chewy texture and the symphony of flavors dancing on your palate.
What makes these Pistachio Pudding Cookies so special is the way they combine nostalgia and innovation. The instant pistachio pudding mix provides both flavor and moisture, resulting in cookies that are incredibly soft and tender. This recipe is perfect for any occasion—whether it’s a holiday celebration or simply a weekday afternoon when you’re craving a comforting sweet treat. And let’s not forget about those luscious white chocolate chips that bring an additional layer of sweetness to each bite! They melt beautifully in the oven, creating pockets of creamy goodness that contrast perfectly with the crunchy chopped pistachios. What could be better than cookies that not only taste extraordinary but also look stunning? Get ready to impress everyone around you!
Pistachio Pudding Cookies: A Delightful Treat for Every Occasion
I’m absolutely thrilled to share this recipe with you! Perfectly soft, chewy, and bursting with nutty flavor, these Pistachio Pudding Cookies are sure to become a favorite in your household. The combination of pistachios and white chocolate creates an indulgent cookie that feels like a warm hug on a plate. So let’s roll up our sleeves and dive into this culinary adventure together!
Ingredients:
Before we embark on this journey of flavor and texture, let’s gather our ingredients. Each one plays a vital role in crafting these delightful cookies.
- 1 ⅔ cups all-purpose flour. This ingredient serves as the backbone of our cookies, providing structure while allowing them to maintain their soft and chewy texture. When selecting flour, look for all-purpose flour labeled as “unbleached” if possible; it often has a slightly higher protein content which helps achieve an even better cookie structure.
- 3.4 ounces instant pistachio pudding mix (1 box). This magical ingredient is what truly sets our cookies apart! Not only does it impart that gorgeous green color we adore, but it also enriches the cookies with an irresistible pistachio flavor while adding moisture that keeps them fresh for days. Trust me; don’t skip this step—it’s absolutely paramount!
- 1 teaspoon baking soda. Baking soda is our leavening agent here; it works wonders in helping our cookies rise ever-so-slightly while contributing to their tender crumb. Make sure your baking soda is fresh for optimal results—if it’s been sitting in your pantry for ages, give it a little sniff test!
- ½ teaspoon salt. This tiny ingredient plays an enormous role by enhancing all the flavors present in our cookies—it’s like magic! Salt balances sweetness and heightens flavor profiles; without it, our cookies would taste flat and one-dimensional.
- ¼ cup light brown sugar. Brown sugar adds depth with its rich molasses undertones while keeping our cookies moist and chewy thanks to its higher moisture content compared to granulated sugar. It lends just the right amount of caramel-like sweetness that complements the nuttiness beautifully.
- ¾ cup granulated sugar. This sugar not only sweetens but also aids in achieving that lovely crisp edge we love so much in cookies! When combined with butter during creaming (more on that later), it helps create air pockets which contribute to the cookie’s overall texture.
- ¾ cup unsalted butter (softened). Butter is key here as it brings richness and flavor into play while ensuring a wonderfully tender cookie base! Softening butter allows for better incorporation into the dough—this process is crucial because if your butter is too cold or melted, you’ll end up with undesirable cookie spread or hard textures.
- 1 teaspoon clear vanilla extract. Vanilla extract adds warmth and depth of flavor—it’s like comfort in liquid form! The clear version means we won’t alter the beautiful green color from our pudding mix; after all, we want these treats to look just as good as they taste!
- 1 egg (room temperature). Eggs bind everything together while adding moisture into the equation—a non-negotiable component for achieving those dreamy soft centers! Using room-temperature eggs ensures smooth blending into your batter, preventing any lumps or inconsistencies.
- 1 cup white chocolate chips. These gems add luxurious creaminess to each bite alongside delightful sweetness—what’s not to love? Make sure you’re using high-quality chocolate chips since they will significantly impact both flavor and melting quality within your baked goods.
- ½ cup chopped pistachios. Here’s where we amp up the nutty goodness! Chopped pistachios provide satisfying crunch alongside bursts of earthy flavor throughout each cookie; they’re essential for achieving balance against sweeter elements in this recipe.
- Green or blue food coloring (optional). While completely optional, adding food coloring can amplify that striking green hue from our pudding mix if desired! Just remember: start small—one drop at a time until you reach your preferred shade.
Equipment You’ll Need:
Before we dive into mixing up our dough, let’s make sure we have all our trusty tools ready at hand! Having the right equipment makes this entire process smoother and more enjoyable—not just for you but also for those lucky enough to get their hands on these incredible cookies afterward!
- Mixing bowls – A set of mixing bowls in various sizes will help you organize your ingredients efficiently without overwhelming yourself during prep time! Opt for glass or stainless steel as both materials are durable and allow you to see what’s happening within each bowl easily.
- Electric mixer – While you can certainly use a whisk if you’re feeling adventurous (and strong!), an electric mixer simplifies creaming butter and sugars together until light and fluffy—a crucial step for obtaining perfect texture in these cookies!
- Rubber spatula – This tool will come in handy when folding ingredients together gently without deflating any air you’ve worked hard to incorporate earlier on—the last thing we want is dense cookies instead of airy ones!
- Baking sheet – A sturdy baking sheet ensures even heat distribution while baking so all edges brown evenly without burning—non-stick sheets work well too if you’re looking for easy cleanup post-baking!
- Parchment paper – Lining your baking sheet with parchment prevents sticking issues while allowing air circulation around each cookie during baking—this results in perfectly golden bottoms every time!
Now that we’ve gathered everything necessary let’s move onto preparing those mouthwatering Pistachio Pudding Cookies!
Preparing the Pistachio Pudding Cookies
Step 1: Whisking Together Dry Ingredients
Let’s begin by combining some key dry ingredients: flour, pistachio pudding mix, baking soda, and salt—all essential components working harmoniously together! Grab your mixing bowl (a medium-sized one will do) and add 1 ⅔ cups all-purpose flour along with 3.4 ounces instant pistachio pudding mix followed by 1 teaspoon baking soda plus ½ teaspoon salt into it too—these last two create balance within flavors while providing lift during baking time without compromising softness throughout each bite latterly enjoyed!
Using a whisk here allows us not only to break up any clumps formed within dry elements but also helps evenly distribute everything before moving forward—this step ensures consistent results across all batches baked thereafter so don’t rush through this part; take about 30 seconds or so doing gentle circular motions until fully combined—it’ll make such difference down line trust me!
Step 2: Creaming Butter & Sugars
Next up? Time for some magic! In another larger mixing bowl (preferably one that’s fitted ideally suited electric mixer), place ¾ cup unsalted butter at room temperature along with both types sugars: light brown sugar (¼ cup) plus granulated sugar (¾ cup). Now comes my favorite part—the creaming process—we’ll beat these three ingredients together until they reach lightness akin clouds fluffiness—a perfect blend should take around 3–5 minutes depending speed settings used on mixer employed here making sure scraping sides midway through helps incorporate tough bits hiding out corners neatly tucked away otherwise unnoticed otherwise leading uneven final product later down line might lead disappointment which none want after waiting patiently smelling aroma wafting kitchen filling senses eagerly awaiting treats close hand!
Step 3: Adding Egg & Vanilla
Once those lovely sugar-butter clouds have formed beautifully fluffy peaks resembling whipped cream texture almost heavenly should feel pride accomplishment now comes next pivotal moment where we’ll introduce one egg (ideally room temperature) plus one teaspoon clear vanilla extract straight onto mixture previously created above letting them meld seamlessly together before continuing beating again till well blended yet still maintaining some volume achieved earlier—it can be tempting rush through just add quickly stir however please resist urge instead slowly drizzle egg/vanilla combo whilst simultaneously mixing gently ensuring incorporation happens uniformly throughout batter guaranteeing no lumps remain stubbornly fighting back against glorious outcome already anticipated ahead!
Step 4: Gradually Stirring In Dry Ingredients
With both wet components harmoniously combined now onto incorporating those previously whisked dry elements into this velvety blend slowly but surely rather than dumping entire contents at once causing shockwaves could result dense situation instead we’re aiming lightness softness here remember? Start sprinkling half mixture over wet batter gently folding using rubber spatula motion until just combined keeping careful eye avoiding overmixing tendencies creeping upon many bakers during excitement building anticipation smells rising inviting us further toward final stages creation blissful indulgences awaiting soon enough patiently must endure few moments longer before finally tasting sweet success achieved earlier notes mentioned earlier regarding colors too if desired tiny drop either green blue food coloring added right now ensure prettier visual appeal enticing guests alike while still retaining authenticity unique flavors contained within essence itself balancing act beautifully executed effortlessly finally find joy knowing every detail accounted carefully beforehand served utmost satisfaction everyone involved loving experience shared amongst loved ones gathered around table ready enjoy spoils earned diligently alongside laughter stories shared fond memories occurred past present future unfolding gently before eyes cherished always forever remembered timelessly treasured moments highlighting life lived fully embraced wholeheartedly once fully baked enjoyed thoroughly along side warm embraced laughter ringing out joyous occasions forever etched minds hearts alike reminding us what matters most connection made memories forged lasting impressions left behind touched softly deeply cared embraced warmness surrounding friendships nurtured lovingly over time making moments ever memorable enriching lives beyond measure…
Trust me when I say you’re going love this process every single moment spent indulging senses finding joy discovering hidden treasures revealed along way leading straight towards ultimate prize delightfully crafted delectable treats awaiting soon enough…
Step 5: The Art of Combining Ingredients
Now that you’ve whisked together the dry ingredients, it’s time to introduce them to the buttery, sugary mixture you created earlier. This step is where the magic truly begins! Gradually add the dry ingredients to the butter and sugar mixture. I like to do this in three parts, blending well after each addition. This method not only ensures that everything is evenly incorporated but also prevents any floury clumps from sneaking into your dough. As you mix, you’ll notice the dough transitioning from a fluffy consistency to a smooth, cohesive mass that smells utterly divine.
Here’s where the optional food coloring comes into play! If you’re hoping for that vibrant green hue reminiscent of fresh pistachio nuts, now’s the time to add a few drops. Trust me on this: while the cookies will taste fantastic regardless, that splash of color makes them visually irresistible and adds an extra layer of fun when you serve them. Just remember—start with a small amount and mix thoroughly; you can always add more if you desire a deeper shade.
Step 6: Finessing with Flavorful Add-Ins
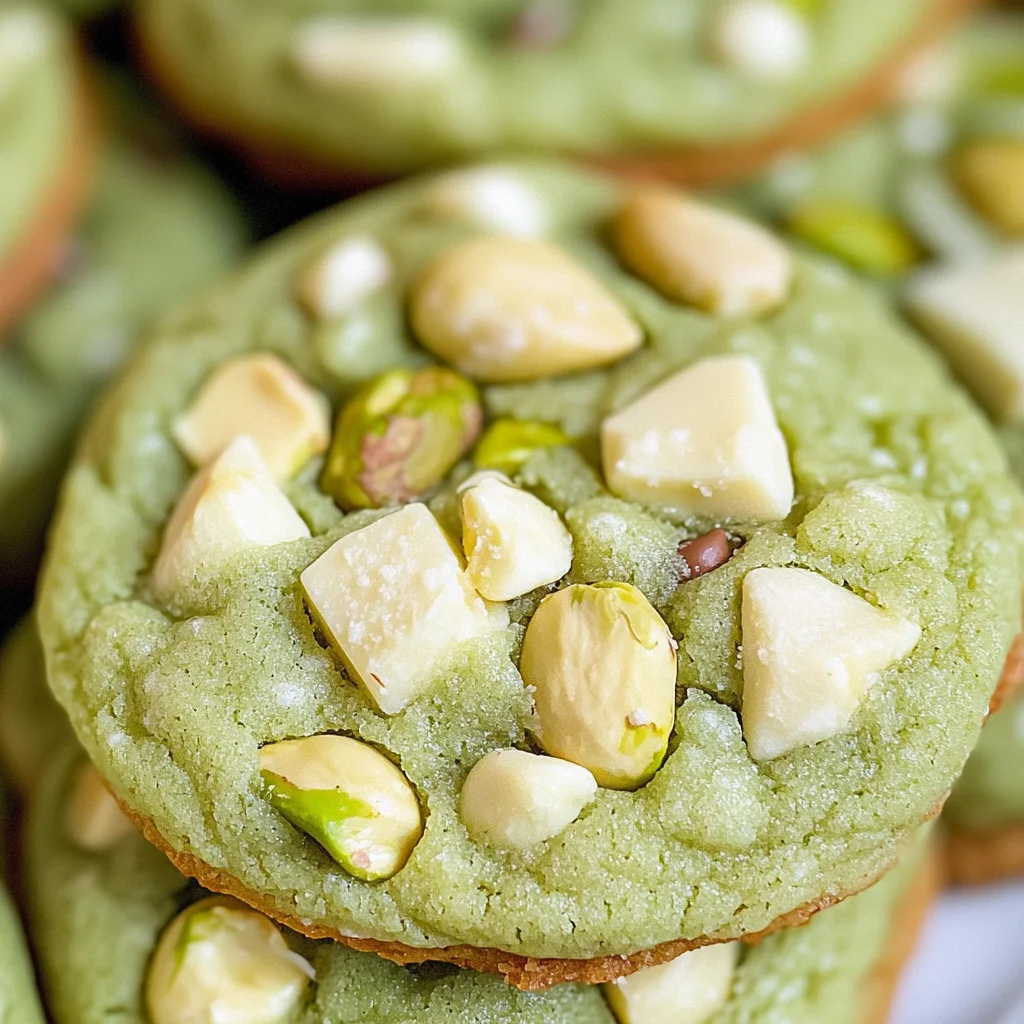
Once your dough is beautifully mixed, it’s time for one of my favorite parts: folding in those delightful white chocolate chips and chopped pistachios! These ingredients are more than just embellishments; they’re essential components that elevate your Pistachio Pudding Cookies from good to downright extraordinary. Carefully fold them into the dough using a spatula or wooden spoon until evenly distributed. This gentle folding technique is key—it helps maintain the airy texture you’ve worked so hard to create while ensuring every cookie gets its fair share of chocolatey sweetness and nutty crunch.
Why are we using white chocolate chips? Their creamy sweetness perfectly balances the earthy flavor of pistachios and contributes to a chewy texture that’s simply divine. Plus, those crunchy bits of pistachios not only enhance flavor but also provide an appealing contrast in texture—every bite is a little symphony of flavors! After ensuring everything is well combined, cover your mixing bowl with plastic wrap or a clean kitchen towel and pop it in the refrigerator for at least 30 minutes. Yes, I know waiting can feel torturous when you’re excited about cookies, but trust me—this chilling step is non-negotiable! It allows the fat in your dough to solidify slightly, which leads to thicker cookies with delightful chewiness instead of flat discs.
Step 7: Prepping for Baking Bliss
As your cookie dough chills, it’s time to prep your baking environment! Preheat your oven to 325°F (that’s about 160°C for my friends who use Celsius). While it warms up, line a baking sheet with parchment paper or lightly grease it with cooking spray—this will help prevent any sticking and ensure easy cleanup afterward. Now’s also an excellent moment to gather all your tools; grab a cookie scoop or two tablespoons for portioning out your dough later.
When you’re ready to scoop out those cookies, I recommend using rounded tablespoons of cookie dough because these sizes yield perfectly soft centers while achieving those lovely golden edges we all crave. Don’t overcrowd your baking sheet; leaving space between each mound allows warm air to circulate around them as they bake—this airflow is crucial for even cooking and helps prevent any melting-together mishaps.
Step 8: Baking Your Perfect Pistachio Pudding Cookies
With everything prepped and ready, it’s time for the most exciting part—baking! Carefully place your cookie sheets in the preheated oven and set a timer for 12-14 minutes. Keep an eye on them because every oven behaves differently! You’ll want these cookies to look just set but still slightly underbaked in the center; they should be soft when you take them out but will continue cooking on the baking sheet even after they’ve been removed from heat due to residual heat retention—a little trick I learned from my grandma.
Look out for visual cues: once you see just a hint of browning around the edges and their tops appear firm yet slightly puffy, it’s time to pull them out! Remember, if you let them get too brown, they’ll lose that delectable chewy texture we’re aiming for; trust me when I say nobody wants dry cookies! If you see any browning at all before they hit that perfect doneness point, take action immediately—they’re ready!
Final Touches: The Finishing Flourish
Step 9: The White Chocolate Kiss
As soon as those gorgeous Pistachio Pudding Cookies come out of the oven—oh my goodness! The aroma wafting through your kitchen will have everyone flocking like bees to honey! Now here comes one last delightful touch: gently press a few extra white chocolate chips into the top of each warm cookie right after they come out of the oven. This step isn’t just about aesthetics; it adds an inviting charm that beckons everyone closer while providing pockets of melted goodness right in each bite.
Let these beauties cool on their baking sheet for several minutes before transferring them onto a wire rack to cool completely. Allowing them to rest initially keeps their shape intact while letting excess steam escape—this is crucial for maintaining their soft texture rather than ending up soggy or overly firm. As they cool on racks adorned with shimmering sugar crystals from those decadent white chocolate chips, take a moment to inhale deeply—the intoxicating scent will remind you why baking is such an art form!
And there you have it—your very own batch of scrumptious Pistachio Pudding Cookies! Each bite promises an explosion of flavors with every delightful chew—a combination that’s truly extraordinary and utterly satisfying. Whether shared with loved ones or savored solo with a cup of tea or coffee (my personal favorite!), these cookies are bound to bring joy and warmth into any occasion. So go ahead, dive in—you’ve earned this moment of deliciousness!
Storage and Enjoyment Tips for Your Pistachio Pudding Cookies
Now that your kitchen is filled with the tantalizing aroma of freshly baked Pistachio Pudding Cookies, it’s time to revel in the joy of enjoying these delightful treats! The moment you bite into one, you’ll experience that perfect balance of soft, chewy texture paired with the nutty crunch of pistachios and the sweet melty goodness of white chocolate—pure bliss in every mouthful. But let’s be real: sometimes, we don’t finish all those cookies in one sitting (as hard as that might be!). So, let’s chat about how to store these gems to keep them fresh and delightful for days to come.
Storing Leftover Pistachio Pudding Cookies
To preserve your beautiful Pistachio Pudding Cookies, I recommend placing them in an airtight container—this is crucial! A cookie jar or a plastic food storage container works wonders. Simply stack the cookies in layers with parchment paper between them to prevent any sticking. If stored properly at room temperature, these cookies can last up to a week, maintaining their soft and chewy charm. For an extra tip that never fails me, toss a slice of bread inside the container; it helps keep the cookies moist and prevents them from becoming too dry! Trust me when I say that even after a few days, these cookies will still taste utterly intoxicating—soft and flavorful with each bite. If you’d like to enjoy a warm cookie again later on, just pop them in the microwave for about 10-15 seconds; they’ll regain their delightful gooeyness!
Freezing Pistachio Pudding Cookies for Later
Now, if you’re like me and want to have a stash of these heavenly treats ready for whenever the mood strikes (because let’s face it, who doesn’t?), freezing is your best friend! To freeze your Pistachio Pudding Cookies properly, arrange them in a single layer on a baking sheet first—this way they won’t stick together. Once they’re frozen solid (about an hour should do), transfer them into a freezer-safe bag or container. They can happily live in your freezer for up to three months without losing any flavor or texture. When you’re ready for a treat, simply remove however many you want from the freezer and let them thaw at room temperature for about 30 minutes or so. This convenience factor is absolutely paramount; having delicious homemade cookies on hand makes any day feel like a special occasion!
Pistachio Pudding Cookies
Pistachio Pudding Cookies are a delightful blend of flavors and textures that will elevate any gathering. These soft and chewy cookies are infused with the nutty essence of pistachios and complemented by creamy white chocolate chips, creating a mouthwatering treat that’s as beautiful as it is delicious.
- Prep Time: 15 minutes
- Cook Time: 14 minutes
- Total Time: 29 minutes
- Yield: Approximately 24 cookies 1x
- Category: Dessert
- Method: Baking
- Cuisine: American
Ingredients
- 1 ⅔ cups all-purpose flour
- 3.4 ounces instant pistachio pudding mix
- 1 teaspoon baking soda
- ½ teaspoon salt
- ¼ cup light brown sugar
- ¾ cup granulated sugar
- ¾ cup unsalted butter (softened)
- 1 teaspoon clear vanilla extract
- 1 egg (room temperature)
- 1 cup white chocolate chips
- ½ cup chopped pistachios
Instructions
- Preheat your oven to 325°F (160°C) and line a baking sheet with parchment paper.
- In a medium bowl, whisk together flour, pistachio pudding mix, baking soda, and salt.
- In a large bowl, cream softened butter with brown sugar and granulated sugar until fluffy.
- Add in the egg and vanilla extract, mixing until well combined.
- Gradually incorporate the dry ingredients into the wet mixture until just blended.
- Fold in white chocolate chips and chopped pistachios gently.
- Chill the dough in the refrigerator for at least 30 minutes.
- Scoop rounded tablespoons of dough onto prepared baking sheets, leaving space between each cookie.
- Bake for 12-14 minutes or until edges are lightly golden but centers remain soft.
- Let cool on the baking sheet for several minutes before transferring to wire racks.
Nutrition
- Serving Size: 1 cookie
- Calories: 150
- Sugar: 10g
- Sodium: 90mg
- Fat: 7g
- Saturated Fat: 4g
- Unsaturated Fat: 2g
- Trans Fat: 0g
- Carbohydrates: 20g
- Fiber: 0g
- Protein: 2g
- Cholesterol: 15mg