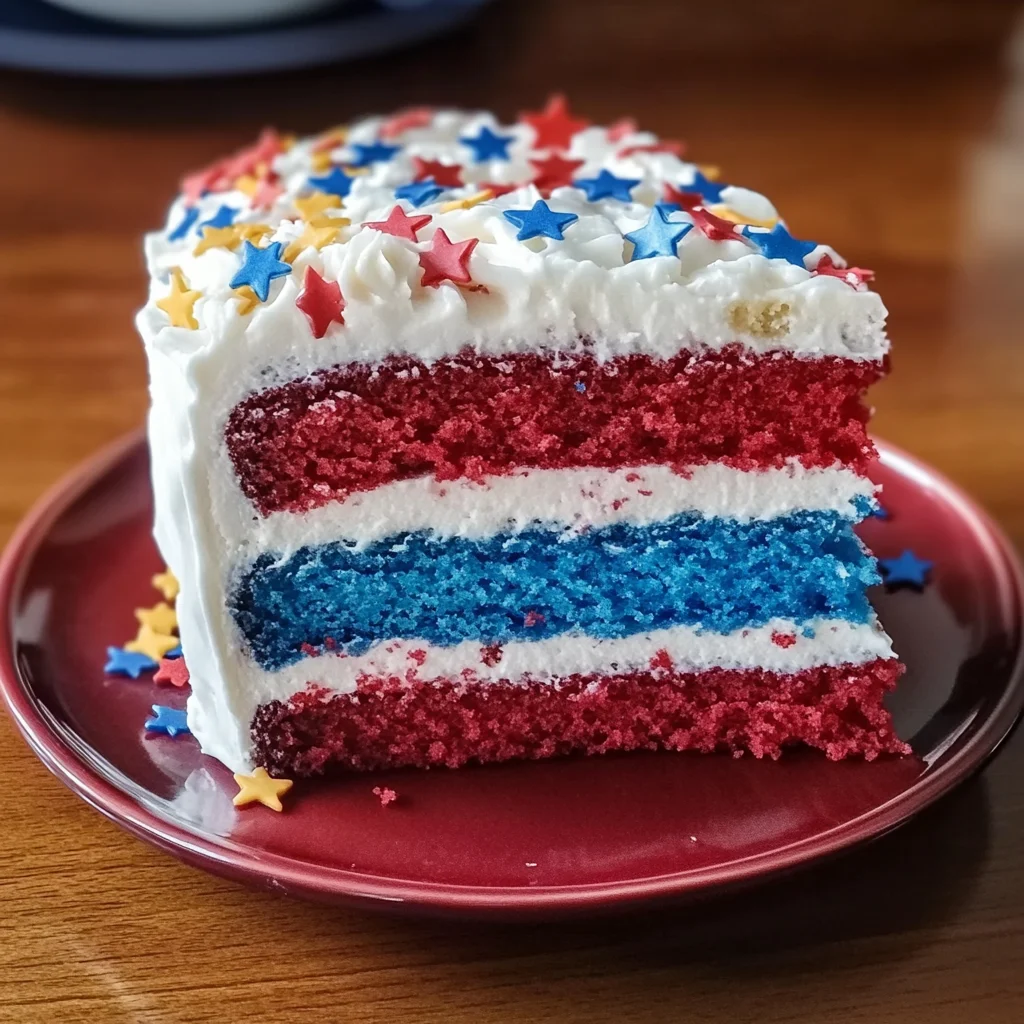
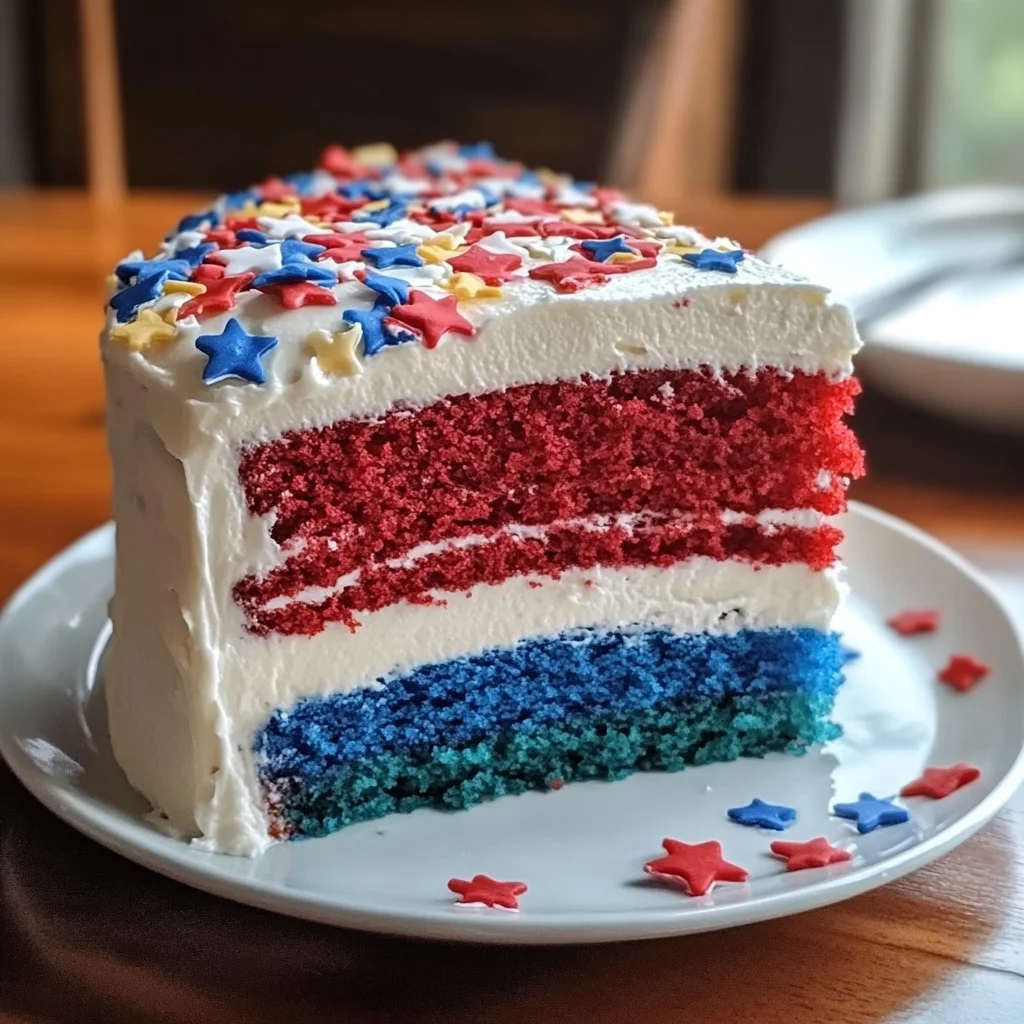
Red, White and Blue Layered Flag Cake
There’s something undeniably magical about the Fourth of July, isn’t there? As the sun sets, families and friends gather, laughter dances in the air, and the tantalizing aroma of barbecues wafts around, beckoning everyone to come together. And what better way to celebrate this vibrant occasion than with a stunning Red, White and Blue Layered Flag Cake? This isn’t just any dessert; it’s a heartfelt tribute to patriotism that transforms an ordinary gathering into a memorable feast. Each slice reveals layers of rich red and white cake adorned with a splash of blue—it’s a visual delight that captures the essence of summer celebrations. When you cut into this cake, you’re not just serving dessert; you’re serving joy, laughter, and connection—all wrapped up in sweet nostalgia.
I can still remember my first attempt at baking a layered cake for the Fourth of July. It felt like a rite of passage—mixing colors, layering flavors, and creating something truly spectacular. This Red, White and Blue Layered Flag Cake is inspired by those cherished memories, and I promise you it will be a showstopper at your celebration too! Its moist texture combined with fluffy frosting is simply irresistible; every bite sings with joy while your taste buds revel in the sweetness. Whether enjoyed at a backyard barbecue or during fireworks displays, this cake has an uncanny ability to bring people together.
Ingredients:
Embarking on this culinary journey is like stepping into a warm embrace filled with anticipation. Each ingredient plays a vital role in crafting this delightful cake that’s as much about flavor as it is about fun. Let’s dive into what makes each component special!
- 1 box Betty Crocker™ Super Moist™ White Cake Mix. This cake mix serves as our foundation, creating that soft and tender crumb we desire. The beauty of using a mix lies not only in its convenience but also in its reliability—it’s formulated for perfect results each time! If you’re craving something homemade, feel free to substitute with your favorite white cake recipe; just ensure it’s light enough to hold up under those glorious layers.
- Water, vegetable oil and whole eggs called for on cake mix box. These ingredients are essential for hydration and richness. The water activates the dry components while the vegetable oil ensures moisture throughout the cake. Whole eggs add structure and richness that elevate the texture beyond mere fluffiness—think of them as the glue that holds everything together.
- 2 teaspoons red paste food color. This vibrant hue is more than just eye-candy; it adds excitement to each slice! Using paste food coloring versus liquid gives us that bold intensity without altering our batter’s consistency. When mixing it in, you’ll see how beautifully it transforms your batter—it’s like watching magic happen right before your eyes!
- 1 box Betty Crocker™ Super Moist™ White Cake Mix (for blue/white layers). We’re using another box here for our other layers! It’s crucial to maintain consistency across flavors while allowing room for creativity—this additional layer will bring balance to our cake both visually and texturally.
- Water, vegetable oil, and egg whites called for on cake mix box. Similar to before but now we’re focusing on egg whites which will yield an even lighter texture in our white cakes! The combination of oils helps keep everything moist while ensuring our batter remains airy.
- 1/2 teaspoon blue paste food color. Just like the red food coloring enhances our red layer, this blue will give us that patriotic pop! Use caution: a little goes a long way with paste coloring—start small and build until you achieve your desired shade.
- 3 tablespoons red, white and blue star-shaped candy sprinkles. These delightful sprinkles aren’t merely decorative; they add an element of whimsy! Their texture contrasts beautifully against the softness of our cake while enhancing its visual appeal—who doesn’t love sprinkles?
- 3 tubs (12 oz) Betty Crocker™ Whipped Fluffy White Frosting. Ahh… frosting—the crown jewel of any layered cake! This whipped fluffy frosting is light yet decadent enough to complement our textures perfectly without overwhelming them. If you prefer homemade frosting, go ahead! Just aim for something fluffy with enough stability to hold up between layers.
- Betty Crocker™ Red, White & Blue Sprinkles, as desired. These festive sprinkles are optional but highly recommended for adding that final touch—a playful reminder of all things celebratory!
Equipment You’ll Need:
Before we roll up our sleeves and get baking, let’s talk tools! Having the right equipment makes all the difference when preparing something as intricate as our layered flag cake—it allows creativity to flow smoothly while ensuring success every step of the way.
- Two 8-inch round cake pans – These pans are essential for achieving uniform layers that stack beautifully! Using two ensures we can bake both red and white cakes simultaneously without waiting too long between batches—a huge time-saver!
- Parchment paper – Lining your pans with parchment paper prevents sticking—a crucial step if you want flawless layers without crumbs tearing apart during assembly! Trust me; taking this precaution will save you from heartache when flipping those cakes out!
- Mixing bowls – A set of mixing bowls will help keep your workflow organized; one for wet ingredients, another for dry mixes—all contributing to clearer steps leading towards success.
- Electric mixer or whisk – Whether hand-held or stand-alone mixers make light work of blending ingredients together effortlessly—especially handy when incorporating those colors evenly into batters!
- Spatula – A sturdy spatula is key when spreading frosting smoothly across layers; it’ll help create that polished finish we’re aiming for!
Now that we have all our components lined up let’s dive deeper into preparing this beautiful Red, White and Blue Layered Flag Cake!
Step 1: Prepping Your Oven & Pans
To kick things off right away, preheat your oven to 350°F (325°F if you’re using dark or nonstick pans). This step is crucial because starting with an adequately heated oven ensures even baking throughout each layer—no one wants unevenly baked cakes! While that’s warming up nicely, grab your two 8-inch round pans; spray them generously with cooking spray before lining their bottoms with parchment paper—a technique I swear by! It creates an easy release after baking while also preventing any unintended sticking incidents that could lead to heartbreak later on.
Step 2: Creating Our Red Layers
Now let’s whip up those vibrant red layers! Take one box of Betty Crocker™ Super Moist™ White Cake Mix (the one designated for red) and combine it according to package directions using water, vegetable oil, and whole eggs specified on the box—which brings richness along with moisture needed throughout baking time! After mixing well until smooth—and I mean really smooth—you’ll want to beat in those two teaspoons of red paste food color until fully incorporated (don’t be shy here!). Divide evenly between both prepared pans because we want symmetry in our flag design after baking!
Step 3: Baking Time!
Carefully transfer both pans into your preheated oven (a gentle touch makes all difference here). Set timers for about 28–33 minutes—but don’t forget: check doneness by inserting a toothpick in center areas; if it comes out clean then voilà—perfection achieved! Once baked beautifully golden brown around edges (those aromas filling kitchen should be divine), allow cakes cool down slightly before removing from pans onto cooling racks where they can rest completely (about one hour should do wonders).
Step 4: Preparing Blue & White Layers
While our gorgeous reds are cooling down properly let’s shift gears towards prepping blue-and-white beauties next! Spray those same round pans again with cooking spray before lining them once more with parchment paper—we’re going for consistency here folks! Grab another box of Betty Crocker™ Super Moist™ White Cake Mix (this time meant exclusively for blue-and-white) then follow instructions utilizing water/oil/egg whites specified instead—the result? An even lighter texture perfect alongside reds upon assembly later on!
As we embark on making these delightful layers together remember patience is key through each step; enjoy every moment spent crafting something lovely alongside loved ones who’ll appreciate both taste & presentation alike!
Stay tuned as we move forward through assembling this show-stopping masterpiece!
Step 5: The Artful Assembly Begins
Now that we’ve got those vibrant layers ready, it’s time for the truly exciting part—the assembly! Start by placing one of your gorgeous red cake layers on a serving platter. This is not just any cake; this is a canvas for your creativity and a celebration of flavors. Spread about 1/3 cup of frosting evenly over the top of the layer, ensuring that every bite will be infused with that creamy goodness. The frosting acts as both a delicious glue and a delightful flavor enhancer, so don’t skimp here! You want it to be smooth and even, so take your time. Next, gently place one of the white cake layers right on top of that frosted red layer, and again, spread another 1/3 cup of frosting over it.
Repeat this process with the second red layer—frosting it just as lovingly before adding the blue layer on top. Here’s where you can really let your inner artist shine! As you add the blue layer, carefully spread a thin layer of frosting on the cut edge inside of this cake layer. This step is crucial because it creates a cohesive structure that supports our next move—insert the little white 4-inch round cake into the center! This addition not only looks stunning when you slice into your cake, but it also helps maintain balance and keeps everything from sliding apart. Press down slightly to make sure it’s secure while feeling that satisfying squish between layers—it’s all about creating a beautiful masterpiece here!
Step 6: Crumb Coating – The Secret to Success
Now we are going to create what bakers affectionately call a crumb coat. This step might seem simple, but I assure you, it’s absolutely paramount in achieving that pristine finish we all dream about. With a spatula or an offset knife, apply a thin layer of frosting over the entire outside surface of the cake. This initial coating traps any crumbs so they won’t interfere with your stunning final layer of frosting. Trust me on this—if you skip this step, you’ll end up with an unsightly mess once you frost for presentation!
After you’ve coated the sides and top with this protective layer, pop your cake into the refrigerator for at least 30 minutes. Why chill? Chilling allows the crumb coat to set up properly and firm up a bit, making it easier to apply the final decorative frosting without disturbing those beautiful layers underneath. Keep an eye on it; if you’re using a more humid environment or different types of frosting, you may need to let it chill for an extra few minutes until it feels just right—firm yet still spreadable.
Step 7: Frosting Perfection – The Final Layer
Once those thirty minutes have passed and your crumb coat is set beautifully, it’s time for the big reveal—the final coating of frosting! Take out your cake and get ready to transform it into something utterly intoxicating. With your remaining frosting (which should be around two-thirds left), generously spread it over the sides and top of your cake. Don’t rush this step; instead embrace it as an opportunity to make every inch luscious and decadent. Aim for smooth edges and swirls that reflect your personality—this is where you can really have fun!
If you’re feeling adventurous (and I hope you are!), as you’re applying this last coat, consider using an offset spatula or even a bench scraper to create some texture or patterns in the icing—it adds character and draws in your guests like moths to a flame! And don’t forget about those star-shaped sprinkles; sprinkle them generously atop your frosted creation before refrigerating again for another cool-down session—about 30 minutes is perfect here too!
Step 8: The Grand Finale – Chill & Reveal
Now comes perhaps one of my favorite parts: letting this beauty chill one last time before we slice into it! After you’ve finished decorating with sprinkles galore (because who doesn’t love sprinkles?), place your masterpiece back in the fridge for another half-hour. This time is non-negotiable; allowing everything to set ensures each slice comes out perfectly clean without any rogue bits trying to escape their layered home.
As you wait (and oh boy does waiting feel like forever sometimes!), take in all those delightful scents wafting through your kitchen—vanilla mingling with hints of sweetness from both cakes and frosting—it’s pure bliss! When you’re finally ready to serve up slices, remove from refrigerator and let sit at room temperature for about ten minutes before cutting; this will allow flavors to bloom even further while ensuring easier slicing through those beautiful layers.
Wrapping It Up: Your Red, White and Blue Layered Flag Cake Awaits!
Congratulations! You’ve crafted not just any dessert but a stunning Red, White and Blue Layered Flag Cake that’s sure to steal hearts (and maybe even some thunder from those fireworks!). Remember that each slice represents not only delicious flavors but also love poured into making something truly extraordinary for friends and family alike. So go ahead—slice into that glorious creation—and watch as heads turn and smiles widen when they see what you’ve made!
The joy in baking lies not just in following steps but in sharing moments around food with loved ones. I promise you’ll find immense satisfaction watching everyone enjoy their slices while celebrating togetherness on this special day! Enjoy every bite knowing you’ve created something that will become tradition—a sweet memory wrapped in vibrant colors perfect for any Fourth of July gathering or summer barbecue!
Storage and Enjoyment Tips for Your Red, White and Blue Layered Flag Cake
Now that you’ve crafted this stunning Red, White and Blue Layered Flag Cake, it’s time to dig in and celebrate! But what happens when you have a slice (or two) left over after the festivities? Fear not, my friend! This cake is just as delightful the next day—if it lasts that long! To keep your cake fresh and flavorful, store any leftovers in an airtight container at room temperature. If you’ve got a particularly hot summer day ahead, feel free to pop it in the fridge. Properly stored, this cake will remain delicious for about 3-4 days. Trust me; if you want to maintain that moist texture and vibrant colors, try placing a slice of bread in the container with it. This little trick helps absorb excess moisture while keeping your cake wonderfully soft. When you finally decide to treat yourself to another slice, prepare for that same profound satisfaction as when you first took a bite!
Storing Leftover Red, White and Blue Layered Flag Cake
To ensure your Red, White and Blue Layered Flag Cake remains as delightful as when it was first served, consider wrapping any leftover pieces tightly in plastic wrap or transferring them into an airtight container. I recommend keeping it at room temperature for short-term storage; however, if you’re in a particularly humid climate or if you’d like to keep it a bit longer, the refrigerator is a safe bet. In either case, this vibrant cake can stay fresh for up to four days without losing its charm. Just imagine biting into that light and fluffy texture again! As for taste after storage? It holds up beautifully—moisture from the frosting keeps it tender, while the flavors meld together even more deliciously over time. When you’re ready to enjoy some more of this festive delight, simply serve it chilled or let it sit at room temperature for about 30 minutes before slicing; this will help bring out all those incredible flavors once again!
Freezing Components for Later
You might be wondering how to preserve specific components of your Red, White and Blue Layered Flag Cake for those spontaneous celebrations down the line—or just because you want to indulge later! Freezing is an excellent option here. Start by slicing your cooled cake layers into individual pieces or keeping them whole if you prefer. Wrap each layer tightly in plastic wrap followed by aluminum foil to prevent freezer burn—this step is absolutely crucial for maintaining quality during storage! These layers can last up to three months in the freezer. When you’re ready to use them, simply remove the desired piece from the freezer and let it thaw overnight in the refrigerator or at room temperature for a few hours. The convenience of having some patriotic dessert ready at your fingertips is just unbeatable! Plus, there’s something so wonderfully satisfying about pulling out a homemade treat from your freezer—it feels like unearthing a hidden treasure just waiting for celebration!
Red, White and Blue Layered Flag Cake
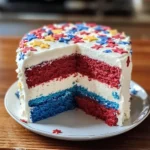
Get ready to celebrate summer with a stunning Red, White and Blue Layered Flag Cake that embodies the spirit of togetherness and joy! This delightful dessert features vibrant layers of red and blue cake, all wrapped in fluffy frosting that is as delicious as it is visually appealing. Perfect for Fourth of July gatherings, backyard barbecues, or any festive occasion, this cake is a showstopper that will bring smiles to everyone at the table. Each slice reveals a beautiful display of colors that capture the essence of summer celebrations, making it not just a treat but a centerpiece for your festivities. Whether enjoyed with family and friends or at a summer party, this cake promises to create sweet memories and joyful connections.
- Prep Time: 30 minutes
- Cook Time: 60 minutes
- Total Time: 1 hour 30 minutes
- Yield: Serves about 12 slices 1x
- Category: Dessert
- Method: Baking
- Cuisine: American
Ingredients
- 1 box Betty Crocker Super Moist White Cake Mix
- Water, vegetable oil, whole eggs (as per package instructions)
- Red paste food coloring
- Additional box of white cake mix (for blue/white layers)
- Egg whites (as per package instructions)
- Blue paste food coloring
- Star-shaped candy sprinkles
- 3 tubs Betty Crocker Whipped Fluffy White Frosting
Instructions
- Preheat your oven to 350°F (or 325°F if using dark/nonstick pans) and prepare two 8-inch round cake pans with cooking spray and parchment paper.
- For the red layers: Combine one box of white cake mix with water, vegetable oil, and whole eggs as instructed. Add red food coloring until desired shade is achieved. Pour evenly into prepared pans.
- Bake for 28-33 minutes or until a toothpick comes out clean. Allow cakes to cool before removing from pans.
- Repeat steps for blue and white layers using the second box of white cake mix and egg whites.
- Assemble by layering cakes alternately with frosting between each layer. Finish with a crumb coat followed by a decorative layer of frosting.
- Chill before serving and enjoy!
Nutrition
- Serving Size: 1 slice (100g)
- Calories: 350
- Sugar: 30g
- Sodium: 200mg
- Fat: 14g
- Saturated Fat: 5g
- Unsaturated Fat: 9g
- Trans Fat: 0g
- Carbohydrates: 52g
- Fiber: 0g
- Protein: 3g
- Cholesterol: 55mg