Peanut Butter Cake
There’s an undeniable magic that happens in the kitchen when the aroma of something sweet fills the air, wrapping you in a warm embrace reminiscent of home and comfort. This Peanut Butter Cake is more than just a dessert; it’s a heartfelt piece of nostalgia that brings together simple ingredients to create something truly extraordinary. The rich, nutty scent of peanut butter wafting through your kitchen will make your heart swell with joy, and I promise you, each bite is a symphony of flavors that dances on your palate. As you slice into this cake, the soft crumb and lush frosting beckon you to take just one more piece—it’s that good!
You see, this recipe is dear to my heart because it captures the essence of cozy gatherings with family and friends. There’s something so comforting about sharing a slice of homemade cake, especially one that combines the deep flavors of peanut butter with a tender crumb. This old-fashioned treat has graced many celebrations in my home, from birthdays to casual weeknight dinners; each occasion enriched by laughter and love. The beauty lies not only in its taste but also in its ability to bring people together around the table—a true testament to the power of food.
Peanut Butter Cake: A Slice of Nostalgia
Let’s dive into this delightful journey of baking! This Peanut Butter Cake is so easy to make and promises a rich flavor profile that will leave everyone asking for seconds. With just a few basic ingredients and some love, you’re on your way to creating one sensational dessert that embodies warmth and comfort.
Ingredients:
As we embark on this culinary adventure, let me tell you how each ingredient plays a vital role in crafting our delectable Peanut Butter Cake. Every spoonful contributes to an experience that’s profoundly satisfying.
- 2 cups all-purpose flour. Flour serves as the backbone of our cake, providing structure and stability. It’s essential for achieving that tender crumb we all adore in cakes. When selecting flour, look for a brand with a good protein content to ensure it rises beautifully. For those who need gluten-free options, almond or coconut flour can be substituted; however, remember these alternatives may alter texture slightly!
- 2 cups granulated sugar. Sugar does more than sweeten our cake; it enhances flavor and creates moisture while promoting browning during baking—think golden edges! Granulated sugar dissolves easily into our batter, leading to a light texture that’s utterly intoxicating. If you prefer less sweetness or want an alternative, consider using coconut sugar or even maple syrup (but adjust liquid accordingly).
- 1 tsp baking soda. This little magic powder is responsible for leavening our cake, helping it rise and become fluffy. Baking soda reacts with acidity present in other ingredients (like peanut butter) to create carbon dioxide bubbles that lift your cake as it bakes. Be sure it’s fresh—an expired box won’t give you those wonderful results!
- ½ cup whole milk. Whole milk adds richness and moisture to our batter without making it too heavy. It also supports the chemical reactions taking place during baking by providing hydration for our flour proteins and activating the baking soda’s leavening properties. If you’re looking for dairy-free options, almond or oat milk can work wonders here too!
- 2 large eggs. Eggs are essential for binding all our ingredients together while adding moisture and richness as they cook. They also provide structure through their proteins when baked—so don’t skip them! If you’re looking for an egg substitute due to dietary preferences or allergies, flaxseed meal mixed with water works great as an alternative.
- 1 tsp vanilla extract. Ahh, vanilla—the unsung hero in many baking recipes! This extract adds depth of flavor that enhances every other ingredient’s natural sweetness without overpowering it. Always opt for pure vanilla extract over imitation for the best results—trust me on this!
- 1 cup water. Water might seem like an odd addition in a cake recipe but hear me out: it hydrates our dry ingredients and helps create a lighter texture. Using hot water aids in melting fats like butter or peanut butter effectively within our batter—a trick I swear by!
- ½ cup unsalted butter (for the batter). Unsalted butter provides fat necessary for flavor and tenderness while allowing us complete control over salt levels in our recipe—a non-negotiable element! It must be softened properly at room temperature before use; otherwise, you risk ending up with lumps instead of smooth batter.
- ¾ cup peanut butter (for the batter). The star ingredient! Peanut butter infuses flavor while ensuring moistness throughout each bite with its creamy goodness—it’s what makes this cake truly special! Aim for natural peanut butter without additives; it gives better results both taste-wise and texture-wise.
- ½ cup unsalted butter (softened) (for frosting). Just like before, softened unsalted butter is key for creating a creamy frosting base—not too hard nor melted but perfectly spreadable! This will ensure your frosting turns out light yet indulgent.
- 1 cup peanut butter (for frosting). You guessed it—the second dose of deliciousness comes here! The combination with the frosting base takes flavors up several notches—it’s utterly divine when paired with powdered sugar.
- ⅓ cup whole milk (for frosting). Just enough milk to reach your desired consistency without making things runny—this helps achieve that perfect spreadable texture we crave atop our cake!
- 3 cups powdered sugar. Powdered sugar lends sweetness along with thickness needed for our frosting while keeping things silky smooth—no graininess allowed here! Sift if necessary before adding to prevent any lumps from forming as you mix.
Equipment You’ll Need:
Every great chef knows that having the right tools makes cooking not only easier but also more enjoyable! While these items aren’t ingredients, they’re essential partners in creating something wonderful together.
- Electric mixer – This trusty appliance is crucial for achieving fluffy batters through proper creaming techniques—especially when combining butter and sugars initially! A stand mixer can be particularly beneficial since it allows hands-free mixing; however, hand mixers do just fine too!
- 9×13 baking dish – The ideal size for our Peanut Butter Cake ensures even baking throughout while making slicing easy once cooled down! Glass or metal pans work well; just make sure you grease them properly beforehand!
- Rubber spatula – Perfect for scraping down sides when mixing batters ensures we incorporate everything evenly without leaving lumps behind—that’s key! Plus, it’s great for spreading frosting smoothly across surfaces later on.
Now that we’ve gathered all these elements together let’s dive into preparing this beautiful Peanut Butter Cake—you’re going to love every moment spent bringing this creation to life!
Step 1: Prepping Your Oven & Pan
First off, preheat your oven to 350°F because we want everything hot and ready when we’re done mixing—that’s absolutely paramount! While that’s heating up, grab your beloved 9×13 baking dish because we’ll need it next… Give it a good coat of butter followed by light dusting of flour—this step keeps any sticky situation at bay when it comes time to release our baked beauty from its pan after cooling down!
Step 2: Mixing Dry Ingredients
In your electric mixer bowl—which should be clean and ready—add two cups of all-purpose flour alongside two cups granulated sugar plus one teaspoon baking soda sprinkled atop like fairy dust! Blend these dry ingredients together briefly on medium-low speed until they come together harmoniously; this step ensures even distribution throughout later stages as well as eliminating any clumps hiding within flour bags—you definitely don’t want surprises here!
Step 3: Incorporating Wet Ingredients
Now comes the fun part: slowly add half a cup whole milk followed by two large eggs cracked open like treasure chests filled with potential goodness along with one teaspoon pure vanilla extract… Mix these wet additions gently yet thoroughly until everything melds beautifully into one glorious batter mixture! Don’t rush this step; taking time allows flavors meld together before proceeding onto next phase where heat transforms them further into scrumptiousness…
Step 4: Melting Butters & Peanut Butter
In a small saucepan over medium heat combine one cup water along with half cup unsalted butter plus three-fourths cup peanut butter until they melt down smoothly into liquid gold… Stir frequently so nothing sticks while ensuring there are no lumps left behind—the ultimate goal here is creaminess galore which enhances overall texture once poured over existing batter mixture later on—it’s truly intoxicating when combined!
Stay tuned as we continue making this delightful Peanut Butter Cake—I can’t wait for you to experience every delectable moment ahead!
Baking Your Perfect Peanut Butter Cake
Step 5: The Creamy Fusion
Now, let’s transform those dry ingredients into a luscious batter! In a small saucepan over medium heat, you’ll want to add the water, butter, and peanut butter. This step is essential because it creates a velvety mixture that will not only enhance the flavor of your cake but also contribute to its moist texture. As the ingredients begin to meld together, stir frequently—the goal here is to achieve a creamy consistency where all the components are seamlessly blended. Trust me on this: if you rush through this part or allow any clumps to remain, you might end up with an uneven texture in your cake.
Once everything is beautifully combined and has that inviting aroma wafting through your kitchen—think of it as liquid gold—you’ll carefully pour this mixture into your previously prepared batter. Mix everything on medium speed for about two minutes until you see that gorgeous batter come together. This mixing time is crucial; it allows air to incorporate into the cake, ensuring it rises beautifully during baking. As you observe the batter change from grainy to smooth and shiny, you’ll know you’re on the right track!
Step 6: Pouring Perfection
With your batter ready, it’s time for the exciting part: pouring it into your prepared baking dish! I always find joy in this step; there’s something so satisfying about watching that thick batter glide into the pan. Ensure you’ve buttered and floured your 9×13 baking dish well; this non-stick layer is non-negotiable for achieving that perfect release after baking. Once poured in, gently jiggle the dish back and forth a little bit—this helps eliminate any air bubbles trapped within the batter, which can lead to unsightly holes in your finished cake.
Now comes a little patience as we wait for our creation to bake. Slide that beautiful pan into your preheated oven set at 350°F (175°C) and set your timer for 35-40 minutes. Keep an eye on it during this time; every oven behaves differently, so while you’re aiming for that golden-brown top, you’ll want to check for doneness by inserting a cake tester or toothpick into the center of the cake. If it comes out clean or with just a few moist crumbs clinging to it, congratulations! You’ve nailed it! Remember not to open the oven door too soon; releasing heat can affect how well your cake rises.
Step 7: The Art of Frosting
Once your peanut butter cake has cooled completely at room temperature—yes, patience here is key—you can turn your attention to making that dreamy frosting. In an electric mixer fitted with a paddle attachment (this is my go-to tool!), cream together your softened butter and peanut butter until they form an utterly intoxicating blend that’s smooth and fluffy. This process aerates the mixture, which contributes significantly to achieving that light frosting texture we all adore.
Gradually add in the powdered sugar—this step requires a gentle hand because we don’t want a sugary cloud exploding everywhere! Mix on low speed until the sugar is mostly incorporated before cranking up the speed again. If at any point it feels too thick or resistant (and trust me, you’ll know), thin it down with some whole milk until you reach that perfect spreadable consistency. You want this frosting to be rich yet manageable so you can easily spread it over your cake without tearing it apart underneath.
Step 8: Frosting Your Masterpiece
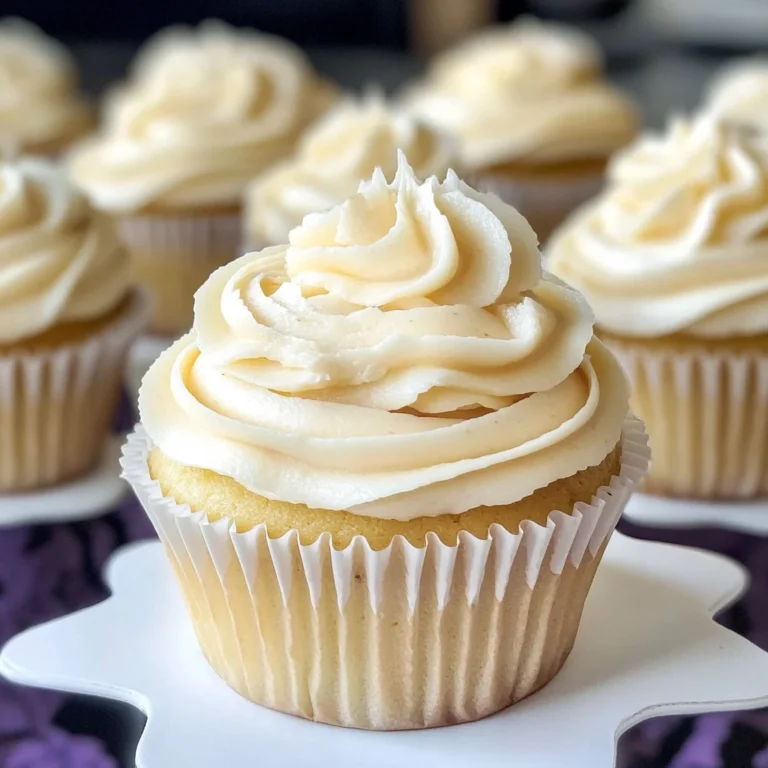
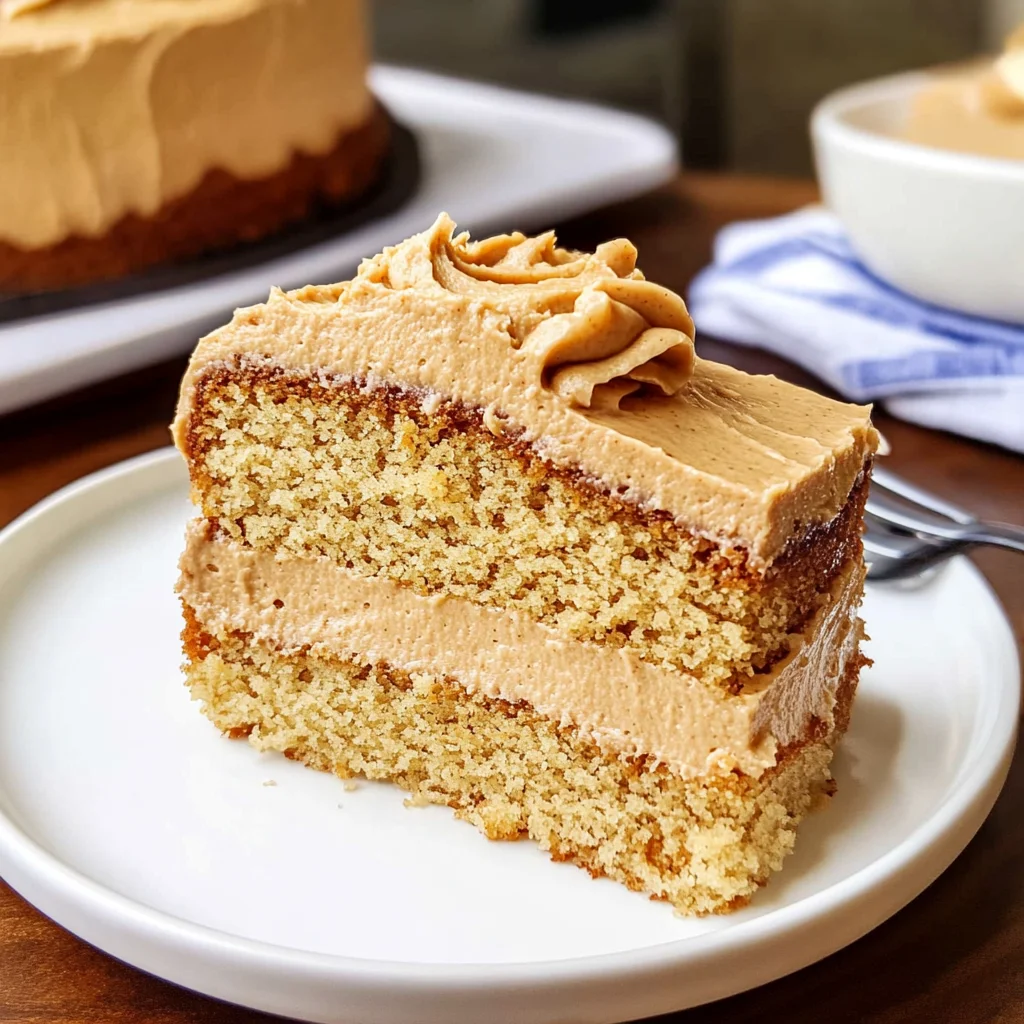
Now comes what I consider one of the most delightful parts of this entire process—frosting your cooled peanut butter cake! Using a spatula or even an offset spatula if you have one handy will give you excellent control over spreading that heavenly frosting across the surface of your cake. Start from the center and work outward; gently coaxing it over edges will create those beautiful swirls and peaks that make any dessert visually appetizing.
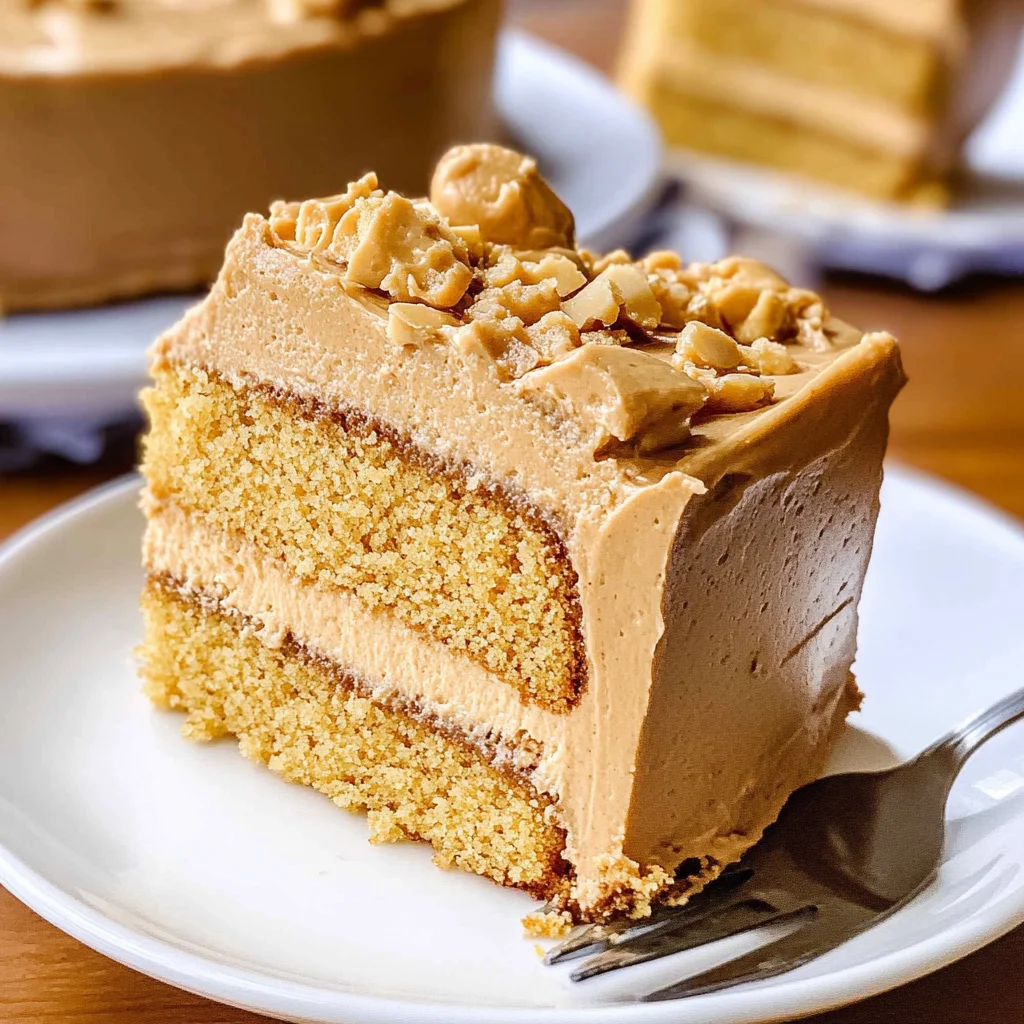
Take a moment here to appreciate what you’ve created—a warm slice of nostalgia with an enchanting aroma swirling around you! If you’re feeling adventurous (and why not?), consider adding some crushed peanuts on top for added crunch or even drizzling some melted chocolate to balance out those nutty flavors beautifully. After all, these little touches elevate not just taste but also presentation—and trust me when I say we eat with our eyes first!
Conclusion:
As we come to the end of this delightful journey through creating a classic Peanut Butter Cake, I hope you feel as excited as I do about making this beloved recipe part of your baking repertoire. There’s something profoundly satisfying about blending simple ingredients into a symphony of flavors that result in a cake so rich yet light that every bite feels like pure joy. The combination of creamy peanut butter and the soft crumb of the cake creates an experience beyond just dessert—it’s comfort food at its finest.
This recipe isn’t just about taste; it’s about creating memories with loved ones gathered around the table. Picture pulling this stunning cake from the oven—the golden crust gently cradling all that luscious peanut butter flavor—and watching everyone’s eyes light up with anticipation. The joy of baking this cake lies not only in how accessible and straightforward it is but also in its ability to bring people together during celebrations or even on quiet afternoons when you need a little pick-me-up.
Imagine savoring one with a steaming cup of coffee, allowing the rich flavors to mingle on your palate while you chat and laugh with friends. Or perhaps serve it alongside vanilla ice cream on warm summer evenings when everyone gathers outside under twinkling fairy lights—what a truly extraordinary pairing! For an afternoon treat, consider slathering on some extra peanut butter or drizzling melted chocolate over each slice; these simple additions elevate each serving into indulgence.
Feeling adventurous? This recipe is wonderfully adaptable! You could swap out half of the peanut butter for almond butter for a nutty twist or sprinkle in some chocolate chips for those who crave a bit more sweetness with their cake. Don’t forget about adding crushed nuts on top for texture or layering fresh banana slices between frosting layers—it’s all about what makes your heart sing! So go ahead—try out these variations and let this classic recipe inspire your creativity in the kitchen. I invite you to share your experiences with me; let’s connect through our love for baking and create something magical together!
Peanut Butter Cake

Indulge in the comforting sweetness of our Peanut Butter Cake, a delightful dessert that captures the essence of nostalgia with every bite. This easy-to-make cake combines rich, creamy peanut butter with moist layers and a luscious frosting, creating a classic treat perfect for any occasion. With its inviting aroma wafting through your kitchen, this cake is sure to become a cherished favorite among family and friends. Serve it at birthdays, gatherings, or simply enjoy it as an afternoon pick-me-up—every slice is a warm embrace that brings smiles all around.
- Prep Time: 20 minutes
- Cook Time: 40 minutes
- Total Time: 1 hour
- Yield: Approximately 12 servings 1x
- Category: Dessert
- Method: Baking
- Cuisine: American
Ingredients
- 2 cups all-purpose flour
- 2 cups granulated sugar
- 1 tsp baking soda
- ½ cup whole milk (or almond/oat milk)
- 2 large eggs (or flaxseed meal for vegan option)
- 1 tsp vanilla extract
- 1 cup water
- ½ cup unsalted butter (softened)
- ¾ cup peanut butter (natural preferred)
- For Frosting: ½ cup unsalted butter (softened), 1 cup peanut butter, ⅓ cup whole milk, and 3 cups powdered sugar.
Instructions
- Preheat oven to 350°F (175°C) and grease a 9×13 baking dish.
- In an electric mixer bowl, combine flour, sugar, and baking soda; mix briefly.
- Add milk, eggs, and vanilla extract; mix until combined.
- In a saucepan over medium heat, melt water, butter, and peanut butter together until smooth.
- Pour melted mixture into the batter; mix on medium speed for about two minutes until smooth.
- Pour batter into the prepared dish and bake for 35-40 minutes or until a toothpick comes out clean.
- Allow cake to cool completely before frosting with the peanut butter frosting.
Nutrition
- Serving Size: 1 slice (100g)
- Calories: 400
- Sugar: 32g
- Sodium: 250mg
- Fat: 20g
- Saturated Fat: 8g
- Unsaturated Fat: 10g
- Trans Fat: 0g
- Carbohydrates: 52g
- Fiber: 2g
- Protein: 6g
- Cholesterol: 40mg