Dutch Honey Syrup (Vanilla Butter Syrup Recipe)
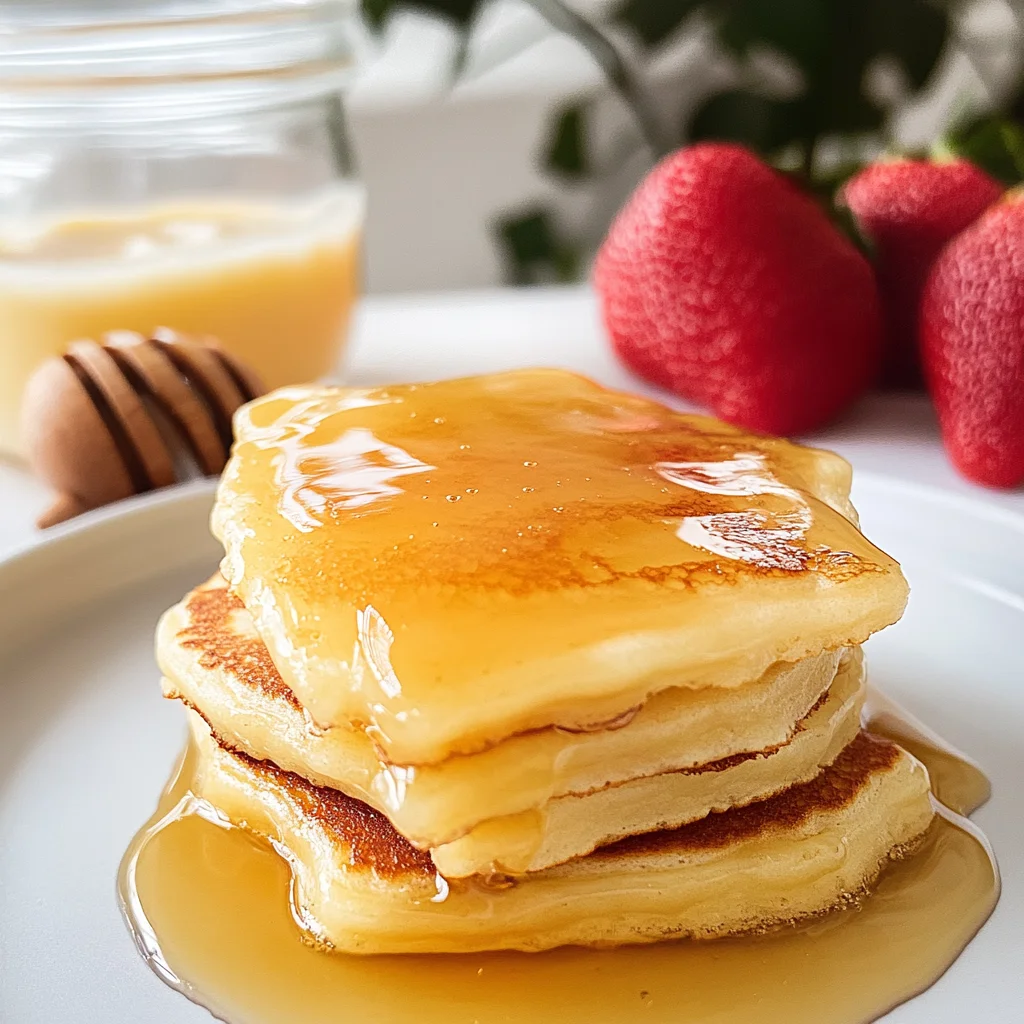
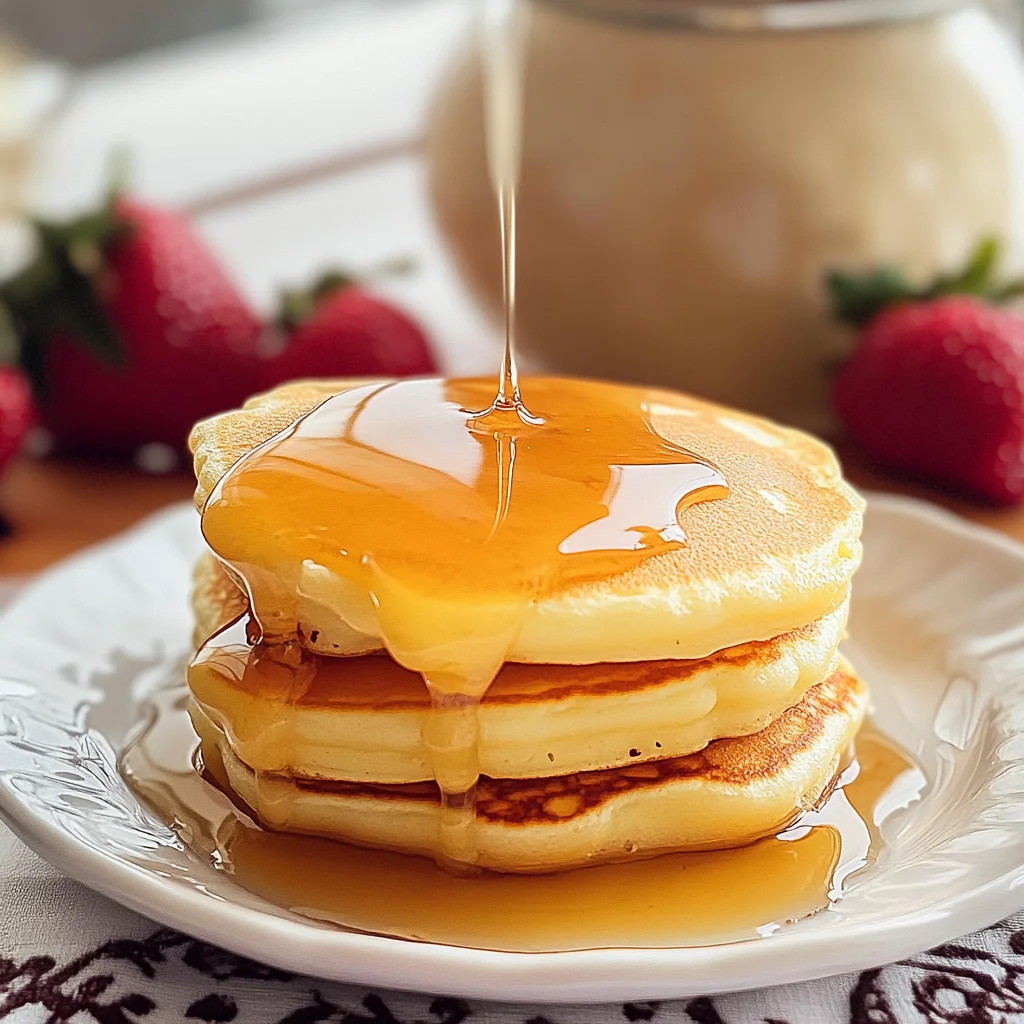
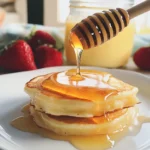
There’s something truly magical about creating a syrup from scratch. It’s like capturing the essence of sweetness in a bottle, an experience that transcends mere cooking and becomes a heartfelt expression of love. This Dutch Honey Syrup (Vanilla Butter Syrup Recipe) is not just a topping; it’s a celebration of flavors that elevates any breakfast into something extraordinary. Imagine drizzling this golden elixir over fluffy pancakes, or watching it pool around warm waffles, shimmering like liquid gold. The vanilla dances through the rich creaminess while the buttery notes wrap you in a comforting embrace, creating an indulgent experience that warms the soul.
What makes this syrup even more special is its simplicity. With just five ingredients, you can whip up a batch of this utterly intoxicating treat that will make your kitchen smell heavenly. As it bubbles away on the stove, you’ll find yourself entranced by its transformation from sugar and cream to something profoundly satisfying—an alchemy of flavors that brings joy to your breakfast table. Trust me when I say that once you make this syrup, you’ll be dreaming of new ways to use it—over biscuits, drizzled on vanilla ice cream, or even as an unexpected twist in your favorite dessert recipes.
Dutch Honey Syrup (Vanilla Butter Syrup Recipe): An Irresistible Breakfast Delight
This Dutch Honey Syrup is all about indulgence and comfort. It’s perfect for those cozy Sunday mornings when you want to linger over breakfast or impress guests during brunch with minimal effort. Just imagine the delight on their faces as they taste this homemade syrup! Its versatility means it can accompany a variety of dishes—from classic pancakes and waffles to French toast and beyond. You’re not just serving food; you’re serving memories!
Ingredients:
Embarking on this culinary adventure requires just five simple ingredients, each playing a crucial role in creating the velvety texture and rich flavor of your Dutch Honey Syrup.
- 1 cup sugar. Sugar is more than just sweetness in our recipe; it’s the foundation that gives our syrup its rich consistency and glossy finish. When heated, sugar undergoes caramelization, which adds depth to the flavor profile. I always recommend using granulated cane sugar for its neutral taste and ability to dissolve easily without leaving any graininess behind. If you’re looking for alternatives, brown sugar could lend a hint of molasses flavor, but keep in mind it may alter the syrup’s color slightly.
- 1 cup heavy cream. This ingredient is absolutely paramount because it provides the luscious mouthfeel that makes our syrup irresistible. Heavy cream contains a higher fat content than regular cream, which contributes to that decadent richness we crave in syrups. When you heat it gently with the other ingredients, it thickens beautifully, ensuring every drizzle coats your fluffy pancakes perfectly. For those who might be dairy-sensitive or looking for alternatives, coconut cream can be used here as an excellent substitute while still delivering that creamy consistency.
- 1/2 cup salted butter. Ahh, butter—the secret ingredient that takes this syrup from good to extraordinary! Salted butter enhances the overall flavor by balancing out the sweetness while adding a touch of savory richness that’s simply divine. Be sure to use high-quality butter for optimal results; European-style butters tend to have an even higher fat content which will make your syrup richer and more flavorful than standard American brands.
- 1 teaspoon vanilla extract or vanilla bean paste. Vanilla is what ties everything together in our Dutch Honey Syrup; it adds warmth and complexity to each bite. I personally love using vanilla bean paste because it delivers those gorgeous specks of vanilla bean throughout the syrup—it’s like nature’s confetti! If you’re using extract instead, make sure it’s pure vanilla extract for an authentic flavor; imitation extracts simply won’t do justice here.
- 1/4 teaspoon baking soda. Now, this might seem like an odd addition at first glance, but trust me—this step is crucial! Baking soda acts as a leavening agent that helps stabilize the syrup as it cooks and thickens while preventing sugar crystallization that could lead to grainy outcomes later on. It’s important not to skip or rush this step; simply stir until it’s fully dissolved right before taking your syrup off heat.
Equipment You’ll Need:
Having the right tools makes all the difference in achieving culinary success—and making homemade Dutch Honey Syrup is no exception! These essential items will ensure your cooking experience is smooth and enjoyable.
- Heavy bottom saucepan: The cornerstone of our recipe! A heavy-bottomed pan distributes heat evenly across its surface, reducing hot spots that could cause burning or uneven cooking—something we definitely want to avoid when crafting our sweet symphony of flavors.
- Wooden spoon: This trusty utensil isn’t just charming—it’s perfect for stirring without scratching your saucepan’s surface while allowing you to mix thoroughly without worrying about melting plastic parts into your delicious creation!
- Measuring cups and spoons: Precision matters here! Investing in quality measuring tools ensures you get accurate portions every time—no guesswork needed!
- Whisk (optional): While not strictly necessary since we’re using a wooden spoon primarily, having a whisk on hand can help incorporate air into some mixtures should you decide to experiment further with different textures.
Preparing the Dutch Honey Syrup (Vanilla Butter Syrup Recipe)
Step 1: Combine Your Ingredients
To kick things off beautifully, grab your heavy-bottom saucepan and combine sugar, heavy cream, salted butter, and either vanilla extract or paste right there inside. It’s like gathering all your friends before starting an adventure—each ingredient plays its part in creating something wonderful together! Stir everything gently with your wooden spoon until well mixed; you’ll notice how quickly those elements start melding into one another—the creamy richness blending seamlessly with sweet notes from sugar and aromatic wafts of vanilla filling your kitchen.
Step 2: Heat It Up
Now comes the fun part: place your saucepan over medium heat until everything begins bubbling away ever so gently—that low boil will coax out all those delicious flavors hiding within! Keep stirring constantly during this process because we want each grain of sugar dissolved completely before moving forward—trust me when I say no one likes crunchy bits when they’re expecting silky smoothness! Allowing it to reach a low boil helps develop more intense flavors as well as thickening properties down the line.
Step 3: Simmer Down
Once you’ve reached that delightful low boil stage (and yes—it looks beautiful!), reduce heat slightly so we can simmer our mixture instead—it’s time for some patience here! Continue stirring regularly for about 5–10 minutes; you’ll begin noticing how slowly yet surely things transform into thicker consistency—a process akin to nurturing something precious until perfection unfolds before us! As we near completion here—right before taking off heat—we’ll stir in baking soda until dissolved completely; watch how lively bubbles form at this addition—it’s magical!
Step 4: Serve or Store
Finally—the moment we’ve been waiting for has arrived! You have two options now: either serve immediately over warm pancakes or waffles hot off the griddle—or allow it cool down first for storage purposes if you’d like leftovers (and trust me—you will!). If storing away any portion leftover after indulging fully today—I recommend transferring cooled syrup carefully into jars or airtight containers once cooled completely so flavors stay intact longer while nestled safely within their glass homes!
Did you try making this delightful Dutch Honey Syrup? How did yours turn out? Please share in comments below—I genuinely can’t wait to hear all about your maple-sweetened journeys together!
Step 5: Bringing It All Together
Now that you have your ingredients beautifully combined in the saucepan, it’s time to bring them to life. Turn your heat to medium and allow the mixture to come to a gentle boil. This process is where the magic begins! As the sugar dissolves into the cream and butter, they will meld into a sweet, luscious concoction that smells utterly intoxicating. Stir continuously with a wooden spoon—this is crucial because it prevents any sugar from sticking to the bottom of the pan and burning. Keep an eye on it; the bubbling will start off gentle but will gradually become more pronounced as it heats up. That’s your cue that things are progressing beautifully!
As you stir, you’ll witness this mesmerizing transformation unfold before your eyes—the colors deepening, the texture shifting from thin to something more syrup-like. This step typically takes about 5 minutes, but don’t rush it; patience is key here! The gentle rolling boil ensures that all those flavors are thoroughly integrated, which is absolutely paramount for achieving that silky consistency we’re after. Trust me on this: once you see those bubbles dancing across the surface, you’ll know you’re on the right track!
Step 6: The Art of Thickening
Once you’ve reached that glorious boil, it’s time to reduce the heat to a low simmer. This step may seem simple, but it’s where you allow your Dutch Honey Syrup to truly develop its character and richness. Continue stirring regularly—this helps maintain even heat distribution and prevents any potential scorching at the bottom of your saucepan. During this simmering phase, which typically lasts between 5 to 10 minutes, you’ll notice that as the mixture reduces, it thickens beautifully and transforms into what I can only describe as liquid gold.
The science behind this thickening process lies in moisture evaporation; as steam escapes, you’re left with a syrup that’s not only thicker but has also concentrated flavors that will leave you feeling deeply satisfied with each drizzle over your breakfast delights. You’re aiming for a consistency similar to warm honey—velvety and smooth but still pourable. Be sure to keep an eye out for visual cues; if you dip a spoon into your syrup and it coats the back nicely without running off too quickly, congratulations—you’ve nailed it!
Step 7: The Baking Soda Surprise
Just when you think we’re done stirring, there’s one last magic trick up our sleeve! Right before taking your syrup off the heat, stir in 1/4 teaspoon of baking soda until it’s fully dissolved. Now, I know what you’re thinking: “Why baking soda?” Well, my friend, this is where we elevate our syrup from great to extraordinary! The baking soda reacts with the acidity of the cream and butter, creating tiny bubbles that lighten up your syrup’s texture while also adding a touch of caramelization depth that makes every bite profoundly satisfying.
As you stir in this secret ingredient, watch as your syrup undergoes another transformation—the mixture will foam up slightly and become even more luxurious in texture. Don’t be alarmed; this is completely normal and part of what makes our Dutch Honey Syrup so special. Allow it to simmer for just another minute after adding the baking soda so that those tiny bubbles can incorporate fully into your syrup. This final step enhances both flavor complexity and consistency—an absolute non-negotiable for achieving perfect results.
Step 8: Serving Your Masterpiece
Now comes one of my favorite moments—the time to serve up this delightfully decadent Dutch Honey Syrup! Whether you’re drizzling it over fluffy pancakes or swirling it into creamy vanilla ice cream (oh yes!), this syrup promises to transform any dish into something magical. If you’re serving immediately, grab a clean glass jar or bowl; pouring your warm syrup into an inviting vessel will not only make for beautiful presentation but will also allow you to share its warmth with loved ones right away.
If you’d like to save some for later—a wise choice—you can allow it to cool slightly before transferring it to an airtight container for refrigeration. Just remember that once chilled, your syrup will thicken even further due to cooling; don’t fret! Just give it a gentle reheat on low when you want to use it again—this brings back that silky pourability we adore so much! And let me tell you—the experience of tasting this homemade syrup—the creamy richness mingling with sweet notes of vanilla—is simply unparalleled.
Conclusion:
As we wrap up our journey through the creation of this delightful Dutch Honey Syrup, I hope you’re as excited about making it as I am! There’s something profoundly satisfying about crafting your own syrup from scratch—the way the sugar dances with cream and butter creates this luxurious blend that’s far beyond what you’ll find in any store. The addition of vanilla extract brings an aromatic depth that elevates every bite into an extraordinary experience. Trust me when I say that once you taste this syrup drizzled over hot pancakes or fresh waffles, you’ll understand why it’s become such a beloved staple in my kitchen.
This recipe isn’t just about flavor; it’s also about joy—the joy of cooking something beautiful and knowing exactly what’s gone into it. It’s perfect for lazy Sunday brunches with friends or even special occasions where you want to impress loved ones with something homemade yet incredibly easy to whip up. Can you picture pulling out a bottle of this golden delight just before serving breakfast? The anticipation alone makes every moment spent preparing worthwhile.
Imagine savoring one of those warm pancakes topped with a generous drizzle of syrup while surrounded by laughter and stories shared around the table. For an afternoon pick-me-up, try pairing it with freshly baked biscuits slathered in butter—each bite will have you swooning! And if you’re feeling adventurous, how about adding some chopped nuts or dark chocolate chips on top? Oh! Or swirling some into vanilla ice cream for an indulgent treat that will make any day feel like a celebration.
Speaking of adventures, don’t hesitate to play around with flavors! Feeling adventurous? You could infuse different extracts like almond or hazelnut instead of vanilla for unique twists that bring new character to the syrup. Or why not add spices such as cinnamon or nutmeg to give it warmth during chilly seasons? This recipe is wonderfully adaptable—let your creativity flow and make it yours! So grab those ingredients and get started; I can’t wait to hear how your own batch turns out!
Dutch Honey Syrup (Vanilla Butter Syrup Recipe)
Experience the joy of homemade sweetness with our Dutch Honey Syrup (Vanilla Butter Syrup Recipe). This delightful syrup, crafted with just five simple ingredients, captures the essence of indulgence and transforms your breakfast routine. Picture drizzling this velvety elixir over warm pancakes or waffles, allowing its rich creaminess and aromatic vanilla to elevate your morning meals into something truly memorable. Perfect for lazy Sundays or impressing guests at brunch, this syrup is not just a condiment; it’s a celebration of flavors that will leave everyone craving more. Easy to prepare and versatile enough for desserts, you’ll find endless ways to enjoy it—from topping biscuits to swirling it into ice cream.
- Prep Time: 5 minutes
- Cook Time: 10 minutes
- Total Time: 15 minutes
- Yield: About 12 servings 1x
- Category: Breakfast
- Method: Cooking
- Cuisine: American
Ingredients
- 1 cup sugar
- 1 cup heavy cream (or coconut cream)
- 1/2 cup salted butter
- 1 teaspoon vanilla extract or vanilla bean paste
- 1/4 teaspoon baking soda
Instructions
- In a heavy-bottom saucepan, combine sugar, heavy cream, salted butter, and vanilla.
- Stir gently until mixed, then heat over medium until bubbling.
- Reduce heat and simmer for 5–10 minutes while stirring regularly until thickened.
- Stir in baking soda until dissolved, then remove from heat.
- Serve warm or allow to cool before storing in an airtight container.
Nutrition
- Serving Size: 1 serving
- Calories: 110
- Sugar: 16g
- Sodium: 25mg
- Fat: 6g
- Saturated Fat: 4g
- Unsaturated Fat: 2g
- Trans Fat: 0g
- Carbohydrates: 12g
- Fiber: 0g
- Protein: <1g
- Cholesterol: 20mg