Raspberry Lemon Cookies
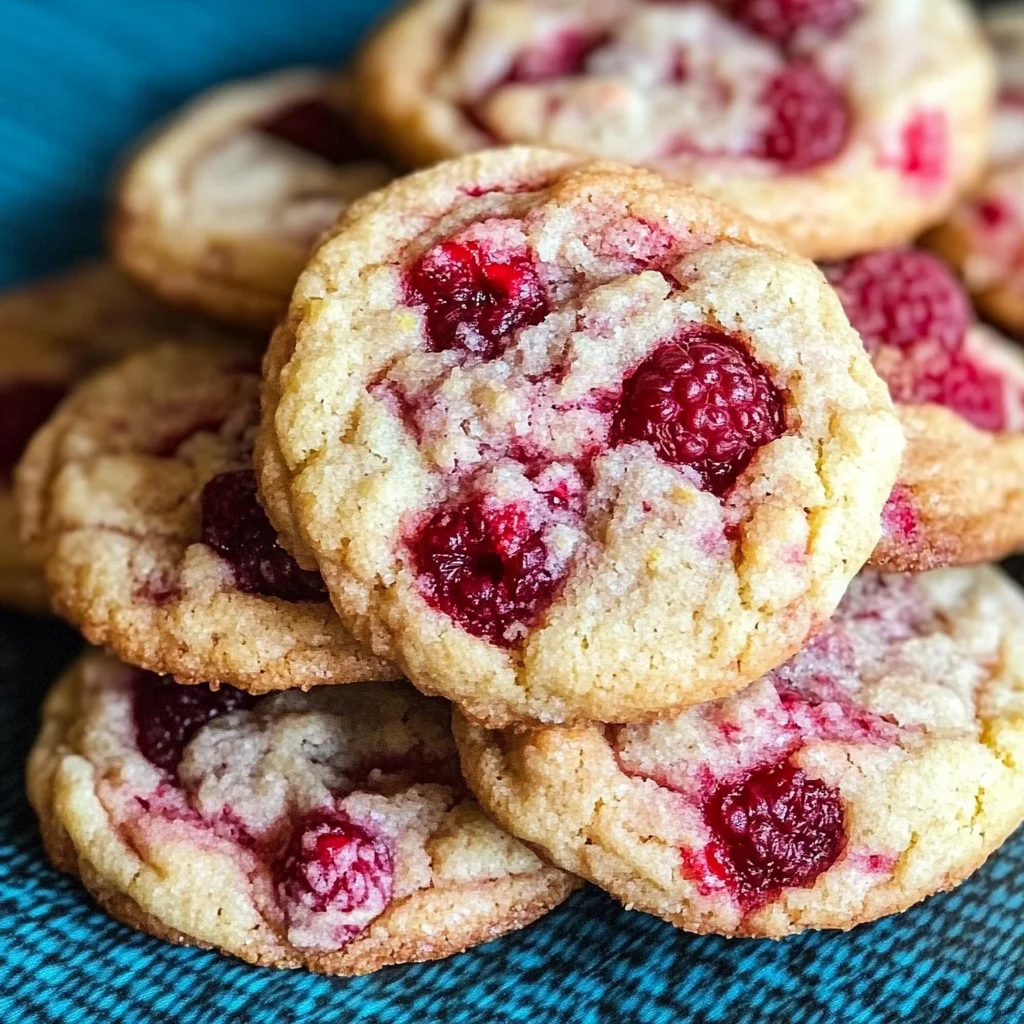
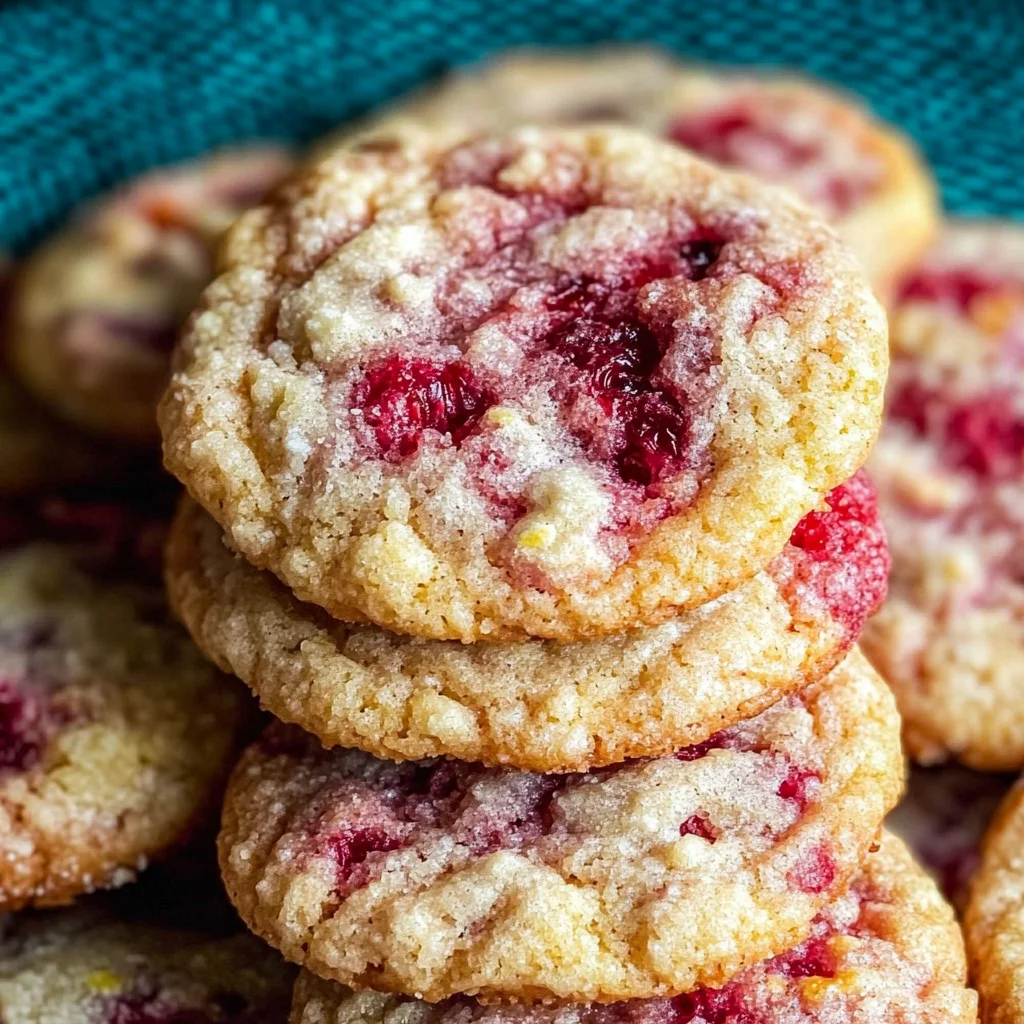
There’s something truly magical about the combination of raspberries and lemons, isn’t there? It’s like a sunbeam cutting through a cloudy day—bright, fresh, and utterly uplifting. These Raspberry Lemon Cookies are not just any cookies; they’re a delightful embrace of flavor that captures the essence of sweet summer days. When you bite into one, the burst of juicy raspberries dances with zesty lemon, creating a symphony of flavors that is both refreshing and comforting. Each cookie is ultra-soft and chewy, promising to melt in your mouth while leaving a trail of happiness behind. I promise you; this recipe is going to become one of your favorites!
Imagine serving these cookies at your next gathering—friends and family gathered around, laughter filling the air as they savor each bite. You’ll find that the bright color of the raspberries and the sunny zest of lemon not only look stunning on a plate but also evoke feelings of joy and nostalgia. Whether it’s a warm afternoon tea with loved ones or a cozy evening treat, these cookies are perfect for any occasion. They hold a special place in my heart, reminding me of sunny afternoons spent baking with my grandmother, who always taught me that cooking should be about love and sharing. And trust me on this; once you experience these Raspberry Lemon Cookies for yourself, you’ll understand what makes them so extraordinary.
Raspberry Lemon Cookies: A Sweet Burst of Sunshine
These Raspberry Lemon Cookies are incredibly quick and easy to make! With just a few simple ingredients, you’ll have a batch ready in no time. The balance between tartness from the lemon juice and sweetness from the raspberries creates an irresistible treat that everyone will love—even those who think they don’t like fruit in their cookies! So let’s roll up our sleeves and embark on this delicious culinary journey together.
Ingredients:
As we dive into creating these lovely cookies, let’s take some time to appreciate each ingredient. They play vital roles in crafting the perfect balance of taste and texture.
- 1/2 cup (1 stick or 113g) unsalted butter, softened. This is crucial for achieving that light and fluffy texture we all adore in cookies. When butter is softened properly—think room temperature—it easily incorporates air during creaming with sugar, leading to cookies that rise beautifully without being dense. If your butter is too cold, it won’t cream effectively; if it’s melted, you risk ending up with flat cookies that lose their charm! I always recommend using high-quality butter because its rich flavor enhances every aspect of your cookie.
- 1 cup (200g) granulated sugar. Sugar does more than just sweeten; it plays an essential role in achieving that coveted chewy texture while contributing to the cookie’s overall structure. The granulated kind helps create a bit of crispness on the edges while keeping the center soft. Plus, sugar caramelizes slightly as it bakes, bringing out deeper flavors—a truly necessary element in making these Raspberry Lemon Cookies shine!
- 1/2 teaspoon vanilla extract. This rich liquid adds warmth and depth to your cookies’ flavor profile—it’s like a comforting hug for your taste buds! Vanilla acts as an enhancer for other flavors; when combined with lemon and raspberry, it rounds everything out beautifully. Always opt for pure vanilla extract rather than imitation for optimal flavor.
- 1 large egg. Eggs are pivotal in baking as they provide moisture while helping bind all ingredients together seamlessly. They also contribute to the rise during baking due to their proteins setting up when heated—the result is tender yet structurally sound cookies! Be sure to use eggs at room temperature; they mix more uniformly into your batter.
- Zest and juice from 1/2 lemon. The zest imparts vibrant oils that brighten up every bite while the juice brings tanginess—think about how refreshing lemonade tastes on a hot day! This combination creates an addictive contrast to the sweetness from the sugar and berries. Always opt for fresh lemons; store-bought juice simply can’t compete with that zesty aroma!
- 1/4 teaspoon salt. Don’t overlook salt! It may seem small but adding salt enhances sweetness by balancing flavors—it’s like magic! Salt elevates every component within your cookies so they don’t taste flat or overly sweet.
- 1/4 teaspoon baking powder & 1/8 teaspoon baking soda. Both are crucial leavening agents that help our cookies rise perfectly during baking—baking powder works best when combined with acidic ingredients like lemon juice here, while baking soda helps achieve tenderness! They work hand-in-hand to create those irresistibly soft centers we’re after.
- 1 1/2 cups (188g) all-purpose flour. Flour serves as the backbone of our cookie dough; it provides structure while allowing us to create beautiful shapes as we scoop them onto our sheets! The key here is measuring correctly—too much flour can lead to dry cookies instead of chewy delights.
- 3/4 cup frozen raspberries, coarsely chopped. Ahh, finally our star ingredient! Raspberries add bursts of juicy flavor throughout each cookie—frozen berries are great here since they’ll hold their shape better when baked compared to fresh ones which may release too much moisture into our dough.
Equipment You’ll Need:
Having the right tools makes baking not just easier but also more enjoyable! Think of these items as your trusty companions on this flavorful adventure—we’ll be creating some fantastic treats together!
- Mixing bowl – A spacious mixing bowl allows you ample room to cream butter and sugar together without worrying about spills or splatters—trust me; you want enough space for everything as you beat those ingredients into submission!
- Stand mixer or hand mixer – While you can mix by hand if you’re feeling particularly ambitious or nostalgic (which I totally respect!), an electric mixer saves time and effort during creaming—you’ll achieve fluffiness much quicker than manual mixing could offer!
- Cookie sheets – A sturdy cookie sheet ensures even baking across all your cookies—the last thing you want is unevenly baked treats! Don’t forget parchment paper or silicone mats—they prevent sticking while allowing easy clean-up afterward.
- Cookie scoop or tablespoon – The right tool makes portioning out your cookie dough both fun AND consistent—a scoop gives uniformity which means they’ll bake evenly too!
Preparing the Raspberry Lemon Cookies
Step 1: Preheat Your Oven Like It’s Ready for Magic
Before diving into mixing up our delicious cookie dough, let’s set ourselves up for success by preheating our oven to 350°F (175°C). Preheating is absolutely paramount because it allows baked goods like our Raspberry Lemon Cookies to start cooking immediately upon entering—a crucial step for achieving perfect texture! Without proper preheating, you risk unevenly baked cookies where centers may remain raw while edges harden excessively—a situation we definitely want to avoid!
Step 2: Line Your Cookie Sheets
As we get ready for action, line two cookie sheets with parchment paper or silicone baking mats—this simple step ensures easy removal after baking without risking any sticking disasters! Plus, cleaning becomes a breeze afterward since there’s minimal residue left behind—trust me; you’ll thank yourself later!
Step 3: Cream Together Butter & Sugar
In either a large bowl or using your stand mixer fitted with paddle attachment (if you’re lucky enough!), add softened butter along with granulated sugar—this process known as ‘creaming’ incorporates air into fat which aids in achieving lightness within those beautiful cookies we’re preparing! Beat them together until light—and fluffy—that dreamy consistency should take about 3–5 minutes on medium speed if using an electric mixer (don’t rush this step!). You’ll know it’s ready when everything appears pale yellow rather than buttery gold—it really sets us up nicely moving forward!
Step 4: Add Eggs & Flavorings
Once you’ve creamed butter-and-sugar mixture successfully (high-five!), it’s time for our egg along with vanilla extract plus fresh lemon zest & juice—in goes all these fragrant goodies straight into that bowl now—the egg binds everything beautifully while enhancing moisture levels needed when mixed thoroughly throughout dough structure itself later down line too! Mix well until fully incorporated (scraping sides occasionally)—watch closely here so nothing gets left behind because every little bit counts towards ultimate success down road ahead!
I can already feel excitement bubbling over thinking about how wonderful these Raspberry Lemon Cookies will turn out! Trust me on this one—they’re going to be absolutely divine once pulled from oven fresh—all soft-and-chewy goodness waiting patiently just for YOU…
Baking Your Perfect Raspberry Lemon Cookies
Step 5: Incorporating Dry Ingredients for Balance
Now that we have a luscious, creamy mixture of butter and sugar, it’s time to introduce our dry ingredients into the mix. Begin by adding the salt, baking powder, baking soda, and flour to your bowl. This is crucial; each ingredient plays a unique role in creating the perfect texture for our cookies. The baking powder is a leavening agent that helps the cookies rise and become light and fluffy, while the baking soda ensures they spread just right during baking. The salt enhances the sweetness of the sugar and balances out the flavors—think of it as a secret ingredient that makes everything sing!
Using a spatula or your mixer on low speed, gently combine these ingredients until just incorporated. Trust me on this—overmixing can lead to tough cookies, which is something we want to avoid at all costs. We’re after soft and chewy raspberry lemon cookies, remember? As you mix, watch for any dry flour pockets hiding in your bowl; it’s okay if the dough looks slightly shaggy—that means you’re on the right track! After mixing, take a moment to appreciate how beautifully fragrant your dough has become; the combination of butter and lemon zest is utterly intoxicating.
Step 6: The Magic of Raspberries
Now comes the moment we’ve been waiting for—introducing those beautiful frozen raspberries! Gently fold them into your dough with a spatula or wooden spoon. This step is not just about adding flavor; it’s also about ensuring that each cookie gets its fair share of those vibrant bursts of tartness we love so much. The raspberries will thaw slightly in the warm dough, releasing some juice which will infuse our cookies with even more flavor.
Be careful not to overmix at this stage either! You want those raspberry pieces to remain intact rather than disintegrating into mush. I always find it helpful to think of this as a gentle embrace rather than a vigorous shake—the goal here is unity without losing individuality! Once mixed, take a moment to admire your dough’s colorful speckles of red against its buttery yellow base; it’s like a canvas waiting to be transformed into art.
Step 7: Shaping Your Cookies
Next up, let’s shape these lovely blobs of dough into cookies that are ready for their sweet transformation in the oven. Using either a cookie scoop or two spoons (the latter being less uniform but perfectly acceptable), drop tablespoonfuls of dough onto your prepared cookie sheets spaced about two inches apart. This spacing is absolutely paramount because these cookies will spread as they bake; if they’re too close together, they’ll merge into one giant cookie—a delicious mistake but one you might not want today!
As you’re placing them on the sheet, feel free to give each mound an extra little pat down for uniformity—you want them to look inviting as they go into the oven! If you find that your hands are becoming sticky from working with this delightful dough (and trust me, they will), simply dust them lightly with flour—it works wonders! Plus, don’t forget: this dough is super forgiving; if you end up with somewhat misshapen cookies, don’t worry—they’ll still taste divine!
Step 8: Baking to Perfection
With everything set on your cookie sheets, slide them into that preheated oven and get ready for an aroma that will fill your kitchen like warm sunshine on a spring day! Bake these beauties for 14-16 minutes—keep an eye on them towards the end of this window. Visual cues are essential here: you’re looking for just a hint of golden brown around the edges while the centers should still appear slightly soft and puffy. They should no longer look shiny—that’s when you know they’re ready to come out.
Ovens can vary widely in temperature accuracy (I’ve had my fair share of surprises!), so if yours runs hot or cold, keep that in mind as you monitor your cookies. When they come out of the oven, allow them to sit on their sheets for about 10 minutes before transferring them onto wire racks—it’s during this cooling phase that they’ll continue setting up while still holding onto that delightful chewiness we adore. The patience required here will reward you tenfold when you bite into these decadent treats!
Final Touches
Step 9: Cooling and Storing
After allowing your raspberry lemon cookies some time to cool on the sheet—a crucial step because moving them too soon could lead to breakage—carefully transfer them onto wire racks using a spatula. This allows air circulation around all sides of each cookie so they can cool evenly without becoming soggy at the bottom—a fate none deserve! As they cool completely (which might feel like eternity because they smell so good), take a moment to admire your handiwork; these little treasures are truly extraordinary!
Once cooled completely (again with patience!), store any leftover cookies in an airtight container at room temperature where they’ll stay fresh for up to five days—if they last that long! Alternatively, if you’re feeling generous or want to save some for later indulgence (trust me—you’ll thank yourself!), pop them in the freezer where they’ll keep well for up to three months. Just remember to let them cool fully before freezing; nobody wants frostbitten cookies!
And there you have it—your homemade raspberry lemon cookies are now ready to be enjoyed by friends and family alike! Each bite offers an irresistible combination of tartness from those juicy raspberries paired with zesty lemon notes—it’s simply blissful! I promise you’ll find joy in every single crumb as these delightful bites melt in your mouth—a true testament to how wonderful homemade treats can be.
So gather around those who matter most or savor one alone with a cup of tea while basking in culinary glory—you deserve every morsel! Enjoy every bite knowing you’ve created something truly special from scratch with love. Happy baking!
Storage and Enjoyment Tips for Your Raspberry Lemon Cookies
Now that your kitchen is filled with the utterly intoxicating aroma of freshly baked Raspberry Lemon Cookies, it’s time to revel in the joy of enjoying them! But let’s talk about keeping this delightful treat fresh so you can savor every last crumb. Storing these cookies properly will ensure they remain as soft and chewy as the moment they came out of the oven, allowing you to indulge in their sweet-tart glory over several days or even weeks.
Storing Leftover Raspberry Lemon Cookies
To keep your Raspberry Lemon Cookies at their peak, I suggest placing them in an airtight container. This is absolutely paramount in preserving their soft texture and vibrant flavor. You can choose a sturdy plastic container or a glass jar with a tight-sealing lid—whatever makes you feel good about storing these little gems. Just be sure to keep them at room temperature, where they’ll stay perfectly delicious for up to five days. If you want a pro tip to keep them even fresher, consider adding a slice of bread to the container; trust me on this one! The moisture from the bread helps maintain that pillowy softness we all adore. After a day or two, you’ll find these cookies still bursting with flavor, providing that profoundly satisfying experience with each bite as if they just came out of the oven. If you’d like to enjoy them warm again, simply pop them in the microwave for about 10 seconds—they’ll quickly regain their melt-in-your-mouth quality!
Freezing Raspberry Lemon Cookies for Later
If you’re like me and love having a stash of goodies ready for unexpected guests (or just those late-night cravings), freezing your Raspberry Lemon Cookies is a fantastic option! Start by laying the cookies flat on a baking sheet lined with parchment paper and place them in the freezer until they’re firm—this usually takes about an hour. Once frozen solid, transfer them into a freezer-safe bag or container. They can stay happily frozen for up to three months! When you’re ready to indulge again, there’s no need to thaw; simply bake straight from frozen at 350 degrees F for an extra few minutes. This convenience factor is truly wonderful because you can whip up a fresh batch any time the mood strikes you—or when friends drop by unexpectedly—and enjoy that fresh cookie experience without much fuss!
Raspberry Lemon Cookies

Raspberry Lemon Cookies are the perfect blend of fruity freshness and zesty brightness, making them a delightful treat for any occasion. With their soft, chewy texture and vibrant flavors, these cookies transport you to sunny days filled with laughter and joy. Each bite delivers an explosion of juicy raspberries dancing harmoniously with tangy lemon, creating a refreshing experience that’s hard to resist. Ideal for sharing at gatherings or enjoying with a cup of tea, these cookies are sure to become a favorite in your baking repertoire. Easy to make and utterly delicious, get ready to impress friends and family with this scrumptious recipe!
- Prep Time: 15 minutes
- Cook Time: 16 minutes
- Total Time: 31 minutes
- Yield: Approximately 24 cookies 1x
- Category: Dessert
- Method: Baking
- Cuisine: American
Ingredients
- 1/2 cup unsalted butter, softened
- 1 cup granulated sugar
- 1 large egg
- 1/2 teaspoon vanilla extract
- Zest and juice from 1/2 lemon
- 1/4 teaspoon salt
- 1/4 teaspoon baking powder
- 1/8 teaspoon baking soda
- 1 1/2 cups all-purpose flour
- 3/4 cup frozen raspberries, coarsely chopped
Instructions
- Preheat your oven to 350°F (175°C) and line two cookie sheets with parchment paper.
- In a mixing bowl, cream together softened butter and sugar until light and fluffy.
- Add the egg, vanilla extract, lemon zest, and juice; mix until well combined.
- In another bowl, whisk together the flour, baking powder, baking soda, and salt.
- Gradually add the dry ingredients to the wet mixture; mix until just combined.
- Gently fold in the chopped frozen raspberries.
- Drop tablespoonfuls of dough onto prepared cookie sheets about two inches apart.
- Bake for 14-16 minutes or until edges are lightly golden; let cool on sheets before transferring to wire racks.
Nutrition
- Serving Size: 1 cookie (25g)
- Calories: 100
- Sugar: 9g
- Sodium: 55mg
- Fat: 4g
- Saturated Fat: 2g
- Unsaturated Fat: 2g
- Trans Fat: 0g
- Carbohydrates: 15g
- Fiber: <1g
- Protein: <1g
- Cholesterol: 15mg