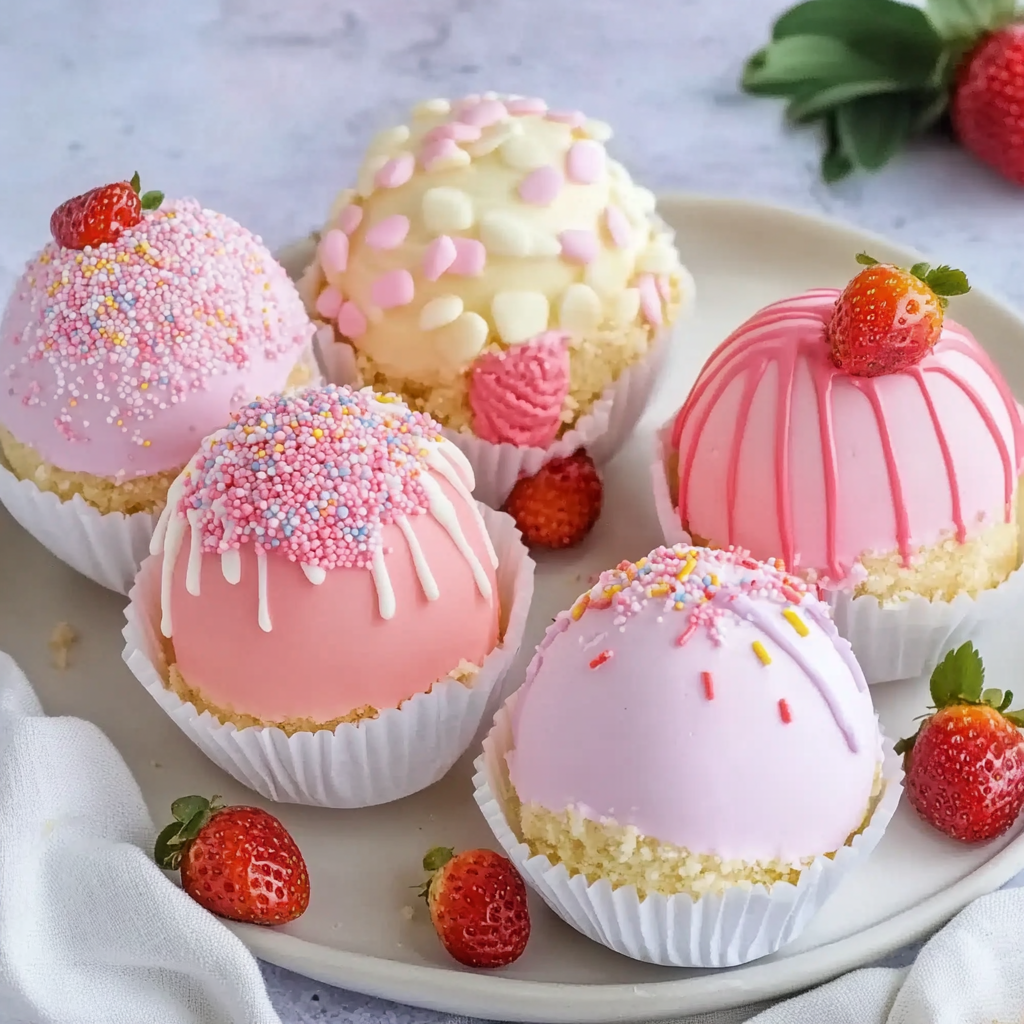
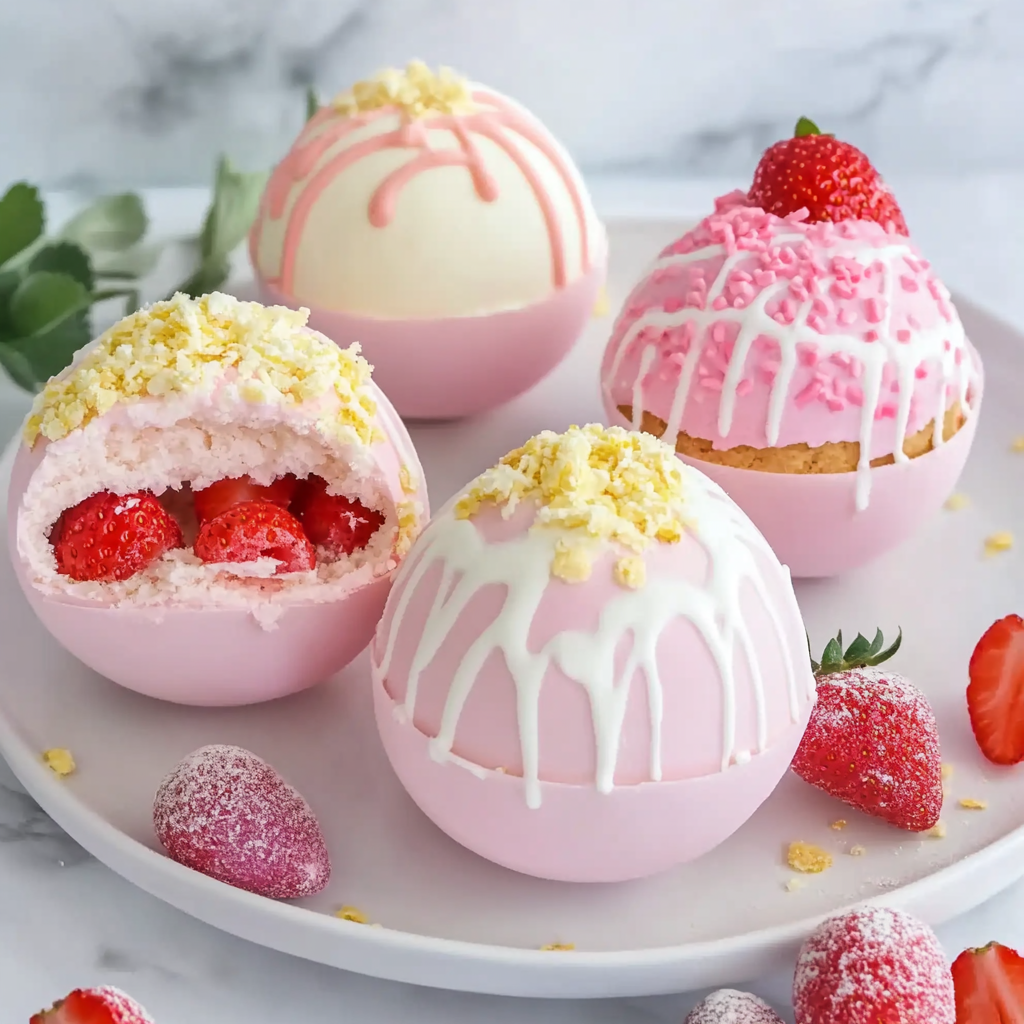
Strawberry Shortcake Easter Egg Bombs
As the blossoms of spring emerge, bringing with them the promise of renewal and joy, I find myself yearning for desserts that embody the spirit of the season. There’s something profoundly enchanting about creating treats that not only taste divine but also serve as a celebration of life’s little moments. One such delight is my Strawberry Shortcake Easter Egg Bombs. These whimsical bites are more than just dessert; they’re a playful reminder of childhood, filled with laughter, love, and the sweet fragrance of strawberries. Imagine breaking open a delicate white chocolate shell to reveal layers of airy whipped cream and tangy strawberry puree—it’s like unearthing a treasure crafted from nostalgia and creativity.
What makes these Strawberry Shortcake Easter Egg Bombs so special is their ability to bridge tradition with innovation. Inspired by the classic strawberry shortcake that graced our family gatherings, this recipe takes on a new form that is perfect for Easter celebrations or any springtime gathering. The vibrant colors and delectable flavors create a symphony of sensations that transport you back to those sun-drenched afternoons spent in the garden, picking ripe strawberries straight from the vine. Trust me when I say that every bite captures that essence, making it an experience rather than just a dessert. So roll up your sleeves, gather your loved ones, and let’s embark on this delightful culinary journey together!
Strawberry Shortcake Easter Egg Bombs: A Whimsical Springtime Treat
There’s something utterly captivating about desserts that surprise you—like these enchanting Strawberry Shortcake Easter Egg Bombs. They resemble beautifully crafted eggs but deliver a burst of nostalgic flavor in every bite. Imagine how thrilled your friends and family will be when they crack open their egg-shaped treats! With creamy strawberry goodness inside, these handheld delights are destined to become a favorite at any gathering or simply as a sweet indulgence enjoyed at home.
Ingredients:
As we dive into this delightful recipe, let’s take a moment to appreciate each ingredient that plays its part in creating these delicious bombs. Every single component has its own story and purpose in crafting this masterpiece.
- 1 cup white chocolate chips (Melted for coating). The allure of white chocolate lies in its creamy sweetness, which beautifully complements the bright flavors of strawberries. Melting these chips creates a luscious coating that hardens into a delicate shell around our dessert. When purchasing white chocolate chips, look for high-quality brands with cocoa butter as one of the first ingredients; this ensures a rich flavor and smooth texture. If you prefer a non-dairy option, there are excellent vegan white chocolate alternatives available now.
- 1 cup strawberries, pureed (Fresh strawberries, pureed). Fresh strawberries are the heart and soul of this recipe! Their natural sweetness and slightly tart flavor bring an irresistible brightness to our filling. When choosing strawberries, opt for those that are vibrant red, firm to the touch, and fragrant—they should smell like summer! Pureeing them allows their juices to mingle harmoniously with other ingredients, transforming them into an intoxicating strawberry sauce that’ll have everyone reaching for seconds.
- 1/2 cup heavy cream (Whipped until soft peaks form). This ingredient adds an airy lightness to our filling—it’s truly magical! Heavy cream contains enough fat to whip beautifully into soft peaks that hold their shape without being too stiff or heavy. When working with heavy cream, make sure it’s chilled; cold cream whips better and faster! If you’re looking for lighter options, coconut cream can also be whipped up similarly while adding a unique flavor twist.
- 1 teaspoon vanilla extract. Vanilla is like the magic wand in baking—it enhances all other flavors while adding its own warm undertones. A good quality vanilla extract made from real vanilla beans will provide depth and richness that imitation vanilla simply cannot match. Remember to pour it gently; this little splash is absolutely paramount in elevating your Strawberry Shortcake Easter Egg Bombs from great to extraordinary!
- 1/2 cup shortcake crumbs (For sprinkling inside and on top). These crumbs are essential for giving our egg bombs texture—a delightful crunch amidst the creamy filling! You can easily make your own shortcake using simple ingredients or even repurpose leftovers from another dessert if you happen to have them on hand. Just ensure they’re finely crumbled so they blend seamlessly into each bite while still providing contrast.
- 1 set Easter egg molds (For shaping the egg bombs). These molds are your faithful companions in shaping our whimsical treats! While any silicone mold could work here based on what you have available at home, those specifically designed for Easter eggs will give you that perfect shape we’re after—smooth edges and just the right size for filling with all those delicious flavors.
Equipment You’ll Need:
Cooking is always more enjoyable when you have the right tools at your fingertips! Here’s what you’ll need for crafting these charming Strawberry Shortcake Easter Egg Bombs.
- Mixing bowls – A sturdy set of mixing bowls is essential for combining ingredients smoothly without worrying about spills or messes along the way! Opt for glass or stainless steel ones since they’re durable and easy to clean.
- Spatula – A flexible spatula helps ensure every bit of your precious mixture is scraped from bowls into molds without wasting any deliciousness—trust me; you’ll want every last drop!
- Electric mixer – While you could whip by hand (and I commend anyone who does!), an electric mixer makes whipping cream effortless—turn it on low before escalating speed so you don’t end up wearing whipped cream!
- Silicone spatula – This handy tool makes folding ingredients together feel seamless; plus it’ll help prevent sticking when pouring mixtures into molds.
- Easter egg molds – As mentioned earlier, these molds are pivotal in shaping our egg bombs perfectly! Silicone works best here as it allows easy removal once set—nothing worse than struggling with rigid plastic!
Now that we’ve gathered all our gorgeous ingredients and equipment, let’s dive into preparing these delightful Strawberry Shortcake Easter Egg Bombs!
Step 1: Melt That White Chocolate
Begin by placing your white chocolate chips in a microwave-safe bowl or using a double boiler if preferred—I personally love watching my chocolate melt slowly over gentle heat because it feels almost therapeutic! Microwave in 30-second intervals until just melted; stir between each interval until smooth as silk forms under your spoon’s gentle embrace—this process guarantees even melting without overheating which can cause seizing (a total bummer!). Trust me on this: temperamental melted chocolate is nothing but trouble! Once silky perfection is achieved, allow it to cool slightly before moving onto molding.
Step 2: Coating Your Molds
Now comes one of my favorite parts—the transformation begins! Take your cooled melted white chocolate and start drizzling it generously inside each cavity of your Easter egg mold using either a spoon or brush; make sure every nook gets coated evenly—that thick layer will create that coveted shell we adore! It’s crucial not to rush this step; allow some time for it all to settle before adding another coat if needed—two coats usually yield optimal results ensuring durability yet delicacy when cracking open later.
Step 3: Chill Out!
Once you’ve completed coating all cavities—and perhaps licked some melted chocolate off your fingers (I won’t tell!)—it’s time for chilling magic! Pop those molds into the refrigerator for about 15 minutes until set firm enough so they won’t collapse upon removal later—no one enjoys sad sagging eggs after all! This brief waiting period also gives us time to prepare our scrumptious filling while eagerly anticipating what awaits us next!
Step 4: Create That Creamy Filling
While awaiting our shells’ completion, we’ll focus on whipping up an utterly intoxicating creamy filling loaded with fresh strawberry puree goodness alongside lightly whipped heavy cream mixed gently together with just enough vanilla extract enhancing everything beautifully—it’s truly heavenly! Start by pureeing fresh strawberries until smooth—you want their juices flowing freely so they meld beautifully with airy clouds created during whipping process—combine both components carefully avoiding deflation at all costs as we aim for lightness here folks!
As we continue crafting these lovely Strawberry Shortcake Easter Egg Bombs step by step together through subsequent stages ahead—it becomes clearer why patience pays off wonderfully within culinary adventures filled with joy collaboration!
Step 5: Crafting the Egg Shells with a Touch of Magic
Now that you have your luscious white chocolate melted and ready to go, it’s time to create the beautiful egg shells that will encase the delightful strawberry shortcake filling. Begin by carefully pouring about one tablespoon of the melted white chocolate into each half of your Easter egg mold. This step is so crucial because it creates a solid foundation and a barrier that will hold all the magic inside. Using the back of a spoon or a pastry brush, spread the chocolate evenly across the inner surface of each mold half, ensuring that every inch is coated. You want this layer to be thick enough to hold up against the filling but not so thick that it becomes hard to bite into later—aim for about 1/8 inch thickness.
Once you’ve coated all your molds, it’s time for a little patience as we chill these beauties. Place them in the refrigerator for at least 15-20 minutes until they are set and firm to the touch. This chilling process is absolutely paramount; it not only helps the chocolate harden nicely but also enhances its snap when you eventually take a bite. While you wait, indulge in the heavenly aroma wafting from your kitchen—trust me, it’s a prelude to some serious deliciousness! When you remove them from the fridge, they should feel solid yet slightly pliable; if they seem too soft or sticky, don’t hesitate to pop them back in for another few minutes.
Step 6: Whipping Up That Heavenly Strawberry Cream
While your chocolate shells are setting beautifully, let’s turn our attention to that utterly intoxicating strawberry cream filling. In a mixing bowl, pour in your heavy cream and add one teaspoon of vanilla extract—this simple addition works wonders! Using an electric mixer on medium speed, whip the cream until soft peaks form; this typically takes about 3-5 minutes. Remember, you’re looking for that perfect balance here—you want it airy and fluffy but still stable enough to hold its shape when we combine it with our strawberry puree later on.
As you whip away, keep an eye on those peaks! They should form gently and hold their shape without collapsing back into themselves; if you see any liquid pooling at the bottom of your bowl, you might need to whip just a tad longer. Once you achieve those soft peaks, fold in your previously prepared strawberry puree gently using a spatula—this is where the magic really happens! The key here is to be gentle yet thorough; folding helps maintain the lightness of your whipped cream while incorporating those vibrant flavors seamlessly. I promise you, this filling will transport you straight into strawberry shortcake heaven!
Step 7: Bringing It All Together with Shortcake Crumbs
Now comes my favorite part: assembling everything into those beautiful egg molds! Carefully remove your chilled chocolate shells from their molds—if they resist at all, simply warm them slightly by holding them in your hands for a moment. You want them to come out effortlessly without cracking; this delicate maneuver requires patience but is so worth it when done right! Once they’re free from their molds, lay them open on a clean surface.
Begin by sprinkling about one teaspoon of shortcake crumbs inside each half of your egg shell. This sprinkle adds texture and flavor that complements our creamy filling beautifully while preventing it from becoming too soggy—a little science lesson on moisture balance there! Next, spoon in some of your heavenly strawberry cream mixture until each shell is filled almost to the top—leave just enough room for another sprinkle of shortcake crumbs for that final flourish. Trust me on this layering technique; it guarantees every bite is packed with flavor and texture that dances across your palate.
Step 8: Sealing Your Sweet Surprise
After generously filling each egg half with that luscious strawberry cream and topping it off with more shortcake crumbs, we need to seal these beauties up! Carefully take another spoonful of melted white chocolate and drizzle it over the filled halves before gently pressing two halves together to form complete eggs. This step is where things get magical—the warm chocolate acts like glue, holding everything together while contributing even more rich flavor.
You’ll want to ensure there’s no gap between the two halves—press gently but firmly until they connect well, creating an airtight seal around all that delightful filling inside. Now comes another round of chilling; place these assembled egg bombs back in the refrigerator for at least another 30 minutes. This chilling period allows everything to set perfectly—the chocolate shell firms up around that delicious creamy center while marrying all those fantastic flavors together into one harmonious bite. The anticipation builds during this waiting game—it’s truly extraordinary how something so simple can become such an enchanting treat!
Conclusion:
As we wrap up this delicious journey through making Strawberry Shortcake Easter Egg Bombs, I can’t help but feel a sense of joy at sharing this recipe with you. From the moment you mix those fresh strawberries into creamy perfection to watching as the chocolate coating hardens into a beautiful shell, every step is filled with anticipation and delight. This dessert isn’t just about flavors; it’s about bringing happiness into our lives through simple yet profound ingredients: sweet strawberries harmonizing beautifully with rich white chocolate and fluffy whipped cream creates an experience that’s truly extraordinary.
This recipe is a must-try not only for its taste but also for the sheer joy of creating something so whimsical and fun! It’s perfect for Easter celebrations or any spring gathering where laughter fills the air and smiles are abundant. Imagine pulling these charming egg bombs from your fridge or freezer; they become instant conversation starters as everyone gathers around excitedly waiting to take that first bite. The experience of making these treats can be just as enjoyable as eating them—so gather your loved ones, share stories while you create together, and watch as smiles light up all around.
Pairing suggestions are endless with these delightful goodies! Imagine savoring one alongside a steaming cup of coffee in the morning or enjoying one after dinner with friends over tea—it becomes a moment worth cherishing. For an afternoon pick-me-up, serve them alongside some fresh fruit—a medley of berries would complement their flavor beautifully! And if you’re feeling indulgent, why not drizzle some extra melted white chocolate on top just before serving? For a truly decadent experience that will leave everyone asking for seconds (or thirds), consider pairing them with a scoop of vanilla coconut ice cream; oh my goodness, it’s pure bliss!
Feeling adventurous? This recipe is wonderfully adaptable! You could swap out strawberries for ripe peaches or blueberries if you’re looking to change things up—each fruit brings its unique charm while still capturing that beloved shortcake essence which makes this dessert sing! Wanting to add an aromatic twist? A hint of lemon zest mixed into your whipped cream can elevate this dish to new heights! As you experiment with flavors and adaptations, I invite you to share your experiences with me; let’s connect through our culinary adventures! Your creativity could inspire others just like this recipe inspired me!
Strawberry Shortcake Easter Egg Bombs
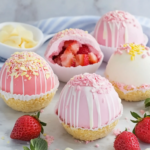
Indulge in the playful delight of Strawberry Shortcake Easter Egg Bombs, a whimsical treat that captures the essence of springtime celebrations. These delightful desserts feature a delicate white chocolate shell filled with luscious whipped cream and tangy strawberry puree, all layered with crunchy shortcake crumbs for added texture. Perfect for Easter festivities or any joyful gathering, these egg-shaped confections not only evoke childhood memories but also offer a fun surprise in every bite. Gather your loved ones and embark on this delightful culinary adventure that promises to bring smiles all around.
- Prep Time: 30 minutes
- Cook Time: 15 minutes
- Total Time: 45 minutes
- Yield: Makes approximately 6 servings 1x
- Category: Dessert
- Method: Chilling
- Cuisine: American
Ingredients
- 1 cup white chocolate chips (melted for coating)
- 1 cup fresh strawberries (pureed)
- 1/2 cup heavy cream (whipped until soft peaks form)
- 1 teaspoon vanilla extract
- 1/2 cup shortcake crumbs
- Easter egg molds
Instructions
- Melt white chocolate chips using a microwave or double boiler until smooth.
- Coat the inside of Easter egg molds with melted white chocolate, ensuring an even layer. Chill for about 15 minutes until set.
- In a mixing bowl, whip heavy cream and vanilla extract until soft peaks form. Gently fold in the strawberry puree.
- Once the chocolate shells are set, sprinkle shortcake crumbs inside each half, fill with strawberry cream mixture, and top with more crumbs.
- Seal the egg halves together with melted white chocolate and chill for another 30 minutes before serving.
Nutrition
- Serving Size: 1 egg bomb (45g)
- Calories: 180
- Sugar: 12g
- Sodium: 15mg
- Fat: 9g
- Saturated Fat: 5g
- Unsaturated Fat: 4g
- Trans Fat: 0g
- Carbohydrates: 23g
- Fiber: 1g
- Protein: 2g
- Cholesterol: 15mg