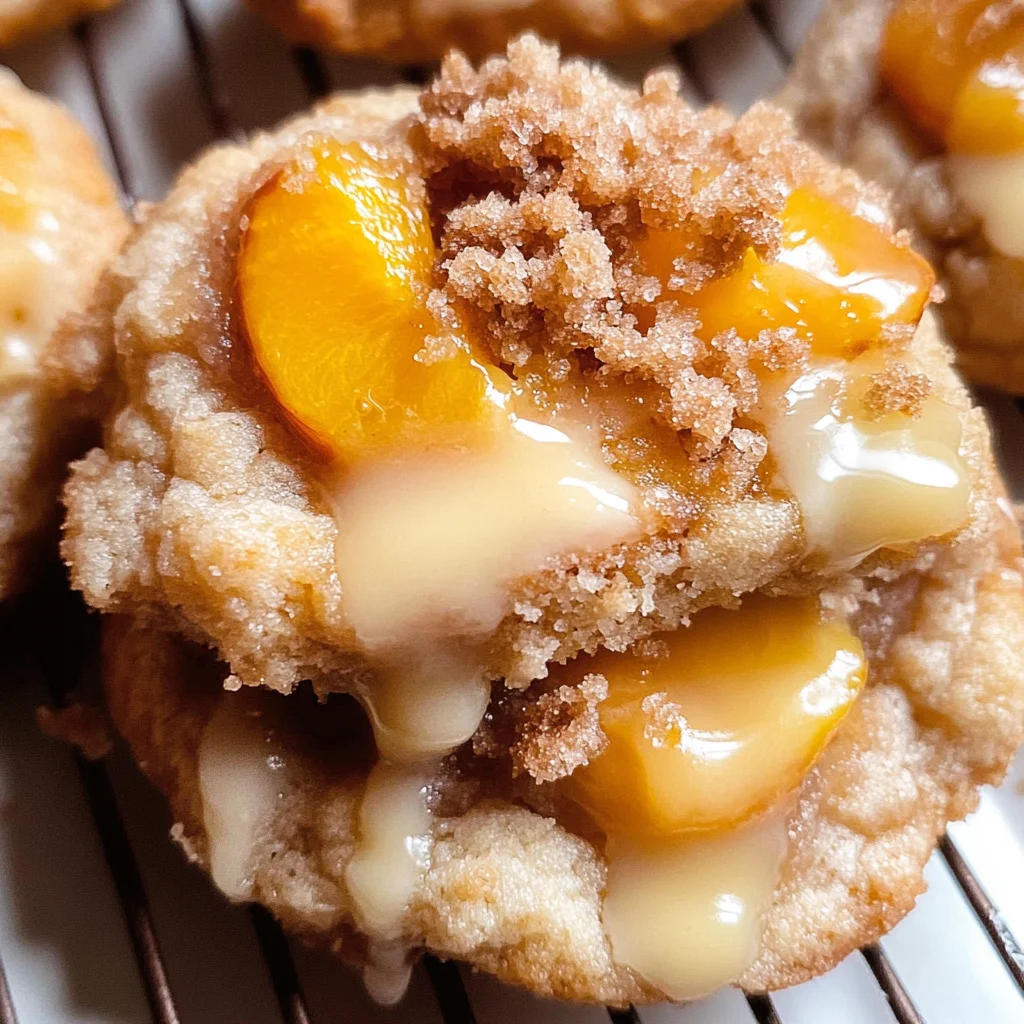
Peach Cobbler Cookies
There’s something deeply enchanting about the simple act of baking — it’s more than just combining ingredients; it’s a dance of flavors, a celebration of tradition, and, when done right, an unforgettable experience that lingers long after the last crumb has been enjoyed. Today, I’m thrilled to share with you my cherished recipe for Peach Cobbler Cookies. Imagine biting into a warm, chewy cookie that bursts with the sweet essence of ripe peaches and is embraced by a buttery crumble on top. Trust me when I say that these cookies are not just treats; they’re little bites of summer sunshine, bringing joy to every occasion they grace.
Baking these Peach Cobbler Cookies is like revisiting fond memories spent with family during lazy afternoons in the sun. Each step is infused with love and nostalgia as we transform fresh peaches into a delightful jammy filling nestled within a soft cookie. The combination of warm spices and the rich sweetness of brown sugar creates an utterly intoxicating aroma that wafts through your kitchen, inviting everyone to gather around. These cookies encapsulate everything we adore about summer desserts — they’re fun to make, perfect for sharing, and incredibly satisfying. So grab your apron; let’s embark on this delicious journey together!
Ingredients:
As we dive into this culinary adventure together, let’s take a moment to appreciate each ingredient that will help us craft these delightful Peach Cobbler Cookies. Each one plays a crucial role in creating that perfect balance of flavor and texture.
- 1 1/2 cups fresh diced peaches: Fresh peaches are truly the star of this recipe! Their natural sweetness and juicy essence infuse our cookies with vibrant flavor. When choosing peaches, look for ones that are slightly soft to the touch but still firm enough to hold their shape when diced. If fresh peaches aren’t available, you can use frozen or canned peaches—just make sure they’re drained well to avoid excess moisture.
- 2 tbsp granulated sugar: This humble ingredient helps draw out the natural juices from the peaches while also enhancing their sweetness. It acts as a catalyst in our filling mixture, making those gorgeous peach flavors pop! You can use less if your peaches are particularly sweet; however, don’t skip this step altogether as it balances out the acidity.
- ½ tsp ground cinnamon: Cinnamon adds warmth and depth to our peach filling, creating that nostalgic cobbler flavor we all love. It beautifully complements the sweetness of the peaches and rounds out the overall taste profile. I often find myself reaching for cinnamon in various recipes because it has an incredible ability to make everything feel cozy.
- ½ tsp lemon juice: A splash of lemon juice brightens up our peach filling by adding acidity, which enhances all those lovely peach flavors while keeping them from becoming overly sweet. It’s crucial because without it, the filling could taste flat! If you have fresh lemons on hand, go ahead and squeeze some juice right into your mixture—it makes all the difference.
- Pinch of fine sea salt: Salt is essential in baking; it enhances flavors and balances sweetness. Just a pinch elevates our peach cobbler filling from good to extraordinary! Remember, too much salt can overpower your dessert—but just enough brings all those flavors together harmoniously.
- 1 tsp cornstarch: Cornstarch acts as a thickening agent for our peach filling when cooked. It ensures our filling has that perfect jammy texture without being overly runny—nobody wants soggy cookies! If you’re looking for alternatives due to dietary restrictions or preferences, arrowroot powder works wonderfully too.
- 1 tsp water: Mixing cornstarch with water creates a slurry that helps thicken our peach mixture without clumping. This step is crucial; when added correctly, it smooths out any potential lumps in your sauce while ensuring even distribution throughout.
- 7 tbsp unsalted butter (room temperature): Butter brings richness and flavor to our cookies while also contributing to their delightful texture. Using room-temperature butter is non-negotiable here because it creams better with sugars—this process incorporates air into the dough resulting in tender cookies.
- 3.5 oz cream cheese: Cream cheese adds moisture and richness along with a subtle tang that balances sweetness beautifully in our cookie dough. Ensure it’s at room temperature too; this allows for seamless incorporation into your batter without any lumps!
- 1/2 cup granulated sugar: This sugar helps create a chewy cookie base by contributing sweetness while aiding in structure development during baking—a fundamental aspect for achieving those fluffy textures.
- 1/2 cup light brown sugar (packed): Brown sugar introduces caramel notes and moisture thanks to its molasses content! This not only enhances flavor but also contributes softness—making every bite melt-in-your-mouth delightful.
- 1 whole large egg (room temperature): Eggs act as binders for our cookie dough while providing structure and moisture—this is vital for achieving perfectly chewy cookies! Room temperature eggs emulsify better with other ingredients; trust me here!
- 1 large egg yolk (room temperature): Adding an extra egg yolk enriches the dough further by bringing additional fat which yields even softer cookies—a true secret weapon in baking!
- 1 teaspoon vanilla extract: Vanilla adds warmth and depth of flavor that’s simply irresistible! It’s another layer of complexity that turns ordinary cookies into extraordinary delights—don’t skimp on quality here!
- 1 3/4 cup all-purpose flour (see notes below for measuring): Flour provides structure by forming gluten when mixed—this gives our cookies their chewy texture! When measuring flour, I recommend spooning it into your measuring cup rather than scooping directly from the bag; this prevents packing too much flour which can lead to dry cookies.
- 2 teaspoon baking powder: Baking powder serves as our leavening agent making sure we achieve those beautifully puffed cookies—we want them soft yet stable enough to hold up under all that deliciousness!
- ¼ teaspoon salt: Just like before, this tiny amount ensures balance within our cookie dough enhancing all other flavors present!
- 1/2 cup coarse cane sugar (for rolling): Coarse cane sugar not only adds texture but offers an appealing crunch outside each cookie—the contrast between soft interiors and slightly crispy exteriors makes every bite much more exciting!
- 3/4 tsp ground cinnamon (for rolling): Rolling these cookies in cinnamon-sugar before baking gives them an extra punch of flavor while elevating their visual appeal! Who can resist that inviting aroma?
- 4 tbsp unsalted butter (melted): Melted butter binds crumbs together seamlessly allowing us to create that streusel topping which adds both crunchiness & richness atop each cookie!
- 1/4 cup light brown sugar (packed): Brown sugar here contributes moisture & slight caramelization during baking—it caramelizes beautifully offering deeper flavors as well!
- 1 tbsp granulated sugar: Just a touch more sugar enhances sweetness within our crumb topping ensuring it’s deliciously irresistible!
- 1/2 cup all-purpose flour: Just like before—flour forms structure & stability within crumb topping ensuring it holds together nicely without falling apart during baking process.
- 3/4 tsp ground cinnamon: More cinnamon means more deliciousness! Here again it’s added specifically for flavor enhancement giving depth & warmth throughout entire dish—not just limited solely within cookie dough itself!
- 1 cup powdered sugar: Powdered sugar forms an incredible glaze atop finished cookies imparting sweetness & stunning aesthetic appeal once drizzled over top!
- 1–2 tbsp whole milk: Milk thins out glaze allowing us drizzle evenly across surface area—it should be creamy yet pourable consistency; add gradually until desired thickness achieved.
- 1 tsp vanilla extract: Another splash of vanilla ties everything back together harmoniously providing familiar comforting notes throughout entire dish experience leaving tastebuds delighted!
Equipment You’ll Need:
Before we dive headfirst into mixing up this delightful batch of Peach Cobbler Cookies, let’s take stock of some essential tools you’ll need along the way! Having these trusty partners at your side will make your baking experience smoother and infinitely more enjoyable—trust me on this one!
- Mixing bowls – A good set of mixing bowls in various sizes is vital; they’ll serve multiple purposes from whisking together dry ingredients to creaming butter and sugars smoothly without splattering everywhere! Opt for glass or stainless steel since they’re durable & easy-to-clean options worth investing in.
- Measuring cups & spoons – Precision matters immensely when baking so having accurate measuring tools at hand ensures everything comes out just right! Invest in both dry measuring cups (for flour) & liquid measuring cups (for milk)—each designed specifically for their respective tasks will guarantee consistent results time after time.
- Hand mixer or stand mixer – While you could certainly mix everything by hand using elbow grease alone—it’s far easier (and quicker!) using an electric mixer instead! A stand mixer does wonders especially with creaming butter perfectly fluffy which sets up ideal textures later on—if you don’t own one yet consider adding this essential tool into your kitchen arsenal soon!
Step 1: Cooking Down Those Juicy Peaches
Begin by combining your fresh diced peaches with granulated sugar, ground cinnamon, lemon juice, and fine sea salt in a medium-sized pot over medium heat. As you watch them cook away—give yourself permission to get lost in those delightful aromas wafting through your kitchen! You’ll want to stir occasionally while letting them simmer until they become juicy and start thickening up—a process likely taking around 15–20 minutes depending on ripeness levels encountered among chosen fruit varieties. Once they’re soft enough where mashing yields small jammy bits easily attained using fork or potato masher—it should resemble something akin dreamy compote perfection! At this point stir in cornstarch slurry prepared beforehand using equal parts cold water mixed until smooth—cooking another couple minutes longer allows mixture settle nicely before transferring everything over onto clean cooled bowl reserved earlier onward till cooled completely down prior moving forward next steps later down road towards assembling final masterpiece ahead!
Step 2: Creaming Butter & Sugar
In another large mixing bowl or stand mixer fitted with paddle attachment(s), cream together softened unsalted butter alongside cream cheese until both form light fluffy consistency—that’s what we’re aiming for here folks! This step known as creaming creates air pockets within mixture leading towards tender-textured outcome upon completion stage later awaiting eagerly so don’t rush through this crucial phase either please okay? Once you’ve achieved desired fluffiness factor add granulated sugar followed closely behind by packed light brown sugar mixing thoroughly until fully incorporated—the resulting combination should be pale golden hue showcasing successful blend happening right before eyes now isn’t that lovely? Next beat in whole egg alongside additional egg yolk along with tablespoonfuls worth vanilla extract until everything melds beautifully together forming luscious batter awaiting subsequent ingredient additions shortly thereafter too…
Step 3: Combining Dry Ingredients
Now let’s shift gears slightly shall we? In separate bowl sift together measured amounts from both all-purpose flour alongside baking powder plus finishing touches via sprinkling remaining pinch worth fine sea salt evenly across surface area ensuring proper distribution occurs throughout blending process thereafter leading down path toward success straight ahead into glorious baked goods realm ahead waiting patiently just beyond horizon ready greet us warmly once completed successfully later down line eventually… Gently fold dry ingredients mixture directly into previously creamed concoction until no flour streaks remain visible but avoid overmixing please okay? Gentle folding technique keeps gluten formation minimal leading towards ideal chewy texture expected from final product outcomes anticipated shortly thereafter once baked properly within oven above ours waiting patiently…
Step 4: Chilling Dough For Perfect Texture
After mixing everything well enough now comes critical part involving patience—you must chill dough inside refrigerator briefly spanning thirty minutes approximately might feel lengthy but trust me folks—it’s absolutely paramount if want achieve desired results here today successfully too okay? Cooling solidifies fats preventing excessive spreading during bake times ultimately yielding thicker plump shapes instead flat pancakes instead… Take advantage downtime wisely catching up on favorite show perhaps grabbing snack prepping trays lined parchment paper ready prepped beforehand allowing quick transitions later going back forth between stages smoothly without delays occurring unnecessarily hindering progress made thus far…
I can assure you dear friend—you’re doing wonderfully already just getting started here today so keep pushing through each step knowing ultimate rewards await once emerge victorious later upon completion ahead shortly thereafter soon enjoy flavorful creations produced lovingly hearts inspired kitchens everywhere abound round globe beckoning eager taste buds everywhere yearning satisfy cravings galore!! Stay tuned always more coming right after break ahead friends see ya shortly!!
Step 5: Chilling the Dough for Perfect Texture
Now that you’ve mixed your ingredients into a beautifully cohesive dough, it’s time to give it a little time in the fridge. Trust me on this step; chilling the dough is absolutely paramount to achieving that delightful chewy texture we all adore. By resting the dough for about 30 minutes, you allow the gluten in the flour to relax, which will lead to cookies that spread just right when they hit the oven. An overly warm dough can result in sad, flat cookies that sacrifice flavor and texture for quickness.
As you wait patiently, picture those luscious peach cobbler flavors melding with each other, just waiting to burst forth onto your taste buds. It’s during this time that the sugars also have a chance to soak into the flour, creating a richer flavor profile. You might want to use this time to wash up your mixing bowls or even sneak a taste of that irresistible peach filling—go ahead, I won’t tell!
Step 6: Rolling in Cinnamon Sugar
After you’ve given your dough its well-deserved chill, it’s time for one of my favorite parts: rolling those cookie balls in cinnamon sugar! Combine ½ cup of coarse cane sugar with ¾ teaspoon of ground cinnamon in a small bowl. This simple mixture is like a warm hug from grandma; it adds an enchanting sweetness and a lovely aromatic spice that makes every bite sing with joy.
Using a cookie scoop (or simply your hands), scoop out about two tablespoons of dough and roll it into perfect little balls. Don’t rush this step; aim for uniformity so they bake evenly. Once you’ve rolled all your dough balls, gently toss them into your cinnamon-sugar mixture until they are fully coated. The sugar not only enhances the flavor but also creates a slight crunch on top, which perfectly contrasts the soft interior. Place these sugary gems on a parchment-lined tray, leaving ample space between each ball—about 1-2 inches apart will do just fine! This spacing allows them to spread without merging into one big cookie.
Step 7: Indenting and Filling with Peach Goodness
Now comes the transformative moment where we take these adorable cookie balls and turn them into vessels of peachy delight! With the back of a round measuring spoon (or any small rounded tool), gently press down in the center of each cookie ball to create an indentation; this is where your peach cobbler filling will nestle beautifully. Don’t worry if they crack slightly around the edges—that’s normal and adds character!
Speaking of filling, once you’ve made those indents, it’s time to spoon in that luscious peach cobbler filling you prepared earlier—a heaping teaspoon per cookie should do nicely! This filling is what makes these Peach Cobbler Cookies truly extraordinary; it’s like capturing summer in each bite! The sweet peaches mixed with cinnamon create an utterly intoxicating aroma that will have everyone swooning as they waft through your kitchen. After filling them up generously, pop your tray back in the freezer for at least 3-4 hours—overnight is even better if you can wait! Freezing helps solidify everything so that when they bake, they maintain their shape while allowing that delicious filling to bubble up just right.
Step 8: Preheating and Baking Perfection
Once your cookies have chilled and firmed up beautifully in the freezer, it’s time to preheat your oven to 350°F (180°C). This temperature is crucial because it ensures that when those cookies hit the heat, they’ll rise perfectly while still keeping that soft center we’re all dreaming about. While you’re waiting for your oven to reach temperature—a process that usually takes about 10-15 minutes—let’s prepare for our crumb topping.
Combine melted butter, light brown sugar, granulated sugar, flour, and ground cinnamon until crumbs form—a delightful mixture reminiscent of streusel topping on pies. You’ll want those crumbs to be quite crumbly but cohesive enough to hold together when pressed onto our cookies later. Bake these crumbs on a parchment-lined baking sheet for about 12-15 minutes or until they’re gloriously golden brown; keep an eye on them because every oven behaves differently! Once they’re done baking, let them cool completely before breaking them into smaller pieces—these crumbs are going to add such delightful texture and flavor on top of your cookies.
When you’re ready to bake those filled cookie dough balls, place them spaced out on another parchment-lined tray (2-3 inches apart). Bake for about 12-13 minutes; you’ll know they’re ready when their edges are set but their centers still look soft—it’s okay if they don’t look fully baked yet because they’ll continue cooking from residual heat once removed from the oven! Keep an eye out because overbaking can lead you away from that wonderfully chewy texture we’re aiming for.
Conclusion:
As we wrap up our journey through this recipe for peach cobbler cookies, I can’t help but feel thrilled sharing such a special treat with you! From the moment those fragrant peaches begin bubbling with sugar and cinnamon on your stove, you’re embarking on an experience that celebrates every essence of summer. The blend of chewy brown sugar cookie meets that jammy peach filling topped with crunchy crumble creates what I can only describe as a symphony of flavors—each bite is profoundly satisfying and utterly intoxicating.
This recipe is more than just something delicious; it’s an invitation to create memories. Whether it’s a sunny afternoon gathering with friends or simply needing a sweet pick-me-up after a long day, these peach cobbler cookies are sure to impress. Picture pulling them from the oven—the golden edges slightly crisp while the center remains soft—and watching your loved ones’ faces light up as they take that first bite. It’s one of those moments that makes cooking so rewarding!
Speaking of moments—imagine savoring one alongside your favorite cup of coffee or tea; it’s like wrapping yourself in warmth on a cool evening. For an afternoon pick-me-up, serve them with fresh whipped cream or perhaps alongside vanilla ice cream for that delightful contrast between warm and cold—a truly decadent experience! They also shine at potlucks or family gatherings where everyone will be clamoring for seconds.
Feeling adventurous? This recipe is wonderfully adaptable! You could experiment by adding chopped nuts for added crunch or swapping out the peaches for juicy blueberries or tart cherries if that’s what tickles your fancy. Wanting more spice? A dash of nutmeg would elevate this cookie’s flavor profile beautifully! I encourage you to make this recipe your own—try new things and see what magic happens in your kitchen. And when you do make it—or if you’ve already fallen in love with it—I would absolutely adore hearing about your experiences. Share your stories and connect; let’s celebrate this joyous journey together!
Peach Cobbler Cookies

Peach Cobbler Cookies are a delightful fusion of chewy cookies and sweet, jammy peach filling, topped with a buttery crumble. These treats capture the essence of summer in every bite, making them perfect for sharing at gatherings or enjoying with a cup of coffee at home. With a warm aroma of cinnamon and the richness of brown sugar, these cookies not only satisfy your sweet cravings but also evoke cherished memories. They are easy to make and offer endless variations—whether you want to add nuts or substitute fruits, these cookies are sure to impress.
- Prep Time: 30 minutes
- Cook Time: 20 minutes
- Total Time: 50 minutes
- Yield: Approximately 24 servings 1x
- Category: Dessert
- Method: Baking
- Cuisine: American
Ingredients
- 1 1/2 cups fresh diced peaches
- 2 tbsp granulated sugar
- ½ tsp ground cinnamon
- ½ tsp lemon juice
- Pinch of fine sea salt
- 1 tsp cornstarch
- 1 tsp water
- 7 tbsp unsalted butter (room temperature)
- 3.5 oz cream cheese
- 1/2 cup granulated sugar
- 1/2 cup light brown sugar (packed)
- 1 whole large egg (room temperature)
- 1 large egg yolk (room temperature)
- 1 teaspoon vanilla extract
- 1 3/4 cup all-purpose flour
- 2 teaspoon baking powder
- ¼ teaspoon salt
- 1/2 cup coarse cane sugar (for rolling)
- 3/4 tsp ground cinnamon (for rolling)
- 4 tbsp unsalted butter (melted)
- 1/4 cup light brown sugar (packed)
- 1 tbsp granulated sugar
- 1/2 cup all-purpose flour
- 3/4 tsp ground cinnamon
- 1 cup powdered sugar
- 1–2 tbsp whole milk
- 1 tsp vanilla extract
Instructions
- Cook diced peaches with granulated sugar, cinnamon, lemon juice, and salt in a medium pot over medium heat until thickened.
- In a separate bowl, cream together butter and cream cheese until fluffy. Gradually add sugars, then mix in eggs and vanilla.
- Combine dry ingredients (flour, baking powder, salt) in another bowl and fold into the wet mixture until just combined.
- Chill dough for 30 minutes in the refrigerator.
- Roll chilled dough into balls, coat with cinnamon-sugar mixture, and create an indentation for the peach filling.
- Fill indents with cooled peach mixture and freeze for 3–4 hours.
- Preheat oven to 350°F (180°C) and bake cookies for 12–13 minutes until edges are set.
Nutrition
- Serving Size: 1 cookie (40g)
- Calories: 170
- Sugar: 10g
- Sodium: 50mg
- Fat: 7g
- Saturated Fat: 4g
- Unsaturated Fat: 2g
- Trans Fat: 0g
- Carbohydrates: 25g
- Fiber: 1g
- Protein: 2g
- Cholesterol: 30mg