Melt In Your Mouth Caesar Chicken
There’s something undeniably magical about cooking that transcends mere sustenance; it’s an experience that weaves together memories, emotions, and a sense of belonging. As I think about my journey in the kitchen, one recipe that truly stands out is my Melt In Your Mouth Caesar Chicken. This dish is not just another meal—it’s a rich tapestry of flavors that hugs you with warmth and comfort. The creamy, luscious sauce enveloping tender chicken breasts creates a delightful harmony that dances on your palate, whispering promises of satisfaction with every bite. Imagine pulling this golden-brown beauty from the oven, its aroma filling the air like a soft embrace, making your heart flutter with anticipation. This recipe is a bridge between tradition and innovation, inviting you to gather around the table with loved ones while creating new stories over dinner.
Now, you might wonder why this particular dish holds such a special place in my heart. Perhaps it’s the nostalgia of family dinners where laughter echoed through the kitchen as we shared our day’s adventures over heaping plates of food. Or maybe it’s the sheer ease of preparation that makes cooking feel less like a chore and more like an opportunity for creativity. What’s truly extraordinary about Melt In Your Mouth Caesar Chicken is its adaptability; it seamlessly fits into both casual weeknight dinners and festive gatherings alike. Whether paired with pasta, rice, or roasted vegetables, it transforms any meal into an occasion worth celebrating. And trust me when I say, once you’ve tasted this creamy delight, you’ll be marking it as a staple in your culinary repertoire.
Melt In Your Mouth Caesar Chicken: A Creamy Delight You Can’t Resist
As we embark on this flavorful journey together with Melt In Your Mouth Caesar Chicken, let me assure you: you’re in for a treat! This recipe brings together simple ingredients to create something profoundly satisfying—a true testament to how comfort food can also be elegant. The rich creaminess from both the Caesar dressing and sour cream perfectly complements the juiciness of the chicken breasts while the parmesan cheese adds a nutty depth that elevates every mouthful. So, roll up those sleeves and let’s dive into this culinary adventure!
Ingredients:
Before we get started on our Melt In Your Mouth Caesar Chicken masterpiece, let’s take a moment to appreciate each ingredient that will play a vital role in creating this dish. Each component contributes its own unique character and flavor profile, coming together to form something utterly intoxicating.
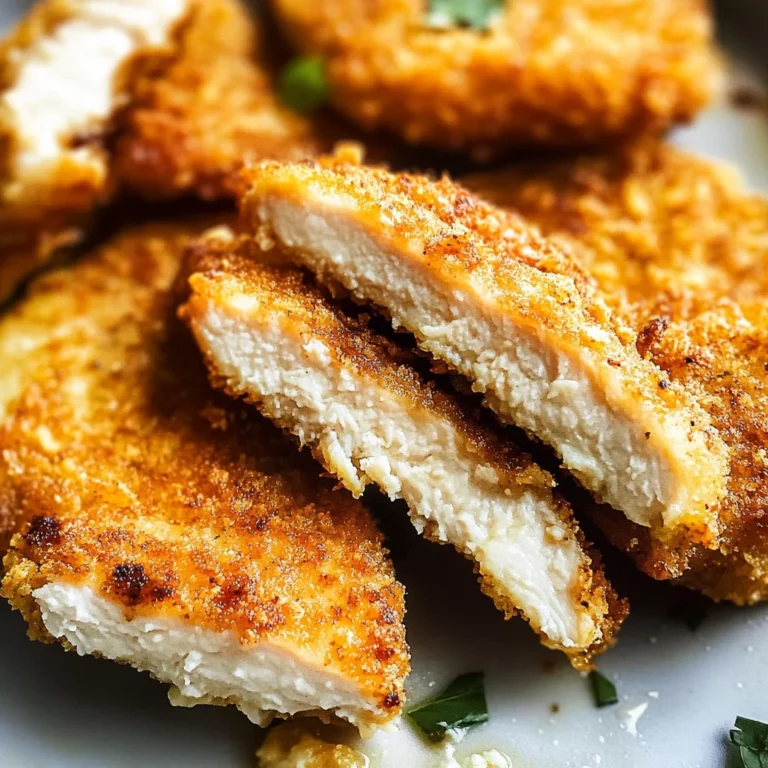
- 4 boneless skinless chicken breasts. The star of our show! Choosing high-quality chicken breasts is absolutely paramount for achieving that melt-in-your-mouth texture we’re after. Look for chicken that is plump and has a nice pink hue—this indicates freshness. Organic or free-range options are fantastic choices as they often have better flavor and texture due to how they are raised. And remember, letting your chicken sit at room temperature for about 15-20 minutes before cooking allows for even cooking throughout.
- 1 cup Caesar dressing. This ingredient serves as the foundation of our creamy sauce and infuses each bite with bold flavor. I recommend using a high-quality Caesar dressing made with real ingredients—look for one that contains anchovies or Worcestershire sauce (without animal-derived gelatin) for an authentic taste experience. If you’re feeling adventurous, you could even whip up your own dressing at home! Just ensure it balances tanginess and richness beautifully.
- 1/2 cup sour cream. This ingredient adds an incredible level of creaminess while also cutting through the richness of the dressing to balance everything out perfectly. Sour cream also lends a subtle tang that elevates the overall flavor profile of our dish. Make sure to use full-fat sour cream for the best results; low-fat versions tend to lack depth in flavor.
- 1/2 cup freshly grated parmesan cheese. Freshly grated parmesan cheese is non-negotiable here—it melts beautifully and brings an irresistible nuttiness to our dish. Plus, you’ll notice how much fresher it tastes compared to pre-grated options! When grating at home, opt for block cheese; it will give you superior texture and flavor.
- 1 teaspoon garlic powder. Garlic powder enhances our sauce’s depth without overwhelming it—it’s simply perfect for adding that aromatic touch we crave in comfort food! If you’re feeling extra garlicky (and who isn’t?), consider using fresh minced garlic instead; just remember to adjust quantities since fresh garlic is more potent than its powdered counterpart.
- 1/2 teaspoon black pepper. This humble spice adds warmth and complexity to our dish without being overpowering—just enough kick to awaken your taste buds! Freshly ground black pepper works wonders here; its vibrant flavor enhances every layer of our creamy sauce.
- 1 tablespoon chopped fresh parsley (optional). While not essential, fresh parsley offers a burst of color and brightness when sprinkled atop your finished dish—it’s like confetti on your plate! Plus, parsley provides additional freshness that cuts through all those rich flavors beautifully.
Equipment You’ll Need:
Now that we’ve gathered our ingredients let’s talk about some essential tools you’ll need on this culinary journey toward creating Melt In Your Mouth Caesar Chicken! Having the right equipment not only makes cooking smoother but also enhances your enjoyment in the kitchen—a joyful atmosphere can make all the difference!
- Baking dish (9×13 inches recommended) – A sturdy baking dish ensures even heat distribution while roasting our chicken evenly; glass or ceramic options work wonderfully here because they allow you to monitor browning easily without lifting off foil too much during cooking.
- Mixing bowl – A large mixing bowl will be your best friend when combining all those delicious sauces together! Choose one that’s spacious enough so there’s no risk of spilling—trust me; nobody wants extra clean-up when there’s dinner waiting!
- Measuring cups/spoons – Precision matters when baking or cooking seriously! Accurate measurements help achieve consistent results each time—you want those layers of flavor just right!
- Grater (box or microplane) – For grating our parmesan cheese smoothly—the right tool makes all the difference here by ensuring maximum surface area exposed during melting!
With these tools in hand (or rather at arm’s reach), you’re well-equipped for success!
Preparing the Melt In Your Mouth Caesar Chicken
Step 1: Preheat & Prepare
First things first: preheating your oven is crucial because starting with hot air will help brown your chicken beautifully while locking in moisture—a process known as searing without actually searing! Set your oven temperature to 375°F (190°C). While that’s heating up, grab your trusty baking dish and lightly grease it with oil or non-stick spray; this step ensures easy cleanup later on while preventing any sticking mishaps during baking.
Step 2: Create Your Creamy Sauce
In this step, we combine all those luscious ingredients into one harmonious mixture! In a mixing bowl—preferably large enough so everything can come together nicely—add your cup of creamy Caesar dressing along with half a cup of rich sour cream followed by garlic powder and black pepper. Use a whisk or spatula to mix until smooth; don’t rush this step! Take time blending those flavors because they’ll meld beautifully during baking—and trust me when I say you’ll want every spoonful bursting with deliciousness!
Step 3: Coat Those Breasts!
Now comes my favorite part: placing our lovely chicken breasts into that prepared baking dish! Lay them flat side by side—you want them snug but not overcrowded so they cook uniformly without steaming each other (nobody likes bland chicken!). Once nestled comfortably inside their cozy surroundings pour half of your creamy mixture over top before gently spreading it out evenly across each breast using either spatula or spoon—this ensures every piece gets bathed lovingly in flavor!
Step 4: Sprinkle & Bake
This is where things begin transforming into pure magic! Grab that freshly grated parmesan cheese like it’s liquid gold—it brings such depth—and generously sprinkle it over each coated breast until they’re covered delightfully like snowflakes on winter trees… okay maybe not quite as poetic but you get my drift! Once finished layering cheese goodness atop everything pop it into your preheated oven for 30–35 minutes (or until internal temperature reaches 165°F). Keep an eye out during baking—you want golden perfection here!
As we continue down this flavorful path together let me remind you: patience pays off—the aromas wafting from your oven as they bake will drive everyone wild with anticipation!
Stay tuned as we dive deeper into final steps leading up towards serving this delightful dinner soon…
Step 5: The Golden Transformation Begins
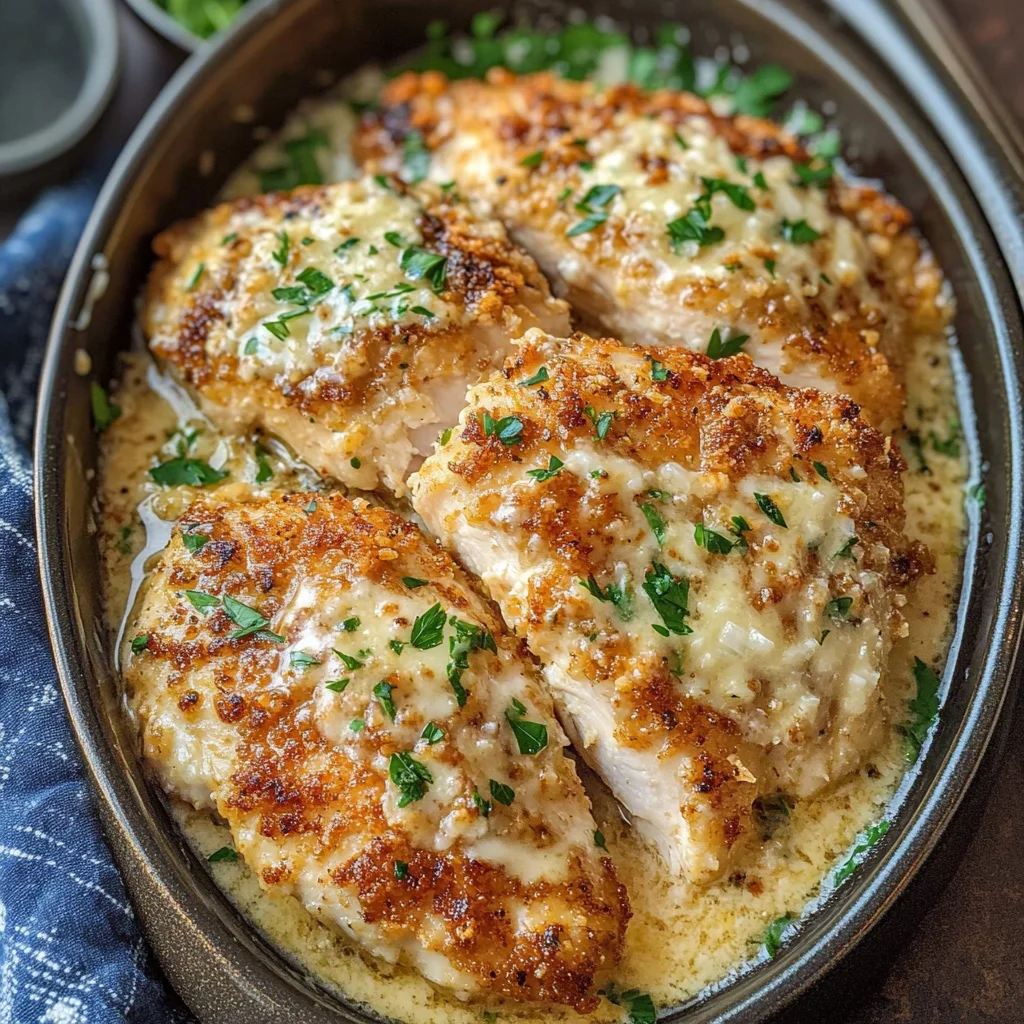
Now that your chicken is nestled comfortably in the baking dish, it’s time to set it on the path to becoming the Melt In Your Mouth Caesar Chicken of your dreams. You’ll want to slide that baking dish into the preheated oven, which should be at a cozy 375°F (190°C). This temperature is absolutely paramount for achieving that golden-brown exterior while allowing the flavors to meld beautifully. As the chicken bakes, the internal heat will coax out its natural juices, creating a tender and juicy bite. I can’t emphasize enough how important it is to bake uncovered during this stage; this not only helps develop a lovely crust but also allows those mouthwatering flavors to concentrate without being trapped under foil.
Set a timer for about 30 minutes, but don’t just walk away! This is your moment to check in and savor the aroma wafting through your kitchen – it’s nothing short of intoxicating! After about 25 minutes, you’ll want to grab a meat thermometer and check for doneness by inserting it into the thickest part of one of the chicken breasts. The magic number here is 165°F (74°C); if you hit that mark, you’re golden! If not, pop it back in for another few minutes. Watching for that perfect internal temperature ensures your chicken remains moist, avoiding dryness—a common issue with poultry when overcooked. Trust me on this; patience will pay off with every tender bite.
Step 6: The Resting Ritual
Once your chicken has reached perfection and emerged from the oven—oh, those glorious scents!—you might be tempted to dive right in. However, let me share a crucial secret with you: letting your chicken rest for about 5 minutes before serving is non-negotiable. Why? When meat cooks, its fibers contract and push moisture towards the surface; allowing it to rest gives those fibers time to relax again, redistributing those juices throughout every luscious bite. I promise you, skipping this step can lead to dry chicken—no one wants that!
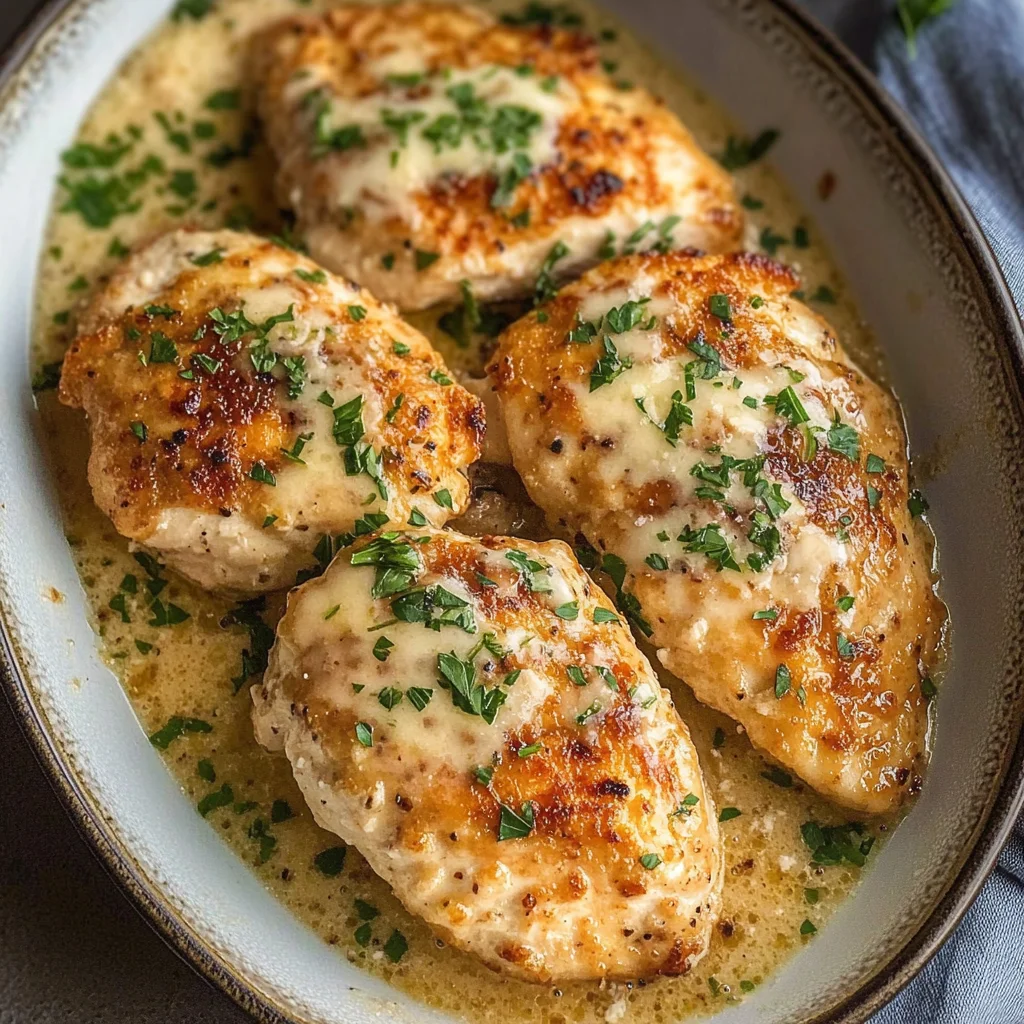
While your creation rests, take a moment to appreciate the beauty of what you’ve crafted. The top should be lightly golden and enticingly creamy; perhaps sprinkle some fresh parsley over everything for a vibrant pop of color! This simple garnish adds an extra layer of freshness and elevates its visual appeal—after all, we eat with our eyes first! And let’s be honest; who doesn’t love an Instagram-worthy dish? As you prepare to serve this delightful meal, consider what sides would complement it best. Roasted vegetables or fluffy rice would be fantastic companions, soaking up any of that rich sauce.
Step 7: Plating With Purpose
Now comes one of my favorite parts: plating! This step is where you really get to show off your culinary masterpiece. Using tongs or a spatula, gently lift each piece of chicken from the baking dish, taking care not to disturb too much of that gorgeous creamy sauce clinging onto each piece. You want each slice presented beautifully on your plates because this dish deserves all the love! As you serve, consider spooning some of that luscious sauce drizzled over the top—it’s like liquid gold shimmering on your plate.
When plating up this Melt In Your Mouth Caesar Chicken, think about balance and texture. A light side salad or steamed green beans can provide a refreshing contrast against the richness of the chicken. And don’t forget—the presentation isn’t just aesthetic; it’s how we engage our senses before we even take that first delicious bite! Encourage everyone at the table to dig in together; there’s something so heartwarming about sharing a meal made with love.
Step 8: The Grand Finale
Finally, as everyone gathers around the table eagerly waiting for their taste buds’ dance party to begin, take a second for yourself—a little moment of gratitude for what you’ve created and shared. Dive into your own plate first; savor that first forkful as you experience an explosion of flavors—the creaminess from the dressing mingling perfectly with savory notes from garlic and parmesan cheese creates an utterly extraordinary experience.
Feel free to talk about how easy this recipe was while secretly basking in compliments; after all, nothing feels better than knowing you’ve impressed friends or family with minimal effort! As they taste that melt-in-your-mouth goodness, you’ll see smiles form; trust me when I say there’s no greater reward than witnessing pure joy over something made with care.
Final Touches: Enjoying Every Bite
As everyone indulges in their servings of Melt In Your Mouth Caesar Chicken, encourage them to pair each bite with whatever sides you’ve prepared—whether it’s twirling pasta around their forks or scooping up rice alongside each succulent piece of chicken. Each mouthful should be savored slowly; after all this isn’t just dinner; it’s an experience meant to be enjoyed fully.
And remember—this recipe scales beautifully if you’re feeding more guests or simply want leftovers for lunch tomorrow (which I assure you will taste even better!). So embrace those moments spent together at the table—you’ve created something truly special here that goes beyond mere sustenance; it holds memories waiting to unfold.
So there you have it—a complete guide not only on how to create delicious Melt In Your Mouth Caesar Chicken but also on how cooking can bring people closer together through shared experiences around good food. Dig in and enjoy every last bite!
Storage and Enjoyment Tips for Your Melt In Your Mouth Caesar Chicken
Now that you’ve pulled this divine Melt In Your Mouth Caesar Chicken from the oven, you can almost hear the chorus of oohs and aahs from your friends and family as they savor each creamy bite. I can’t tell you how satisfying it is to see everyone gathered around the table, plates piled high with this comforting dish. But what if you have leftovers? Fear not! This chicken holds up beautifully, allowing you to enjoy its rich flavors even days later.
Storing Leftover Melt In Your Mouth Caesar Chicken
To keep your leftover Melt In Your Mouth Caesar Chicken fresh and delicious, I recommend transferring it into an airtight container. Glass containers are my personal favorite because they don’t absorb odors and maintain the quality of the chicken. Place it in the refrigerator, where it’ll stay delightful for about 3 to 4 days. A pro tip? If you want to keep moisture locked in, lay a piece of bread on top of the chicken before sealing it; this trick works wonders! When you’re ready to enjoy it again, just remember that reheating in the oven or microwave will bring back that creamy decadence. The flavors meld beautifully over time, making each bite just as satisfying—if not more so—than when it was freshly baked.
Freezing Melt In Your Mouth Caesar Chicken for Later
If you’re like me and love to meal prep, freezing your Melt In Your Mouth Caesar Chicken is a fantastic option. To do this properly, let the chicken cool completely after cooking, then place individual portions in freezer-safe bags or containers. Be sure to squeeze out as much air as possible before sealing them up tight. This dish can be stored in the freezer for up to 3 months without losing its signature flavor! When you’re ready for a quick meal, simply thaw it overnight in the fridge or pop it straight into a baking dish from frozen—just adjust your baking time accordingly. Trust me; having this creamy delight ready at your fingertips is a game changer for busy weeknights!
Melt In Your Mouth Caesar Chicken

Melt In Your Mouth Caesar Chicken is a creamy, flavorful dish that offers a delightful twist on classic comfort food. Tender chicken breasts are enveloped in a rich sauce made from high-quality Caesar dressing, sour cream, and freshly grated parmesan cheese. This easy baked chicken recipe not only delivers on taste but also fills your home with mouthwatering aromas that beckon loved ones to the dinner table. Perfect for weeknight meals or special gatherings, this dish guarantees satisfaction with every forkful. Serve it alongside pasta, rice, or roasted vegetables to create an unforgettable dining experience.
- Prep Time: 15 minutes
- Cook Time: 35 minutes
- Total Time: 50 minutes
- Yield: Serves 4
- Category: Main
- Method: Baking
- Cuisine: American
Ingredients
- 4 boneless skinless chicken breasts
- 1 cup Caesar dressing (without animal-derived gelatin)
- 1/2 cup sour cream
- 1/2 cup freshly grated parmesan cheese
- 1 teaspoon garlic powder
- 1/2 teaspoon black pepper
- 1 tablespoon chopped fresh parsley (optional)
Instructions
- Preheat oven to 375°F (190°C) and grease a baking dish.
- In a mixing bowl, combine Caesar dressing, sour cream, garlic powder, and black pepper; mix until smooth.
- Place chicken breasts in the baking dish and coat with half of the creamy mixture.
- Sprinkle parmesan cheese over the top of each breast and pour remaining sauce on top.
- Bake uncovered for 30–35 minutes, or until the internal temperature reaches 165°F (74°C).
- Let the chicken rest for 5 minutes before serving; garnish with fresh parsley if desired.
Nutrition
- Serving Size: 1 chicken breast (approximately 150g)
- Calories: 320
- Sugar: 2g
- Sodium: 800mg
- Fat: 18g
- Saturated Fat: 8g
- Unsaturated Fat: 9g
- Trans Fat: 0g
- Carbohydrates: 5g
- Fiber: 0g
- Protein: 35g
- Cholesterol: 100mg