Italian Herbs and Cheese Bread Recipe
Ah, my dear friend! Today, I am bubbling with excitement to share a recipe that has nestled itself into the very heart of my kitchen: the Italian Herbs and Cheese Bread Recipe. This isn’t just any loaf of bread; it’s a warm embrace from the Mediterranean, a fragrant bouquet of herbs, and the kind of cheesy goodness that brings people together around the table. Imagine pulling apart a golden crust to reveal soft, pillowy insides infused with aromatic garlic and melty cheese. It’s like an Italian bakery has taken residence in your home! I promise you, once you make this bread, each bite will transport you to sun-drenched hillsides dotted with olive groves and charming trattorias.
Every time I knead this dough or watch it rise, I can’t help but feel connected to generations of cooks who have passed down their love for bread-making. This Italian Herbs and Cheese Bread is not only a staple for your pasta nights or cozy sandwiches but also an invitation for family and friends to gather. It’s perfect for those evenings when the aroma of freshly baked bread fills your home, making it feel warm and welcoming. Trust me on this—there’s something profoundly satisfying about creating a loaf that can stand alone as a meal or complement any dish on your table. Let’s dive into this journey together!
Italian Herbs and Cheese Bread Recipe: A Warm Hug in Loaf Form
This recipe is more than just instructions; it’s about savoring every moment spent in the kitchen. As we embark on this culinary adventure, you’ll find that making your own bread is not only rewarding but also surprisingly simple. With just a few ingredients and some love, you’ll create a loaf that’s perfect for sharing—or keeping all to yourself!
Ingredients:
Before we begin our delightful journey into baking this Italian Herbs and Cheese Bread, let’s gather our ingredients. Each one plays a vital role in crafting that irresistible texture and flavor combination we crave.
- 3½ cups all-purpose flour. Flour is the backbone of our bread, providing structure and support while allowing our creation to rise beautifully. When selecting flour, look for high-protein all-purpose options which provide strength without being too heavy—this helps achieve that ideal airy texture we desire. If you’re feeling adventurous or want to add a little nuttiness, consider mixing in whole wheat flour or even spelt flour! Just remember that if you do alter the type of flour used, you may need to adjust the liquid content slightly.
- 2¼ teaspoons active dry yeast (1 packet). Yeast is truly magical; it’s what gives our bread its lightness and airy quality! When activated properly with warm water and sugar, it releases gases that create those delightful bubbles in your dough. Always check the expiration date on your yeast packets before using them—if they’re past their prime, they won’t work their magic as effectively! If you prefer fresh yeast or instant yeast, those are great alternatives too; just make sure to adjust quantities accordingly.
- 1 tablespoon sugar. Now, sugar might seem like an odd addition to savory bread but trust me; it acts as food for our yeast during fermentation while enhancing browning for that beautiful crust we all adore. You can use granulated sugar here or even honey if that’s what you have on hand; both will sweeten our dough subtly without overpowering those savory notes.
- 1½ teaspoons salt. Salt isn’t just about seasoning; it plays an essential role in controlling yeast activity as well as strengthening gluten formation in our dough. It enhances every other flavor present while preventing the yeast from working too quickly—this balance is absolutely paramount! Don’t skip this step; it’s crucial for developing depth in flavor.
- 1 cup warm water (110°F). Water is essential for bringing all our dry ingredients together into one cohesive mass—the right temperature is key here! Too hot can kill our precious yeast while too cold can cause sluggish activation. Use a thermometer if you have one—it takes out any guesswork—and aim for that cozy bath temperature that feels pleasant to touch.
- 3 tablespoons olive oil. Ahh, olive oil—the liquid gold of Mediterranean cooking! It enriches our dough not only with flavor but also adds moisture which leads to a tender crumb once baked. You can opt for extra virgin olive oil if you want those robust flavors shining through—it’s an excellent choice with its fruity notes that perfectly complement herbs!
- 4 tablespoons butter (softened). Butter adds richness and enhances flavor while helping create a lovely texture in each slice of our bread. Make sure it’s at room temperature so it blends smoothly into the dough; otherwise, you’ll end up with clumps instead of creamy goodness! If you’d like to keep things dairy-free or vegan-friendly, you can substitute with coconut oil or vegan butter here.
- 3 cloves garlic (minced). Garlic brings such an intoxicating aroma when baked—it infuses each bite with warmth and depth that’s utterly irresistible! Freshly minced garlic is always best as it offers stronger flavor compared to powdered forms—plus those little bits get beautifully caramelized while baking.
- 1½ tablespoons dried Italian herb blend. Here’s where we pack in some serious flavor! This blend typically includes herbs like oregano, basil, thyme, and rosemary—all staples in Italian cuisine that harmonize beautifully together! If you’re feeling creative or have fresh herbs on hand—feel free to chop them up finely instead; they’ll lend even more vibrant flavor!
- 1 cup shredded mozzarella cheese. Mozzarella adds that gooey pull we all crave when biting into cheesy bread—it melts beautifully within while creating pockets of blissful creaminess throughout each slice! Opt for low-moisture mozzarella for better melting properties—trust me; it makes all the difference!
- ½ cup grated parmesan cheese. Parmesan lends a sharp nuttiness that elevates our flavors beyond simply cheesy—it complements the buttery richness nicely while adding depth to every mouthful! Look for freshly grated versions if possible; they’ll offer superior taste compared to pre-packaged options.
- 2 tablespoons fresh parsley (chopped). Fresh herbs brighten up any dish by adding color and freshness; parsley is no exception here! It contrasts wonderfully against rich flavors while offering mild earthiness—a sprinkle on top before serving gives us visual appeal along with added aroma!
Equipment You’ll Need:
As we gear up for this delightful process of crafting our Italian Herbs and Cheese Bread Recipe together, let’s ensure we have all the right tools lined up beside us like loyal kitchen companions ready to assist us on this flavorful journey.
- Large mixing bowl – A sturdy bowl is essential for combining ingredients without fear of spills or messes as we mix together floury goodness with warm water and active yeast—the perfect vessel for this transformation!
- Wooden spoon or spatula – These trusty utensils help us mix ingredients thoroughly without overworking them—allowing gentle folding motions rather than aggressive stirring which keeps air incorporated into our dough!
- Floured surface – A clean countertop dusted lightly with flour becomes our stage where we knead away—this ensures proper elasticity develops during kneading while preventing sticking!
- Rolling pin – While not everyone may think they need one at home—you’ll be grateful once we roll out our dough into that lovely rectangle shape needed later on! A good rolling pin allows us control over thickness so everything bakes evenly throughout.
- Loaf pan (9×5 inch) – The right pan matters significantly here—it guides shape formation during rising/baking processes leading us towards those lovely golden crusts everyone craves!
Now that we’ve gathered everything necessary let’s dive deep into preparing this heavenly Italian Herbs and Cheese Bread Recipe!
Step 1: Awakening Our Yeast
First things first—we need to awaken those sleepy yeast granules hiding inside their packet! In your large mixing bowl, combine warm water (that cozy bath temperature) with sugar before sprinkling over active dry yeast gently without stirring yet—let it sit undisturbed for about 5 minutes until foamy bubbles form atop like tiny clouds gathering on a sunny day outside your window! This bubbling indicates successful activation—the moment when life begins anew within these tiny granules transforming ordinary ingredients into extraordinary dough filled with potential joy ahead!
Step 2: Bringing Everything Together
Once you’ve seen those lovely bubbles emerge after five minutes’ time has passed patiently waiting—we’re ready now to introduce some additional components into our mixture: drizzle olive oil overtop followed by three cups’ worth of all-purpose flour accompanied by salt (which plays its important balancing act!) Next comes mixing either via wooden spoon/spatula until everything combines seamlessly forming what looks like shaggy dough mass within seconds—don’t worry if there are still bits clinging stubbornly around edges—they’ll join forces soon enough during next step where kneading magic occurs!
Step 3: Kneading Into Perfection
Transfer this shaggy beauty onto floured surface before getting hands involved—you’ll want firm pressure applied yet gentle motions guiding floury masses toward elasticity development needed down line ahead as they transform magically before eyes’ very sight within six-eight minutes’ worth diligent efforts spent kneading away until achieving smooth/elastic finish emerges victoriously at last through perseverance shown throughout process—I promise it’ll be worth every drop sweat shed along way too because nothing compares fresh homemade goodness crafted from scratch made solely love shared among friends/family gathered close nearby kitchen counter sharing laughter amidst joyful chaos unfolding around them too during preparations made alongside cherished memories being formed simultaneously through baking adventures shared together forevermore captured inside hearts forever long after loaves vanish off plates devoured eagerly enjoyed moments brought forth therein themselves themselves…
Step 4: Rising Time
Now comes perhaps one most crucial stages involved within entire process—that patient period allowing dough rise peacefully upon settling comfortably inside oiled mixing bowl covered tightly atop towel placed overhead gently cradling warmth found within surroundings guaranteeing optimal environment necessary facilitate doubling size achieved fully approximately hour later depending individual conditions present based around however warm coziness experienced overall atmosphere surrounding said area prepared especially beforehand ensuring success achieved ultimately afterwards once risen successfully completed adequately checked via gentle poke test performed delicately alongside fingertips discerning light bounce back achieved indicating readiness…
Stay tuned as we’ll continue unraveling remaining steps leading toward final touches bringing forth ultimate masterpiece destined delight everyone gathered around tables enjoying freshly baked slices shared lovingly amongst cherished beings everywhere present today evening gathering celebration uniting hearts souls alike celebrating life through food experienced together forevermore… Let’s keep going!
Step 5: Spreading the Flavorful Herb Butter
Now that your dough has risen to a fluffy, beautiful state—trust me, there’s nothing quite like the sight of that dough doubling in size—it’s time to get down to the real magic. Start by preparing your herb butter. In a small bowl, take those three tablespoons of softened butter and add the minced garlic and dried Italian herb blend. This aromatic mixture is what will infuse your bread with an utterly intoxicating flavor profile that will have everyone asking for seconds. Mix it all together until it’s well combined; you want that vibrant green from the herbs to meld beautifully into the creamy butter, creating what I affectionately call “liquid gold.”
Next comes the fun part! Roll out your dough into a rectangle measuring about 12×18 inches on a lightly floured surface. As you do this, take a moment to savor the gentle elasticity of the dough beneath your fingers; it’s so satisfying! Once you have your rectangle ready, spread that fragrant herb butter evenly across the surface using a spatula or even just your hands—there’s no wrong way here! Make sure every inch is covered; this step is crucial because it ensures that each bite of your finished bread is bursting with flavor. Don’t rush this step either; let the butter sit for a minute if necessary, allowing it to soften further and meld into the warm bread.
Step 6: Adding Cheesy Goodness
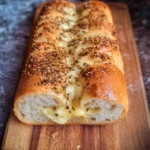
Now that your herb butter has been generously slathered onto the dough, it’s time to elevate this dish even further with cheese! We’re using both shredded mozzarella and grated parmesan here because they each bring something unique to our Italian herbs and cheese bread recipe. The mozzarella offers stretchiness—think gooey goodness when you pull apart a slice—while parmesan adds an intensely savory depth. Evenly sprinkle one cup of mozzarella over the herb butter, followed by half a cup of grated parmesan. Then toss in two tablespoons of freshly chopped parsley for that touch of freshness, which brightens everything up beautifully.
As you sprinkle on these delightful ingredients, take a moment to appreciate how they will melt and blend together during baking. This combination not only enhances flavor but also adds layers of texture that make each bite an experience in itself. It’s absolutely paramount that every corner of your rolled-out rectangle gets some cheesy love! Once all ingredients are added, prepare for the next exciting step by rolling up your dough tightly from the long side—think of it as rolling up a delightful gift filled with cheesy surprises. Pinch the seam closed tightly; this is where you’re sealing in all those magical flavors.
Step 7: Shaping and Rising Again
With your dough rolled up snugly like a cozy blanket around its cheesy filling, it’s time to shape it for its final rise. Gently place the rolled loaf seam-side down into a greased 9×5-inch loaf pan. It’s important to ensure there’s enough space around it; we want it to rise comfortably without feeling cramped. Cover it lightly with a clean kitchen towel or plastic wrap (just be sure it’s not too tight) and let it rest again for about 30-45 minutes in a warm spot—this is crucial for developing that airy texture we’re craving.
During this second rise, keep an eye on your dough; you’ll notice it puffing up beautifully once again as those yeast cells continue their work fermenting and producing gas—this is what gives us those lovely air pockets we adore in freshly baked bread! You can preheat your oven during this time so that when your loaf is ready, you’re prepared to pop it in immediately. If you’ve got a drafty kitchen or if it’s particularly cool outside, consider placing your pan near an oven set on low or near a sunny window. Remember: patience is key here; don’t rush this process! A well-risen loaf means better texture and flavor.
Step 8: Baking Your Golden Loaf
Ah, at last! The moment has come for our Italian herbs and cheese bread recipe to transform from dough into something truly extraordinary in the oven. Preheat your oven to 375°F (190°C) if you haven’t already done so—you want it nice and hot before introducing our precious loaf into its warm embrace. Once heated, gently slide your loaf pan inside and set a timer for 30-35 minutes. As it bakes, be prepared for an olfactory experience like no other—the aroma of melting cheese mingling with fresh herbs will waft through your home like an Italian bakery on a bustling street corner.
But how will you know when it’s done? This part is essential! After about 30 minutes, start checking on your beautiful creation by tapping lightly on top of the loaf; listen closely—it should sound hollow! Another handy test is looking for that glorious golden brown crust—a visual cue that tells us our bread has reached its peak deliciousness. If you find yourself unsure after checking at 30 minutes, allow another few minutes in the oven—it’s always better to err on the side of caution when baking bread!
Conclusion:
As we wrap up our exploration of this magnificent Italian herbs and cheese bread recipe, I hope you feel as excited as I do about sharing this labor of love with friends and family. The journey from mixing ingredients to pulling that golden loaf out of the oven is filled with joy at every turn. What truly makes this recipe special is how each element sings together—the aromatic herbs entwined with gooey mozzarella create an irresistible symphony of flavors that offers both comfort and satisfaction with every bite. It’s not just another loaf; it’s a heartfelt creation meant to be shared.
This recipe is an absolute must-try—not only because of its delightful taste but also due to the sheer joy of making it! Picture yourself gathering around the table with loved ones, breaking open that warm loaf while everyone inhales its heavenly scent; it’s moments like these that transform ordinary dinners into extraordinary memories. This versatile bread shines at any occasion—from cozy weeknight meals paired with soups to festive gatherings where everyone wants their slice of happiness.
Imagine savoring one with a bowl of rich marinara sauce for dipping or slathering on some herbed olive oil while enjoying an afternoon chat with friends over coffee. And let’s not forget how beautifully this bread complements salads or charcuterie boards—its fluffy interior eagerly soaking up any surrounding flavors. For a truly decadent experience, serve slices alongside creamy risotto or use them as sandwich bases piled high with roasted vegetables and fresh basil—a mouthwatering combination!
Feeling adventurous? This recipe is wonderfully adaptable! You can experiment by folding in different cheeses like cheddar or adding sun-dried tomatoes for an extra punch of flavor. Perhaps swap in some fresh herbs like basil or thyme if you’re looking for something green and fragrant; trust me on this one—it’ll elevate your baking game beyond belief! I wholeheartedly invite you to get creative—share your variations and experiences with me; let’s celebrate this beautiful art of bread-making together!
Italian Herbs and Cheese Bread
Indulge in the delightful experience of making your own Italian Herbs and Cheese Bread, a warm and inviting loaf that captures the essence of Mediterranean flavors. This delectable bread features a golden crust and a soft, fluffy interior infused with aromatic garlic, savory herbs, and a generous blend of melted mozzarella and parmesan cheese. Perfect for sharing at family dinners or as a comforting snack, this easy-to-follow recipe will transform your kitchen into an Italian bakery.
- Prep Time: 20 minutes
- Cook Time: 35 minutes
- Total Time: 55 minutes
- Yield: Approximately 12 servings 1x
- Category: Dinner
- Method: Baking
- Cuisine: Italian
Ingredients
- 3½ cups all-purpose flour
- 2¼ teaspoons active dry yeast
- 1 tablespoon sugar
- 1½ teaspoons salt
- 1 cup warm water (110°F)
- 3 tablespoons olive oil
- 4 tablespoons softened butter
- 3 cloves minced garlic
- 1½ tablespoons dried Italian herb blend
- 1 cup shredded mozzarella cheese
- ½ cup grated parmesan cheese
- 2 tablespoons chopped fresh parsley
Instructions
- In a large mixing bowl, combine warm water and sugar; sprinkle over active dry yeast and let sit for about 5 minutes until foamy.
- Add olive oil, salt, and flour to the yeast mixture; mix until combined into a shaggy dough.
- Transfer to a floured surface and knead for about 6-8 minutes until smooth and elastic.
- Place the dough in an oiled bowl, cover with a towel, and let rise for about an hour or until doubled in size.
- Prepare herb butter by mixing softened butter with minced garlic and dried herbs; set aside.
- Roll out the risen dough into a rectangle (12×18 inches) and spread the herb butter evenly across.
- Sprinkle mozzarella, parmesan, and parsley over the buttered surface; roll tightly from one long side to form a loaf.
- Place seam-side down into a greased loaf pan; cover lightly and let rise again for about 30-45 minutes.
- Preheat oven to 375°F (190°C). Bake for 30-35 minutes until golden brown and hollow-sounding when tapped.
- Cool on a wire rack before slicing.
Nutrition
- Serving Size: 1 slice (50g)
- Calories: 170
- Sugar: 1g
- Sodium: 320mg
- Fat: 7g
- Saturated Fat: 3g
- Unsaturated Fat: 4g
- Trans Fat: 0g
- Carbohydrates: 22g
- Fiber: 1g
- Protein: 6g
- Cholesterol: 15mg