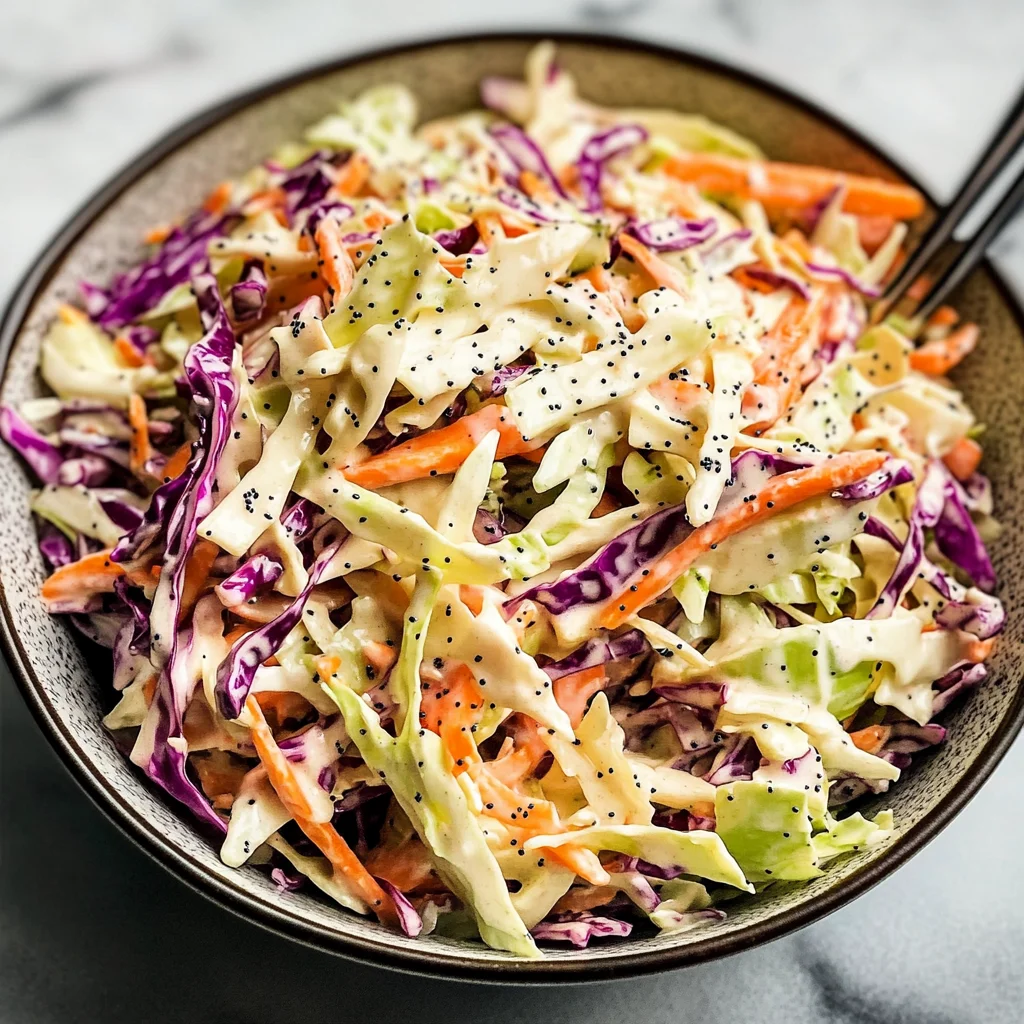
Coleslaw
There’s something truly magical about a dish that brings people together, and that’s exactly what my easy Coleslaw does. It’s more than just a side; it’s a vibrant celebration of crunch and flavor that dances on the palate and evokes memories of family gatherings, sunny picnics, and backyard barbecues. Imagine the crispness of freshly shaved cabbage harmonizing with the sweetness of carrots, all enveloped in a creamy, tangy dressing that ties everything together. The texture is delightfully crunchy, while the flavors create a symphony that feels both comforting and invigorating. This coleslaw isn’t just food; it’s an experience that can elevate any meal.
What makes this coleslaw so special? It’s the way it transforms even the simplest of dinners into something extraordinary. Picture yourself sitting at a table adorned with your favorite seafood or pulled beef sandwiches, and right there is a bowl of this coleslaw, glowing with fresh colors. The tangy-sweet mayonnaise dressing perfectly complements savory dishes, making every bite an absolute delight. Whether it’s a summer cookout or a cozy winter gathering, this coleslaw is versatile enough to be the star of any occasion. I promise you, once you try it, you’ll find yourself craving this refreshing dish over and over again.
Coleslaw: A Crunchy Delight for Every Occasion
Welcome to my kitchen! Today, we’re diving into one of my all-time favorite recipes: Coleslaw! This dish is not just easy to prepare but also an absolute crowd-pleaser. It’s perfect for those who want to add a little crunch and brightness to their meals without spending hours in the kitchen. I love serving it alongside seafood or hearty pulled beef sandwiches; it adds such a delightful contrast that enhances every bite. Together, let’s embark on this culinary journey!
Ingredients:
As we set out to create this delicious coleslaw, let’s take a moment to appreciate each ingredient that plays its role in crafting this masterpiece. Each component adds its own unique touch to the final dish, resulting in layers of flavor that blend beautifully.
- 6 cups shaved green cabbage. Fresh green cabbage is essential here; its crispness provides the backbone of our coleslaw. Look for heads that feel heavy for their size and have vibrant leaves without any wilting or browning—this ensures maximum crunch! Shaving it as thinly as possible allows it to absorb the dressing beautifully while maintaining its integrity through mixing. If you’re looking for alternatives due to taste preferences or availability, you might consider using purple cabbage for added color and slight sweetness or even a combination of both for an eye-catching presentation.
- 1 medium peeled and shredded carrot. Carrots bring not only color but also natural sweetness that balances the zing from our dressing perfectly. When selecting carrots, opt for firm ones that feel heavy; avoid those with soft spots or blemishes as they may affect both flavor and texture in our coleslaw. Shredding them creates delicate strands that integrate effortlessly with our other ingredients—don’t rush this step! A handheld grater or food processor works wonders here.
- 1 cup mayonnaise. This creamy condiment acts as our glue, binding all those crunchy components together into delightful harmony while providing richness to every bite. I recommend using high-quality mayonnaise—it really makes all the difference! If you’re feeling adventurous or prefer something lighter, you can substitute half with Greek yogurt for added tanginess without sacrificing creaminess.
- 3 Tablespoons cider vinegar. Cider vinegar adds brightness and acidity that’s paramount in cutting through the richness of mayonnaise while enhancing overall flavor complexity. The subtle fruity notes elevate our coleslaw beyond mere crunchiness into something truly extraordinary! If you find yourself without cider vinegar at home, white wine vinegar can serve as an excellent substitute.
- 1 teaspoon celery salt. This seasoning adds depth and an aromatic quality that’s simply irreplaceable in classic coleslaw recipes! It provides a savory note without overwhelming other flavors—a little goes a long way here! If you don’t have celery salt on hand, feel free to use regular salt combined with finely chopped celery stalks for freshness.
- ¼ teaspoon white pepper. White pepper brings warmth without altering the beautiful colors of our dish—it’s less pungent than black pepper yet still imparts gentle heat which elevates flavor profiles subtly but effectively! If you prefer black pepper’s bolder taste instead, go ahead—trust me on this!
- ¼ teaspoon Colman’s powdered mustard. Mustard powder contributes not only spiciness but also complexity within our dressing mix—it’s like adding another layer of flavor that elevates everything else! Colman’s brand is particularly known for its sharpness; however, if you can’t find it locally or prefer milder flavors altogether then regular mustard can work too—just adjust quantities accordingly!
- ½ teaspoon poppy seeds. These tiny seeds add an interesting visual element along with slight nuttiness when chewed upon—such a lovely surprise! They also contribute healthy fats which complement our creamy dressing nicely—they’re optional but highly recommended if you’re aiming for authenticity!
- 2 Tablespoons white sugar. Sugar balances out acidity from vinegar beautifully while enhancing overall flavors—it rounds everything out perfectly creating harmony amongst contrasting elements present within our dish! For healthier options try honey or agave syrup instead; they’ll do wonders too if used mindfully!
- 1 Tablespoon extra virgin olive oil. A drizzle of good quality extra virgin olive oil enrichens texture while providing health benefits too—it helps emulsify dressing nicely ensuring even coverage throughout vegetables during mixing process! If you’re looking for alternatives here avocado oil would also work splendidly!
Equipment You’ll Need:
Before we dive into preparing our marvelous coleslaw, let’s ensure we have all the right tools at hand—trust me; having these essential partners makes everything smoother and far more enjoyable!
- Sharp chef’s knife – A good quality chef’s knife will make shaving your cabbage effortless and precise; investing time in finding one you love will pay dividends every time you cook!
- Cutting board – Choose one that offers stability while slicing vegetables—wooden boards are preferable due to their ability to absorb moisture yet remain hygienic if properly maintained.
- Box grater or food processor – Depending on how quick you’d like your carrots shredded—the grater gives control over thickness whereas food processors save time but may yield inconsistent results unless monitored closely.
- Mixing bowl – A large bowl is non-negotiable here since we’ll be tossing together multiple ingredients later on—choose one deep enough so nothing flies overboard during mixing!
- Whisk or spatula – We need something sturdy yet flexible when blending dressing ingredients thoroughly before combining them with veggies—both options provide convenience based on personal preference.
Now armed with knowledge about each ingredient’s importance along with necessary tools let’s get started making this scrumptious coleslaw together!
Step 1: Shaving the Cabbage
The journey begins by preparing our wonderful green cabbage—a task that requires patience but rewards us generously! Start by removing any outer leaves that may appear damaged or wilted before slicing off its base so it stands upright on your cutting board like a proud sentinel ready for transformation into something deliciously crunchy! With your sharp chef’s knife in hand (this part is crucial), begin shaving away thin ribbons from top towards bottom—not only does this create optimal texture throughout but ensures each piece maintains structural integrity even after soaking up all those luscious flavors later on during chilling process!
Once you’ve successfully transformed 6 cups worth (which sounds like a lot but trust me—you’ll be grateful when it’s served!), gently fold them into your large mixing bowl along with shredded carrot prepared earlier—we want these colors intertwined visually appealing as well as flavorful counterparts working harmoniously together!
Step 2: Whisking Up Flavor
Now comes one of my favorite steps—the creation of our glorious dressing! In another bowl (or jug), combine mayonnaise—a cornerstone ingredient bringing creaminess—to cider vinegar which injects brightness & zing needed against rich elements present within mixture plus sugar balancing everything beautifully so no single note overwhelms palate too much either way during tasting experience ahead—this balance is absolutely paramount!
Add celery salt then sprinkle white pepper & mustard powder in next carefully whisking until smooth consistency forms—it should resemble glossy liquid gold gradually brightening up duller tones found previously inside veggie mix awaiting their fate ahead following integration soon thereafter… Don’t rush this step; taking time ensures each element melds perfectly resulting in unforgettable results later down line when served fresh chilled afterwards!
Step 3: Marrying Ingredients
With both veggie base ready alongside luscious dressing just waiting patiently nearby—we can finally bring these two worlds together creating magic right before our eyes! Pour that beautiful mayonnaise mixture generously over cabbage-carrot blend then take large spatula firmly yet gently fold until everything gets coated evenly—trust me; watching colors intermingle feels almost therapeutic yet rewarding knowing what awaits next once chilled properly afterwards…
Step 4: Chilling Time
After achieving desired coating level through gentle folding motions—the real magic begins now as we place entire bowl within refrigerator allowing flavors develop further through chilling process spanning about one hour minimum ideally although longer wouldn’t hurt either since letting sit longer enhances overall outcome significantly transforming ordinary into truly extraordinary experience altogether itself awaits eager diners eagerly anticipating first bites later on down road when finally served up alongside main courses chosen earlier tonight…
This initial preparation phase sets us up beautifully for what lies ahead—a crisp refreshing side-dish bursting forth tantalizing tastes & textures designed specifically complement hearty mains served graciously around dinner tables everywhere across America today celebrating joy found within shared meals enjoyed together…
Step 5: The Art of Mixing It All Together
Now that you have your beautifully shaved cabbage and shredded carrot ready, it’s time to bring everything together. In a separate bowl, combine the mayonnaise, cider vinegar, celery salt, white pepper, Colman’s powdered mustard, poppy seeds, white sugar, and extra virgin olive oil. This step is where the magic begins! Each ingredient plays a crucial role in creating that luscious dressing that will envelop your vegetables like a comforting hug. I can almost hear you saying, “How can something so simple taste so good?” Well, the combination of tangy cider vinegar and sweet sugar balances the creaminess of the mayo perfectly. The celery salt adds an unexpected depth that enhances the overall flavor profile.
As you whisk these ingredients together, pay attention to the texture—the goal is to achieve a smooth and creamy consistency that coats the back of a spoon. This is crucial because if your dressing is too thick, it won’t adhere well to the cabbage and carrots; on the other hand, if it’s too runny, you’ll end up with a watery coleslaw—definitely not what we’re aiming for! So take your time with this mixing process; it should feel like you’re blending flavors into a harmonious symphony. Once this delightful mixture comes together beautifully, it’s time to introduce it to your shredded veggies.
Step 6: Marrying Flavors for Coleslaw Bliss
With your dressing perfectly blended, pour it over the cabbage and carrot mixture. Using tongs or two forks (whatever feels comfortable to you), gently toss everything together until each shred of cabbage and carrot is generously coated in that silky dressing. This step is all about ensuring every bite is bursting with flavor. Don’t rush this step; take your time to really mix it thoroughly. You want each piece of cabbage to be lovingly wrapped in that creamy goodness! If you see any stubborn bits peeking through without dressing, don’t hesitate to give them some extra love.
Now comes one of my favorite parts: letting those flavors mingle! Transfer your coleslaw mixture into an airtight container or simply cover the bowl with plastic wrap before placing it in the refrigerator. This resting period is absolutely paramount—it allows all those vibrant flavors to meld together into something truly extraordinary. I promise you; after just an hour (or even longer if you can resist), you’ll experience a transformation in taste that elevates this dish from good to utterly intoxicating. Think of it as giving your ingredients some time in a cozy retreat where they can bond over their shared purpose—delivering joy!
Step 7: Adjusting for Perfection
After an hour has passed—and trust me when I say waiting will be worth it—take your coleslaw out of the fridge and give it another gentle toss. At this point, you might notice some liquid pooling at the bottom of your container; this is completely normal! It’s just excess moisture released by the cabbage during its chilling time. If you find that it’s more liquid than you’d like (which can happen depending on how fresh your cabbage was), don’t worry! Simply drain off a bit of that watery goodness before serving. Just remember not to pour it all out—some moisture helps keep things juicy!
This little adjustment ensures you’re serving up coleslaw that’s crisp yet creamy without being overly soggy—a balance that’s absolutely essential for texture! As you mix again, take a moment to savor the aroma wafting up from your bowl; it’s like breathing in pure comfort food bliss! And if you’re feeling adventurous, this might be a great time to taste-test and adjust seasoning as needed—a little extra sprinkle of celery salt or sugar can go a long way!
Step 8: The Grand Finale – Serving Your Coleslaw
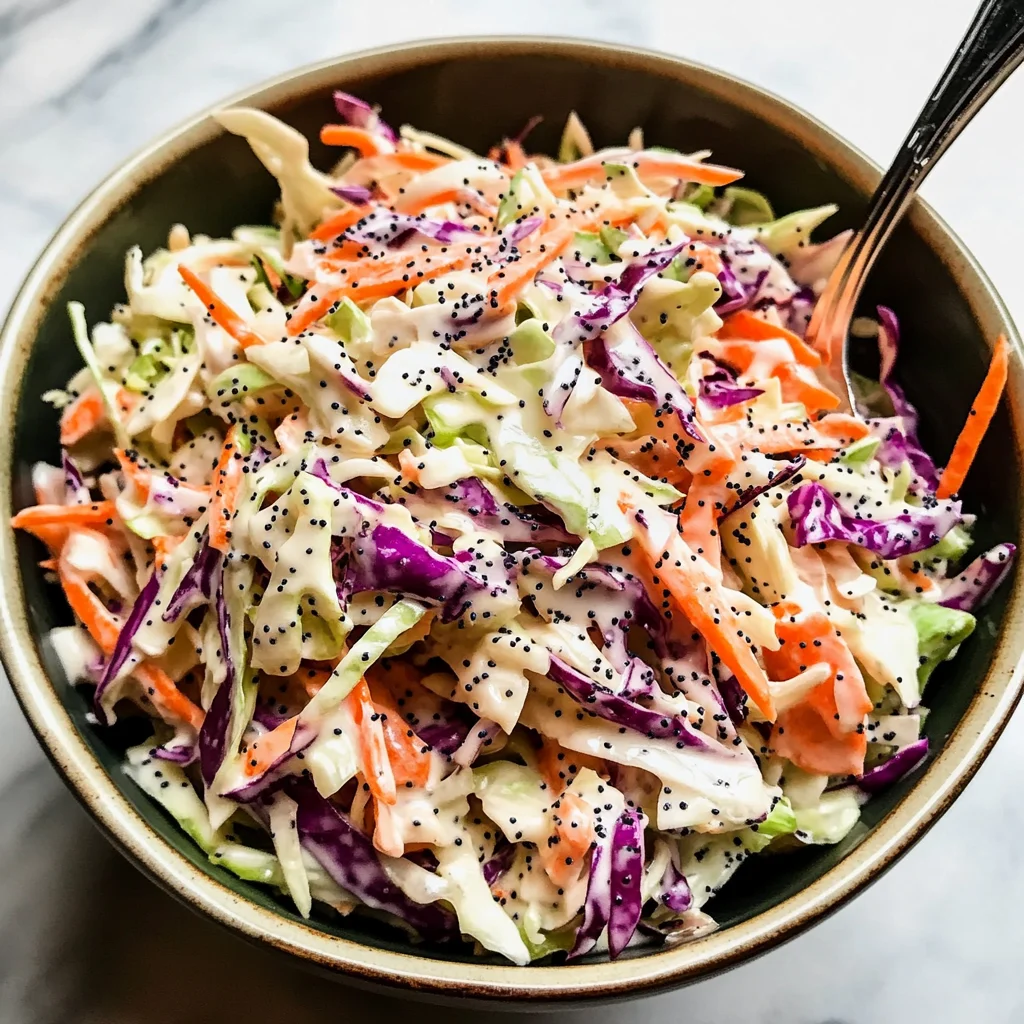
Now for the moment we’ve all been waiting for! When it’s finally time to serve your coleslaw—whether at a backyard barbecue or as a delightful side dish at dinner—make sure it’s presented beautifully. Use tongs or a large spoon to scoop out portions onto plates or into individual bowls; seeing those vibrant colors contrast against each other is enough to make anyone’s mouth water! Don’t forget about garnishing—sprinkling some extra poppy seeds on top not only adds visual appeal but also gives that final touch which says I care.
Before diving into this glorious dish, take a moment to appreciate everything that went into making this special coleslaw. The crispness of the vegetables paired with that creamy dressing creates a delightful crunch and velvety mouthfeel that’s so satisfying with every bite. It pairs beautifully with seafood dishes or pulled beef sandwiches but trust me—it stands proudly on its own as well! Remember, food has an incredible power not just to nourish us but also to evoke memories and create new ones around our dining tables.
Final Touches – Elevate Your Coleslaw Experience
As you serve up this easy coleslaw recipe at gatherings or enjoy it alongside weeknight meals, consider experimenting further by adding other ingredients such as diced apples for sweetness or chopped nuts for added crunch. Each tweak can personalize this classic dish even more while still retaining its soul-soothing essence.
So there you have it—a truly remarkable coleslaw recipe that’s not just easy but profoundly satisfying too! As you embark on this culinary journey filled with fresh flavors and textures galore, remember: cooking should always be about joy and connection. Enjoy every moment spent preparing delicious food; after all, it’s these simple delights that truly enrich our lives!
Storage and Enjoyment Tips for Your Coleslaw
Now that you’ve crafted this deliciously tangy and crunchy coleslaw, it’s time to revel in the joy of enjoying it! Whether you’re serving it alongside a summer barbecue or pairing it with fresh seafood, the magic of coleslaw is in its ability to bring brightness to any dish. But what happens when you find yourself with leftovers? Don’t fret! I’m here to share some fantastic tips on how to preserve your coleslaw while keeping its delightful texture and flavor intact.
Storing Leftover Coleslaw
For those moments when you have a little too much coleslaw left over, the key lies in proper storage. I recommend using an airtight container—this is non-negotiable if you want to keep your coleslaw fresh and vibrant! Pop it into the refrigerator, where it can stay good for about 3 to 5 days. Now, here’s a pro tip: if you notice that your coleslaw has become a bit watery after sitting, simply drain off any excess liquid before serving; this ensures you’re always greeted with that perfect crunch! The flavors will continue to meld beautifully during storage, making each bite even more satisfying than the last. And trust me, there’s nothing like pulling out a cold bowl of coleslaw on a hot day—it tastes like summer in every forkful!
Freezing Coleslaw for Later
If you’ve made a big batch and want to save some for later, freezing is definitely an option, although I suggest being mindful of the ingredients. The best way to freeze your coleslaw is to place it in a freezer-safe container or bag, ensuring that as much air is removed as possible. This method will keep it fresh for about 2 months! Keep in mind that while the flavor will still be delicious upon thawing, the texture may change slightly—cabbage can become a bit softer. However, don’t let that deter you! You can use your frozen coleslaw as a topping for tacos or mix it into soups for an added crunch. Imagine opening your freezer door and finding a taste of summer waiting just for you—it’s like having sunshine on demand!
Coleslaw

Coleslaw is a vibrant and refreshing side dish that perfectly complements any meal, from summer barbecues to cozy winter dinners. This easy-to-make coleslaw combines the crispness of green cabbage with the sweetness of shredded carrots, all enveloped in a creamy, tangy dressing that elevates its flavor profile. Not only does it add a delightful crunch to your plate, but it also evokes memories of family gatherings and sunny picnics. With just a few simple ingredients and minimal preparation time, this classic coleslaw recipe will quickly become a staple at your dining table. Enjoy it alongside grilled chicken, pulled beef sandwiches, or even as a topping for tacos for an extra burst of flavor!
- Prep Time: 15 minutes
- Cook Time: 0 minutes
- Total Time: 15 minutes
- Yield: Approximately 6 servings 1x
- Category: Side Dish
- Method: Mixing
- Cuisine: American
Ingredients
- 6 cups shaved green cabbage
- 1 medium peeled and shredded carrot
- 1 cup mayonnaise
- 3 tablespoons cider vinegar
- 1 teaspoon celery salt
- ¼ teaspoon white pepper
- ¼ teaspoon Colman’s powdered mustard
- ½ teaspoon poppy seeds (optional)
- 2 tablespoons white sugar
- 1 tablespoon extra virgin olive oil
Instructions
- Begin by shaving the cabbage into thin ribbons and place it in a large mixing bowl. Add the shredded carrot.
- In another bowl, whisk together mayonnaise, cider vinegar, sugar, celery salt, white pepper, mustard powder, poppy seeds (if using), and olive oil until smooth.
- Pour the dressing over the cabbage and carrot mixture, gently folding everything together until well coated.
- Cover and refrigerate for at least one hour to allow flavors to meld before serving.
Nutrition
- Serving Size: 1 cup
- Calories: 200
- Sugar: 5g
- Sodium: 380mg
- Fat: 18g
- Saturated Fat: 2g
- Unsaturated Fat: 14g
- Trans Fat: 0g
- Carbohydrates: 10g
- Fiber: 2g
- Protein: 2g
- Cholesterol: 0mg