Chilli Chicken
There’s something truly magical about food that transcends mere sustenance; it becomes a part of our memories, an aroma that evokes nostalgia, and a reason for gathering around the table with loved ones. When I think of Chilli Chicken, I don’t just picture the vibrant colors and tantalizing spices; I remember the warmth of shared laughter and stories with friends who have gathered to savor this dish. This Hakka, Indian Chinese delight is a true celebration of flavor—where crispy chicken meets a symphony of spices in a sauce that dances on your palate. The moment you take that first bite, the spicy notes mingle with the sweetness of honey and soy sauce, creating an utterly intoxicating experience. It’s more than just a meal; it’s an adventure in cooking and sharing joy.
As you embark on this culinary journey with me, trust that each ingredient has a purpose, each step has been honed through love and tradition. Chilli Chicken isn’t merely about the recipe; it’s about feeling connected to our roots while embracing modern tastes. Whether you’re hosting friends for a weeknight dinner or preparing a comforting meal for family, this dish holds the promise of satisfaction and togetherness. Let’s dive into the details that will not only guide you but also encourage you to embrace your inner chef as we create something profoundly satisfying.
Chilli Chicken: A Spicy Celebration of Flavor
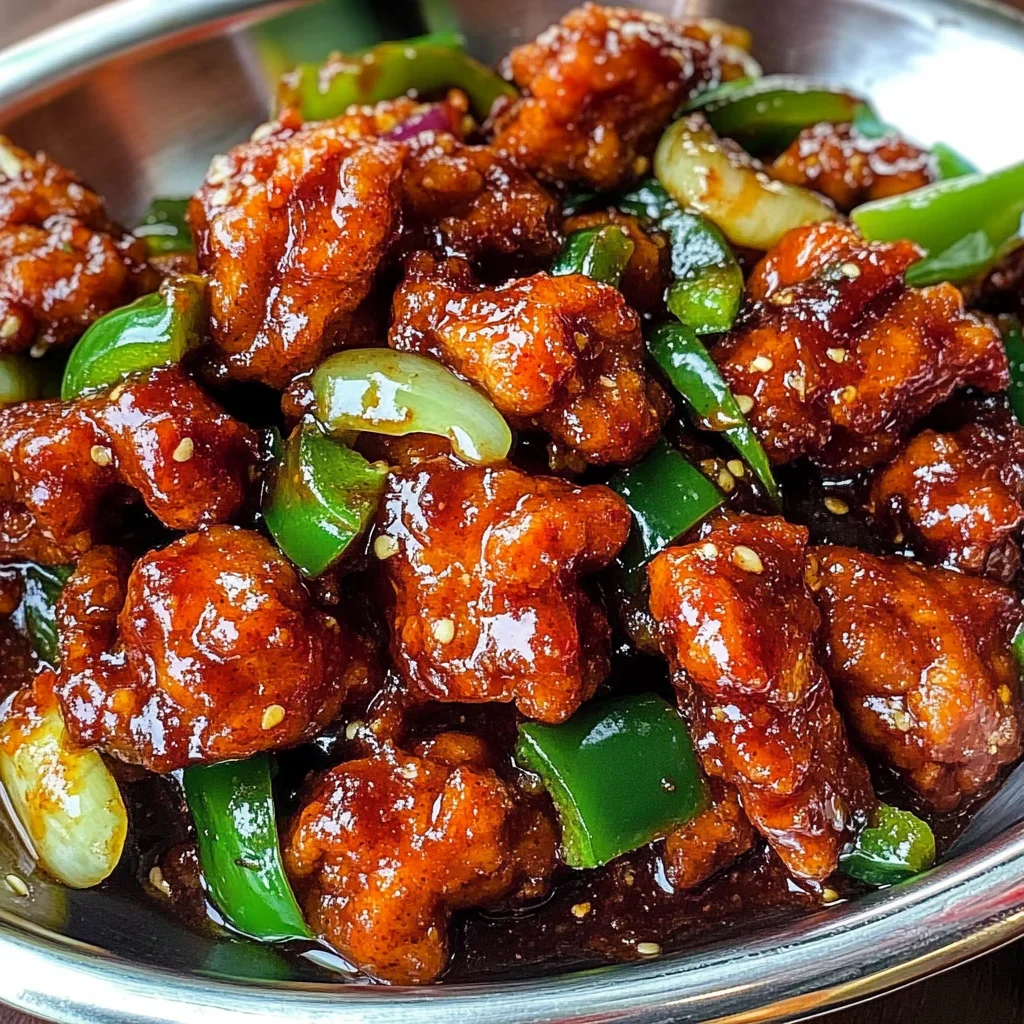
Welcome to the world of Chilli Chicken, where every bite is packed with flavor and every moment spent cooking is infused with love! This dish is perfect for those who crave a little heat in their life but balanced with sweet undertones that make it wonderfully complex. Picture succulent chunks of chicken coated in a light batter, fried until they’re golden and crispy before being tossed into an irresistible spicy sauce filled with vibrant vegetables. It’s comfort food elevated to new heights!
Ingredients:
As we gather our ingredients for this culinary masterpiece, let’s take a moment to appreciate each component’s role in crafting this delightful dish. Each item brings its own character to the table, contributing to the ultimate flavor journey.
- 1 1/2 lbs boneless chicken (preferably dark meat): Choosing dark meat chicken is absolutely paramount for achieving juicy, flavorful results in your Chilli Chicken. The richness inherent in dark meat means it won’t dry out during cooking as easily as white meat does, ensuring every piece remains tender and succulent even after frying. When selecting your chicken, look for pieces that are firm and plump—this guarantees freshness and quality.
- 1/2 green pepper: The crispness and slight bitterness of green bell peppers add an essential crunch and color contrast to our dish. They not only enhance visual appeal but also provide a lovely balance against the spiciness of the chillis. Freshness is key here—choose peppers that are firm without any soft spots or blemishes.
- 1/2 onion: Onions are foundational to many cuisines around the world, adding layers of sweetness when cooked just right. In our Chilli Chicken, they caramelize beautifully while imparting subtle flavors that meld harmoniously with both the chicken and sauce. Opt for onions that feel heavy for their size; these tend to be juicier.
- 2 tablespoons garlic-ginger-onion mix (reserved from marinade): This mixture acts as our secret weapon—it’s where much of our flavor comes from! Garlic provides its pungent aroma while ginger adds warmth and spice; together they form an aromatic base that’s nothing short of heavenly. You can easily make this mix at home by blending equal parts garlic cloves, fresh ginger root, and onion until smooth.
- 1/2 small onion: Adding another layer of onion enhances depth in our sauce without overwhelming other flavors. It will gently sweeten as it cooks down during preparation, contributing to that deep, rich taste we seek in this dish.
- 3-4 slices ginger: Fresh ginger slices bring bright heat that complements our spicy notes perfectly! This ingredient is crucial because it lends warmth without being overpowering—think about how delightful it feels when your senses awaken at its touch!
- 2-3 cloves garlic: Fresh minced garlic is non-negotiable here; its sharpness will harmonize beautifully with other ingredients while infusing every bite with robust flavor. Always choose fresh over pre-minced varieties if possible; trust me on this one!
- 1 teaspoon black pepper: Black pepper adds subtle heat but also depth—a grounding note amidst all those vibrant flavors swirling around! Use freshly cracked black peppercorns if you can; they’ll elevate everything magnificently.
- 1/2 tablespoon chilli powder: This spice blend brings us closer to achieving that signature kick we love so much! Adjust according to your taste preference—less for mild versions or more if you’re feeling bold!
- 1 1/2 tablespoon soy sauce: Soy sauce not only seasons beautifully but also adds umami depth—the kind that leaves people guessing what makes your dish so irresistible! Look for low-sodium options if salt intake is a concern.
- 3-4 tablespoons water: Water helps adjust consistency within our sauces without compromising flavor—it’s essential when we want just the right thickness!
- 6-7 tablespoons corn starch: Coating our marinated chicken in cornstarch before frying creates an ultra-crispy crust while sealing moisture inside—this step is absolutely crucial! It’s best if you use fine cornstarch instead of flour since it yields superior results.
- 5-6 green chilli (or green Thai chillis if you like it spicier): These fiery beauties pack quite a punch! Use them wisely depending on how adventurous you feel today—they’ll lend incredible heat alongside gorgeous visuals!
- 1 1/2 tablespoon dark soy: Dark soy sauce contributes both color richness (think glossy finish) plus deeper flavors compared to regular varieties! A little goes such a long way too!
- 2 1/2 tablespoon soy sauce: A repeat addition here ensures we’re layering flavors correctly throughout each component—we want every bite bursting forth with excitement!
- 1 tablespoon rice vinegar: Rice vinegar imparts brightness cutting through heavier elements—it’s like sunshine captured inside our bowl—and balances sweetness perfectly too!
- 1 tablespoon honey: Sweetness plays off all those savory components beautifully here—honey works wonders enhancing overall complexity without making things overly sugary either!
- 2 teaspoons corn starch (mixed with 4 teaspoons of water): This slurry thickens sauces up nicely while providing shine—a must-have technique whenever achieving velvety textures!
- 1 1/2 teaspoon chilli powder: Another splash ensures we retain consistent heat levels throughout—the key lies within balancing everything out so no single note takes over completely!
- 1/2 cup water: Finally rounding off everything helps adjust overall viscosity—we want something luscious yet still clingy enough allowing coats onto crispy fried pieces evenly distributed throughout each serving!

Equipment You’ll Need:
Before we dive into creating magic in the kitchen together, let’s gather some essential tools that will make your experience smoother and more enjoyable. Having these trusty sidekicks at hand not only saves time but ensures precision when executing each step successfully.
- Heavy-bottomed skillet or wok: A sturdy skillet or wok allows for even heat distribution—a must-have when frying chicken so each piece gets golden brown without burning! If using non-stick pans instead opt cautiously since they can sometimes affect crispiness levels negatively compared directly against traditional cast iron options!
- Mixing bowls (various sizes) – You’ll need several bowls ranging from small prep sizes ideal for gathering ingredients beforehand up through larger ones perfect mixing marinades together seamlessly without spills occurring everywhere else on countertops nearby!
- Measuring cups & spoons – Precision matters significantly here; accurate measurements lead directly towards delightful outcomes every time! Invest in good-quality metal ones—they last longer than plastic counterparts often found cluttering kitchens unnecessarily otherwise…
- Slotted spoon or spider strainer – Perfect tools help retrieve fried items safely whilst draining excess oil off quickly afterward so nothing weighs down overall final presentation aesthetically speaking too much either way…
Preparing the Chilli Chicken
Step 1: Marinating the Chicken
The first step toward culinary perfection begins as we prepare our marinade—a transformative process where ordinary chicken turns into something extraordinary! Start by cutting your boneless chicken into bite-size chunks—this allows them to cook evenly and soak up every ounce of flavor from the marinade you’ll be creating shortly. Combine those beautiful pieces in a bowl along with your garlic–ginger–onion mix (the star seasoning combo), black pepper, soy sauce (both regular & dark), chilli powder—the symphony begins here! Allow these flavors time together by letting them marinate at least half an hour if possible; longer means deeper penetration thus enhancing tenderness immensely throughout cooking later on too!
Step 2: The Cornstarch Coating
Once marinated sufficiently—get excited because now comes one pivotal step crucially enhancing texture upon frying—that satisfying crunch we all crave from Chilli Chicken happens here thanks mainly due cornstarch coating process applied right before diving into hot bubbling oil ahead… Take out your marinated chicken pieces gently shaking off excess marinade allowing them rest momentarily aside while preparing separate bowl filled solely cornstarch ready awaiting next action phase awaits eagerly…
Step 3: Frying Time!
Heat oil within heavy-bottomed skillet until shimmering hot—it should ripple across surface enticingly beckoning eager anticipation igniting senses soaring high above mere earthly bounds experienced only moments ago… Carefully add coated chicken pieces ensuring not overcrowding pan preventing steaming rather than crisping occurring instead—keep watchful eyes peeled listening attentively sounds emanate sizzling away joyfully announcing arrival golden greatness approaching rapidly forward indeed… Fry until deep brown roughly five minutes per side maintaining position allowing perfect searing happen uninterrupted meanwhile simultaneously flipping occasionally checking internal temperatures reached safely cooked through entirely ensuring nobody left behind uncooked left sad lonely outside enjoying feast prepared lovingly…
Step 4: Creating That Irresistible Sauce
Now let’s shift gears towards constructing luscious sauce—the heart & soul behind elevating Chilli Chicken beyond simple fried goodness reaching heights unimaginable previously dreamed only wake amongst cravings lingered far too long… Start sautéing chopped onions alongside sliced ginger garlic mixture until fragrant permeates air wrapping around inviting warmly beckoning everyone closer drawn irresistibly near wanting catch glimpse magic unfolding before eyes… Once translucent add chopped peppers stirring brief moments engage colors mingling dancing vibrantly within pot bringing happiness hard ignore entirely truthfully speaking…
In these steps alone lies incredible opportunity explore creativity indulging senses igniting passions held dear reminding us why cooking remains cherished art passed generations lovingly shared amongst families everywhere alike globally united through universal language food speaks fluently binding hearts souls forever intertwined warmly embracing shared moments created unforgettably lasting impressions always cherished fondly remembered dearly thereafter…
This recipe may seem intricate at first glance—but trust me—I promise once mastered properly leads towards triumphs celebrated jubilantly joyfully shouted loud proclaiming success achieved effortlessly after spending time invested wholeheartedly devoted crafting cherished meals enjoyed endlessly together forevermore…
Step 5: Marinating the Chicken for Flavor Explosion
Now that your chicken is beautifully tenderized, it’s time to marinate it. This step is absolutely crucial because marinating not only infuses the chicken with flavor but also helps to break down the proteins, resulting in a juicier and more succulent bite. In a bowl, combine your chicken pieces with the reserved garlic-ginger-onion mix, black pepper, chilli powder, and soy sauce. I always like to use my hands for this—there’s something so satisfying about massaging the flavors into the meat. Make sure every piece of chicken is generously coated; it’s this intimate connection between the marinade and the meat that will yield those profoundly satisfying results later on.
Once everything is mixed together, cover the bowl with plastic wrap or a clean kitchen towel and let it sit in your refrigerator for at least 30 minutes to an hour. If you have time to spare, letting it marinate overnight can elevate the flavors even more. Trust me on this—allowing those spices to mingle with the chicken truly transforms it into something extraordinary! While you wait, take a moment to reflect on how much flavor will be locked inside each bite when you’re done cooking. The scent wafting from your fridge will only heighten your anticipation!
Step 6: Preparing Your Vegetables – Color and Crunch
While your chicken is soaking up all that goodness, let’s turn our attention to the colorful vegetables that will accompany it in this symphony of flavors. Slice your green pepper and onion into thin strips; remember, we want them to have enough structure so they maintain a delightful crunch when cooked. The contrast of textures here is essential—it’s not just about taste but also about how each ingredient plays its part in creating a well-rounded dish. When you bite into a piece of crunchy pepper against tender chicken, it’s pure magic!
After slicing your vegetables, set them aside and prepare for frying. It’s best to keep these veggies separate until you’re ready to toss them into the wok because adding them too early could lead them to become mushy instead of retaining that crispness we crave. Think of this as setting the stage for an incredible performance—the vegetables are supporting actors that will play a vital role in elevating our Chilli Chicken.
Step 7: Frying Like a Pro – The Art of Deep-Frying
Okay, now we’re getting into one of my favorite parts—frying! Heat vegetable oil in a deep skillet or wok over medium-high heat until shimmering; this usually takes about 5-7 minutes. You can test if it’s hot enough by dropping in a small piece of bread—if it sizzles immediately, you’re good to go! This step might seem daunting if you haven’t deep-fried before, but I promise you it’s easier than it sounds! The goal here is to achieve that beautiful golden-brown crust on our chicken pieces while keeping them juicy inside.
Once your oil reaches temperature, carefully add in the marinated chicken pieces one by one; avoid overcrowding the pan as this can lower the oil temperature too quickly and result in soggy batter rather than crispy goodness. You’ll want to fry these bad boys for about 4-5 minutes or until they turn golden brown and float gracefully on top of the oil—a sign they’re perfectly cooked through. Use tongs or a slotted spoon to remove them from the oil and transfer them onto paper towels to drain any excess fat; this little trick keeps them crispy without being overly greasy.
Step 8: Creating That Heavenly Sauce – The Heart of Chilli Chicken
Now comes perhaps one of the most exciting parts—creating that utterly intoxicating sauce that binds everything together! In a separate pan (or use your wok after draining out excess oil), heat a couple of tablespoons of fresh oil over medium heat. Add sliced ginger and garlic cloves first; let them sizzle gently until fragrant but be careful not to burn them—nobody wants bitter notes in our dish! This initial step creates an aromatic base that sets up layers of flavor for what’s coming next.
Next, add those beautifully sliced green chilies (remember, adjust based on your spice preference) along with your soy sauces, rice vinegar, honey, water, and additional chilli powder. This concoction will simmer together for about 3-4 minutes until you see bubbles forming and everything starts thickening slightly; you’ll know it’s ready when you catch whiffs that make your mouth water just thinking about how delicious it’s going to be! At this point, add the cornstarch slurry (made from mixing cornstarch with water) which acts as our thickening agent—this gives our sauce that luscious quality we all crave. Let everything simmer together until it becomes velvety smooth—this is where patience pays off!
Final Touches: Bringing It All Together
Step 9: Tossing It All Together – The Grand Finale
Once your sauce has reached its ultimate thickness—a glossy coating that’s simply begging for attention—it’s time for our crispy chicken pieces and vibrant veggies to join in on the fun! Gently fold in all those fried chicken chunks into that glorious sauce along with your prepared green peppers and onions. You want every piece coated with love; trust me when I say this is crucial for achieving those layers of flavor we’ve been building toward throughout this journey.
As you stir everything together over low heat for another minute or two, watch as each piece transforms under that liquid gold—the sizzling sound alone will bring joy straight to your heart! It’s at this moment you’ll feel an overwhelming sense of satisfaction knowing you’ve created something truly special from scratch—your kitchen filled with enticing aromas is proof enough!
Finally, serve your Chilli Chicken hot alongside steamed rice or noodles—you’ll find they complement each other beautifully while balancing out all those bold flavors we’ve brought together so lovingly. Don’t forget to garnish with some fresh coriander or spring onions if you’d like an extra pop of color—it makes such a difference visually and adds freshness too! I promise you’ll be met with smiles all around as family and friends dig into this comforting meal you’ve crafted with care.
Enjoy every bite knowing you’ve not only made something delicious but also shared love through food—a tradition that never goes out of style! Happy cooking!
Storage and Enjoyment Tips for Your Chilli Chicken
Now that you have crafted this beautiful, aromatic plate of Chilli Chicken, it’s time to revel in the deliciousness you’ve created! I can already imagine the joyful smiles around your dinner table as everyone digs into those crispy chunks, enveloped in that spicy, glossy sauce. But what if you happen to have some leftovers? Fear not, my friend! Let’s talk about how to store this delectable dish so you can enjoy it even more.
Storing Leftover Chilli Chicken
When it comes to preserving your leftover Chilli Chicken, the right container is absolutely paramount. Opt for an airtight container that seals in all those intoxicating flavors while keeping the chicken nice and juicy. Store it in the refrigerator, where it will happily keep for about 3 to 4 days—though I promise, it’s so delicious that it might not last that long! If you want to maintain its quality and avoid any moisture loss, here’s a little trick: toss a slice of bread into the container with your chicken. The bread will absorb excess moisture and keep your dish from getting soggy. When you’re ready to indulge again, simply reheat it on medium-low heat in a skillet or microwave until warmed through. Trust me; the flavors only deepen over time, making each bite just as profoundly satisfying as when you first made it.
Freezing Chilli Chicken for Later
If you find yourself with a surplus of this incredible Chilli Chicken—and who could blame you?—freezing is a fantastic option! To do this properly, allow the dish to cool completely before transferring it into a suitable freezer-safe container or resealable bag. This step is crucial because freezing warm food can lead to ice crystals forming, which alters texture. Wrapped tightly, your frozen Chilli Chicken can last up to three months without sacrificing flavor or quality. When you’re ready to enjoy it again, simply thaw it overnight in the refrigerator and then reheat on the stove or in the oven; doing so ensures that those vibrant spices come back to life! The convenience of having this exquisite meal ready at a moment’s notice makes it all the more enjoyable—just imagine pulling out a serving on a busy weeknight and being transported back to that delightful cooking experience!
Chilli Chicken
Chilli Chicken is a vibrant and flavorful dish that brings together crispy chicken and a medley of spices, creating a tantalizing experience for your taste buds. This delectable stir-fry, rooted in Indian Chinese cuisine, features tender chicken pieces coated in a light batter and tossed in a spicy sauce enriched with garlic, ginger, and fresh vegetables. The perfect balance of heat and sweetness will leave you craving more! Whether you’re hosting a dinner party or enjoying a cozy meal at home, this recipe promises satisfaction and joy with every bite.
- Prep Time: 30 minutes
- Cook Time: 20 minutes
- Total Time: 50 minutes
- Yield: Serves approximately 4 people 1x
- Category: Main
- Method: Frying
- Cuisine: Indian Chinese
Ingredients
- 1 1/2 lbs boneless chicken (preferably dark meat)
- 1/2 green pepper
- 1/2 onion
- 2 tablespoons garlic-ginger-onion mix
- 3–4 slices ginger
- 2–3 cloves garlic
- 1 teaspoon black pepper
- 1/2 tablespoon chilli powder
- 1 1/2 tablespoons soy sauce (low-sodium if preferred)
- 6–7 green chillis (adjust for spiciness)
- Fresh herbs for garnish (optional)
- Water
- Cornstarch
- Rice vinegar
- Honey
Instructions
- Cut the chicken into bite-size chunks and marinate with garlic-ginger-onion mix, black pepper, soy sauce, and chilli powder for at least 30 minutes.
- Coat the marinated chicken pieces in cornstarch.
- Heat oil in a skillet or wok over medium-high heat and fry the coated chicken until golden brown; set aside on paper towels to drain.
- In the same pan, sauté onions, ginger, and garlic until fragrant. Add sliced green pepper and chillis; cook until slightly tender.
- Combine fried chicken with sautéed vegetables and pour in remaining soy sauce, vinegar, honey, and chilli powder; toss to coat thoroughly.
- Serve hot with steamed rice or noodles.
Nutrition
- Serving Size: 1 cup (250g)
- Calories: 380
- Sugar: 8g
- Sodium: 750mg
- Fat: 14g
- Saturated Fat: 3g
- Unsaturated Fat: 8g
- Trans Fat: 0g
- Carbohydrates: 38g
- Fiber: 3g
- Protein: 28g
- Cholesterol: 90mg