Spicy Salmon Sushi Bake
There’s something utterly enchanting about the way food can weave together memories, traditions, and flavors to create an experience that transcends mere sustenance. Take this Spicy Salmon Sushi Bake, for instance—it’s more than just a dish; it’s a warm embrace of nostalgia and innovation. Imagine the crackle of seaweed, the creamy richness of salmon mingled with sriracha’s gentle heat, and the tender sushi rice that binds it all together in a symphony of tastes. It beckons you to gather around the table, share laughter, and savor each bite as if it were a cherished moment in time. This recipe is a delightful twist on traditional sushi rolls, transforming them into a cozy casserole that radiates comfort while being surprisingly simple to prepare. I promise you, once you dive into this bake, it will feel like a heartfelt invitation to indulge in flavors that dance upon your palate.
As I reminisce about my culinary adventures, I can’t help but think of the first time I tasted baked sushi—it was like discovering a hidden treasure! The beauty of this Spicy Salmon Sushi Bake lies not only in its exquisite flavor but also in its accessibility; there are no complicated rolling techniques required here! Instead, we embrace the joy of layering ingredients that harmonize beautifully together. Whether you’re looking for an easy weeknight meal or planning a gathering with friends and family, this dish is perfect for any occasion. It’s ideal for those nights when you want something comforting yet unique—a true celebration of both tradition and creativity wrapped into one delightful casserole.
Spicy Salmon Sushi Bake: A Cozy Twist on Classic Sushi
This spicy salmon sushi bake is sure to become a beloved staple in your kitchen! It captures all the intricate flavors of sushi without requiring you to master the art of rolling. Just imagine digging your fork into layers of perfectly cooked sushi rice topped with creamy salmon goodness—it’s bound to become your new favorite comfort food!
Ingredients:
Let’s embark on this culinary journey together! Each ingredient plays a crucial role in crafting this masterpiece, so let’s take our time exploring what makes each one special.
- 1 cup sushi rice. Sushi rice is truly the heart of this dish; its sticky texture helps bind everything together while providing that signature chewiness we all adore. When selecting your rice, look for high-quality short-grain varieties—these are essential for achieving that perfect consistency. Rinsing the rice thoroughly under cold water before cooking is absolutely paramount; it removes excess starch which could lead to gummy rice instead of fluffy perfection.
- ¼ cup rice vinegar. This liquid gold adds brightness and tanginess to our sushi rice that enhances its overall flavor profile. Rice vinegar has a subtle sweetness that balances beautifully with other savory elements in our dish. If you’re looking for alternatives, apple cider vinegar can work in a pinch, though it may impart a slightly different taste.
- 2 teaspoons sugar. Sugar might seem like an odd addition to savory dishes, but trust me on this—it rounds out flavors and elevates the taste experience! It helps balance the acidity from the vinegar while creating depth in our dish’s overall flavor.
- 1 teaspoon salt. Salt is non-negotiable here; it enhances every other flavor present in your dish! By seasoning thoughtfully throughout the cooking process, you’ll ensure each bite is profoundly satisfying.
- ½ cup furikake seasoning. This is where things get exciting! Furikake is a Japanese seasoning blend typically made from dried fish, sesame seeds, seaweed flakes, and spices—it’s packed with umami goodness! Not only does it add complexity to our bake but also visual appeal with its vibrant colors. If you’re vegetarian or vegan-friendly, you can find furikake without fish or even make your own at home!
- 8 oz salmon fillets (2 portions). Fresh salmon provides both richness and flavor—it’s tender and flakey when cooked right! Opt for high-quality salmon fillets; wild-caught varieties often have superior taste compared to farmed ones. The beauty of utilizing salmon here lies in its ability to absorb other flavors beautifully while still standing out on its own.
- 1 tablespoon soy sauce (gluten-free if needed or use tamari). Soy sauce introduces savory notes that deepen our salmon mixture’s overall flavor profile—it’s akin to adding a pinch of magic! If gluten-free options suit your needs better than traditional soy sauce does, tamari works wonderfully as an alternative without compromising taste.
- ¼ cup cream cheese, softened. Cream cheese adds an extra layer of creaminess that’s simply irresistible! It melds seamlessly with our salmon mixture while enriching texture—this element creates that delightful mouthfeel we crave.
- ¼ cup mayonnaise (Kewpie or regular mayonnaise). Mayonnaise contributes richness and moisture that brings everything together cohesively—Kewpie mayo offers an extra hint of umami which makes it my go-to choice if available! If you’re looking for lighter options or dairy-free alternatives, avocado-based mayo can do wonders here too!
- 2 tablespoons sriracha sauce or sambal oelek. Here comes the spice factor! Sriracha elevates everything by infusing warmth without overwhelming heat—it transforms our bake into something truly extraordinary! Feel free to adjust based on your personal heat preference; perhaps start with less and add more gradually until you find your sweet spot!
For toppings:
– 1 avocado, sliced or cubed. Avocado lends creaminess alongside healthy fats—it also adds beautiful color contrast against our baked filling!
- ½ cucumber, sliced or cubed. Cucumber provides freshness and crunch—a divine contrast against rich layers beneath!
- 2 green onions, sliced. Green onions brighten up every bite while adding an aromatic touch that’s uniquely satisfying!
- Nori seaweed sheets—these will serve as delightful little vessels for scooping up all those delicious flavors when serving!
- More Kewpie mayo—a drizzle over top after baking will enhance richness even further!
- Unagi sauce—this sweet glaze can be drizzled atop just before serving for additional depth—the balance between salty-sweet is such an indulgent treat!
Equipment You’ll Need:
Before we dive into preparing this delicious Spicy Salmon Sushi Bake, let’s talk about having the right tools at your disposal—they’re essential partners in creating something wonderful together! While they may not be ingredients themselves, these pieces of equipment will help streamline your cooking experience.
- Fine meshed sieve: This tool is critical for rinsing sushi rice thoroughly before cooking; it allows water to flow freely while retaining grains without losing any precious kernels down the drain!
- Air fryer or oven: Both methods are fantastic for cooking salmon evenly—you’ll achieve tender results either way! An air fryer offers quicker results with less oil needed than traditional frying methods; however should you prefer using an oven (which works beautifully too), set yours up ahead so it’s preheated when ready!
- Rice paddle or spatula: A soft-edged tool ensures we won’t damage delicate grains during mixing—we want fluffy goodness rather than mushy clumps here!
- 9×9 baking dish lined with parchment paper (or greased): Using parchment paper prevents sticking while allowing easy removal post-baking—a true lifesaver when serving guests later on!
Now that we’ve gathered all our ingredients and equipment let’s prepare this scrumptious Spicy Salmon Sushi Bake together—I can’t wait for you to taste how amazing it turns out!
Step 1: Rinse Your Sushi Rice
Rinsing sushi rice thoroughly under cold water might feel tedious at first glance; however trust me when I say it’s absolutely vital for achieving optimal texture! This process removes excess surface starch which could lead us down a path toward gummy results rather than fluffy perfection—the goal here is lightness combined with stickiness! Once rinsed well (you’ll know because water runs clear), cook according to package instructions (usually around 20 minutes).
Step 2: Season While You Cook
While we await those precious grains transforming into luscious bites full of love inside our pot/stovetop setup… let’s focus on prepping our lovely salmon fillets next! Rub them gently all over with soy sauce—this step infuses them deeply with savory notes that’ll elevate every forkful later on down line.
Step 3: Cook That Salmon
Here comes one part where things get fun—cooking those seasoned beauties until they flake effortlessly apart afterward! Choose either air-frying at 400°F (around 10 minutes) OR bake them up nicely within an oven set similarly high (15–20 minutes depending thickness). Don’t rush through this stage either; patience pays off beautifully here as proper cooking yields tender morsels bursting forth from their skins ready for blending magic moments shortly thereafter…
Step 4: Create Your Creamy Mixture
Once cooked through perfectly golden brown outside yet moist inside? Grab yourself fork & break apart cooked salmon fillets gently until they’re shredded nicely then toss them lovingly into large bowl along side softened cream cheese & mayonnaise mix along sriracha sauce too—all components come together cohesively creating delightful base layer topping awaiting assembly time soon enough…
I’m thrilled just thinking about how satisfying this process will be—and I know you’ll enjoy every moment as much as I do when crafting such beautiful meals from scratch alongside friends & family alike sharing smiles around table filled fragrant aromas wafting through kitchen spaces harmonizing warmth enveloping hearts everywhere present enjoying feast prepared especially just FOR THEM!! Stay tuned because soon we’ll dive deeper into assembling these lovely layers awaiting magical oven transformations ahead…
Step 5: Creating the Flavorful Salmon Mixture
Now that the sushi rice is perfectly cooked and seasoned, it’s time to focus on that creamy, spicy salmon mixture that will elevate this dish into a true culinary masterpiece. Begin by carefully seasoning your salmon fillets with soy sauce. This isn’t just a step; it’s a moment of magic! The soy sauce enhances the natural flavors of the salmon while also adding a delightful umami punch. If you’re using gluten-free soy sauce or tamari, rest assured that the flavor will remain robust and rich. Cook your salmon in an air fryer set to 400°F for about 10 minutes, or if you prefer the oven, aim for around 15-20 minutes depending on thickness. You’ll know it’s done when the salmon flakes easily with a fork and has that beautiful, slightly opaque color that signals perfection.
As the salmon cooks, keep an eye on your timer, but don’t rush this step! It’s essential to let the salmon cook thoroughly to ensure it’s tender and moist. While it’s cooking, take a moment to appreciate how your kitchen smells—it’s utterly intoxicating! Once cooked, remove the salmon from heat and allow it to cool slightly before breaking it into small pieces with a fork. This gentle shredding technique lets you maintain some texture while mixing it into your creamy concoction later. Trust me, getting this right will make all the difference in achieving that heavenly combination of flavors.
Step 6: Mixing It All Together
With your flaked salmon ready to go, it’s time to bring together all those luscious ingredients into one glorious bowl. In a large mixing bowl, combine your flaked salmon with softened cream cheese, mayonnaise (Kewpie mayonnaise adds an extra layer of flavor), and sriracha sauce. The cream cheese is crucial here; not only does it lend creaminess to the dish, but its slight tang also beautifully balances out the richness of the salmon and mayo. I like to use a spatula or wooden spoon for this stage—something sturdy enough to really mix everything together without creating too much mess.
As you fold these ingredients together gently yet thoroughly, take a moment to appreciate how they meld into what can only be described as pure comfort in a bowl! The visual transformation from separate components to a cohesive mixture is quite satisfying—this is where the magic truly happens. You want this mixture smooth yet chunky enough so there are still bites of delectable salmon throughout. This blend should be beautifully creamy with just enough spice from the sriracha; if you’re feeling adventurous, taste as you go! Adjusting flavors at this stage is absolutely paramount; after all, you want every bite of your Spicy Salmon Sushi Bake to sing.
Step 7: Prepping Your Baking Dish
Before we move forward with assembling our beautiful bake, let’s get our baking dish ready. Preheat your oven to 425°F; this high heat is what will give our sushi bake that lovely golden finish while ensuring everything heats evenly throughout. While waiting for the oven to warm up, line a 9×9 inch baking dish with parchment paper or give it a good spray with cooking oil—this step is non-negotiable if you want easy removal later on! Parchment paper acts as a protective barrier against sticking and makes cleanup significantly easier—a little foresight goes a long way in making your cooking experience stress-free.
Once prepped, gently press down the sushi rice into your prepared baking pan using either your hands (be sure they’re clean!) or a spatula for even distribution. You’re aiming for about an inch thick layer here; this base is going to hold all those fabulous flavors together like a warm hug from grandma! Don’t rush this step—take pride in pressing down firmly but evenly across the surface so that every bite has equal parts rice and topping. And remember—we want each layer to complement one another beautifully!
Step 8: Assembling Your Bake
Now comes one of my favorite parts—the assembly! Spread your luxurious salmon mixture evenly over the pressed sushi rice layer in the baking dish. Use that spatula again and take care as you spread it out so every inch gets covered; we’re aiming for complete bliss in every bite! This layering method keeps things tidy and ensures each serving has just enough of everything without feeling too heavy. As you’re spreading, marvel at how vibrant and inviting it looks already—it’s like art on a plate!
Once you’ve achieved an even layer of that creamy goodness over your rice base, sprinkle generously with furikake seasoning. Furikake isn’t just any ordinary topping; it’s like confetti for savory dishes! It brings an irresistible crunch along with seaweed flavor that echoes traditional sushi rolls without overwhelming them. After sprinkling on the furikake, pop this beauty into your preheated oven for about 15 minutes or until heated through and bubbling slightly at the edges—oh my goodness, just wait until you see (and smell) this gorgeous creation come together! Keep an eye out for those little bubbles forming on top—it’s one of those joyful signs letting you know it’s nearly ready!
Final Touches: Bringing It All Together
Step 9: The Finishing Touches
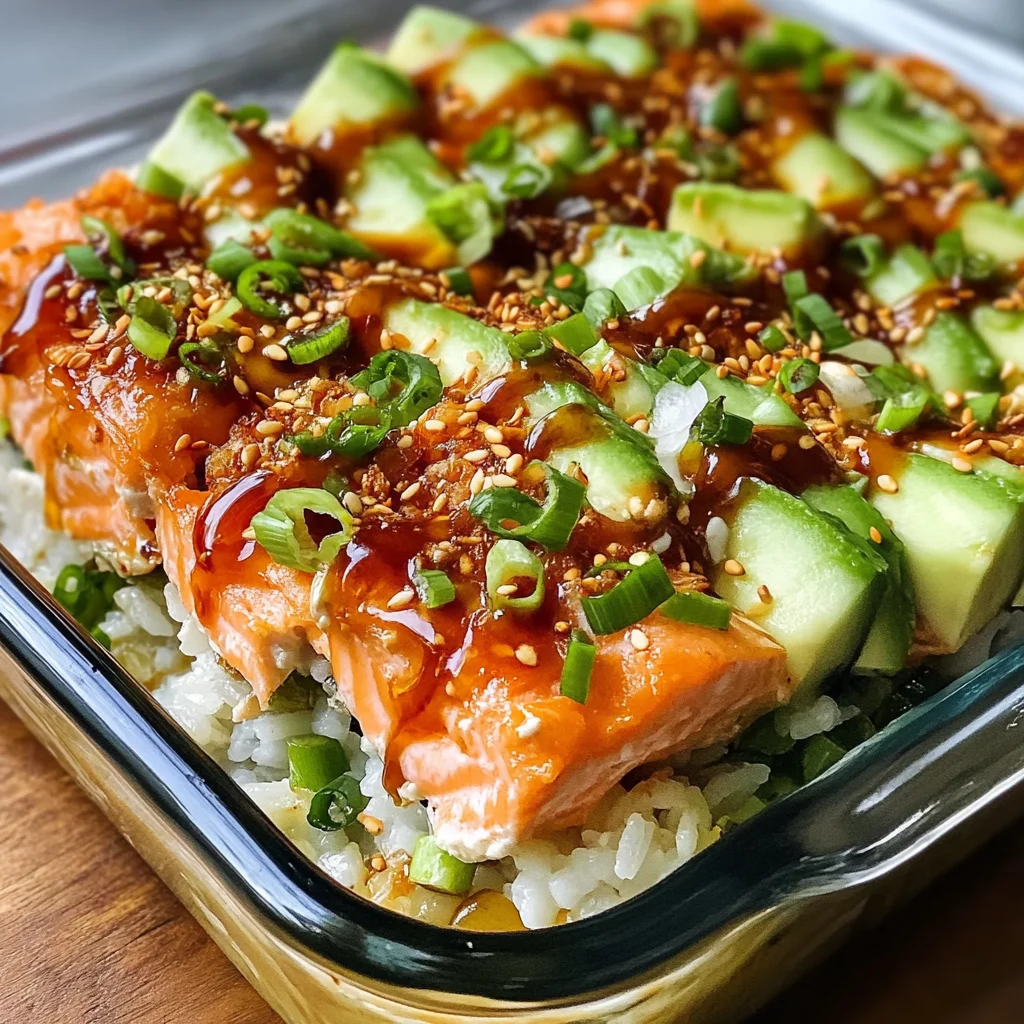
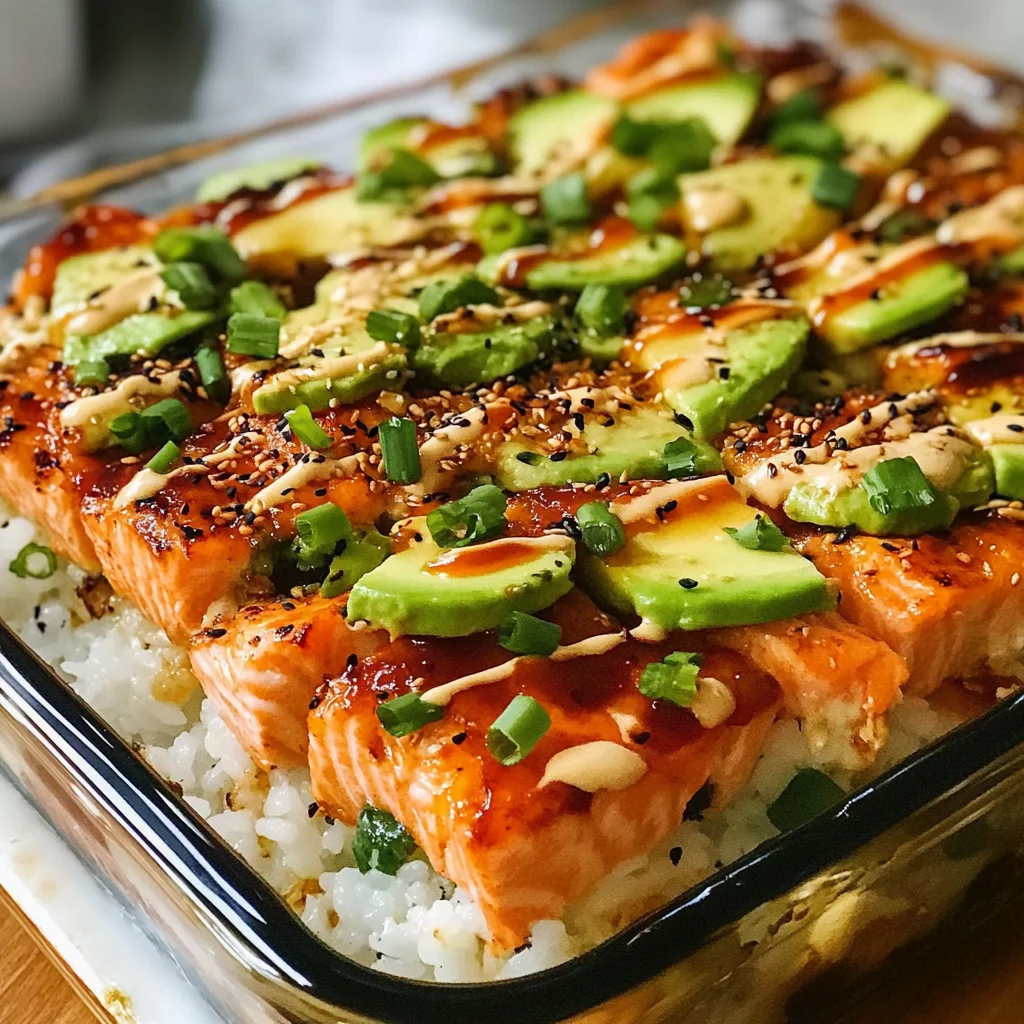
Once out of the oven and allowed just a moment to settle (trust me—you want those layers intact!), it’s time for those finishing touches that’ll elevate your dish from delicious to extraordinary! Drizzle some additional Kewpie mayo across the top—it adds such an indulgent creaminess—and sprinkle fresh green onion slices over everything for that burst of color and crunch. Then comes my personal favorite part: adding sliced avocado and cucumber on top not only brings freshness but also enhances texture in every mouthful.
These final elements are not merely decorative; they are essential components in balancing flavors throughout each bite you’ll savor shortly after serving these beauties up! The creamy avocado complements spicy notes with its rich texture while cool cucumbers add refreshing contrast—perfectly harmonious indeed! Serve alongside squares of nori sheets so everyone can customize their bites however they please—it’s like creating tiny sushi masterpieces right at home!
There you have it—a Spicy Salmon Sushi Bake that promises profound satisfaction through every delicious layer! Each bite offers a symphony of flavors wrapped up in warmth and love—all without fussing over rolling individual pieces of sushi at home (though I adore doing that too!). I can assure you this will quickly become one of those cherished recipes you’ll return to again and again—because who doesn’t love cozying up with something utterly delectable?
Storage and Enjoyment Tips for Your Spicy Salmon Sushi Bake
Now that your Spicy Salmon Sushi Bake is bubbling away in the oven, filling your kitchen with an utterly intoxicating aroma, it’s time to dig in! But before we indulge, let’s chat about how to store those delicious leftovers (if there are any!) because I promise you, this dish is just as delightful the next day. Proper storage not only keeps your sushi bake fresh but also helps maintain that wonderful symphony of flavors you’ve crafted.
Storing Leftover Spicy Salmon Sushi Bake
For any leftover Spicy Salmon Sushi Bake—if you can bear to part with it—transfer it to an airtight container. Make sure the container is large enough so that the rice and salmon mixture isn’t squished together; I always use glass containers when storing baked goods because they keep everything fresh and free from unwanted odors. You can pop it in the fridge, where it should stay good for about 3 to 4 days. To keep that creamy texture and vibrant taste intact, consider placing a slice of bread on top before sealing it up; this little trick draws moisture away from the rice so your leftovers don’t dry out! Trust me; when you pull this out a couple of days later, you’ll still be met with that beautiful meld of flavors that danced together upon its first bake. Reheating is a breeze too—just warm it gently in the oven at 350°F until heated through or microwave for a quick fix. Let each bite take you back to that first moment of enjoyment!
Freezing for Later
If you’re looking to extend the life of your Spicy Salmon Sushi Bake even further, freezing it is a fantastic option! Once completely cooled, slice the bake into individual portions and wrap each piece tightly in plastic wrap—this ensures that no air sneaks in and causes freezer burn. Then place these wrapped portions into a freezer-safe bag or container. When frozen properly, your sushi bake will maintain its delightful flavor for up to 2 months! And when you’re ready to enjoy it again? Simply remove a portion from the freezer and let it thaw overnight in the refrigerator or pop it straight into the oven at a lower temperature until warmed through. The convenience factor of having such a comforting dish at your fingertips is absolutely paramount, especially on busy weeknights!
Spicy Salmon Sushi Bake

Spicy Salmon Sushi Bake is a comforting twist on traditional sushi that combines the rich flavors of salmon, creamy texture, and a gentle kick of spice—all baked into a delightful casserole. This easy-to-make dish eliminates the complexities of rolling sushi, making it perfect for any night of the week or gatherings with friends and family. With layers of fluffy sushi rice topped with tender salmon and a creamy sriracha mixture, this recipe invites everyone to dig in and savor each mouthful. The vibrant colors and enticing aromas will fill your kitchen with warmth and nostalgia, making mealtime a celebration of flavor and togetherness.
- Prep Time: 20 minutes
- Cook Time: 30 minutes
- Total Time: 50 minutes
- Yield: Serves 8
- Category: Main
- Method: Baking
- Cuisine: Japanese
Ingredients
- 1 cup sushi rice
- ¼ cup rice vinegar (or apple cider vinegar)
- 2 teaspoons sugar
- 1 teaspoon salt
- ½ cup furikake seasoning
- 8 oz salmon fillets
- 1 tablespoon soy sauce (or tamari for gluten-free)
- ¼ cup cream cheese (softened)
- ¼ cup mayonnaise (Kewpie or regular)
- 2 tablespoons sriracha sauce
- 1 avocado, sliced or cubed
- ½ cucumber, sliced or cubed
- 2 green onions, sliced
- Nori seaweed sheets
- More Kewpie mayo
- Unagi sauce
Instructions
- Rinse sushi rice under cold water until water runs clear; cook according to package instructions.
- Preheat oven to 425°F. Line a 9×9 inch baking dish with parchment paper or grease it.
- Season cooked salmon fillets with soy sauce and bake at 400°F for about 15 minutes or until flaky. Allow cooling before shredding.
- In a bowl, combine shredded salmon, cream cheese, mayonnaise, and sriracha; mix until smooth.
- Press cooked sushi rice into the bottom of the baking dish, then spread the salmon mixture evenly on top.
- Sprinkle furikake seasoning over the salmon layer and bake for an additional 15 minutes until heated through.
- Let cool slightly before serving, topped with avocado, cucumber, green onions, and extra Kewpie mayo if desired.
Nutrition
- Serving Size: 1 square (approximately 150g)
- Calories: 320
- Sugar: 3g
- Sodium: 680mg
- Fat: 18g
- Saturated Fat: 5g
- Unsaturated Fat: 12g
- Trans Fat: 0g
- Carbohydrates: 30g
- Fiber: 1g
- Protein: 14g
- Cholesterol: 50mg