Vietnamese Fresh Spring Rolls Recipe
The joy of cooking is often about more than just the ingredients we use; it’s about the stories we tell, the memories we create, and the bonds we forge over a shared meal. When I think of Vietnamese Fresh Spring Rolls, my heart fills with warmth at the thought of family gatherings where laughter mixes with the fragrant aroma of fresh herbs and the crunch of crisp vegetables. These delicate rolls are not merely an appetizer; they are an experience, a vibrant tapestry of flavors that dance on your palate, evoking memories of sun-drenched afternoons spent in bustling markets or tranquil kitchens. The rice paper wraps are like little gifts, each bite revealing a delightful surprise of shrimp, vermicelli noodles, and a medley of garden-fresh veggies and herbs. I promise you, once you take that first bite, you’ll understand why these spring rolls have captured hearts worldwide.
What makes these spring rolls truly special is their versatility and freshness. You can adapt them to suit your taste, whether you prefer them loaded with shrimp or brimming with crunchy vegetables for a fully vegetarian take. The process is also incredibly engaging; it invites you to get hands-on and allows for creativity as you roll and assemble each piece. Imagine gathering around the table with friends or family, sharing tips on how to roll them perfectly while savoring each layer of flavor as your creation comes to life! They’re not just food; they’re a canvas for connection, laughter, and love—a perfect dish for celebrations or simply to brighten up any weeknight dinner.
Vietnamese Fresh Spring Rolls Recipe: A Colorful Delight
Let’s dive into this delightful recipe together! Making Vietnamese Fresh Spring Rolls is almost like crafting edible art—each roll bursting with color and flavor, waiting to be shared. Don’t worry if you haven’t rolled spring rolls before; I’ll guide you through every step so that by the end, you’ll feel like a pro! Get ready for an adventure in taste where each ingredient plays a pivotal role in creating something utterly extraordinary.
Ingredients:
As we embark on this culinary journey together, let’s talk about what goes into these beautiful spring rolls! Each ingredient is selected not just for flavor but also for texture and nutritional value. Here’s what you’ll need:
- ½ bunch cilantro (stems removed). Cilantro brings an aromatic freshness that elevates these rolls from ordinary to extraordinary. Its bright green leaves add a peppery note that cuts through the richness of other ingredients beautifully. When selecting cilantro, look for vibrant leaves without any wilting—the fresher the herb, the better the flavor! If you’re not a fan of cilantro’s unique taste, feel free to substitute it with fresh parsley for a milder touch.
- 1 ounce basil (sweet or Thai, stems removed). This herb adds a sweet fragrance that complements the shrimp perfectly. Basil has such an intoxicating aroma that can transport you straight to Southeast Asia! Thai basil has a slightly spicier kick compared to its sweet counterpart—both work wonderfully here depending on what you’re seeking. Just make sure to remove those stems as they can be tough and chewy.
- 1 pound boiled shrimp (36/40 count, peeled and deveined). Shrimp are a classic addition in Vietnamese Fresh Spring Rolls because their tender meat offers both protein and sweetness. The size matters here; 36/40 count means there are about 36-40 shrimp per pound—perfectly bite-sized for rolling! Always choose shrimp that smell fresh without any fishy odor; this ensures your rolls will be deliciously clean-tasting.
- 4 ounces vermicelli rice noodles (cooked). These delicate noodles add substance while still keeping things light. Vermicelli noodles are made from rice flour and water—they’re gluten-free and have an almost ethereal quality when cooked properly. Cook them according to package instructions until just tender but still slightly chewy; this texture will hold together beautifully in your rolls!
- 2 cups matchstick carrots. Carrots bring crunchiness along with their natural sweetness—a wonderful contrast against softer ingredients like shrimp and noodles. When preparing them as matchsticks, I recommend using a sharp knife or mandoline for uniformity; this not only looks appealing but ensures an even bite every time.
- 1 large cucumber (seeds removed, cut into 3-inch long ¼-inch strips). Cucumber serves as another refreshing crunch in our spring rolls—its coolness balances out richer flavors perfectly. Be sure to deseed it as those watery bits can make your roll soggy over time! Cutting them into strips allows for easy rolling without overwhelming other ingredients.
- 2 cups cabbage (cut into 3-inch long slices). Cabbage adds another layer of crunch while providing health benefits like fiber and vitamins C and K. Napa cabbage works especially well here due to its tender leaves—but regular green cabbage will do! Cut it thinly so it fits snugly inside your rolls without overpowering everything else.
- 12 rice papers (gluten-free). These delicate sheets are what holds everything together in our spring rolls—they’re essential! When purchasing rice paper wrappers, look for ones specifically labeled gluten-free if that’s important for your diet. Soak them briefly in warm water until pliable but not too soft—this step is crucial because if they’re too wet when rolling up your ingredients will spill out!
- ½ cup peanut butter (smooth). This creamy goodness acts as both glue and dipping sauce base—it adds richness while balancing out other flavors nicely! Choose high-quality peanut butter without added sugars or oils; pure roasted peanuts provide the best flavor here!
- 2 tablespoons soy sauce or Tamari (Tamari or gluten-free). Soy sauce adds umami depth—a savory note that’s absolutely paramount in Asian cuisine! If you’re looking for gluten-free options due to dietary restrictions then Tamari is perfect since it offers similar flavor profiles without wheat content.
- 2 tablespoons packed brown sugar (honey or coconut sugar). Brown sugar adds subtle sweetness alongside depth thanks to its molasses content which enhances all those delightful tastes happening within our rolls! You could swap out honey if desired—just remember it’ll alter consistency slightly but still be delicious!
- 1 tablespoon rice vinegar (or lime juice). This tangy component brightens everything up—it cuts through richness beautifully while adding complexity overall! Rice vinegar brings mild acidity whereas lime juice has more pronounced tartness so pick whichever appeals most at that moment!
- 1 clove garlic crushed. Garlic infuses aromatic warmth into our dipping sauce—it’s essential not only for flavor enhancement but also packs health benefits too! Make sure it’s crushed well so its essence fully mingles throughout rather than being clumpy!
- ½–1 teaspoon Sriracha sauce (to taste). Sriracha introduces heat—a little goes a long way here depending on personal preference! Start small then adjust accordingly since everyone’s spice tolerance varies greatly—from mild bites all way up fiery bliss!
- 3–6 tablespoons warm water. Warm water is used mainly during soaking rice papers; temperature makes all difference in achieving pliability needed prior rolling process begins smoothly!

Equipment You’ll Need:
Before we start creating these delectable spring rolls together, let’s gather some essential tools that will help make our cooking experience smoother and more enjoyable—think of these as vital partners in our delicious endeavor!
- Large mixing bowl: A spacious bowl is necessary not just for combining ingredients but also provides ample room when soaking rice papers without overcrowding them—this makes handling much easier later on too!
- Sharp knife: A good quality knife is non-negotiable here—it ensures clean cuts through your vegetables making prep quicker while allowing us maintain precision throughout assembly process.
- Cutting board: A sturdy cutting board provides safety during chopping sessions plus keeps countertops pristine—opt for one large enough accommodate various veggies without needing constant shuffling back-and-forth between surfaces!
- Tongs: Tongs are fabulous tools when maneuvering cooked shrimp or tossing together salad elements gently—they help avoid squishing delicate components ensuring everything looks lovely inside those final presentations before serving guests!
Preparing the Vietnamese Fresh Spring Rolls Recipe / Making Magic Happen
Now comes the fun part—the actual preparation where we bring all these beautiful elements together into one harmonious dish! Rolling spring rolls might seem intimidating at first glance but trust me when I say once you get hang of it you’ll find yourself enjoying every moment spent assembling those colorful parcels filled with love!
Step 1: Gather Your Ingredients
Begin by laying out all ingredients within reach—this makes assembly seamless since having everything nearby allows quick transitions between steps preventing unnecessary interruptions mid-rolls forming session later down line! Take time washing vegetables thoroughly under running water before slicing them according desired shapes mentioned previously above—trust me on this aspect cleanliness plays significant role keeping flavors vibrant during tastings ahead!
Step 2: Soften Rice Papers
Next up comes softening those coveted rice papers—which requires patience alongside proper technique mastery over soaking process itself: fill shallow dish warm water then dip one wrapper at time until pliable yet firm enough retain shape during wrapping stage afterward (about 10 seconds usually suffices!). Avoid leaving them submerged too long lest they become overly gooey making impossible achieve correct form afterwards—watch closely until right texture achieved before carefully removing from bath onto damp surface ready next phase awaiting completion thereafter…
Step 3: Assemble Your Rolls
Lay softened wrapper flat onto clean surface followed by spreading small amount peanut butter across center area where fillings shall reside next laid atop evenly arranged portioned veggies including layers crispy carrots crunchy cucumbers tender cabbage fragrant herbs finally crowned lastly boiled shrimp nestled snugly amidst pile—all proportions matter greatly ensuring consistent bites enjoyed throughout entire experience hence careful consideration vital here indeed no rushing allowed please take joy savoring artistry unfolding right before eyes now…
Step 4: Roll It Up!
Here comes most thrilling part: rolling up those divine creations tightly yet gentle manner ensuring none escape through cracks created during initial wrapping phase earlier—you want secure closure without tearing fragile skin surrounding filling blend within whilst maintaining enough airiness present thus guiding fingers upwards towards edge closest body gently tucking filling inside before folding side ends inward sealing edges shut completely achieving desired cylindrical shape beholden gaze upon proudest creations made thus far today…
Stay tuned as we continue exploring further steps toward completing full recipe showcasing fullest potential offered within delightful world Vietnamese cuisine awaits eager palates yearning discover wonders hidden simplicity found amongst humble origins drawn forth creativity expressed heartfelt connections made through deliciousness shared moments cherished forevermore…
Vietnamese Fresh Spring Rolls Recipe
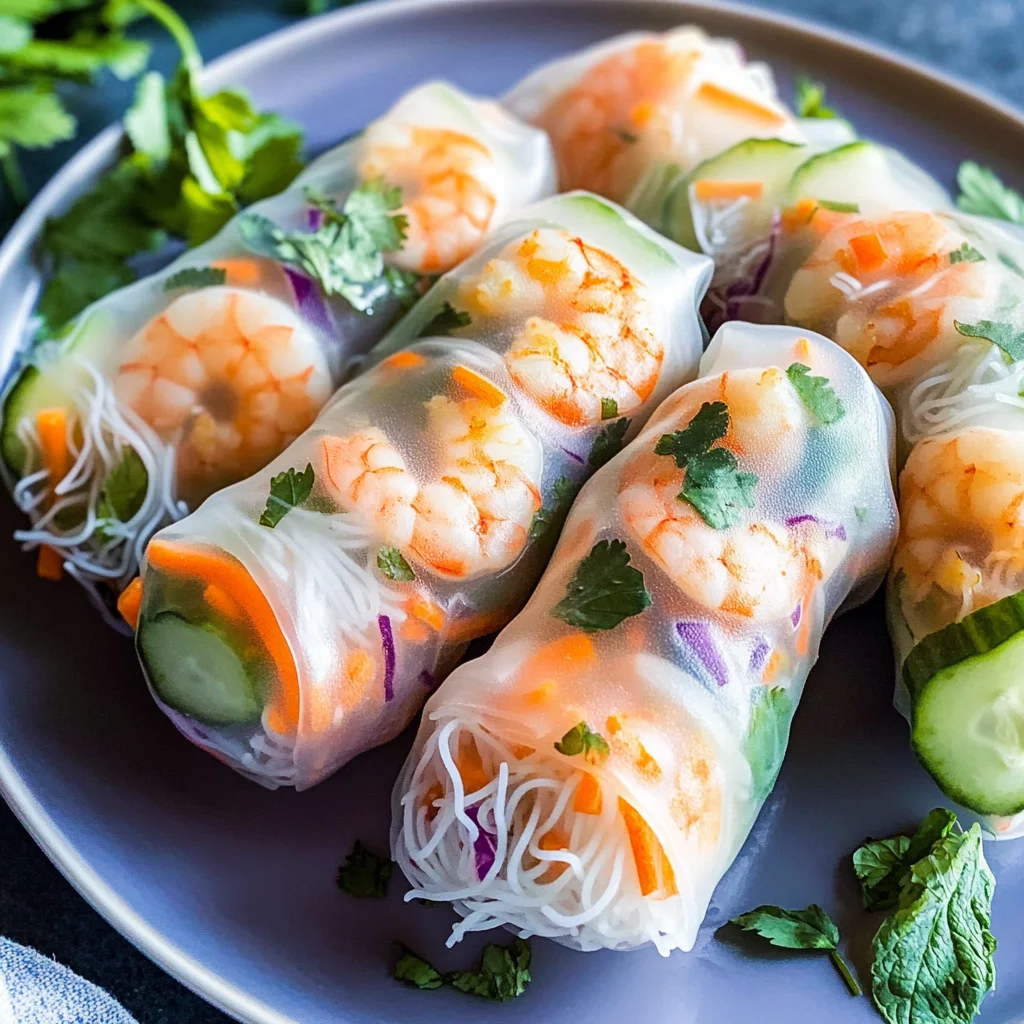
I can hardly express how excited I am to share this Vietnamese Fresh Spring Rolls Recipe with you! These vibrant, colorful rolls are not just a feast for the eyes; they are also a delightful burst of fresh flavors and textures that will transport you straight to the bustling streets of Vietnam. They embody a beautiful balance of crunchy veggies, fragrant herbs, and succulent shrimp, all wrapped in delicate rice paper—a perfect appetizer that’s both satisfying and light. Trust me, once you master this recipe, you’ll be making them for every gathering!
Step 5: Rolling the Perfect Spring Rolls
Now comes the part that truly makes these spring rolls shine—the rolling technique! First, fill a shallow dish or a large plate with warm water. You want it to be warm enough to soften the rice papers but not boiling hot; think of it as a gentle bath for your wrappers. Carefully dip one rice paper into the water for about 10-15 seconds. It should become pliable but still slightly firm—this is key because it will continue to soften as you work with it. If you leave it in too long, it can get overly sticky and tear easily, which can be frustrating. Remember, patience is your best friend here!
Once your rice paper is ready, lay it flat on a clean cutting board or plate. Now, let’s assemble our fillings! Start by placing a small handful of cooked vermicelli noodles just below the center of the rice paper. Next, layer in your matchstick carrots and cucumber strips—these add such an incredible crunch! Then tuck in a few pieces of boiled shrimp and sprinkle over those lovely herb leaves: cilantro and basil. This combination is what makes these rolls truly special. The aromatic basil adds a sweet yet slightly peppery flavor while the cilantro gives that refreshing zing that dances on your palate.
Step 6: The Art of Rolling
With your fillings arranged like a colorful canvas, it’s time to roll! Begin by folding the bottom edge of the rice paper over the filling tightly but gently—think of it as giving your ingredients a snug little hug. Then fold in the sides like an envelope to secure everything inside before rolling it up toward the top edge. As you roll, apply even pressure without squishing—this helps maintain that wonderful texture we crave in each bite. It’s crucial to ensure there are no gaps; otherwise, your delicious fillings might spill out during dipping or serving! Don’t worry if your first few rolls aren’t perfect; every great chef started somewhere!
Once rolled, place each spring roll seam-side down on a platter or serving tray so they stay closed beautifully. If you find yourself making several rolls at once (which I definitely encourage), cover them with a damp kitchen towel to keep them moist while you finish up assembling the rest. This little tip will prevent them from drying out and becoming tough—a huge win when you’re trying to impress friends or family!
Step 7: Preparing Your Dipping Sauce
Ahh, now we arrive at one of my favorite parts—the dipping sauce! This is where things get really exciting because dipping sauces can elevate any dish from good to absolutely spectacular. For these fresh spring rolls, we’re whipping up a silky peanut sauce that is utterly intoxicating and perfectly complements those fresh ingredients. In a mixing bowl, combine ½ cup of smooth peanut butter with 2 tablespoons of soy sauce (or Tamari if you’re gluten-free), 2 tablespoons of packed brown sugar (or honey/coconut sugar if you prefer), 1 tablespoon of rice vinegar (or lime juice for an extra zing), and one crushed garlic clove.
Now comes the fun part; whisk everything together until it’s smooth and creamy—this may take some elbow grease depending on how thick your peanut butter is! Gradually add in warm water—start with 3 tablespoons—and keep whisking until you reach your desired consistency. I promise you; this sauce is what transforms those fresh spring rolls into something truly extraordinary! It should be thick enough to cling beautifully to each roll but thin enough for easy dipping; think liquid gold draping over vibrant vegetables.
Step 8: Final Touches & Serving
Before presenting these culinary delights to your eager guests (or yourself!), let’s talk about presentation—because we eat with our eyes first! Arrange your beautifully rolled Vietnamese Fresh Spring Rolls on a large platter alongside small bowls filled with that luscious peanut sauce for dipping. If you’re feeling fancy, sprinkle a few crushed peanuts or finely chopped green onions over the top for an extra flair; it adds texture and visual appeal that truly elevates your dish.
Now here’s an important tip: serve these spring rolls fresh rather than letting them sit too long after assembly. Ideally, enjoy them right after making for that crispness in every bite—they lose their charm when they sit too long! However, if you’re prepping ahead of time for an event or gathering, wrap each roll individually in plastic wrap before refrigerating—just remember to eat them within 24 hours for optimal freshness.
And there you have it—the ultimate Vietnamese Fresh Spring Rolls Recipe! I can’t wait for you to dive into this experience; it’s nothing short of magical when you take that first bite wrapped in all those flavors and textures combined together beautifully. Enjoy every moment spent creating these delightful treats—you deserve it!
Storage and Enjoyment Tips for Your Vietnamese Fresh Spring Rolls Recipe
Now that you’ve crafted these delightful Vietnamese fresh spring rolls, it’s time to revel in the joy of enjoying them! Whether you’re hosting a lively gathering or simply treating yourself, these rolls are sure to be a hit. But what if there are leftovers? Don’t fret! I’m here to share some fantastic tips on how to store them without sacrificing that fresh, vibrant taste we all love.
Storing Leftover Vietnamese Fresh Spring Rolls Recipe
When it comes to storing your homemade Vietnamese fresh spring rolls, the right container is absolutely paramount. Opt for an airtight container that will keep them snug and protected from air exposure. You can stack them carefully with parchment paper between layers to prevent sticking and keep those beautiful rice paper wrappers intact. Ideally, you’ll want to refrigerate these tasty morsels, where they’ll stay fresh for about 1-2 days. Now, here’s a little pro tip: if you place a slice of bread in the container with your spring rolls, it absorbs excess moisture and helps maintain that wonderful crispness. I promise you, this trick works like magic! After storage, while they might lose just a tiny bit of their original crunch, the flavors remain profoundly satisfying—fresh herbs and sweet veggies still shine through. When you’re ready to enjoy them again, simply serve cold straight from the fridge or let them sit at room temperature for about 10 minutes for optimal enjoyment.
Freezing Components for Later
If you’re looking to extend the life of your delicious creations even further, consider freezing components of your Vietnamese fresh spring rolls! While it’s best to enjoy the spring rolls fresh, you can freeze cooked shrimp or vermicelli noodles separately. To freeze properly, place them in freezer-safe bags or containers after cooling completely—this ensures they don’t stick together into one solid block! They can stay good in the freezer for up to three months. When you’re ready to use them from frozen, just thaw them overnight in the refrigerator or use the defrost setting on your microwave. This is such a convenient option when you crave that burst of freshness but don’t have time for prep work. Having these components ready on hand means you can whip up a batch of spring rolls anytime inspiration strikes!
I hope these storage tips inspire you as much as making the rolls does! Remember, this recipe is not just about nourishment; it’s about sharing joy—and what better way than enjoying these delectable bites over time?
Vietnamese Fresh Spring Rolls
Dive into the vibrant world of Vietnamese cuisine with these delightful fresh spring rolls! Bursting with a medley of colors and flavors, each roll is a refreshing combination of crunchy vegetables, tender shrimp, and fragrant herbs, all wrapped in delicate rice paper. Perfect as an appetizer or light meal, these rolls are not only visually stunning but also incredibly versatile—customize them to suit your taste! Whether enjoyed solo or paired with a creamy peanut dipping sauce, these spring rolls promise to transport you straight to the bustling streets of Vietnam. Let’s roll up some deliciousness!
- Prep Time: 30 minutes
- Cook Time: None
- Total Time: 0 hours
- Yield: Serves approximately 6 people (2 spring rolls each) 1x
- Category: Appetizer
- Method: No-Cook
- Cuisine: Vietnamese
Ingredients
- ½ bunch cilantro (stems removed)
- 1 ounce basil (sweet or Thai, stems removed)
- 1 pound boiled shrimp (36/40 count, peeled and deveined)
- 4 ounces cooked vermicelli rice noodles
- 2 cups matchstick carrots
- 1 large cucumber (seeds removed, cut into strips)
- 2 cups cabbage (cut into thin slices)
- 12 rice papers (gluten-free)
- ½ cup smooth peanut butter
- 2 tablespoons soy sauce or Tamari
- 2 tablespoons packed brown sugar
- 1 tablespoon rice vinegar
- 1 clove garlic (crushed)
- ½–1 teaspoon Sriracha sauce (to taste)
Instructions
- Gather all ingredients and prepare vegetables by washing and slicing them appropriately.
- Soften the rice papers by briefly dipping them in warm water until pliable.
- Lay the softened rice paper flat on a clean surface. Spread a small amount of peanut butter in the center.
- Layer cooked vermicelli noodles, matchstick carrots, cucumber strips, boiled shrimp, and fresh herbs on top.
- Fold the bottom edge over the filling tightly, then fold in the sides and roll towards the top edge to seal.
- Repeat for all rice papers and fillings.
- For the dipping sauce, mix peanut butter with soy sauce, brown sugar, rice vinegar, crushed garlic, and Sriracha in a bowl until smooth.
Nutrition
- Serving Size: 1 spring roll (approximately 80g)
- Calories: 150
- Sugar: 5g
- Sodium: 250mg
- Fat: 7g
- Saturated Fat: 1g
- Unsaturated Fat: 6g
- Trans Fat: 0g
- Carbohydrates: 20g
- Fiber: 3g
- Protein: 8g
- Cholesterol: 60mg