Thai Satay Chicken with Peanut Sauce
There’s something profoundly special about cooking that goes beyond mere sustenance; it’s a journey that connects us to our roots, our culture, and even our loved ones. Each ingredient has a story, a purpose, and when combined with love and intention, they create an experience that transcends the plate. Imagine the sizzling sounds of marinated chicken skewers hitting the grill, the intoxicating aroma of spices wafting through the kitchen, and the rich, creamy texture of peanut sauce waiting to embrace those tender morsels. This is what makes Thai Satay Chicken with Peanut Sauce not just a recipe but a celebration—a bridge between tradition and innovation that invites everyone around the table to savor every moment. I promise you, once you make this dish at home, it will become your go-to for gatherings and special occasions alike!
The allure of Chicken Satay is undeniable; its origins trace back to Southeast Asia where street vendors entice passersby with their smoky aromas and vibrant flavors. The beauty lies in its simplicity—the way juicy pieces of chicken are transformed into succulent skewers after marinating in a symphony of flavors, only to be paired with an utterly addictive peanut sauce that dances on your palate. It’s no wonder that this dish graces menus around the world—it invites sharing and creates memories over laughter and conversation. Whether you’re preparing for a festive holiday gathering or looking for an easy weeknight meal that impresses, this Thai Satay Chicken will surely make your heart sing.
Thai Satay Chicken with Peanut Sauce: A Flavorful Celebration
Let’s dive into this culinary adventure together! Making Thai Satay Chicken with Peanut Sauce is not only straightforward but also incredibly rewarding as you transform simple ingredients into something spectacular. The joy of marinating chicken fills your kitchen with fragrant notes while anticipation builds for that first bite of grilled skewers dipped into luscious peanut sauce. I can’t wait for you to experience how these flavors come together!
Ingredients:
As we embark on this delicious journey, let’s gather our ingredients. Each one plays a vital role in creating that unforgettable taste.
- 2 pounds chicken breasts or thighs (sliced into 1 1/2 wide strips by 3-5 long). This choice of protein is crucial because it becomes the canvas for all those wonderful marinades and spices we’re about to introduce. Chicken thighs offer juiciness due to their higher fat content compared to breasts; however, if you’re looking for leaner options, breasts will still deliver great flavor when cooked correctly. The key here is slicing them into uniform strips so they cook evenly on the grill or in the oven—an essential step for achieving that tender perfection we all crave.
- 3 tablespoons olive oil. This golden liquid is more than just a cooking fat; it acts as a carrier for flavor while keeping our chicken moist during cooking. Olive oil has heart-healthy properties that complement our dish beautifully—choose high-quality extra virgin olive oil if possible for its robust flavor profile. It’s also important to note how oil helps in browning the chicken during cooking, enhancing both appearance and taste.
- 1/4 cup coconut milk plus more as needed (may sub water). Coconut milk brings an exquisite creaminess to our marinade and peanut sauce while introducing subtle sweetness—a hallmark of many Thai dishes. When selecting coconut milk, look for full-fat varieties in cans for rich flavor; light versions can dilute this richness significantly. If you find yourself in need of a substitute due to dietary restrictions or preferences, water can work but may not yield quite the same luxurious result.
- 1/3-1/2 cup smooth peanut butter. Ahh, peanut butter—the star ingredient! It adds depth and an irresistible nuttiness to our sauce that pairs perfectly with grilled chicken. Opt for natural peanut butter without added sugars or oils for the best flavor; it should be smooth enough to blend seamlessly into our sauce later on. Trust me when I say you might want to keep some extra on hand because once you taste this sauce, you’ll want more!
- 12-15 skewers. These handy tools are essential for transforming our marinated chicken strips into delightful bites perfect for grilling or baking! If you’re using wooden skewers (which I highly recommend), remember to soak them in water beforehand—this step prevents them from burning during cooking and ensures they hold your delicious morsels securely.
- 1/4 cup low sodium soy sauce. Soy sauce introduces umami—a savory depth—into our marinade that enhances all other flavors present in the dish while keeping sodium levels in check! Look for low-sodium options if you’re mindful of salt intake; it’s always easier to add salt than take it away after cooking.
- 1/4 cup packed brown sugar. Sweetness is key here! Brown sugar lends a beautiful caramel note that balances out spicy elements while promoting browning during cooking—a crucial part of achieving those enticing charred edges on our chicken skewers.
- 1 tablespoon chili paste (like Sambal Oelek). This ingredient packs a punch! Chili paste adds some heat while offering complex flavors beyond just spiciness—think tangy undertones mixed with garlic essence which elevates our marinade especially well.
- 1 1/2 tablespoons lime juice. The bright acidity from lime juice cuts through richness; it’s essential not just for flavor but also helps tenderize meat during marination by breaking down protein fibers gently over time—this results in juicy goodness!
- 1 1/2 tablespoons fish sauce: Fish sauce may sound intimidating initially but bear with me—it’s what brings authenticity to many Southeast Asian dishes while adding incredible depth of flavor we’ve come to love! Don’t worry about overwhelming fishy taste; it blends harmoniously once combined with other ingredients.
- 1 teaspoon dried basil: An aromatic herb like basil complements both marinades and sauces effortlessly—it evokes warmth reminiscent of sunny days spent enjoying meals outdoors!
- 1 teaspoon ground coriander: Ground coriander offers floral notes that balance out spice perfectly—you’ll appreciate its subtlety as it mingles gracefully within each bite.
- 1/2 teaspoon ground ginger: Ginger contributes warmth along with its signature zing which plays so nicely alongside sweeter elements present within peanut sauce—it’s vital!
- 1/2 teaspoon garlic powder: Garlic powder provides convenience without sacrificing flavor—it works wonders when combined effectively throughout various components found within both satay marinade & accompanying dipping sauce!
- 1/2 teaspoon ground turmeric: This bright yellow spice doesn’t only add color but also infuses earthiness—it’s an integral player here promoting health benefits too!
Now that we have everything ready let’s gather those utensils because we’re going to create something extraordinary together!
Equipment You’ll Need:
Having the right tools makes all the difference when it comes to creating culinary magic! While these items may not be listed as ingredients per se, they play pivotal roles in ensuring everything runs smoothly throughout your culinary journey.
- Skewers (wooden or metal) – These are non-negotiable if you want perfectly grilled satay! Wooden skewers require soaking beforehand so they won’t burn on high heat while metal ones tend towards durability—they’re reusable too! Choose based on preference but ensure they’re sturdy enough to handle those delectable chunks of chicken.
- Medium bowl – A reliable medium-sized mixing bowl will serve multiple purposes from whisking marinades together seamlessly before coating chicken pieces adequately—all while allowing space needed for proper mixing without mess!
- Whisk – Essential equipment indeed! A good whisk ensures all ingredients meld together beautifully while creating an inviting texture within both marinade & peanut sauce—use one made from stainless steel or silicone depending on personal preference.
- Baking sheets lined with foil or parchment paper – If opting for oven-baking method later; lining sheets prevents sticking & allows easy cleanup afterward making life simpler post-cooking!
- Non-stick spray/oil spray – A must-have whether grilling indoors/outdoors too since preventing sticking means minimal hassle turning skewers ensuring even cooking throughout each piece!
With these tools gathered up let’s roll up those sleeves because we’re diving headfirst into preparing this incredible dish step by step!
Step 1: Whisking Up Flavorful Magic
To begin this delightful process, grab your medium bowl and combine all those captivating marinade/sauce ingredients: soy sauce, chili paste, lime juice alongside brown sugar & spices like dried basil along ground ginger/turmeric until thoroughly whisked together—making sure every element mingles beautifully before setting aside roughly one-third cup worth within freezer bag marked ‘marinade.’ Now comes my favorite part—add three tablespoons olive oil directly into remaining mix then toss cubed chicken strips until every piece gets lovingly coated within flavorful goodness before placing inside refrigerator covered tightly allowing them time (ideally six hours up overnight!) absorbing every nuance developing deep flavors transforming ultimately come cook-time later…
Step 2: Soaking Skewers & Prepping Chicken
As we near cook-time excitement builds exponentially! First things first though: don’t forget about soaking those wooden skewers mentioned earlier–ensure at least thirty minutes immersed fully submerged within cool water otherwise risk burning during grilling/baking phase ahead… meanwhile let’s remove marinated chicken from refrigerator allowing bring room temp aiding even cooking thereafter threading each coated strip carefully onto soaked skewer ensuring ‘em spaced apart sufficiently avoiding clumping leaving ample surface area exposed promoting optimum browning effect once hit heat source…
Step 3: Choosing Your Cooking Method
At this point you’ve got options galore regarding how best approach finishing touches—we’ll explore three popular methods today! If opting oven route simply preheat oven set temperature around 350°F then line two separate baking sheets using foil lightly greased nonstick spray creating perfect surface area whilst evenly distributing threaded skewered creations across both sheets ensuring none overlap too much… Bake away anywhere between fifteen-twenty minutes whilst keeping keen eye checking internal temperature achieving safe mark around 165°F preventing overcooking resulting dry texture ruining experience altogether…
Step 4: Grilling To Perfection
On flip-side if outdoor grilling suits mood better grease grill well heating up high before dropping those heavenly morsels onto heated grate reducing temp down medium cover lid letting each side sizzle away three-four minutes maximizing caramelization creating signature char marks we crave most times indulging people plates… Keep close watch though ensuring reaching internal temperature mentioned earlier confirming readiness maintaining juiciness intact throughout process…
I can already imagine how deliciously aromatic your kitchen must smell right now as these tantalizing scents waft through air–stay tuned friends because soon we’ll whip up glorious peanut sauce bringing everything full circle beautifully elevating dining experience even further beyond imagination—you won’t want miss out trust me!
Stay connected as we prepare ourselves next steps ahead diving deeper layers building upon masterpiece ultimately leading ultimate satisfaction gratifying palates around world loves coming together sharing good food—the heart home truly exists isn’t?
Step 5: Grilling Your Chicken to Perfection
Now that you have your chicken beautifully marinated and ready to go, it’s time to elevate those flavors even further by grilling them. Trust me when I say that grilling adds a depth of smoky, charred goodness that is simply irresistible! Start by preheating your grill—whether it’s an indoor grill pan or an outdoor grill—to high heat. This step is absolutely crucial because you want to create a beautiful sear on the outside of the chicken. Once your grill is hot, carefully reduce the heat to medium before adding the skewers. Why this adjustment? It allows for an ideal cooking environment—high enough to achieve that golden crust while ensuring that the inside cooks through without drying out.
Place the skewers on the grill with a gentle sizzle that is music to your ears. You’ll want to cover them with a lid while they cook, trapping in all those incredible flavors and moisture. Grill each side for about 3-4 minutes until they’re perfectly cooked through, reaching an internal temperature of 165 degrees Fahrenheit. You can tell they’re done when they are firm and opaque throughout, with lovely grill marks adorning their surfaces. But don’t rush this step! The magic truly happens when you allow those flavors to meld together on the grill, creating a symphony of tastes that will transport you straight to Thailand with every bite.
Step 6: Creating Your Irresistible Peanut Sauce
While your chicken is grilling away, let’s turn our attention to what makes this dish utterly extraordinary—the peanut sauce! In a small saucepan over medium heat, combine your reserved marinade (the one we saved earlier) with either coconut milk or water—your choice depending on how rich you want the sauce to be. Bring this mixture to a gentle boil; you’ll notice it starts bubbling and thickening just slightly. This process not only heats up the flavors but also helps them come together in perfect harmony.
After letting it simmer for about one minute—just enough time for those ingredients to mingle—you’ll stir in the smooth peanut butter. Now, here’s where you want to channel your inner chef; whisk it vigorously until it becomes a luscious and creamy delight. If you’re like me and love a thicker sauce, feel free to add additional peanut butter at this stage; otherwise, if you’re leaning towards something lighter, introduce water or coconut milk one tablespoon at a time until you reach your desired consistency. Taste as you go—this is where you can customize it! Perhaps just a touch more chili paste for some extra heat? This step allows you not only to adjust flavors but also ensures that every bite is tailored perfectly to your liking.
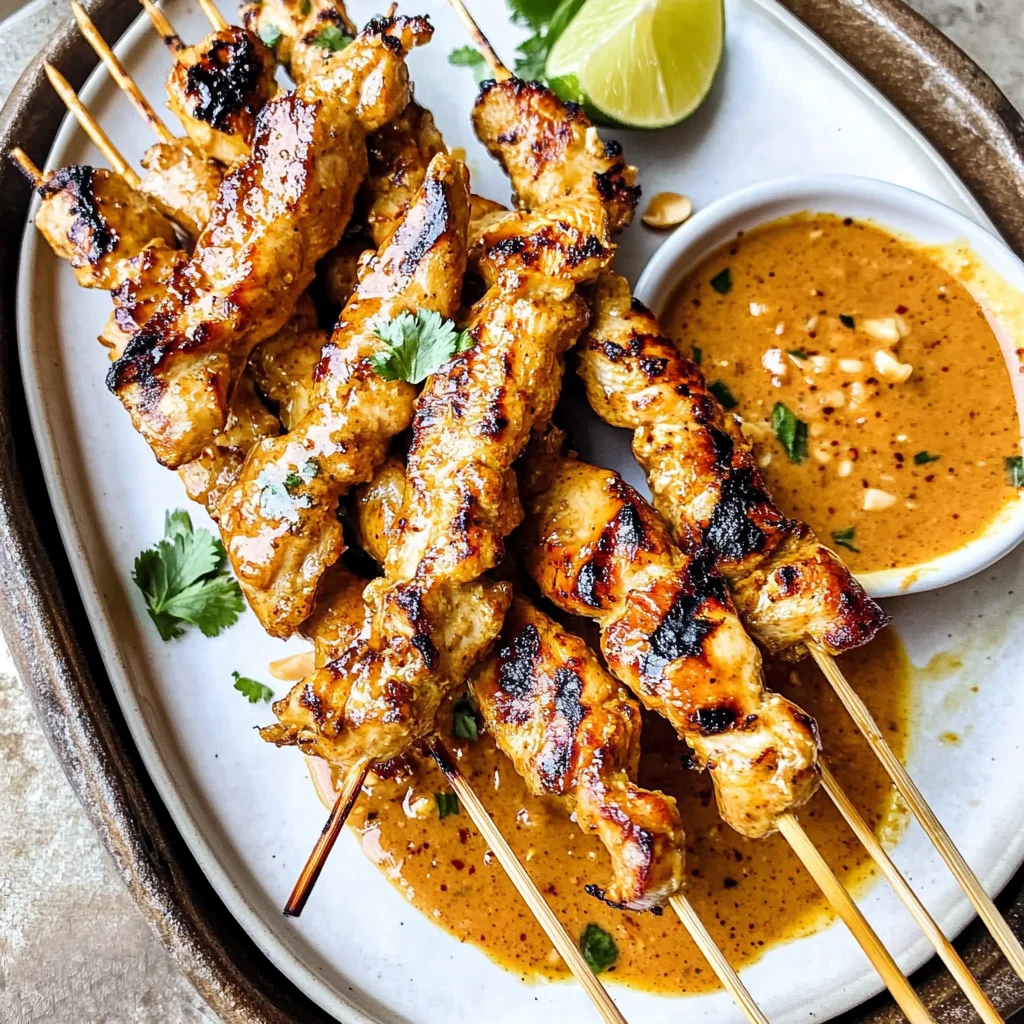
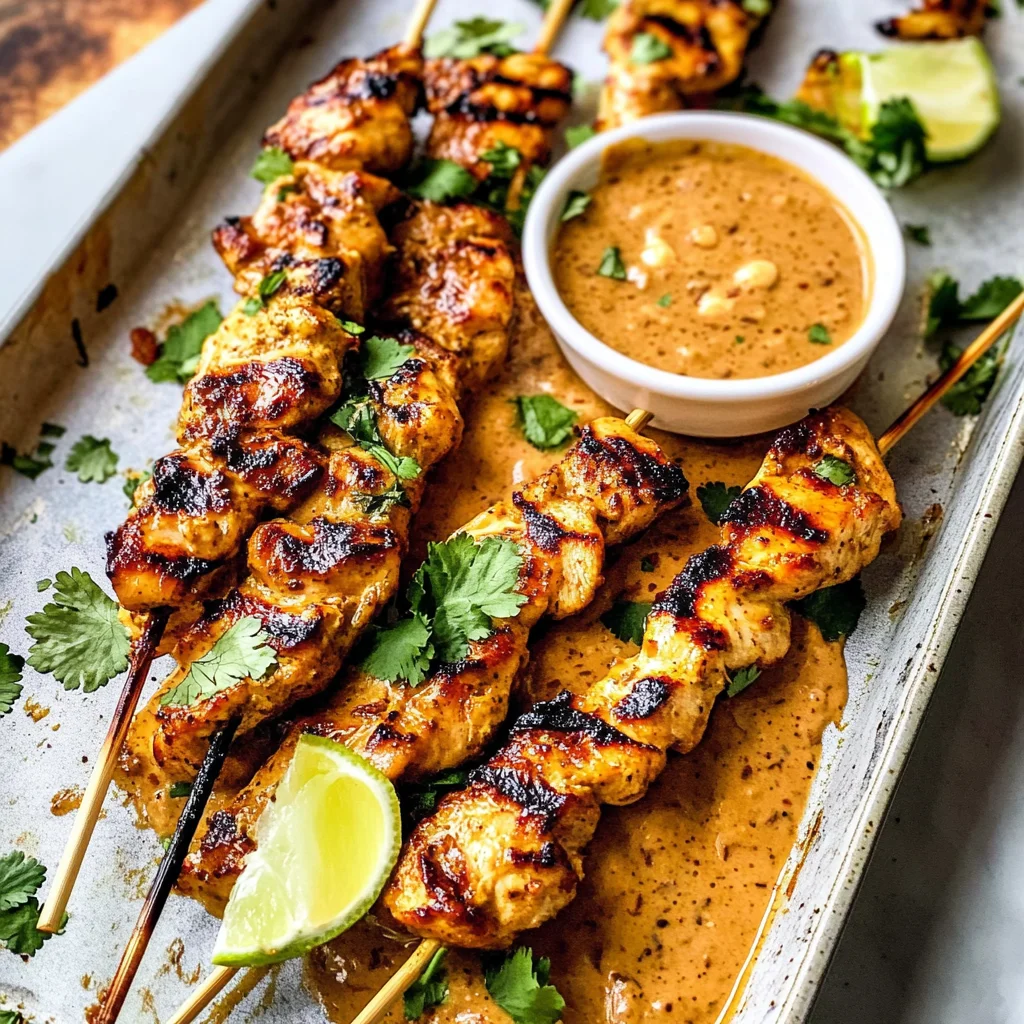
Step 7: Serving Up Your Thai Satay Chicken
With everything now beautifully prepared—the skewered chicken sizzling away and the peanut sauce waiting patiently—it’s time for my favorite part: serving! When plating these delightful chicken satays, think about presentation as well as flavor. Arrange the skewers artfully on a platter; I love garnishing with some fresh cilantro or crushed peanuts for an added layer of texture and visual appeal. This simple touch elevates your dish from everyday fare into something special—a feast for both the eyes and palate!
Now comes the moment of truth: dipping that warm chicken into your creamy peanut sauce. As you do so, take note of how each piece glistens in that liquid gold sauce—it’s utterly intoxicating! When serving this dish as an appetizer or main course with rice and veggies alongside, consider offering additional lime wedges for guests who might enjoy an extra pop of acidity; trust me on this one! The bright zing from lime will cut through the richness of the peanut sauce beautifully.
Step 8: Final Touches and Enjoying Every Bite
Once everything is beautifully arranged and ready to go, don’t forget about those final touches before diving in! A sprinkle of sesame seeds over the top can add another layer of crunch and visual excitement while keeping things authentic. If you’re feeling adventurous, some sliced scallions or red chili slices can bring not just color but also additional flavor dimensions that will leave everyone wanting more.
As you gather around with family or friends—because let’s be honest, food is best enjoyed in great company—take a moment to soak it all in: the aroma wafting through the air, laughter echoing around you, and anticipation building as everyone digs into this vibrant dish! Each bite should remind you why cooking holds such joy—a deeply satisfying experience filled with love, tradition, and unforgettable memories.
So there you have it! You’ve just crafted an exquisite plate of Thai Satay Chicken with Peanut Sauce right from your own kitchen. Whether it’s for a festive occasion or simply a weeknight treat, I promise you this recipe will quickly become one of your cherished staples. Happy cooking!
Storage and Enjoyment Tips for Your Thai Satay Chicken with Peanut Sauce
Oh, the moment has finally arrived! Your kitchen is filled with the mouthwatering aroma of Thai Satay Chicken with Peanut Sauce, and I promise you, it’s as delightful to eat as it is to prepare. As you gather your loved ones around the table, take a moment to appreciate the flavors you’ve crafted together. But let’s not forget that sometimes, there are leftovers—and that’s a blessing in disguise! Knowing how to store and enjoy your delectable creations will ensure that every bite remains as heavenly as the first.
Storing Leftover Thai Satay Chicken with Peanut Sauce
When it comes to storing your leftover Thai Satay Chicken with Peanut Sauce, choosing the right container is absolutely paramount. Opt for airtight glass containers if possible; they preserve flavors beautifully and are reusable. You can keep your leftovers in the refrigerator for up to three days, ensuring that those tantalizing flavors don’t fade away. For keeping your chicken extra juicy, try placing a slice of bread in the container—this clever trick helps maintain moisture! When you take it out of storage, you’ll find that even after a day or two, the savory notes and creamy richness of the peanut sauce still dance on your palate. For reheating, simply pop it in the microwave or enjoy it warmed on a skillet over low heat; trust me, it’s just as satisfying!
Freezing Thai Satay Chicken with Peanut Sauce for Later
If you want to savor this dish even longer, freezing is an excellent option! To do this properly, make sure to let your chicken cool completely before transferring it into freezer-safe bags or containers. Squeeze out as much air as possible before sealing them tight; this will help prevent freezer burn and keep those beautiful flavors intact. Your frozen satay can last for up to three months—truly a lifesaver for busy weeknights! Just thaw in the fridge overnight when you’re ready to use it again; then reheat gently on a skillet or in the oven until heated through. The convenience factor here is incredible; imagine having your favorite dish waiting for you on a hectic day—it brings such joy!
Thai Satay Chicken with Peanut Sauce

Thai Satay Chicken with Peanut Sauce is a delightful dish that brings the vibrant flavors of Southeast Asia right to your kitchen. Juicy marinated chicken skewers, grilled to perfection and served with a creamy, nutty peanut sauce, create a culinary experience that is both satisfying and unforgettable. The marinade blends savory soy sauce, sweet brown sugar, and zesty lime juice, while the peanut sauce adds a rich finish that perfectly complements the tender chicken. Ideal for gatherings or an easy weeknight dinner, this dish promises to impress your family and friends. Dive into this flavorful adventure and enjoy every bite!
- Prep Time: 20 minutes
- Cook Time: 15 minutes
- Total Time: 35 minutes
- Yield: Approximately 6 servings 1x
- Category: Dinner
- Method: Grilling
- Cuisine: Thai
Ingredients
- 2 pounds chicken breasts or thighs
- 3 tablespoons olive oil
- 1/4 cup coconut milk
- 1/3–1/2 cup smooth peanut butter
- 1/4 cup low sodium soy sauce
- 1/4 cup packed brown sugar
- 1 tablespoon chili paste
- 1 1/2 tablespoons lime juice
- 12–15 skewers
Instructions
- In a medium bowl, whisk together soy sauce, olive oil, coconut milk, brown sugar, chili paste, lime juice, and spices. Set aside one-third of the mixture for later.
- Add sliced chicken to the remaining marinade and coat well. Cover and refrigerate for at least six hours or overnight for maximum flavor.
- Soak wooden skewers in water for at least 30 minutes to prevent burning.
- Preheat your grill or oven to medium heat (350°F). Thread marinated chicken onto skewers.
- Grill each skewer for about 3-4 minutes per side until fully cooked (internal temperature of 165°F).
- In a saucepan over medium heat, combine reserved marinade with coconut milk or water until heated through. Stir in peanut butter until creamy.
- Serve skewers warm with peanut sauce for dipping.
Nutrition
- Serving Size: 1 skewer (approx. 100g)
- Calories: 320
- Sugar: 8g
- Sodium: 550mg
- Fat: 18g
- Saturated Fat: 3g
- Unsaturated Fat: 12g
- Trans Fat: 0g
- Carbohydrates: 16g
- Fiber: 2g
- Protein: 24g
- Cholesterol: 70mg