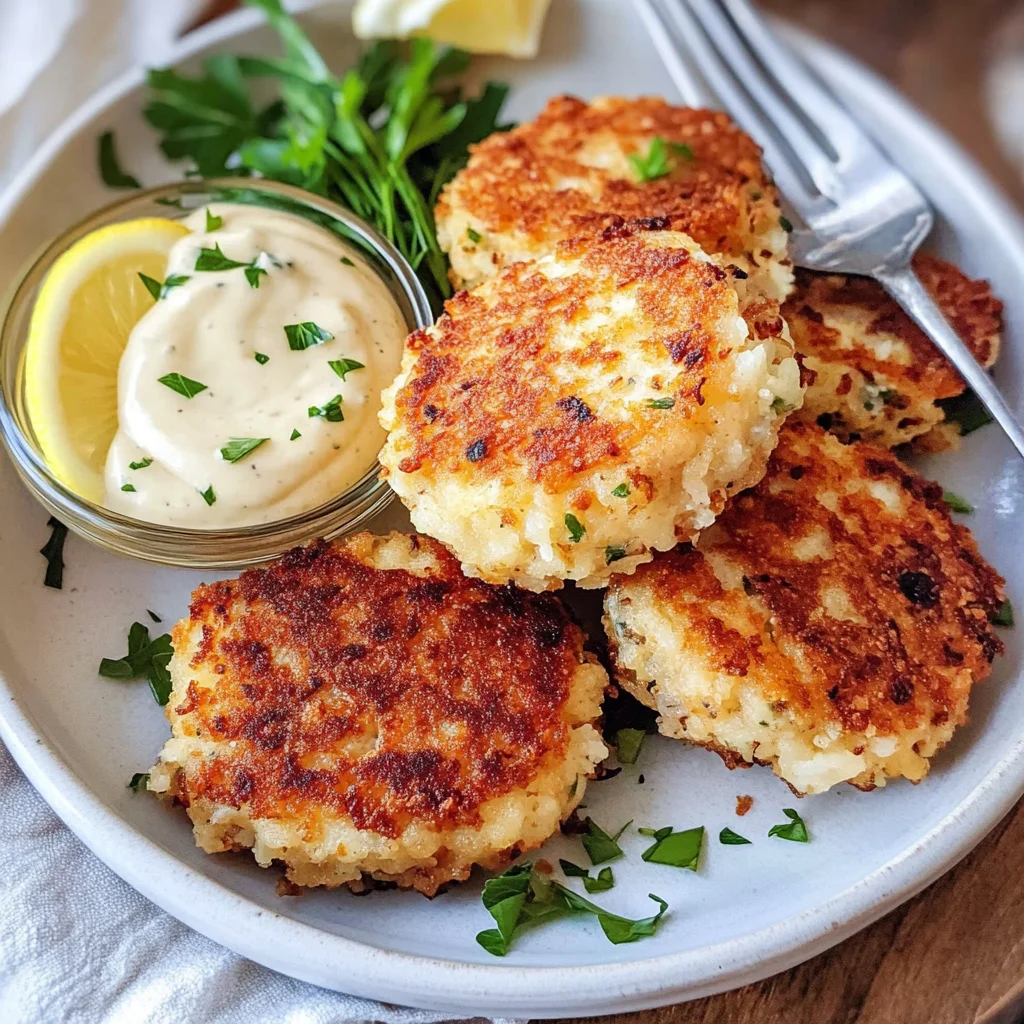
Shrimp Cakes with Lemon Aioli
There’s something utterly captivating about the way food can transport us to cherished moments, isn’t there? When I think of my favorite dishes, they aren’t just meals; they’re experiences that weave together flavors, aromas, and memories. Today, I’m thrilled to share a recipe that embodies this sentiment beautifully: Shrimp Cakes with Lemon Aioli. Imagine sinking your teeth into a crispy golden patty, where tender shrimp meet fresh herbs and spices, bursting with flavor. And just when you think it can’t get any better, a bright and zesty lemon aioli adds an irresistible tang that elevates every single bite. This isn’t just food; it’s a celebration of taste, a bridge between the comforting familiarity of home cooking and the exciting thrill of culinary adventure.
I’ve always been captivated by seafood and how it can be transformed with just a few thoughtful touches. These shrimp cakes are not merely an appetizer; they’re perfect for any gathering—be it a cozy dinner party or a sunny afternoon barbecue. They hold their own as finger food but can also shine as part of a more elaborate meal. Trust me when I say that once you serve these little delights, you’ll have friends and family clamoring for the recipe! So let’s dive into this delightful culinary journey together.
Shrimp Cakes with Lemon Aioli: A Coastal Delight
These Shrimp Cakes with Lemon Aioli are sure to become your new go-to dish for gatherings or weeknight dinners. With simple ingredients and straightforward steps, you’ll impress your loved ones while enjoying the process yourself!

Ingredients:
As we embark on this culinary adventure together, let’s take a moment to appreciate each ingredient that will bring our shrimp cakes to life. Each one plays a vital role in creating those layers of flavor that make this dish so special.
- 1 lb shrimp, peeled and deveined. The star of our show! Fresh shrimp is essential here; it brings a delicate sweetness and tender texture that forms the foundation of our cakes. When purchasing shrimp, look for those labeled wild-caught if possible, as they typically have superior flavor compared to farmed varieties. If you’re unsure about cleaning shrimp yourself, don’t hesitate to ask your fishmonger for help—they’re usually more than happy to assist!
- 1/2 cup panko breadcrumbs. These Japanese-style breadcrumbs are crucial for achieving that coveted crispy exterior without weighing down the cake itself. Their light texture allows them to absorb less oil during frying while still providing an irresistible crunch. If you can’t find panko, regular breadcrumbs will work in a pinch but won’t give you quite the same airy crispiness.
- 1/4 cup mayonnaise. A binding agent that also adds richness and moisture to our cakes. The creaminess it imparts helps meld all the ingredients together beautifully while ensuring our cakes don’t dry out during cooking. For a lighter option, you might opt for Greek yogurt instead—it will provide similar moisture without sacrificing flavor.
- 1 egg. This little powerhouse serves as another binding agent in our mixture, helping everything hold together while adding subtle richness as well. Using room temperature eggs helps them incorporate more easily into the mixture; so if you remember this step ahead of time, your shrimp cakes will blend seamlessly.
- 2 tablespoons fresh parsley, finely chopped. Fresh herbs elevate any dish with vibrant color and flavor! Parsley brings brightness and freshness that perfectly complements the sweetness of our shrimp without overpowering it. If you’re feeling adventurous or want to mix things up, feel free to substitute with cilantro or chives!
- 1 tablespoon Dijon mustard. The mustard adds not only depth but also a hint of tanginess that enhances the overall flavor profile of the cakes—a non-negotiable addition in my book! It gives our patties an unexpected layer that keeps everyone guessing what makes them so delicious.
- 1 tablespoon lemon juice. A splash of acidity is absolutely paramount in balancing out the richness from our other ingredients—this is what will make your taste buds dance! Fresh lemon juice is always best; bottled varieties tend to lose some brightness over time.
- 1 teaspoon Old Bay seasoning. This iconic blend is packed with flavors like celery salt, paprika, and black pepper—perfectly suited for seafood dishes! It adds warmth and complexity without being overwhelming.
- 1/2 teaspoon garlic powder. While fresh garlic is wonderful too (if you prefer), garlic powder provides an even distribution of flavor throughout without leaving chunks behind in our delicate cake mixture.
- Salt and pepper to taste. Never underestimate these kitchen staples! They enhance all other flavors present in your dish—think of them as enhancers rather than mere seasonings.
- 2 tablespoons olive oil (for frying). A good quality extra virgin olive oil will not only help achieve that golden-brown crust we crave but also impart its own fruity notes into each bite!
For the Lemon Aioli:
– 1/2 cup mayonnaise. Just like before, this creamy base ensures our aioli is smooth and luscious—the perfect dipping companion for those scrumptious shrimp cakes!
- 1 tablespoon lemon juice. Again bringing brightness into play—this ingredient ties everything together beautifully while keeping flavors lively.
- 1 teaspoon lemon zest. Oh my goodness—the zest truly adds such intensity! It’s amazing how just a hint can brighten up any dish exponentially—don’t skip this step!
- 1 clove garlic, minced. Fresh garlic here brings an aromatic punch that elevates our aioli from ordinary to extraordinary!
- Salt and pepper to taste. Just as before—they’re essential players when building flavors!
Equipment You’ll Need:
Before we dive into crafting these delightful Shrimp Cakes with Lemon Aioli, let’s make sure we have all our trusty tools at hand! Having the right equipment not only makes cooking smoother but also sparks joy in creating something delicious.
- Large mixing bowl: This is where all the magic happens! A sturdy bowl allows enough room for mixing without fear of spills—opt for glass or stainless steel for easy cleanup after all that deliciousness has been devoured!
- Food processor (optional): If you’re looking to save some time chopping your shrimp or herbs finely—and trust me when I say there’s no shame in using tools like this—then reach for your trusty food processor! Just be careful not to over-pulse; we want small pieces rather than mush!
- Skillet or frying pan: A heavy-bottomed skillet ensures even heat distribution while frying those beautiful cakes until golden brown—a must-have tool in any kitchen!
- Spatula: For flipping those delicate patties without breaking them apart mid-air—grab one that’s wide enough yet flexible enough to slide under easily.
Now we’re set up perfectly for success! Let’s move on to preparing those scrumptious shrimp cakes paired with the zesty aioli that’ll leave everyone raving about this delightful dish!
Step 1: Preparing Your Shrimp
Start by taking those lovely fresh shrimp and giving them some love—you want them chopped into small pieces roughly the size of a pea or pulse them gently in your food processor until they reach that perfect consistency without turning into paste (a few pulses should do!). This step is crucial because it ensures every bite has just enough texture without overwhelming anyone’s palate with big chunks hiding out inside their cake! Plus—we’re coaxing out maximum flavor by breaking down these beauties gently before introducing them further into our recipe journey ahead…
Step 2: Mixing It All Together
In your large mixing bowl now filled with freshly chopped shrimp goodness awaits—you’ll begin incorporating all those ingredients we discussed earlier: panko breadcrumbs (for crunch), mayonnaise & egg (for binding), parsley (for freshness), Dijon mustard & lemon juice (for zing!), Old Bay seasoning & garlic powder (for warmth)—alongside generous pinches salt ‘n’ pepper! Mix everything until well combined; if it feels too wet upon first mixing add more panko breadcrumbs gradually until achieving desired firmness—a slight tacky feel should be ideal here since we’ll shape these into patties soon enough!
Step 3: Shaping Your Patties
Once combined thoroughly—and believe me when I say it’s going smell heavenly right about now—you’ll want shape small patties roughly 2–3 inches wide from mixture resting comfortably on plate nearby readying themselves for frying action soon enough… Trust me on this: Don’t rush shaping them as attention-to-detail pays off tremendously when frying later on—aiming for an even thickness across each cake helps ensure uniform cooking results throughout!
Step 4: Frying Time!
Now comes perhaps one of my favorite parts—the moment when raw ingredients transform magically before us into deep-fried deliciousness… Heat olive oil over medium heat within skillet; wait until shimmering surface indicates readiness before introducing those gorgeous little patties carefully batch by batch ensuring not overcrowding pan which could lead frustration down road if they stick together whilst cooking away happily… Fry approximately 3–4 minutes per side until golden brown perfection appears—keep close eye on color developing here since nobody likes burnt edges interrupting otherwise joyful experience surrounding their plate full flavorful fishcakes… Once done transfer onto paper towel-lined plate allowing excess oil absorption—a simple yet effective technique preventing greasy results ruining otherwise stellar outcome achieved thus far…
And there you have it—the first steps toward crafting these unforgettable Shrimp Cakes with Lemon Aioli alongside each mouthwatering component awaiting discovery next! We’ll continue exploring how best prepare luscious aioli complementing our savory creations shortly…
The Magic of Cooking Shrimp Cakes with Lemon Aioli
Oh, my dear friend, we are almost there! Just hang tight as we dive into the next steps of crafting these delectable shrimp cakes with lemon aioli. I can already imagine the anticipation building in your kitchen. Let’s turn up the heat—quite literally—and make these shrimp cakes not just a dish, but an experience that will leave you and your loved ones raving long after the last bite.
Step 5: Frying to Golden Perfection
Now comes one of the most exhilarating parts of this recipe: frying those little gems to a glorious golden brown! Start by heating two tablespoons of olive oil in a large skillet over medium heat. It’s crucial to use medium heat here because too high will scorch the outside before the inside is cooked through, and too low will lead to greasy, soggy cakes. Once your oil shimmers and begins to ripple—a promising sign—carefully place your shrimp cakes in batches into the skillet. Don’t overcrowd them; they need their space to crisp up beautifully!
Cook these beauties for about 3-4 minutes on each side. As they cook, keep an eye out for that magical transformation—the moment when they turn from pale and unassuming to a deep, inviting golden hue. This color is your cue that they’re developing that irresistible crispy texture while remaining delightfully tender inside. Trust me on this: patience is key. As tempting as it may be to flip them early, let them form that crust without interruption for maximum crunch. If you notice a lot of bubbling and splattering, it’s a good hint that your oil may be too hot; adjust accordingly so you can achieve that perfect fry without any burnt edges.
Step 6: A Resting Moment
Once your shrimp cakes are gloriously golden brown, it’s time to transfer them to a plate lined with paper towels. This step might seem minor but believe me; it’s absolutely paramount! The paper towels will soak up any excess oil, ensuring that your shrimp cakes remain light and crispy rather than heavy and greasy. As they rest for just a few moments, admire their gorgeous golden crust—it’s like having a piece of art right in front of you!
While they cool slightly—and I know this is hard—you should take this time to prepare yourself for what’s next: the lemon aioli! This sauce isn’t just an accompaniment; it’s the final flourish that ties everything together into one harmonious flavor experience.
Step 7: Whisking Up Liquid Gold
Now let’s get our hands dirty again! In a small bowl, whisk together half a cup of mayonnaise with one tablespoon of fresh lemon juice and one teaspoon of lemon zest until smooth and creamy. This step is where you really elevate your aioli game; combining these ingredients creates an utterly intoxicating dip that not only complements but elevates every bite of shrimp cake!
But wait—there’s more! Add in one clove of minced garlic along with salt and pepper to taste, stirring until well blended. The garlic brings warmth and depth while the acidity from the lemon juice cuts through richness beautifully—it’s all about balance here. You want this aioli to be bright and zesty, something that dances on your palate when paired with the savory shrimp cakes. Give it a taste—does it need more acidity? A touch more seasoning? Trust me; don’t skip this step—it can truly transform your dish from delightful to extraordinary!
Step 8: Serving Your Culinary Masterpiece
At long last, we arrive at the grand finale: plating these scrumptious shrimp cakes alongside your homemade lemon aioli! Serve them hot off the skillet while they’re still crisp; there’s nothing quite like biting into something warm and fragrant after all this love you’ve put into cooking. Arrange them neatly on a platter or individual plates—presentation matters because we eat with our eyes first!
Don’t forget to provide generous dollops of lemon aioli on the side for dipping. This sauce is not just an afterthought; it’s an essential part of this culinary experience! Encourage everyone at your table to mix and match flavors—some might prefer just a hint of aioli while others might dive in wholeheartedly for a decadent dip. And there you have it: beautiful shrimp cakes with lemon aioli ready to be devoured!
Final Touches: Elevating Every Bite
Before you serve these delightful morsels at your next gathering or family dinner, consider adding some fresh herbs or even slices of lemon as garnish on the plate; it’s all about those final touches! They not only enhance visual appeal but also invite everyone into this joyous eating experience.
And remember—the laughter shared around the table while enjoying these shrimp cakes is what truly makes them special. So gather your favorite people around, dig into those crispy delights, and enjoy every moment together because cooking—and sharing food—is one of life’s greatest pleasures.
I promise you’ll find joy not just in devouring these delicious creations but also in relishing every moment spent making them. Happy cooking!
Storage and Enjoyment Tips for Your Shrimp Cakes with Lemon Aioli
Now that you’ve created these delightful Shrimp Cakes with Lemon Aioli, it’s time to dig in and revel in your culinary triumph! Each bite is a celebration of flavors and textures that I promise will have you craving more. But what if there are leftovers? Fear not, my friend! Let’s ensure that every crumb remains as delicious as the first bite.
Storing Leftover Shrimp Cakes with Lemon Aioli
To keep your shrimp cakes tasting fresh and fabulous, store them in an airtight container. This helps seal in all those vibrant flavors while preventing any unwanted moisture from sneaking in. Ideally, place them in the refrigerator, where they’ll stay good for about 2-3 days. Trust me on this: if you want to maintain their crispy texture, placing a slice of bread in the container can work wonders. It absorbs excess moisture and keeps your shrimp cakes from getting soggy—a little trick I learned from my grandmother! When reheating, aim for a gentle warming; pop them back into a skillet over medium heat for just a few minutes per side until heated through, or use the oven at 350°F for about 10 minutes. The goal here is to restore that beautiful golden crispiness without losing their delightful flavor.
Freezing Shrimp Cakes with Lemon Aioli for Later
If you find yourself with extra shrimp cakes—or if you’re just super organized and planning ahead—freezing them is an excellent option! To freeze properly, lay the uncooked patties on a parchment-lined baking sheet, making sure they’re not touching each other. Pop them into the freezer until solid (usually takes about an hour), then transfer them into a freezer-safe bag or container. They can be kept frozen for up to three months! This means that whenever the craving strikes, you can whip out a couple of shrimp cakes and cook them straight from frozen—there’s no need to thaw! Just imagine how convenient it is to have these tasty bites ready to go at a moment’s notice; it’s like having your very own gourmet fast food!
Shrimp Cakes with Lemon Aioli
There’s a charm in cooking that transcends mere sustenance, and these Shrimp Cakes with Lemon Aioli embody that sentiment perfectly. Picture bite-sized patties crafted from tender shrimp, infused with fresh herbs and spices, delivering an irresistible crunch with every bite. Paired with a zesty lemon aioli that elevates the flavors to new heights, this dish is not just food—it’s an experience. Ideal for gatherings or cozy dinners at home, these shrimp cakes are sure to impress. Let’s dive into this easy-to-follow recipe that’s perfect for all skill levels.
- Prep Time: 20 minutes
- Cook Time: 15 minutes
- Total Time: 35 minutes
- Yield: Serves approximately 4 (8 cakes) 1x
- Category: Appetizer/Main
- Method: Frying
- Cuisine: Seafood
Ingredients
- 1 lb shrimp, peeled and deveined
- 1/2 cup panko breadcrumbs
- 1/4 cup mayonnaise
- 1 egg
- 2 tablespoons fresh parsley, finely chopped
- 1 tablespoon Dijon mustard
- 1 tablespoon lemon juice
- 1 teaspoon Old Bay seasoning
- Salt and pepper to taste
- Olive oil for frying
- 1/2 cup mayonnaise for aioli
- 1 tablespoon lemon juice for aioli
- 1 teaspoon lemon zest for aioli
- 1 clove garlic, minced for aioli
- Salt and pepper to taste for aioli
Instructions
- Chop the shrimp into small pieces or pulse in a food processor until coarsely chopped.
- In a large mixing bowl, combine chopped shrimp, panko breadcrumbs, mayonnaise, egg, parsley, Dijon mustard, lemon juice, Old Bay seasoning, garlic powder, salt, and pepper. Mix until well combined.
- Shape the mixture into patties about 2–3 inches wide.
- Heat olive oil in a skillet over medium heat. Fry patties in batches for about 3-4 minutes on each side until golden brown.
- For the aioli, whisk together mayonnaise, lemon juice, lemon zest, minced garlic, salt, and pepper in a small bowl until smooth.
- Serve the shrimp cakes warm with the lemon aioli on the side.
Nutrition
- Serving Size: 1 cake (45g)
- Calories: 170
- Sugar: 0g
- Sodium: 250mg
- Fat: 10g
- Saturated Fat: 1g
- Unsaturated Fat: 7g
- Trans Fat: 0g
- Carbohydrates: 12g
- Fiber: 0g
- Protein: 8g
- Cholesterol: 70mg