Key Lime Pie Cheesecake Dip
There’s something profoundly magical about desserts that evoke memories of sun-drenched days by the beach, laughter echoing in the air, and the sweet tang of citrus that dances on your palate. The Key Lime Pie Cheesecake Dip is not just a dessert; it’s an experience, a celebration of summer encapsulated in a creamy, luscious dip that brings joy with every bite. Imagine dipping a crisp graham cracker into this velvety concoction, each scoop bursting with the zesty brightness of lime and the rich comfort of cheesecake. It’s an invitation to indulge, to share stories around a table, and to savor those little moments that make life extraordinary.
This delightful dip is incredibly easy to whip up, which means you can spend less time in the kitchen and more time creating cherished memories with loved ones. Perfect for potlucks, parties, or lazy summer afternoons, it offers a refreshing twist on traditional desserts while keeping things wonderfully simple. I promise you, once you bring this dish to your next gathering, it will quickly become the star of the show—everyone will be asking for your secret! So let’s dive into making this Key Lime Pie Cheesecake Dip together—it’s going to be delicious!
Key Lime Pie Cheesecake Dip: A Refreshing Twist on a Classic Treat
Gather around as we embark on this culinary adventure! This dip captures all the flavors of classic key lime pie but in a fun and shareable format that will delight both young and old alike. Trust me when I say that you’re going to want to keep this recipe close at hand for all your gatherings—it’s truly a crowd-pleaser!
Ingredients:
As we prepare to create this delectable dip, let me take you through each ingredient’s journey. Understanding what goes into our dish not only enhances our cooking experience but also deepens our appreciation for the flavors we’re about to combine.
- 8 oz cream cheese, softened at room temperature. This is absolutely paramount for achieving that smooth and creamy texture we desire in our Key Lime Pie Cheesecake Dip. When cream cheese is softened, it blends effortlessly with the other ingredients without any lumps or graininess. If it’s too cold straight from the fridge, you’ll struggle to get that silky consistency—so let it sit out for about 30 minutes before you begin. Look for high-quality cream cheese; organic varieties often have richer flavor profiles and contribute beautifully to the overall taste of your dip.
- 1/2 cup sugar (or more or less to taste). Sugar is what transforms this dip from simply creamy to utterly intoxicatingly sweet! It balances out the tartness of the lime juice and adds depth to the flavor profile. Feel free to adjust according to your sweetness preference after mixing; I always encourage tasting along the way—cooking should be intuitive! If you’re looking for alternatives due to dietary restrictions or preferences, consider using coconut sugar or even maple syrup for a unique twist.
- 3 tablespoons lime juice (from 2 small limes or 3 key limes). The heart and soul of this dish lies in its zesty lime juice. Freshly squeezed lime juice elevates this dip with its vibrant acidity and bright flavor—there’s just no comparison to bottled varieties! When squeezing your limes, roll them firmly on your countertop first; this releases more juice. Plus, use your taste buds as guides; if you want more zing, don’t hesitate to add an extra splash.
- Zest of 2 small limes. Ahh, lime zest—the secret weapon in adding an explosion of citrus flavor without overwhelming tartness! Zesting incorporates those essential oils found in the skin that deliver aromatic freshness. When zesting, be careful not to go too deep into the pith (the bitter white part) as it can spoil that delightful brightness we’re aiming for here.
- 1 pinch vanilla bean powder. This tiny addition may seem subtle but trust me—it makes all the difference! Vanilla bean powder adds warmth and complexity that beautifully complements the tartness of lime while enhancing all other flavors present in our dip. If you can’t find vanilla bean powder, pure vanilla extract can work in a pinch; just remember liquid extracts might slightly alter texture.
- 1 pinch salt (optional). Salt might not be something we typically think about when making desserts; however, it plays an integral role by enhancing flavors—a non-negotiable when balancing sweet and sour notes! Just a tiny pinch will elevate everything else here without being detectable.
- 1/4 cup heavy whipping cream. This liquid gold transforms our dip into something ethereal—adding richness and lightness at once! Whipping cream needs some TLC; ensure it’s cold before whipping so it incorporates air effectively for that perfect fluffy texture. If you’re looking for lighter options, feel free to swap in full-fat coconut cream instead!
- Graham crackers, cookies, and/or fruit for dipping. These delightful dippers are what allow us to enjoy our creation fully! Traditional graham crackers nod toward classic key lime pie crust flavors while fresh fruit adds a refreshing touch—a match made in heaven with this creamy dip! You can even get creative with pretzels or chocolate chip cookies if you’re feeling adventurous!

Equipment You’ll Need:
Now that we’ve gathered our ingredients like old friends reuniting after years apart let’s talk about some essential tools you’ll need by your side during this process. The right equipment ensures smoother sailing throughout our cooking journey together!
- Stand mixer or handheld mixer – While it may seem like such a basic piece of equipment, having either type of mixer is crucial for getting that perfectly creamy consistency when combining ingredients like cream cheese and sugar together smoothly without any lumps lurking about!
- Measuring cups & spoons – Precision matters when crafting anything delicious! Accurate measurements ensure every component shines through harmoniously; plus they help avoid any unexpected surprises during tasting time!
- Microplane zester – A must-have tool when working with citrus fruits! Using one allows you effortlessly capture just enough zest without hitting any bitter pith—a small investment yielding tremendous flavor rewards!
- Mixing bowls (various sizes) – Having an assortment means we can easily separate components as needed throughout prep stages while keeping things organized—the less mess created ultimately leads us closer toward enjoying our Key Lime Pie Cheesecake Dip sooner!
Preparing the Key Lime Pie Cheesecake Dip
Step 1: Cream Together Your Base Ingredients
Let’s kick things off by creaming together our softened cream cheese and sugar until they form one harmonious mixture—a process known as creaming which helps incorporate air into these ingredients leading us towards achieving that light texture we crave in dips like these! Start by placing your softened cream cheese into your stand mixer bowl (or mixing bowl if using handheld), then pour in half a cup of granulated sugar along with freshly squeezed lime juice and zest from two small limes too—we’re layering flavors here folks! Set your mixer speed low initially so everything combines well before gradually increasing speed until everything melds beautifully over about one minute’s time—don’t rush this step as patience yields delicious results! Pause mid-way through mixing for a quick taste test; adjust sweetness by adding more sugar if desired—this is your creation after all!
Step 2: Incorporate Vanilla Bean Powder
Next up comes vanilla bean powder—the secret ingredient that’ll elevate our dip’s flavor profile beyond expectations! With your mixer still running at medium speed while scraping down any stubborn bits clinging onto sides periodically (we want every last morsel!), sprinkle just a pinch over top—and oh my goodness doesn’t it smell divine? Continue mixing until combined thoroughly ensuring no lumps remain visible—what awaits us ahead feels utterly intoxicating already!
Step 3: Add Whipping Cream
Now comes perhaps my favorite part—the addition of heavy whipping cream which transforms everything from good-to-great instantly! Pour in chilled heavy whipping cream directly into bowl before turning mixer back on low speed first again allowing gentle incorporation until fully blended into existing mixture—this process creates air pockets needed later leading us toward fluffy perfection we desire throughout every bite taken hereafter so don’t skip/overlook it please!! Once incorporated fully bump up speed gently once again maintaining consistency checked regularly along way ensuring no overwhipping occurs which could lead us astray resulting undesirable results instead… We aim only for heavenly bliss tonight folks!!
Step 4: Final Adjustments & Taste Test
As we near completion ask yourself: how does she taste? Is she zesty enough? Sweet enough? This truly is where personal preference shines brightest among all dishes prepared—you’ve built something beautiful together now let intuition guide final adjustments made based upon own palate preferences experienced thus far through culinary journey undertaken alongside me today!! Feel free tweaking levels accordingly based upon acquired tastes previously mentioned earlier too if necessary—all while stirring gently just enough till everything blends effortlessly once more into dreamy concoction awaiting eager tasters soon thereafter…
And there you have it — with each step carefully executed alongside passion-infused precision crafting perfection awaits ahead ready serve right away chilled too depending upon mood set forth!!
Step 5: Uniting the Flavors
Now that you have your creamy mixture perfected, it’s time to bring everything together in a delightful symphony of flavors. Start by adding the 1/4 cup of heavy whipping cream to your bowl. This step is crucial because the heavy cream adds an airy texture and richness that is absolutely paramount in achieving that classic cheesecake flavor profile. Using your stand mixer again, mix on medium speed until the cream is fully incorporated into the cream cheese mixture, which should take about 2-3 minutes. You’ll notice how the mixture transforms from a slightly dense consistency to something luxuriously smooth and creamy. Trust me, this transformation is what makes this dip truly extraordinary!
Don’t rush this step; give it the time it needs for all those wonderful flavors to meld beautifully. As you mix, keep a close eye on the texture — you want it to be thick yet spreadable, almost like frosting. If you find that it’s not quite coming together as you’d like, feel free to give it a few more seconds in the mixer. The goal here is to create a dip that feels indulgent and velvety on your palate. Once it’s reached that perfect consistency, pause for a moment to taste! You might discover that it needs just a touch more lime juice or sugar depending on your personal preference — maybe you love an extra zing or prefer it sweeter. Don’t be shy about adjusting; this is your creation!
Step 6: The Chilling Process – Patience Makes Perfect
Now comes one of my favorite parts — allowing your Key Lime Pie Cheesecake Dip to chill! While it’s tempting to dive right in after mixing, I promise you that chilling will elevate this dessert dip from good to utterly intoxicating! Transferring your dip into an airtight container is essential at this stage; it will help lock in all those vibrant flavors while allowing them to meld together beautifully. Covering it tightly ensures that no unwanted odors from your fridge seep into your delicious creation.
Letting your dip chill for at least 30 minutes (but ideally up to 2 hours) allows time for the ingredients to settle and blend harmoniously. The cooling process also thickens the dip slightly, creating a more luxurious mouthfeel as you scoop it up with graham crackers or fresh fruit later on. Why wait? Well, think of it as giving the flavors time to party together before serving! It’s during this magical cooling phase that you’ll discover how profoundly satisfying chilled desserts can be — they become cooler, fresher, and even more delightful once served.
Step 7: Perfecting Your Presentation
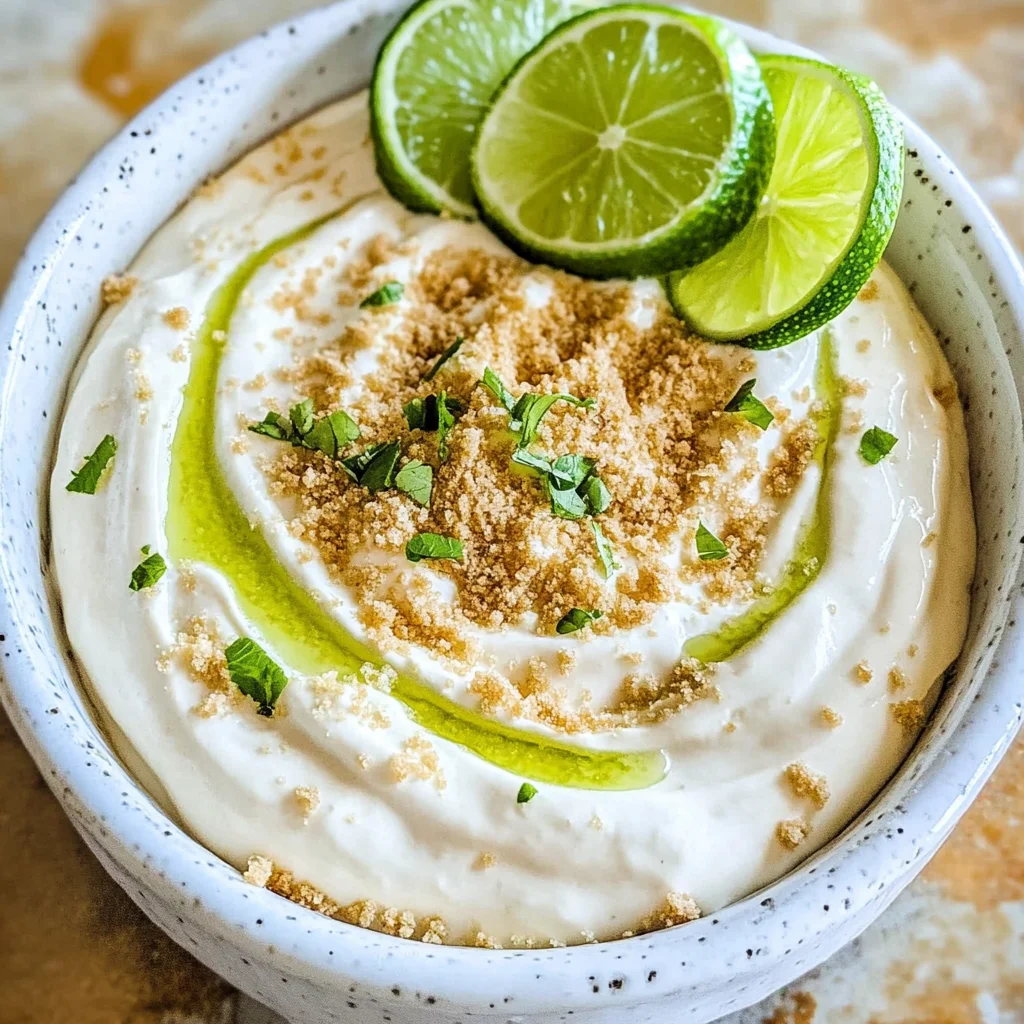
Once you’ve allowed your Key Lime Pie Cheesecake Dip enough time in the fridge, it’s time for one last flourish before serving! Transfer your now-lusciously chilled dip into a beautiful serving bowl or dish — one with some depth works best so guests can easily scoop out their desired amount without making a mess. Presentation matters here; after all, we eat with our eyes first! Use a spatula or spoon to smooth down the top of the dip gently, creating an inviting surface that’s just begging to be dipped into.
For an added touch of elegance—and let’s face it, who doesn’t love some flair?—consider garnishing with additional lime zest sprinkled atop for visual appeal and a burst of aromatic freshness upon serving. You might also want to add thin lime slices around the edge of your bowl or even some whipped cream dollops if you’re feeling fancy! These little touches transform an already delicious dessert into something truly spectacular and exciting for any gathering or family get-together.
Step 8: The Dipping Extravaganza
Now comes perhaps the most exhilarating part: serving your Key Lime Pie Cheesecake Dip alongside an array of tasty dippers! I recommend presenting this delightful treat with graham crackers, which are traditional but oh-so-perfectly crunchy against the creamy dip. You might also consider pairing with cookies — think buttery shortbread or even vanilla wafers for added sweetness and texture contrast. Fresh fruits like strawberries or apple slices are fantastic options too; their natural sweetness complements the tangy lime notes beautifully while adding vibrant color.
When it’s time for everyone to dig in, encourage them to experiment with different combinations — maybe graham cracker first then topped with fruit for added crunch and freshness! This playful approach not only makes dessert fun but creates memorable moments filled with laughter and shared enjoyment. Keep in mind that leftovers (if there are any!) can be stored in an airtight container in the fridge for up to 5 days, making this recipe not only easy but delightfully practical as well!
Final Touches: Enjoying Every Bite
As you gather around with friends or family ready to enjoy this Key Lime Pie Cheesecake Dip, take a moment to savor not just the flavors but also the company you share them with. Food has an incredible power; it’s about connection and celebration! I hope every bite brings joy and sweetness akin to sunny days spent by the beach—refreshing, bright, and utterly unforgettable.
So there you have it—a simple yet extraordinarily delicious dessert that’s sure to leave everyone asking for seconds (or thirds!). Whether it’s a potluck gathering or just a cozy evening at home, I promise you’ll find this Key Lime Pie Cheesecake Dip becomes a beloved staple in your culinary repertoire! Happy dipping!
Storage and Enjoyment Tips for Your Key Lime Pie Cheesecake Dip
Now that you’ve whisked together this delightful Key Lime Pie Cheesecake Dip, I can almost hear the symphony of flavors calling your name! The tangy citrus notes of lime mingle beautifully with the creamy sweetness, creating a dessert that’s simply irresistible. But what happens if you have leftovers? Don’t worry! With a little care, you can savor these luscious flavors over the next few days. Let’s talk about how to store it properly so you can enjoy every last bite.
Storing Leftover Key Lime Pie Cheesecake Dip
To keep your Key Lime Pie Cheesecake Dip fresh, I recommend transferring it into an airtight container. This is absolutely paramount because it locks in that amazing flavor and prevents any unwanted odors from mingling with your dip. Pop it in the refrigerator where it will stay delicious for up to three days. As an added pro tip, if you want to maintain that delightful creaminess, consider placing a slice of bread in the container with the dip; this little trick helps absorb excess moisture and keeps your dip as luscious as the day you made it! After storage, when you take it out to serve again, you’ll find it’s still wonderfully smooth and rich—just give it a gentle stir before diving back in. Trust me on this; there’s nothing quite like enjoying a cool, zesty bite on a warm afternoon!
Freezing Key Lime Pie Cheesecake Dip for Later
If you find yourself with more than enough dip or simply want to prepare ahead, freezing is a fabulous option! To freeze your Key Lime Pie Cheesecake Dip properly, scoop it into a freezer-safe container and make sure to leave a little space at the top since it may expand as it freezes. It can stay good in the freezer for up to two months—now that’s what I call convenience! When you’re ready to indulge again, simply transfer it back to the fridge overnight to thaw. Once it’s ready, give it a good stir; you’ll discover that even after freezing, this dip maintains its velvety texture and vibrant flavor. I promise you will appreciate having this treat on hand for spontaneous gatherings or just when you crave something sweet!
Key Lime Pie Cheesecake Dip

Indulge in the delightful Key Lime Pie Cheesecake Dip, a refreshing twist on a classic dessert that captures the essence of summer in every creamy bite. This easy-to-make dip combines the zesty brightness of fresh lime juice with the rich, velvety texture of cream cheese, creating an unforgettable experience perfect for any gathering. Serve it with crunchy graham crackers, fresh fruit, or cookies for a fun and shareable treat that everyone will love. Whether at a potluck, party, or just a cozy afternoon at home, this dip is destined to be the star of the show.
- Prep Time: 15 minutes
- Cook Time: None
- Total Time: 0 hours
- Yield: Serves approximately 6 people 1x
- Category: Dessert
- Method: No Bake
- Cuisine: American
Ingredients
- 8 oz cream cheese, softened
- 1/2 cup sugar
- 3 tablespoons fresh lime juice
- Zest of 2 small limes
- 1 pinch vanilla bean powder
- 1/4 cup heavy whipping cream
- Graham crackers or fresh fruit for dipping
Instructions
- In a mixing bowl, beat together softened cream cheese and sugar until smooth.
- Add fresh lime juice and zest; mix until combined.
- Incorporate vanilla bean powder and a pinch of salt (if using) while mixing.
- Pour in heavy whipping cream and blend until light and fluffy.
- Taste and adjust sweetness or lime flavor if needed.
- Transfer to an airtight container and chill for at least 30 minutes before serving.
Nutrition
- Serving Size: 1/4 cup
- Calories: 210
- Sugar: 16g
- Sodium: 75mg
- Fat: 15g
- Saturated Fat: 9g
- Unsaturated Fat: 5g
- Trans Fat: 0g
- Carbohydrates: 18g
- Fiber: 0g
- Protein: 2g
- Cholesterol: 40mg