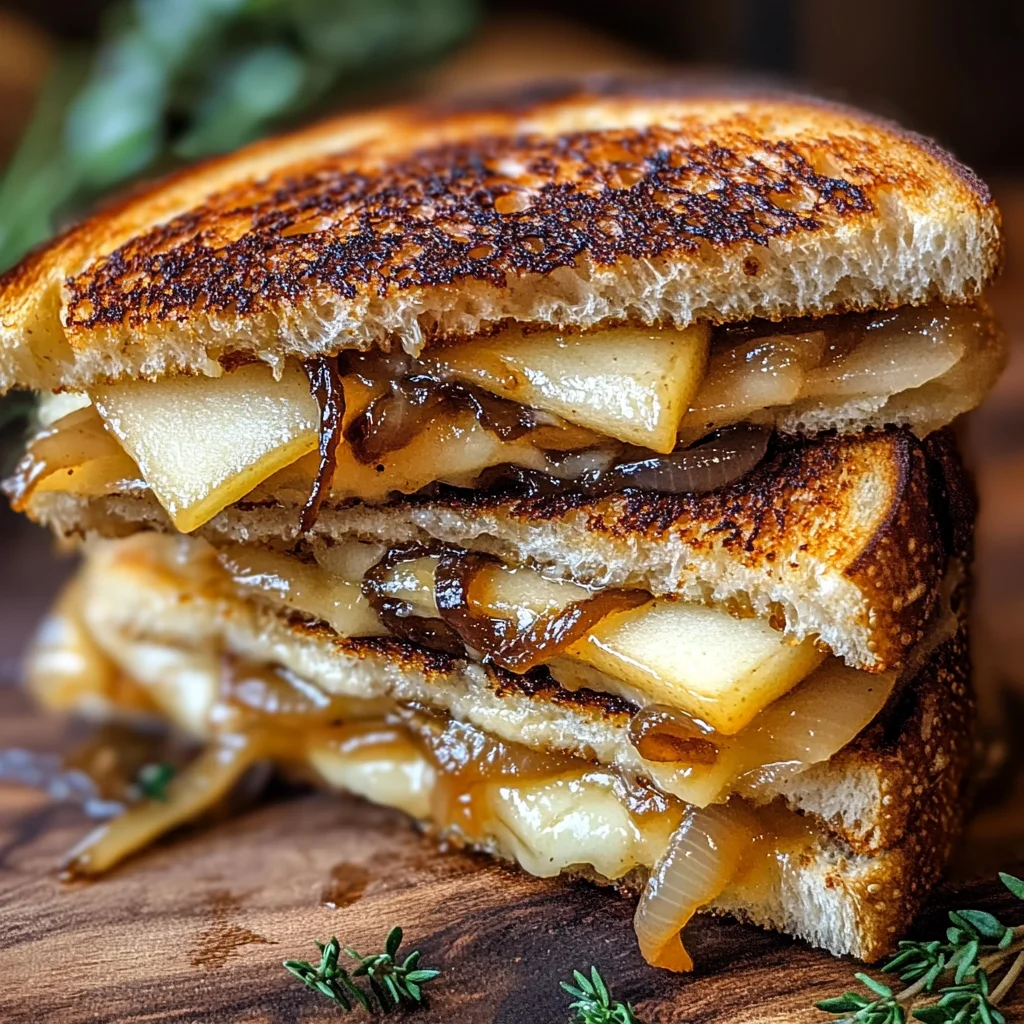
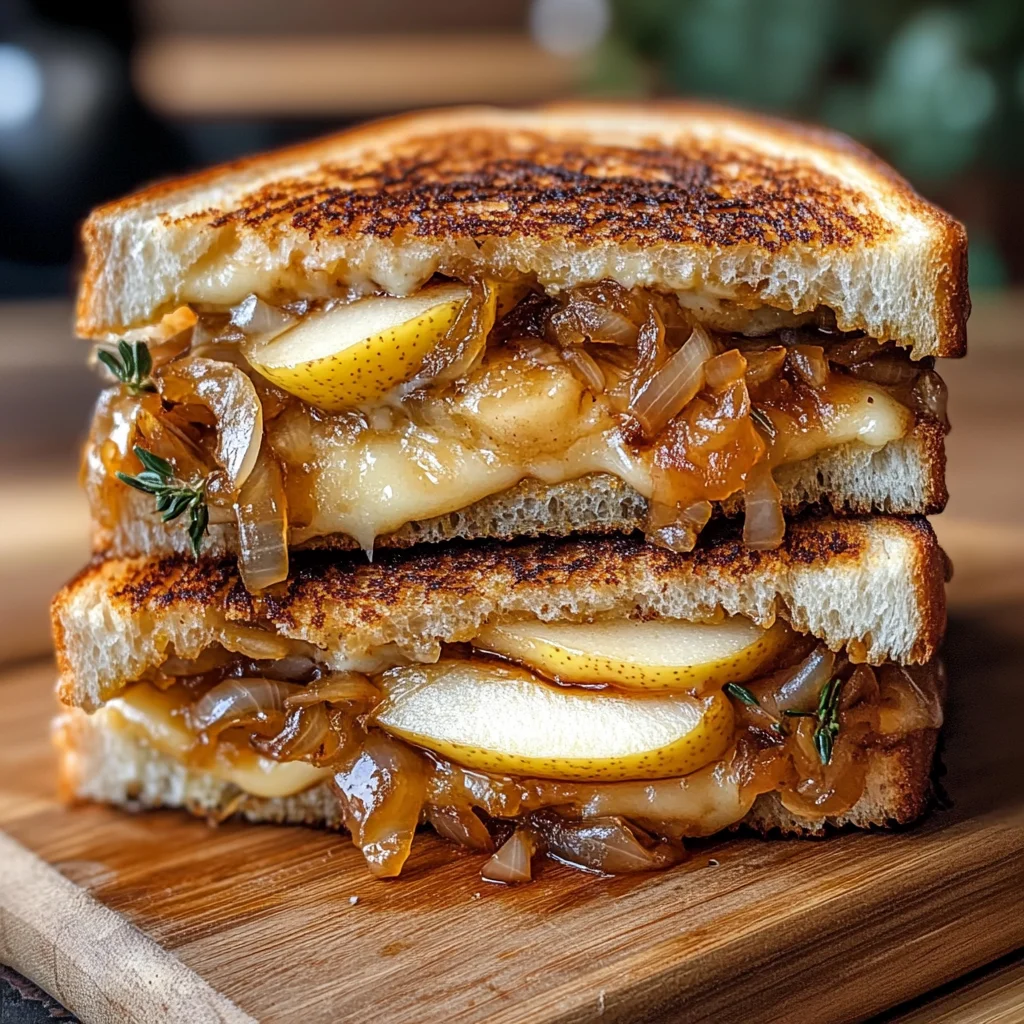
Pear & Apple Grilled Cheese With Caramelized Onions
Ah, the beauty of a grilled cheese sandwich! It’s not just a meal; it’s a cozy embrace on a plate, a symphony of flavors that dances on your palate. Picture this: golden-brown, crispy sourdough bread cradling layers of sharp cheddar cheese that melt into gooey perfection, sweet apples and pears adding their luscious essence, while caramelized onions bring an irresistible depth of flavor. This Pear & Apple Grilled Cheese With Caramelized Onions is more than just comfort food; it’s an experience that transports you to simpler times, where the aroma of melting cheese wafts through the air and pulls you into the kitchen like a warm hug from an old friend.
What makes this recipe so special is its perfect balance between sweet and savory. The tartness of crisp apples and the gentle sweetness of ripe pears mingle beautifully with the rich sharp cheddar and the caramelized onions, which transform from humble raw vegetables into rich, golden treasures full of flavor. Each bite tells a story—a tale of nostalgia mixed with creativity. I’ve always been captivated by how simple ingredients can come together to create something truly extraordinary, and I promise you this dish will leave you feeling profoundly satisfied, whether it’s for a quick dinner or a comforting lunch.
Pear & Apple Grilled Cheese With Caramelized Onions: A Comfort Food Classic Reimagined
Welcome to your next favorite sandwich! This Pear & Apple Grilled Cheese With Caramelized Onions is not just about melting cheese; it’s about layering flavors and textures in a way that makes each bite unforgettable. The combination of sweet fruit and savory cheese creates a match made in culinary heaven, while the caramelized onions add that touch of sophistication we all crave. Trust me when I say this sandwich will become a staple in your home—perfect for weeknight meals or whenever you need something special yet easy to prepare.
Ingredients:
As we embark on this culinary adventure together, let’s take a moment to appreciate each ingredient that plays its part in creating our delicious grilled cheese masterpiece. Every element contributes not just flavor but personality to our dish.
- 4 slices sourdough bread. This beautiful bread is key to achieving that perfect crunch on the outside while maintaining softness within. Sourdough has a delightful tanginess that complements the sweetness of the pears and apples beautifully. When choosing your sourdough, look for loaves with a good crust—this will enhance texture when grilled—and make sure it’s fresh for optimal flavor absorption.
- 2 tablespoons unsalted butter. Butter is essential here; it’s what gives our sandwich its rich flavor and helps achieve that golden crust we’re all dreaming about. Unsalted butter allows you to control the saltiness in your dish better since we’ll be adding seasoning later. I always recommend using high-quality butter because it can elevate even the simplest dishes into something luxurious.
- 1 medium pear, thinly sliced. The star of our show! Pears add sweetness and juiciness that balances out the sharpness of the cheddar. Look for pears that are ripe but still firm—this ensures they won’t turn mushy during cooking while still providing that lovely burst of flavor.
- 1 medium apple, thinly sliced. Apples introduce another layer of sweetness with their crisp texture; I love using varieties like Granny Smith for their tartness or Honeycrisp for their juicy delightfulness. Just like with pears, aim for fresh apples as they’ll provide both taste and crunch—a vital part of our texture game!
- 1 medium onion, thinly sliced. Onions are our secret weapon here; when caramelized properly, they become sweet little gems that elevate this sandwich from ordinary to extraordinary! Caramelizing brings out their natural sugars, transforming them into something quite magical (and utterly intoxicating).
- 1 cup shredded sharp cheddar cheese. Sharp cheddar is non-negotiable in this recipe—it’s got enough bite to stand up against the sweetness from our fruits without being overwhelming. Shredding your own cheese provides better melting quality than pre-shredded options because they often contain anti-caking agents.
- 1 tablespoon balsamic vinegar. This addition might seem small but trust me—it adds depth! The acidity cuts through richness perfectly and enhances those caramelized onions’ natural sweetness beautifully.
- Salt (to taste) & black pepper (to taste). These two humble seasonings are essential partners in our culinary dance; they amplify flavors rather than add distinct tastes themselves—think of them as your flavor enhancers!
Equipment You’ll Need:
Having the right tools at hand makes all the difference in crafting our beloved grilled cheese sandwich! While these may not be ingredients, they are essential partners in bringing our delicious creation to life.
- Skillet – A heavy-bottom skillet or frying pan ensures even heat distribution which is absolutely paramount in achieving that perfect golden crust while allowing the cheese inside to melt thoroughly without burning the bread.
- Spatula – A sturdy spatula will help you flip those sandwiches with grace—no one wants their carefully crafted masterpiece falling apart! A wide spatula allows for easy maneuvering without squishing your lovely layers together.
- Cutting board & knife – Essential tools for slicing your fruits and vegetables precisely! A good chef’s knife makes all slicing tasks easier—aim for sharp blades as dull ones can lead to uneven cuts.
- Grater (for cheese) – If you’re shredding your own cheese (which I highly recommend!), having a box grater or food processor handy can save time while ensuring maximum meltability.
Preparing the Pear & Apple Grilled Cheese With Caramelized Onions
Step 1: The Sweet Transformation Begins
Let’s kick things off by caramelizing those onions since they need some love before joining our sandwich party! In a skillet over medium heat—think calm but confident—melt 1 tablespoon of unsalted butter until it starts bubbling gently; this is where magic begins! Add your thinly sliced onions along with a pinch of salt—they’ll draw out moisture which helps them soften beautifully over time. Stir occasionally (don’t rush this step!) for about 10 minutes until they turn golden brown and become irresistibly fragrant—their transformation from crunchy rawness to gooey sweetness is nothing short of magical! Finally, drizzle in balsamic vinegar during those last few minutes; it’ll elevate their flavor profile further by marrying sweetness with acidity.
Step 2: Setting Up Your Flavor Layers
While those glorious onions are finishing up their caramelization process (trust me—you’ll want every bit!), move on to layering up our grilled cheese sandwiches! In another skillet (or clean the one you just used), melt another tablespoon of butter over medium heat—this ensures every slice gets its fair share of buttery goodness while grilling later on! Meanwhile, take two slices of sourdough bread and start building layers: first half of your shredded sharp cheddar goes down—it acts as glue holding everything together amidst all those delicious fillings!
Step 3: Add Those Beautiful Fruits
Now comes one of my favorite parts—the fruit layer! Evenly distribute those luscious apple slices over the melted cheddar foundation followed by pear slices atop them—each fruit adds its unique sweetness enhancing overall harmony within our creation! Then sprinkle some more shredded cheddar over top before capping everything off with another slice bread—the ultimate cheesy fruit sandwich stack awaits!
Step 4: Time To Grill Perfection
With everything assembled beautifully now comes grilling magic—place one assembled sandwich into your hot skillet carefully using spatula finesse for maximum stability as you navigate these delicate layers! Allow it grill quietly undisturbed for about 4–5 minutes until golden brown appears underneath—that satisfying sizzle sound should fill air around you; don’t be tempted too early though—a rushed flip could spell disaster ruining all previous efforts put forth!
Stay tuned as we continue crafting these delightful sandwiches step-by-step!
Step 5: Let’s Get Grilling!
Now that we’ve assembled our glorious sandwich, it’s time to transform this delightful collection of ingredients into a masterpiece. In the same skillet where you caramelized those luscious onions, melt the remaining tablespoon of unsalted butter over medium heat. This step is absolutely paramount because that butter will not only help achieve a beautiful golden crust on the bread but will also impart a rich, buttery flavor that sings in harmony with our sweet apple and pear filling. As the butter begins to bubble gently, be sure to keep an eye on it; you want it to melt completely without browning too much, as burnt butter can lend an unpleasant bitterness to your sandwich.
Once the butter is beautifully melted and ready, carefully place one of your assembled sandwiches into the skillet. Here’s where patience truly pays off! Grill the sandwich for about 4-5 minutes on one side until it develops a stunning golden-brown hue. You’ll want to keep an eye on this—watch for that wonderful crispiness forming around the edges. Trust me when I say this visual cue is essential; it indicates that the sugars in the bread are caramelizing perfectly, creating a delightful crust that will hold all those gooey fillings together. When it’s time to flip, use a spatula with care; you want to ensure that everything stays intact while revealing that heavenly melty cheese inside.
Step 6: Flip It Like It’s Hot!
After those first few minutes of grilling, it’s time for the big reveal! Gently flip your sandwich over using your spatula—this moment feels like magic as you unveil that beautifully toasted side. Make sure to check underneath; if it’s not quite golden yet, don’t rush this step! Give it another minute or so until it reaches perfection. It’s all about achieving that balance between crispy bread and soft, melting cheese inside. Once flipped, grill the other side for another 4-5 minutes until you can start to smell the intoxicating aroma wafting through your kitchen—a combination of toasted bread mingling with sharp cheddar and sweet fruits—that scent alone is enough to make anyone swoon!
During this time, take a moment to reflect on why we’re giving our grilled cheese so much attention: every second spent grilling translates into textures and flavors building upon one another. The contrast between the crunchy outer layer and the gooey inner filling creates a truly extraordinary experience with every bite. Remember, cooking isn’t just about feeding yourself; it’s about crafting something beautiful and delicious that brings joy.
Step 7: Rinse and Repeat
Once you’ve perfected one sandwich, it’s time to repeat this process for your second masterpiece! Transfer your first creation onto a plate and let it cool slightly while you prepare to grill the second sandwich in any leftover butter from the skillet—you don’t want any of that goodness going to waste! Just like before, melt any residual butter over medium heat before placing your next sandwich in. This second round is equally important; while you’re grilling this one up, feel free to take a moment—savor how good it feels knowing you’re about to indulge in something so comforting.
As you grill this second one just like you did before, remember that cooking is often a dance between patience and excitement. Don’t rush through these steps; each minute counts toward achieving a flavor profile that’s complex yet utterly satisfying. And trust me on this—the anticipation builds magnificently as both sandwiches come together in their crispy glory.
Step 8: The Grand Unveiling
Once both sandwiches are grilled to golden perfection—each side showcasing its beautiful toasted exterior—it’s time for perhaps one of my favorite moments in cooking: the grand unveiling! Carefully remove both sandwiches from their sizzling sanctuary in the skillet and let them rest on a cutting board for just a minute. Yes, I know it’s tempting to dive right in—believe me! But allowing them a moment to rest is crucial. This brief interlude allows all those fantastic flavors inside to settle together rather than spilling out everywhere when you take that first glorious bite.
While they’re resting, take some time to admire your work—the caramelized onions peeking out from beneath layers of velvety cheddar cheese mingling with sweet slices of pear and apple are just waiting for you! Slice each sandwich diagonally or vertically—whatever feels right for you—and revel in seeing those gorgeous layers reveal themselves; it’s like unwrapping a present filled with comfort and warmth.
Final Touches
As you get ready to serve these magnificent Pear & Apple Grilled Cheese With Caramelized Onions sandwiches warm from their griddle bath, consider how best to present them. A simple garnish of fresh herbs can elevate their appearance even further—perhaps some freshly chopped parsley or arugula would add not just color but also a peppery kick against the sweetness within each bite? Serve them alongside a light salad or even some homemade tomato soup if you’re feeling extra cozy.
These delightful sandwiches aren’t merely food; they embody warmth, nostalgia, and laughter shared around tables filled with love—all wrapped up in two slices of flavorful sourdough hugging an irresistible filling. I promise you will fall head over heels in love with every mouthful! Enjoy every single bite; after all, cooking is meant to be savored as much as consumed.
Storage and Enjoyment Tips for Your Pear & Apple Grilled Cheese With Caramelized Onions
Now that you’ve created this mouthwatering masterpiece, it’s time to revel in the delightful flavors of your Pear & Apple Grilled Cheese With Caramelized Onions! Trust me; every bite is a warm embrace, a combination of sweet and savory that makes your taste buds dance with joy. But what if you find yourself with leftovers (though I doubt you will)? Let’s talk about how to keep that deliciousness fresh for later enjoyment!
Storing Leftover Pear & Apple Grilled Cheese With Caramelized Onions
To preserve the magic of your grilled cheese, carefully place any leftover sandwiches in an airtight container or wrap them tightly in plastic wrap. This prevents moisture from seeping in and keeps the bread from becoming soggy—a non-negotiable step if you want to maintain that delightful crunch! You can store them in the refrigerator for about 2-3 days. If you want to keep them longer, consider putting them in the freezer (more on that soon!). After a day or two, you might notice that the flavors meld beautifully, creating an even richer experience when you dig in again. When it’s time to enjoy your sandwich once more, simply reheat it in a skillet over medium heat until the cheese is ooey-gooey again and the bread is crispy. Trust me on this; it’s worth taking the extra time to ensure each bite is as good as freshly made.
Freezing Components for Later
If you’re like me and love having delicious meals ready at your fingertips, freezing components of this recipe can be a game-changer! You can freeze both the caramelized onions and sliced cheeses separately. Just allow your onions to cool completely after cooking and then transfer them into freezer-safe bags, squeezing out as much air as possible before sealing them up tight. These will keep well for about 2-3 months! When you’re ready to whip up a quick meal, just thaw the onions overnight in the fridge or use them straight from frozen—just add an extra minute or two to their reheating time. Imagine how convenient it would be to pull out those perfectly caramelized onions on a busy weeknight! This little trick not only saves you time but also ensures you have that extraordinary flavor ready whenever inspiration strikes.
Pear & Apple Grilled Cheese With Caramelized Onions
Indulge in the warm embrace of a Pear & Apple Grilled Cheese With Caramelized Onions, where comfort food meets gourmet flair. This delightful sandwich features perfectly crispy sourdough bread layered with gooey sharp cheddar cheese, sweet slices of ripe pears and crisp apples, and rich caramelized onions that elevate every bite. The balance of sweet and savory flavors creates a memorable culinary experience that is perfect for a cozy lunch or dinner. Easy to prepare yet sophisticated enough for any occasion, this sandwich is sure to become a staple in your kitchen.
- Prep Time: 15 minutes
- Cook Time: 15 minutes
- Total Time: 30 minutes
- Yield: Serves 2 sandwiches 1x
- Category: Lunch
- Method: Grilling
- Cuisine: American
Ingredients
- 4 slices sourdough bread
- 2 tablespoons unsalted butter
- 1 medium pear, thinly sliced
- 1 medium apple, thinly sliced
- 1 medium onion, thinly sliced
- 1 cup shredded sharp cheddar cheese
- 1 tablespoon balsamic vinegar
- Salt and black pepper to taste
Instructions
- In a skillet over medium heat, melt 1 tablespoon of butter. Add the sliced onions and a pinch of salt. Cook for about 10 minutes until caramelized and golden brown. Stir in balsamic vinegar during the last few minutes.
- In another skillet, melt the remaining butter over medium heat. Layer half of the cheddar on two slices of sourdough, top with apple slices, pear slices, caramelized onions, and the remaining cheddar. Cap with another slice of bread.
- Grill each sandwich for about 4-5 minutes on each side until golden brown and the cheese is melted.
- Allow to cool slightly before slicing and serving.
Nutrition
- Serving Size: 1 sandwich (200g)
- Calories: 490
- Sugar: 10g
- Sodium: 600mg
- Fat: 24g
- Saturated Fat: 14g
- Unsaturated Fat: 8g
- Trans Fat: 0g
- Carbohydrates: 54g
- Fiber: 4g
- Protein: 18g
- Cholesterol: 50mg