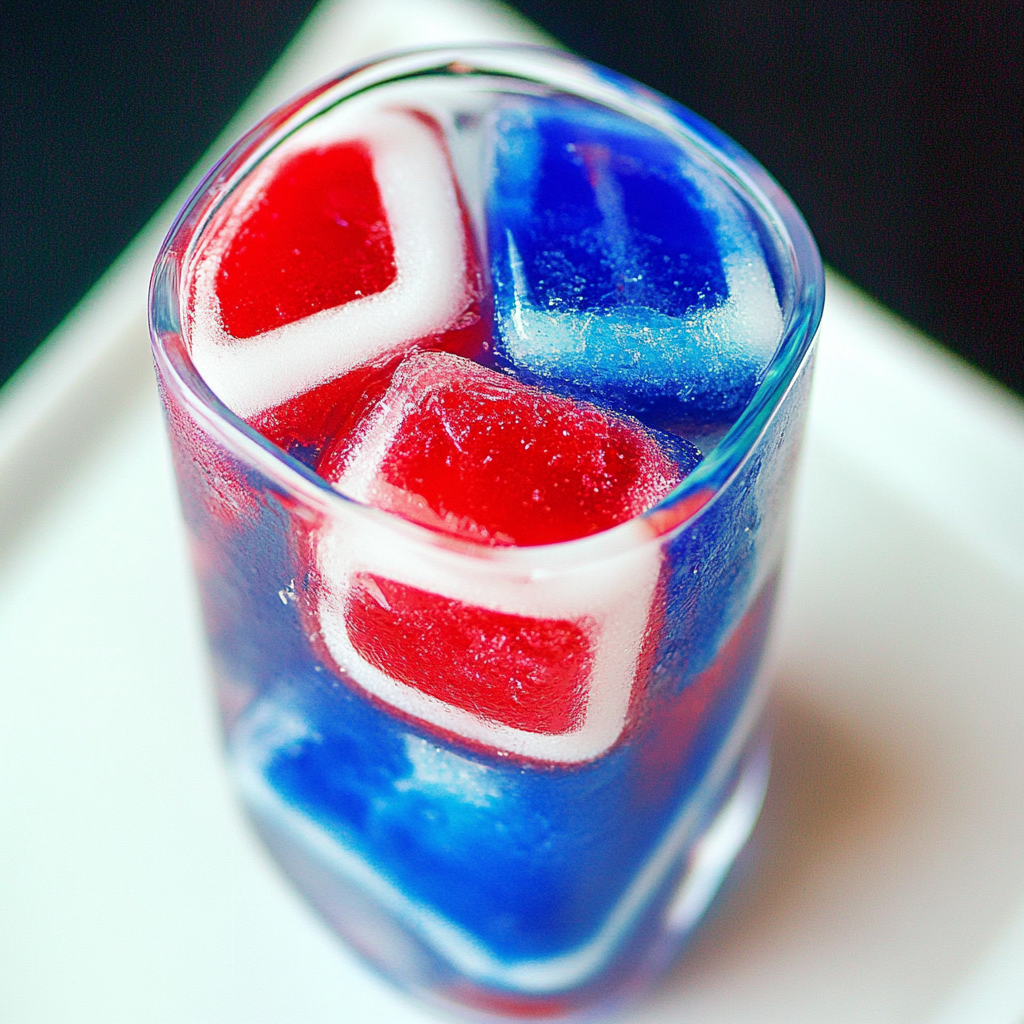
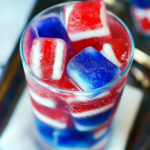
Red, White, and Blue Ice Cubes
There’s something truly magical about ice cubes that can transform a simple drink into a vibrant celebration. As I sit down to write about these Red, White, and Blue Ice Cubes, I’m filled with nostalgia for warm summer evenings shared with friends and family, where laughter dances in the air and colors burst from every corner of the gathering. They’re not merely frozen water; they are a vivid reminder of our cherished moments together—an experience that elevates any drink, whether it’s a refreshing lemonade or a fizzy soda. The bold reds of strawberries, the creamy whites of coconut milk, and the enchanting blues from butterfly pea flower powder come together to create little masterpieces that float gracefully in your glass. This is what makes this recipe so special: it’s more than just an addition to your 4th of July festivities or a nod to your favorite sports teams; it’s an invitation to celebrate life’s joyful moments, one colorful sip at a time.
You’ll find that these ice cubes are incredibly versatile. Picture this: a sun-drenched picnic where you pop open your cooler only to reveal drinks adorned with these stunning cubes, glistening in the sunlight like jewels—and trust me, they taste as good as they look! Not only do they add a splash of color to your beverages, but they also offer delightful hints of flavor as they melt into your drinks throughout the day. There’s something profoundly satisfying about crafting these little delights. When you take just fifteen minutes out of your day to blend fresh strawberries and creamy coconut milk into icy perfection, you’re creating memories that will last far beyond any ordinary drink. So let’s embark on this culinary adventure together!
Red, White, and Blue Ice Cubes: Celebrate Summer in Every Sip
These Red, White, and Blue Ice Cubes are not only visually stunning but also deliciously refreshing! Made with all-natural ingredients, they’re perfect for those sunny summer days when you want something cool and inviting in your glass.
Ingredients:
As we dive into creating these beautiful ice cubes, let’s take a moment to appreciate each ingredient we’ll be using. Each component plays an essential role in crafting our delightful summertime treat.
- 3 large strawberries (stems removed). Strawberries are the heart and soul of our red layer—sweet, tangy, and bursting with freshness. When selecting strawberries for this recipe, always aim for ones that are plump and fragrant; their aroma is often a telltale sign of ripeness! The sweetness will enhance the overall flavor profile of our ice cubes while providing that vibrant red hue that is simply irresistible. If you’re feeling adventurous or if strawberries aren’t in season, feel free to substitute them with raspberries or cherries!
- 1/3 cup water. Water might seem like a humble ingredient here, but it acts as the bridge between flavors—a necessary partner in making our strawberry puree smooth and easy to freeze. Using filtered water can elevate the overall purity of taste; after all, we want every sip to be exceptional!
- 1/3 cup + 2 Tbsp coconut milk (light preferred). Coconut milk adds a lovely creaminess to our white layer that contrasts perfectly with the fruity flavors above it. Opting for light coconut milk keeps things light without sacrificing flavor; it imbues our ice cubes with that tropical essence that transports us straight to paradise! When purchasing coconut milk, look for brands that use minimal additives for an authentic taste—you want the real deal here!
- 1/3 cup + 2 Tbsp water (for blue layer). Just like before, this additional water will help us achieve a fluid consistency with our blue butterfly pea flower powder while ensuring it freezes beautifully without forming any icy clumps.
- 1/2 tsp blue butterfly pea flower powder. This magical ingredient is what gives our ice cubes their stunning blue hue! Known for its natural coloring properties derived from dried flowers, it’s not only visually captivating but also offers subtle earthy notes without overpowering other flavors. The transformation from bright blue to purple when mixed with acidic drinks is nothing short of enchanting! If you can’t find butterfly pea flower powder locally or online, consider using blue food coloring as an alternative—though I promise you won’t regret trying it out!

Equipment You’ll Need:
Before we get started on preparing these charming little ice cubes, let’s gather some essential tools that will make this process smoother and more enjoyable.
- Blender – A high-speed blender is crucial for achieving that silky smooth strawberry puree we desire in our red layer. It ensures everything blends seamlessly without any lumps or chunks—trust me; nobody wants unexpected strawberry bits floating around in their drinks!
- Ice cube tray – This is where all the magic happens! Opt for silicone trays if possible; they make removing those beautiful ice cubes an absolute breeze compared to traditional plastic ones.
- Measuring cups – Precision matters in cooking; having accurate measurements ensures consistent results every time you whip up these beauties!
With all our ingredients prepped and equipment ready at hand, we’re set to create something truly extraordinary together!
Preparing the Red, White, and Blue Ice Cubes
Step 1: Blending the Red Layer
First off, let’s start by creating our vibrant red layer—a beautiful strawberry puree! Begin by placing those luscious strawberries into your blender along with 1/3 cup of water. Blend on high until completely smooth; you should see no chunks remaining—just pure liquid sunshine! This step is truly important because blending thoroughly not only enhances texture but releases all those sweet juices locked within each berry. Once blended into submission (you want it silky smooth!), carefully pour the mixture into your ice cube tray until each compartment is filled about halfway full—this ensures there’s room left for both layers without overflowing later on.
Step 2: Freezing Time!
Now comes one of my favorite parts: patience! Place your filled tray into the freezer for about 30 minutes until firm but not completely frozen solid—this way when we add our next layer it will adhere beautifully instead of sliding around like marbles on ice! Why do we wait? Well darling friend—it allows us to create distinct layers rather than mixing them all together—a visual treat worth waiting for!
Step 3: Crafting the Creamy White Layer
While we wait for our red layer to firm up nicely (feel free to take this time do a happy dance!), let’s prepare the creamy white layer using coconut milk combined with another splash of water—specifically 1/3 cup plus another two tablespoons of water as mentioned earlier—to ensure proper consistency without compromising flavor integrity. In a mixing bowl or directly in your blender again (if you’re feeling adventurous), whisk together those two components until well combined—you’ll notice how dreamy it looks already!
Step 4: Adding That Beautiful Blue Hue
And now onto adding some stunning depth through color—let’s introduce our star performer: blue butterfly pea flower powder! Stir half a teaspoon directly into your white mixture until evenly distributed; watch as swirls form like abstract art before settling down into creamy perfection against that pristine background… Isn’t nature just utterly intoxicating? Gently spoon this luscious mixture over top our now-firm red layer within each cube compartment until they’re filled nearly to the brim—again leaving just enough space so everything has room during freezing!
Stay tuned as we continue this colorful journey towards creating unforgettable treats perfect for summer gatherings—we’re almost there!
Step 5: Blending Red for Vibrancy
To create the stunning red layer of your Red, White, and Blue Ice Cubes, we’ll start with our strawberries. Take those luscious, ripe strawberries—three should be perfect for our needs—and slice them into quarters. This process not only makes them easier to blend but also enhances their flavor release as they mingle with water. Now, place the quartered strawberries into a blender along with 1/3 cup of water. Blend on high until you achieve a smooth, vibrant puree that looks like liquid ruby! This is crucial because the blending breaks down the fruit’s cellular structure, releasing all those beautiful natural sugars and flavors that will make your ice cubes utterly intoxicating.
Once you’ve reached that gorgeous consistency, take a moment to appreciate the wonderful aroma wafting from your blender—a sweet scent that’s not only refreshing but also nostalgic of summertime days spent picking strawberries. It’s important to ensure there are no chunks left in this mixture; it should flow freely and resemble a thick smoothie. If you find any stubborn bits hanging on, give it another quick pulse. Trust me on this: achieving a silky texture is non-negotiable for maintaining the visual appeal of your layered ice cubes. After blending, set this stunning strawberry puree aside while we move on to the next layer.
Step 6: Crafting the Silky Coconut Layer
Now that we’ve got our red layer prepped and ready, let’s dive into creating that creamy white layer using coconut milk which not only adds a beautiful contrast but also contributes a delightful tropical essence to our ice cubes. In a mixing bowl or a jug, pour in 1/3 cup + 2 tablespoons of coconut milk and 1/3 cup + 2 tablespoons of water. Gently stir these together until they’re fully combined; you want to see that smooth integration where both liquids meld beautifully into one another. The reason this step is so essential is that we want to maintain a light consistency in this middle layer so that it freezes evenly without becoming too heavy or dense.
Remember to use light coconut milk if you’re looking for a healthier alternative—it still delivers that amazing creamy texture without weighing you down. As you stir, take in the sweet aroma; it’s like summer in a glass! Once completely mixed, it’s time for some patience again—this mixture needs to be chilled briefly before pouring it into your molds to ensure it doesn’t disturb the strawberry layer below when added. Just pop it in the refrigerator for about 10 minutes; this small wait will help create beautifully defined layers in your final product—an aesthetic delight that I promise will impress anyone who sees them!
Step 7: Building Your Layers
Okay, my friend! Now comes the fun part: layering everything together! Grab your ice cube tray and let’s bring these colors to life! Start by carefully pouring an even layer of the strawberry puree into each compartment of your ice cube tray—fill them up about one-third full. Take care when pouring; let it glide smoothly down the sides of each compartment if possible. This isn’t just about looks; pouring gently helps keep those layers distinct while preventing any mixing that could happen if you’re too hasty.
Once you’ve filled all compartments with this striking red base, it’s time to play color scientist again! Retrieve your chilled coconut milk mixture from the fridge—look at how beautifully it has thickened up! Pour carefully over the strawberry layer until each compartment is filled about two-thirds full. You’ll notice how mesmerizingly they sit atop one another—the bright red against pure white creates an eye-catching contrast that’s just begging to be admired (and tasted!). We’re almost there! Before moving on to our final blue layer, let these layers chill briefly in the freezer for about 30 minutes; this helps them set slightly so they can hold their shape when we add our blue butterfly pea flower mixture next.
Step 8: The Enchanting Blue Finish
Now it’s time to work on that magical blue butterfly pea flower powder! This ingredient isn’t just beautiful; it’s packed with antioxidants and brings an enchanting hue reminiscent of twilight skies or ocean waves crashing against sandy shores. In a small bowl, combine 1/2 teaspoon of blue butterfly pea flower powder with 1/3 cup + 2 tablespoons of warm water—a gentle heat will help dissolve any clumps and awaken its profound color potential more effectively than cold water ever could. Stir vigorously until you’ve created a vivid blue liquid that sparkles invitingly under your kitchen lights.
Once you’ve achieved that stunning shade of blue, take out your ice cube tray from the freezer—you should see nicely defined red and white layers now! Carefully pour in this brilliant blue mixture over each compartment until they are filled to the top. This step is absolutely paramount because layering all three colors creates an incredible visual effect as well as an exciting flavor profile—think refreshing strawberry sweetness mingling with rich coconut creaminess and rounded out by earthy floral notes from the butterfly pea flower powder. After filling all compartments, return them back into the freezer for at least 4-6 hours or until completely solidified; patience is key here! Resist peeking too often—you want them frozen through so they pop out easily without losing their gorgeous shapes.
Conclusion:
As we wrap up our journey through making these dazzling Red, White, and Blue Ice Cubes together, I can’t help but feel excited about sharing such a joyful recipe with you! From the vibrant strawberries bursting with flavor to the silky-smooth coconut milk—a true symphony of flavors awaits in each cube. This recipe isn’t just about creating something beautiful; it’s about crafting memories that sparkle just as brightly as the cubes themselves. The balance of sweetness from the strawberries perfectly mingles with the creamy texture of coconut milk while being lifted by that enchanting blue butterfly pea flower powder—oh my goodness!
You absolutely must try making these ice cubes at least once! They’re not just delicious; they’re an experience all on their own! Imagine pulling these colorful beauties out at your next summer barbecue or family gathering—the smiles on everyone’s faces as they marvel at your creativity are truly priceless. They fit perfectly into any occasion where fun is on the agenda—from summer picnics honoring independence day celebrations to lively sports game viewings where team spirit runs high. And honestly? Nothing feels quite as satisfying as impressing friends with something so simple yet stunning.
When it comes to serving suggestions, I encourage you to get creative! Imagine savoring one of these marvelous cubes nestled within a tall glass of lemonade on a breezy afternoon—it’s pure magic! For an afternoon pick-me-up, toss some into iced tea for a refreshing twist that not only cools you down but also brightens your drink with eye-catching hues. And if you’re feeling indulgent, consider pairing them with a rich coconut smoothie topped with fresh fruits; it’s an utterly intoxicating experience that dances upon your palate.
Feeling adventurous? You can easily adapt this recipe based on what’s available or what flavors excite you most! How about trying raspberries or blueberries instead of strawberries? Or maybe adding mint leaves for an invigorating herbal twist? This recipe is wonderfully versatile and encourages exploration—why not even experiment with different fruit juices instead of water? The possibilities are endless! So go ahead—dive into this delightful project in your kitchen and don’t forget to share your colorful creations with friends and family. Let’s spread happiness one icy cube at a time!
Red, White, and Blue Ice Cubes
Celebrate summer with vibrant Red, White, and Blue Ice Cubes made from natural ingredients—perfect for drinks at any gathering!
- Prep Time: 15 minutes
- Cook Time: None
- Total Time: 0 hours
- Yield: Approximately 12 ice cubes 1x
- Category: Dessert
- Method: Freezing
- Cuisine: American
Ingredients
- 3 large strawberries (stems removed)
- 1/3 cup water (for red layer)
- 1/3 cup + 2 Tbsp light coconut milk
- 1/3 cup + 2 Tbsp water (for blue layer)
- 1/2 tsp blue butterfly pea flower powder
Instructions
- Blend strawberries with 1/3 cup of water until smooth. Pour into an ice cube tray to fill halfway and freeze for 30 minutes.
- In a bowl, mix coconut milk and 1/3 cup + 2 Tbsp water until combined. Pour over the frozen strawberry layer in the tray, filling it two-thirds full. Freeze for another 30 minutes.
- Combine blue butterfly pea flower powder with 1/3 cup + 2 Tbsp warm water until dissolved. Pour this mixture over the coconut layer in the tray until full.
- Freeze for at least 4-6 hours until completely solid.
Nutrition
- Serving Size: 1 ice cube (approximately 25g)
- Calories: 15
- Sugar: 2g
- Sodium: 5mg
- Fat: 0.5g
- Saturated Fat: 0g
- Unsaturated Fat: 0g
- Trans Fat: 0g
- Carbohydrates: 3g
- Fiber: <0g
- Protein: <0g
- Cholesterol: 0mg