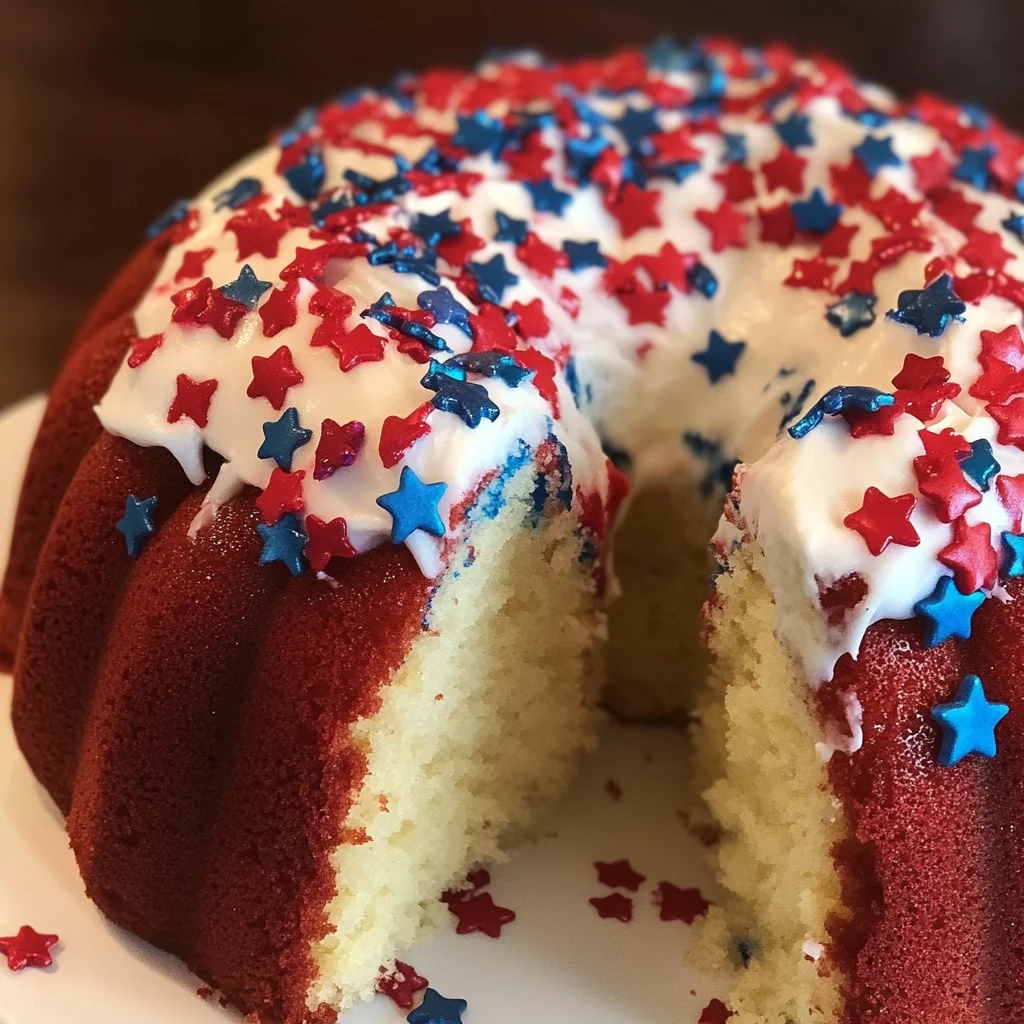
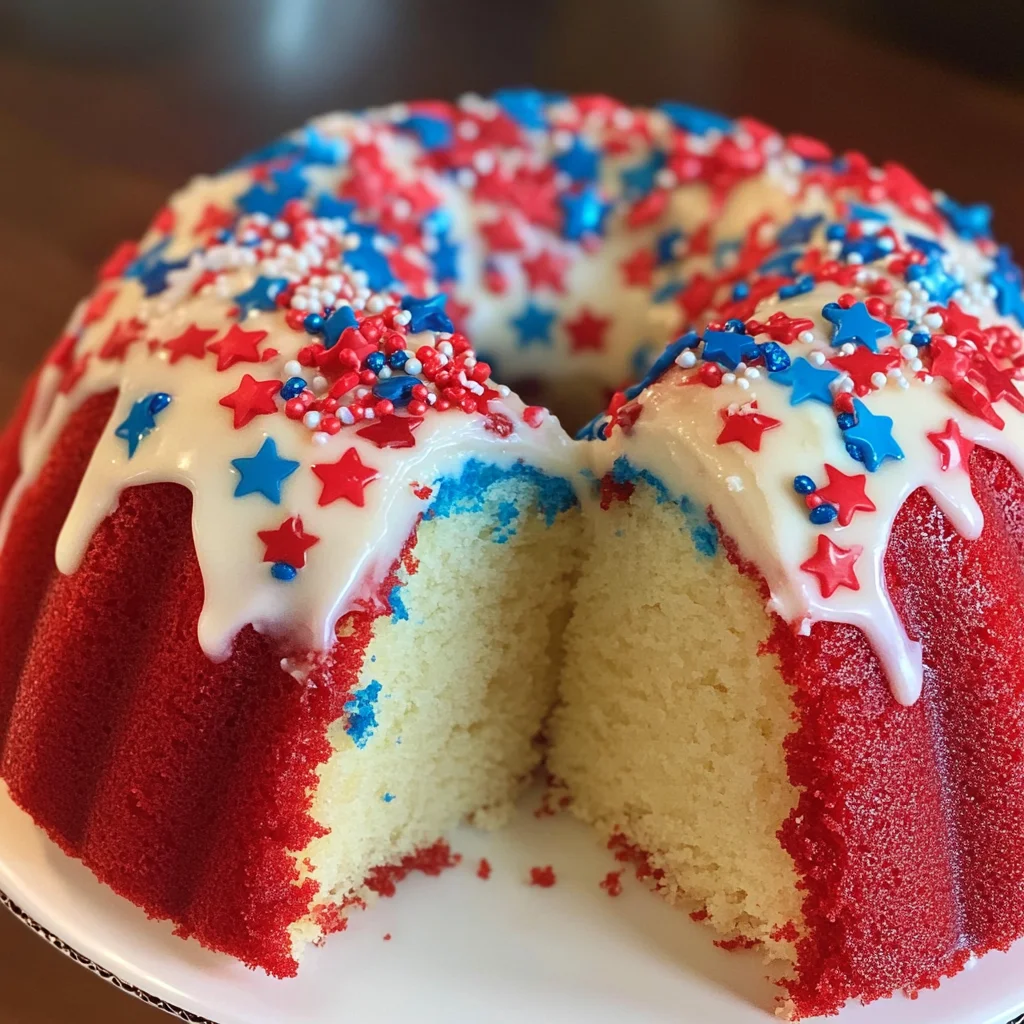
Red, White, and Blue Bundt Cake
There’s something utterly magical about a cake that not only looks beautiful but tastes like a slice of joy. When I first laid eyes on the Red, White, and Blue Bundt Cake, it was love at first sight. This isn’t just any cake; it’s a celebration in dessert form, an ethereal blend of flavors that evokes the spirit of togetherness and festivity. Imagine cutting into this moist, fluffy masterpiece to reveal its vibrant layers—it’s like a burst of summer in every slice! The tangy notes of sour cream dance harmoniously with the sweetness of white chocolate, while the playful jimmies add not just color, but a delightful crunch that makes each bite feel like a mini celebration. Trust me when I say this cake is not just food; it’s an experience that invites you to slow down and savor life’s delightful moments.
Every time I bake this Red, White, and Blue Bundt Cake, I’m reminded of family gatherings—barbecues under the sun, laughter filling the air, and the warmth of loved ones surrounding me. It’s perfect for those moments when you want to impress without spending all day in the kitchen. Whether it’s for Independence Day festivities or simply a weekend treat, this cake brings everyone together. The way it catches the eye with its vibrant colors makes it an instant showstopper on any dessert table. Plus, it’s incredibly easy to whip up! With just a handful of ingredients and some love stirred in, you’ll have a cake that not only tastes phenomenal but also shines bright with patriotic spirit.
Red, White, and Blue Bundt Cake: A Festive Delight for Any Occasion
I’m so excited to share this recipe with you! The journey from mixing bowl to Bundt pan is filled with joyful anticipation as we create something truly special together. So let’s roll up our sleeves and dive into this culinary adventure!
Ingredients:
As we embark on this sweet journey, let’s take a moment to appreciate each ingredient that plays its part in crafting our Red, White, and Blue Bundt Cake. Each one contributes unique qualities that elevate the final product into something extraordinary.
- 1 box (15.25 ounces) Betty Crocker Super Moist white cake mix. This is your canvas—ready to soak up all those wonderful flavors we’re about to add. Using a boxed mix streamlines the process while still delivering moisture and fluffiness that feels homemade. Look for options labeled super moist, as they contain additional ingredients to enhance texture and flavor.
- 1 1/4 cup water (according to cake mix). Water is essential for activating the dry ingredients in your cake mix; it hydrates them so they can come together beautifully. Using room temperature water ensures everything blends seamlessly without creating lumps.
- 1/3 cup oil (according to cake mix). Oil works wonders by keeping our cake tender and moist; it creates that melt-in-your-mouth texture we adore. Vegetable oil is most commonly used here because it has a neutral flavor that allows other ingredients to shine through.
- 4 egg whites. Egg whites are key players in achieving lightness and structure within our bundt cake. They help lift the batter while adding moisture without overwhelming sweetness from yolks. Make sure they’re at room temperature for maximum volume when beaten.
- 1 cup sour cream. This ingredient adds richness and tanginess that elevates our cake’s flavor profile significantly; it’s what makes every bite feel luxurious! Sour cream also contributes moisture without making the batter too heavy—this is absolutely paramount for achieving that dreamy texture.
- 1 (3.3-ounce) box White Chocolate Instant Pudding mix. Adding pudding mix not only enhances flavor but also thickens our batter, giving us an irresistibly moist crumb after baking—who doesn’t love that? This little secret ingredient will have everyone wondering how you made your cake so deliciously tender!
- 1.75 ounces red, white, and blue jimmies. These colorful sprinkles are not just for decoration—they add fun texture and nostalgia! I always choose high-quality jimmies as they hold their shape during baking better than others; they’ll twinkle like tiny stars throughout your festive creation.
- 5 ounces vanilla almond bark. This creamy delight melts beautifully into a luscious glaze or drizzle over your bundt once cooled! Almond bark has a rich vanilla flavor that pairs perfectly with our other ingredients while being easy to work with since it sets nicely at room temperature.
- 2 tbsp butter (softened). Softened butter is crucial here; it helps create a silky smooth frosting or glaze when combined later on! Just make sure you leave it out long enough so it’s soft but not melted—this balance ensures optimal consistency.
- 2 tbsp cream. A splash of cream adds richness to our frosting while contributing an airy lightness—the perfect complement against all those bold flavors dancing around!
- 4 ounces cream cheese (softened). Cream cheese lends an incredible tangy depth that balances sweetness perfectly in our frosting! Be sure to let it soften adequately; otherwise, you’ll end up with lumps instead of creamy goodness!
- 1 cup powdered sugar. This sweet dusting transforms any frosting into pure magic—it sweetens while creating that irresistible fluffiness we look for in cakes! Sifting before measuring can prevent clumping—a small step with enormous impact!
- 1 tsp vanilla extract. Vanilla extract brings warmth and depth to both your batter and frosting; it’s what ties together all those delightful flavors so harmoniously—never skip this step!
- Red and blue star sprinkles (for decoration). Lastly, these adorable sprinkles are purely aesthetic but oh-so-fun! They give your finished bundt a festive flair that’ll surely make everyone smile when they see your glorious creation!
Equipment You’ll Need:
Before diving into baking bliss, let’s gather our essential tools! Having the right equipment makes all the difference between chaos and creativity flowing effortlessly in your kitchen while preparing this lovely bundt cake.
- Bundt pan – Your star player in this recipe! This unique pan shape creates beautiful designs as well as helps evenly distribute heat during baking—a non-stick version ensures easy release later on too!
- Mixing bowls – A sturdy set will do wonders! You’ll need one large bowl for mixing your batter plus smaller bowls for pre-measuring other components like eggs or dry ingredients ahead of time—trust me; organization pays off wonderfully here!
- Hand mixer or stand mixer – Choose what feels comfortable! Either option works brilliantly for combining ingredients together smoothly—mixing by hand can be labor-intensive given how rich our batter becomes but if you’re up for it…you might find some zen there too!
- Rubber spatula – This trusty tool helps incorporate everything without leaving any stubborn clumps stuck behind! Use one gently fold dry ingredients into wet ones until just combined—overmixing here leads toward denser results than desired!
Now that we’ve got everything lined up nicely let’s get ready to create something truly special together!
Preparing the Red, White, and Blue Bundt Cake
Step 1: Mixing Your Dry Ingredients
Start by preheating your oven to 350°F (175°C), letting it warm up while you work on preparing your bundt pan by greasing generously with cooking spray or butter—as we want our gorgeous creation released effortlessly later on! In a large mixing bowl fitted with either paddle attachment if using stand mixer or beaters if opting handheld method combine one box of Betty Crocker Super Moist white cake mix along with instant pudding powder directly into dry mixture before adding wet components shortly thereafter—this will ensure even distribution across all layers throughout baking process itself which results ultimately yields richer texture overall…now don’t rush here: take time measuring carefully as precision matters greatly at this stage!
Step 2: Whisking Together Wet Ingredients
In another separate bowl whisk together four egg whites until slightly frothy then add them straight into dry mixture along with one-and-a-quarter cups room-temperature water alongside third cup vegetable oil—you should see bubbles forming already indicating magic beginning happen right before eyes! Next comes one whole cup sour cream which adds both moisture alongside tangy balance needed against sweetness present within overall flavor profile…mix these goodies until fully blended ensuring no pockets remain unincorporated because trust me: nobody wants surprise lumps hiding inside their perfect slices later down road!
Step 3: Folding In The Fun
Now comes my favorite part: gently folding in those delightful red white blue jimmies! Stir them carefully using rubber spatula ensuring evenly distributed throughout batter without deflating any precious air we’ve worked hard incorporating thus far…remember patience is key here folks—we want each bite bursting colorfully bright rather than clumpy messes appearing sporadically instead…
Step 4: Pouring Into Pan
Finally pour batter evenly into prepared bundt pan taking care filling all corners gently smoothing top flat before sliding into preheated oven allowing oven do its magic over next forty minutes approximately…keep watch though as ovens vary wildly based model type—I recommend inserting toothpick around thirty-five-minute mark testing doneness by seeing if inserted comes out clean indicating readiness—if not yet done allow few extra minutes bake until golden brown edges appear signaling fragrance wafting through home indicating scrumptious dessert nearing completion…
Baking is such an intimate dance between timing & technique; stick with these steps closely & soon enough aromas fill air bringing smiles all around gathering everyone close celebrating life moments shared together through simple act creating delicious memories through good food made from heart…so let’s go ahead finish strong now shall we?!
Step 5: Preparing the Cake Batter – The Heart of Your Bundt
This is where the magic truly begins! In a large mixing bowl, you’ll want to combine the cake mix, water, oil, and egg whites, whisking them together until they’re beautifully blended. I recommend using an electric mixer on medium speed for about two minutes; this aerates the batter, creating that light and fluffy texture we all adore. The science behind this step is crucial—when you incorporate air into the batter, it helps create those lovely little bubbles during baking that make your cake rise and become tender. Trust me on this; you want to feel the excitement as your mixture transforms into a creamy canvas for flavors.
Next, gently fold in the sour cream and instant pudding mix until everything is just combined. This addition is absolutely paramount because sour cream adds moisture and richness while also enhancing that delightful crumb structure. The instant pudding not only contributes flavor but also acts as a stabilizer, ensuring your cake remains moist long after it’s out of the oven. As you fold in these ingredients, be careful not to overmix—this can lead to a dense cake rather than the airy masterpiece we’re aiming for. The batter should be smooth and glossy with no visible lumps. Take a moment to admire the sheer potential of what you’re creating!
Step 6: Infusing Color – Adding Red, White, and Blue Jimmies
Now comes one of my favorite parts: adding those colorful jimmies! Gently fold in approximately 1.75 ounces of red, white, and blue jimmies into your batter. This simple step transforms your cake from a plain dessert into a festive celebration of color! These sprinkles will not only provide visual appeal but will also add delightful little bursts of sweetness as you bite into each slice. When folding them in, be gentle; you don’t want to crush them or release too much color into the batter before it’s baked. Just think about how joyful each slice will look when served—this cake isn’t just food; it’s a centerpiece for laughter and memories!
Make sure you distribute those jimmies evenly throughout the batter so every piece has that celebratory touch. It’s amazing how such small additions can create something so visually stunning while also serving as a reminder of joyous occasions spent with family and friends. So take your time here; let each sprinkle find its place in your beautiful creation.
Step 7: Baking Your Perfect Bundt Cake – The Anticipation Builds
Preheat your oven to 350°F (175°C) because we’re ready to bring this gorgeous batter to life! While waiting for your oven to reach temperature—a perfect time to savor that sweet anticipation—you’ll want to grease your bundt pan generously with cooking spray or butter. This step is non-negotiable; greasing ensures that our precious creation releases effortlessly once baked. Nothing is more disappointing than a cake that sticks stubbornly to its mold!
Once your oven is preheated, pour the batter into the prepared bundt pan, filling it about two-thirds full—this allows space for rising without overflowing. Smooth out the top gently with a spatula for even baking. Now comes the tricky part: baking time! Place your bundt pan in the center of the oven and set a timer for around 40 minutes but keep an eye on it after about 35 minutes because ovens can vary dramatically in heat distribution. You’ll know it’s done when a toothpick inserted into the thickest part comes out clean or with just a few moist crumbs clinging to it.
Remember, patience is key during this phase! The aroma wafting through your kitchen will be utterly intoxicating—just imagine how wonderful it will feel when you pull that golden-brown beauty from the oven! Allowing it to cool slightly before removing from the pan will help maintain its shape; trust me on this one—it’s worth waiting those extra few minutes!
Step 8: Cooling and Unmolding – A Moment of Tension
Once you’ve baked your Red, White, and Blue Bundt Cake to perfection, it’s crucial to allow it to cool in the pan for about 10-15 minutes before attempting any unmolding magic. Why wait? Well, cooling prevents cracks from forming on top by allowing some steam to escape while still holding onto enough warmth so that it retains moisture. During this time, I like to prepare my workspace by gathering my frosting ingredients—a bit of multitasking makes everything smoother later!
After letting it rest for those vital minutes, carefully run a knife around the edges of the pan—this simple act ensures that nothing clings stubbornly when you try to flip it out onto a cooling rack or serving platter later. With bated breath—and perhaps with some joyous music playing—I suggest placing a large plate over the top of your bundt pan before flipping it upside down quickly yet gently.
When done right, you’ll hear that satisfying thunk as your cake releases effortlessly onto the plate like an artist unveiling their masterpiece! If there are any minor imperfections—don’t fret! Remember that each slice tells its own story filled with love and celebration.
Conclusion:
As we wrap up our delightful journey through crafting this beautiful Red, White, and Blue Bundt Cake together, I can’t help but feel an overwhelming sense of joy. From the moment we combined those simple yet magical ingredients to creating layers bursting with flavor and visual splendor—I hope my enthusiasm has inspired you as much as this recipe has captivated me over the years. The interplay between rich vanilla flavors from both the cake mix and white chocolate pudding brings an utterly intoxicating sweetness that dances with every forkful. Together with those vibrant red and blue jimmies sprinkled throughout like confetti at a celebration—the experience transcends ordinary desserts into something profoundly satisfying.
This recipe is an absolute must-try because it embodies not only deliciousness but also creates memories with friends and family during gatherings that will last long after dessert is served. Picture yourself pulling this stunning cake from the oven; those aromas wafting through your kitchen are enough to make anyone’s mouth water! And let’s not forget how versatile this cake truly is—it shines brilliantly at summer barbecues or festive holidays alike while being accessible enough that even beginner bakers can whip it up with confidence.
For serving suggestions that elevate your indulgence further: imagine savoring one slice with a dollop of freshly whipped cream on top alongside a cup of cold brew coffee—a pairing that feels decadent yet refreshing! Or perhaps serve alongside fresh berries drizzled with homemade lemon glaze—oh la la! For an afternoon pick-me-up during those lazy weekends when life feels extra sweet—this cake fits perfectly into any cozy scenario.
Feeling adventurous? This recipe is wonderfully adaptable! You could swap out vanilla almond bark for dark chocolate if you’re feeling bold or add hints of lemon zest into your frosting for an unexpected zing—just think how refreshing that would be against the backdrop of sweet cream cheese frosting! Don’t hesitate to experiment; I invite you wholeheartedly to play around with flavors until they speak directly to your heart. So grab those mixing bowls once more—I can’t wait for you to try this Red, White, and Blue Bundt Cake yourself! Share your experiences with me; let’s connect over our love of baking!
Red, White, and Blue Bundt Cake
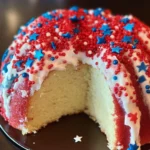
Red, White, and Blue Bundt Cake is a stunning centerpiece perfect for any celebration. Bursting with vibrant colors, this cake combines the tangy richness of sour cream and the sweetness of white chocolate, creating a delightful flavor experience in every slice. The bright red and blue jimmies add a playful touch that captures the spirit of togetherness, making it an ideal dessert for summer gatherings or festive occasions. Easy to prepare, this moist and fluffy bundt cake will have everyone reaching for seconds. Whether you’re hosting a barbecue or enjoying a weekend treat, this recipe invites you to celebrate life’s joyful moments with family and friends.
- Prep Time: 20 minutes
- Cook Time: 40 minutes
- Total Time: 1 hour
- Yield: Serves approximately 12 slices 1x
- Category: Dessert
- Method: Baking
- Cuisine: American
Ingredients
- 1 box (15.25 ounces) white cake mix
- 1 1/4 cup water
- 1/3 cup vegetable oil
- 4 egg whites
- 1 cup sour cream
- 1 (3.3-ounce) box white chocolate instant pudding mix
- 1.75 ounces red, white, and blue jimmies
- 5 ounces vanilla almond bark
- 2 tablespoons butter (softened)
- 2 tablespoons cream
- 4 ounces cream cheese (softened)
- 1 cup powdered sugar
- 1 teaspoon vanilla extract
Instructions
- Preheat oven to 350°F (175°C). Grease a bundt pan.
- In a large bowl, combine cake mix, pudding mix, water, oil, and egg whites using an electric mixer until blended.
- Gently fold in sour cream and jimmies until just combined.
- Pour batter into the prepared bundt pan and smooth the top.
- Bake for approximately 40 minutes or until a toothpick inserted comes out clean.
- Allow cooling for 10-15 minutes before unmolding onto a cooling rack.
- For frosting, beat together softened cream cheese, butter, vanilla extract, cream, and powdered sugar until smooth.
- Drizzle frosting over the cooled cake and decorate with additional sprinkles.
Nutrition
- Serving Size: 1 slice (85g)
- Calories: 310
- Sugar: 23g
- Sodium: 200mg
- Fat: 12g
- Saturated Fat: 5g
- Unsaturated Fat: 6g
- Trans Fat: 0g
- Carbohydrates: 45g
- Fiber: 0g
- Protein: 4g
- Cholesterol: 30mg