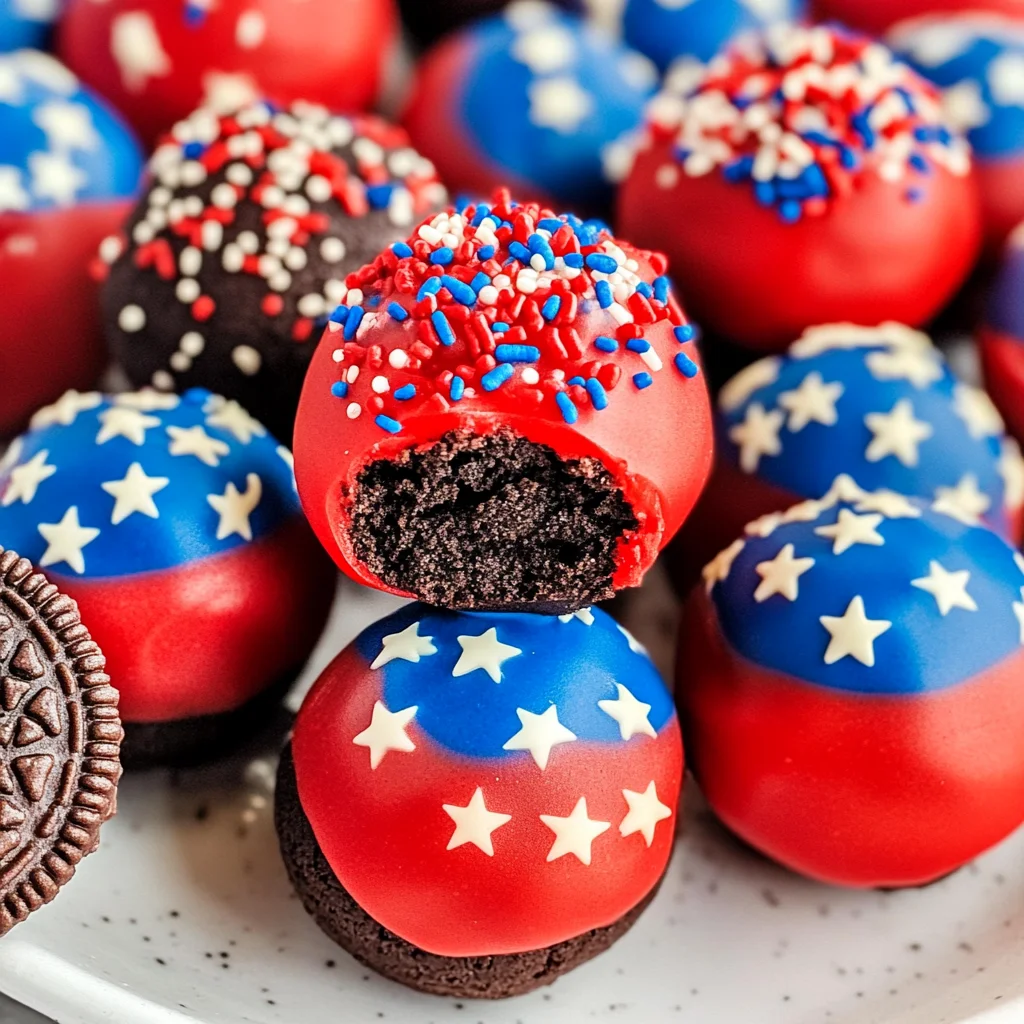
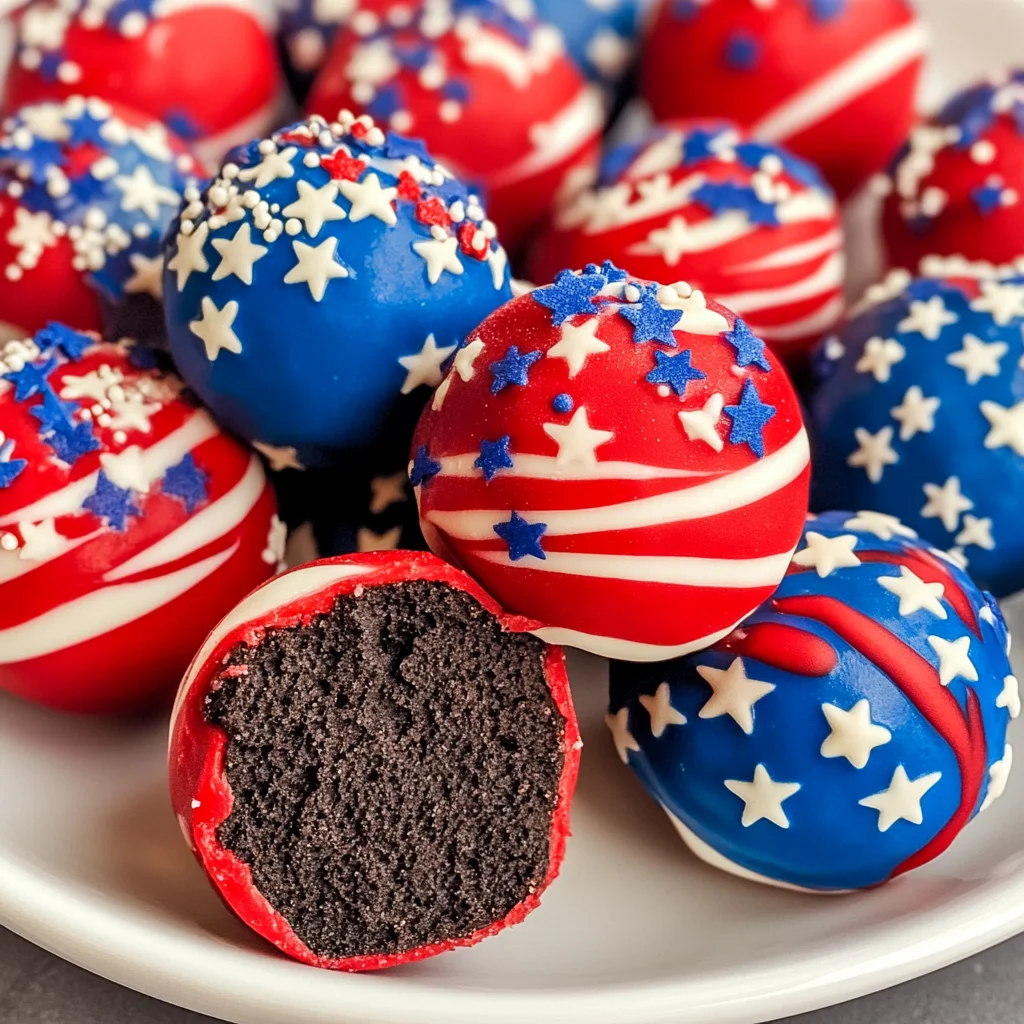
Patriotic Oreo Balls
The moment you take a bite of these Patriotic Oreo Balls, you’re not just savoring a delightful treat; you’re experiencing a celebration of flavors and colors that evoke the spirit of togetherness and joy. Picture this: a creamy, rich interior made from the beloved Oreo cookie, encased in a sweet, vibrant coating that beckons like fireworks against a summer sky. This isn’t merely dessert; it’s an experience wrapped in nostalgia and festivity, perfect for those moments when you gather with friends and family to honor traditions or create new ones. I promise you, each bite is an explosion of flavor—sweet, creamy, and utterly satisfying—that will leave your taste buds dancing with delight.
These Patriotic Oreo Balls are ideal for any occasion that calls for celebration—think Fourth of July picnics, Memorial Day gatherings, or even just a cozy night in with loved ones. The recipe bridges the gap between simple indulgence and heartfelt creativity, allowing you to infuse your own personal touch into every single ball. Plus, they’re so easy to make that you’ll wonder why you ever spent money on store-bought treats! Trust me when I say this recipe is bound to become a cherished favorite in your household.
Ingredients:
As we embark on this delicious culinary journey together, let’s take a moment to appreciate each ingredient that makes these Patriotic Oreo Balls truly special. Each component plays its part in crafting that perfect balance of taste and texture, so let’s dive into what makes them shine!
- 1 lb 2.12 oz Family Size package Oreo Cookies: These iconic cookies are the star of our show! Their rich chocolate flavor and crunchy texture serve as the perfect base for our Oreo balls, bringing both sweetness and depth to every bite. When selecting your Oreos, ensure you’re getting the family-size package; this extra quantity ensures there’s plenty to work with as we mix them into our creamy filling. And if you’re feeling adventurous, there are various flavors available now—consider experimenting with mint or peanut butter Oreos for a unique twist!
- 8 ounce block cream cheese (softened to room temperature): This ingredient is absolutely paramount for achieving that luscious filling texture we crave in our Oreo balls. Cream cheese adds moisture and richness, transforming our cookie crumbs into a decadent mixture that holds together beautifully. It’s crucial to allow it to soften at room temperature before mixing; this prevents lumps and ensures it blends seamlessly with the Oreo crumbs. If you’re looking for alternatives due to dietary preferences, consider using vegan cream cheese—it works wonders without sacrificing any flavor!
- 12 ounce bag red candy melts: These vibrant candy melts are what give our balls their stunning color while adding an irresistible sweetness. Melting them allows us to coat our chilled cookie balls perfectly while creating that glossy finish everyone loves. When purchasing candy melts, opt for high-quality brands like Wilton or Merckens; they melt smoothly and yield beautiful results without clumping. You can always swap out colors based on the occasion—blue melts for summer celebrations or green for St. Patrick’s Day!
- 12 ounce bag blue candy melts: Just like the red melts, these blue beauties help create a festive appearance that’s sure to impress your guests. The key here is patience while melting them; keep your heat low and stir often so they remain smooth without burning or seizing up—a common pitfall! Don’t rush this step since well-melted candy coating contributes significantly to both presentation and flavor.
- ⅓ cup Ghirardelli white melting wafers: A drizzle of white chocolate not only adds elegance but also enhances the overall taste with its creamy sweetness. Ghirardelli is my go-to brand because their melting wafers have a rich flavor profile that elevates any dessert—absolutely non-negotiable if you want those perfect drizzles over your red-coated balls! If needed, feel free to substitute with white chocolate chips; just ensure they’re made specifically for melting.
- White star confetti sprinkles for topping: These adorable little sprinkles add the finishing touch both visually and texturally! They provide delightful crunchiness alongside their fun aesthetic appeal—making each bite feel like a mini celebration! When choosing sprinkles, look for high-quality brands that won’t bleed or fade during storage; you’ll want those stars shining bright on every ball!
Equipment You’ll Need:
Having the right tools at hand can make all the difference when preparing our delicious Patriotic Oreo Balls! Think of these items as essential partners in bringing your culinary vision to life—they’ll help streamline your process and enhance your enjoyment in creating something wonderful.
- Food processor or high-speed blender: This trusty appliance will help you turn those crunchy Oreo cookies into fine crumbs effortlessly! A food processor is particularly effective because it can handle large batches quickly—ideal when making enough treats for gatherings. If you don’t have one handy, a blender can work too; just be cautious not to overload it.
- Large mixing bowl: A sturdy mixing bowl is essential as it provides ample space for combining ingredients without risk of spillage. I recommend choosing one with high sides—this prevents any potential mess while mixing everything together as we combine our cream cheese with those tasty Oreo crumbs.
- Hand mixer: While some may prefer mixing by hand (which is totally doable), using a hand mixer saves time and energy while ensuring everything is thoroughly combined until smooth—the texture we desire for our filling mixture is crucial! Additionally, having this tool on hand will make future baking endeavors much easier.
- Cookie scoop (1.5 inches): This handy gadget will help us achieve uniformity in size when forming our balls—no one likes uneven treats! Using a scoop ensures consistency which translates into even coating later on as well as equal baking times (if applicable).
- Parchment paper: A simple yet vital element in preventing sticking during chilling time! Line your trays generously with parchment paper before placing those rolled balls down—it allows for easy removal later without damage to their delicate coating.
Now that we have gathered all our ingredients and tools together let’s dive into making these incredible Patriotic Oreo Balls step by step!
Step 1: Getting Started – Prepping Your Workspace
Before diving into mixing up those delectable ingredients, let’s set ourselves up for success by preparing our workspace first! Begin by lining two baking trays with parchment paper—this simple action creates an essential barrier between your tasty creations and the tray itself while also facilitating easy cleanup later on (and trust me—you’ll want it!). Make sure your parchment paper covers enough area so there’s room between each ball once rolled out; spacing is key here!
Step 2: Crumbling Those Cookies
Now comes one of my favorite parts—transforming those iconic Oreos into crumbly perfection! Place all your Oreos into either the food processor or high-speed blender (whichever you prefer) before pulsing until they resemble fine crumbs—it should look almost like coffee grounds when done correctly. Take care not to over-process them though; we want crumbs—not dust! Trust me on this; fully crumbled cookies create better cohesion when mixed with cream cheese later on.
Step 3: Cream Cheese Bliss
Once you’ve achieved crumbly perfection—and trust me, it smells divine too—you’ll want to grab that softened block of cream cheese next! In a large mixing bowl (preferably one with high sides), use your hand mixer set on high speed until it’s luxuriously smooth without any lumps remaining—a process known as creaming—which blends air into the mixture giving us lightness throughout each bite later down the line. This step might seem trivial but believe me—it’s absolutely crucial!
Step 4: Bringing It All Together
With your cream cheese perfectly smooth now comes time to fold those crushed Oreos right into this velvety mixture! Add them gradually while running your mixer at medium speed until completely combined—the result should be thick yet cohesive enough where it easily holds shape when formed into balls. Don’t rush this step either; ensuring thorough incorporation will make sure every bite bursts forth flavorfully packed goodness!
These initial steps set us firmly on track toward creating those heavenly Patriotic Oreo Balls, bursting forth from both color and flavor alike—a true delight waiting just around the corner! As we continue onto subsequent phases involving dipping & decorating shortly after letting them chill (so important!), remember always how much joy cooking brings us through sharing beloved recipes like these with friends & family alike!
Step 5: Sculpting Your Little Wonders
Now that we have our creamy Oreo and cream cheese mixture ready, it’s time to bring these Patriotic Oreo Balls to life! Using a 1.5-inch cookie scoop, carefully scoop out an even amount of the mixture. This tool is fantastic because it helps ensure each ball is uniform in size, which not only makes for a beautiful presentation but also ensures they all set evenly. Once you’ve scooped out the mixture, roll it gently in the palms of your hands to create a smooth surface. This step might seem simple, but trust me, it’s absolutely paramount for achieving that flawless finish. If you skip this and leave them rough, you’ll find they won’t hold their shape as beautifully when dipped in the melted candy melts later on.
Place each rolled ball onto your prepared baking trays with parchment paper. I love using parchment paper here because it creates a non-stick surface that makes transferring your finished treats a breeze and keeps clean-up easy—who doesn’t appreciate that? As you work your way through the mixture, I want you to relish this moment; feel the texture of the cookies and cream cheese melding together—it’s truly delightful! When you’re done rolling all the balls, it’s essential to put them in the refrigerator for at least 2 hours. Yes, I know waiting can be hard, especially when you’re excited about that first bite! But chilling is crucial because it firms up the balls, making them easier to coat without falling apart into a sticky mess. If you’re pressed for time and can’t wait that long, popping them in the freezer for 15-20 minutes works as a delightful shortcut!
Step 6: Melting Blue Dreams
Once your Oreo balls are beautifully chilled and firm to the touch—think of them like tiny marbles—you’re ready for the next exciting phase: melting those vibrant blue candy melts! This is where things start to get visually stunning! In a double boiler over low heat or in a microwave-safe bowl (if you prefer), pour in your blue candy melts. As you melt them down, stir every 30 seconds to ensure they heat evenly; this gentle melting technique helps prevent any scorching or clumping. The goal here is to achieve a velvety smooth consistency; think of it as creating liquid gold!
Why do we take such care during this step? Melting chocolate or candy melts requires patience and precision. If you heat them too quickly or too high, you’ll end up with a grainy mess instead of that silky coating we desire. Once they’re fully melted and smooth, dip each chilled Oreo ball into the blue coating using a fork. Be sure to completely coat each one; this is what gives our treats their signature look! After dipping, lift it out and gently tap the fork against the side of your bowl to remove any excess coating—this will help avoid those unsightly drips and give you a professional finish.
Step 7: Adorning with Stars
After you’ve coated your first batch of Oreo balls in luscious blue candy melts, it’s time for some fun—the sprinkles! Immediately sprinkle white star confetti over each ball while the coating is still wet so that they adhere perfectly. This step adds not just flavor but also an exhilarating visual pop that embodies celebration! Just imagine how delightful these will look on your dessert table—a true feast for both the eyes and taste buds!
But why is timing so critical here? If you let the coating dry too much before adding sprinkles, they simply won’t stick—and who wants naked Oreo balls? By working quickly while everything is still wet, you’ll ensure those charming stars stay right where they belong. Once you’ve adorned all your blue-coated wonders with stars, return them to the fridge again so they can set fully; this usually takes around 10-15 minutes but may vary depending on how warm your kitchen is.
Step 8: The Fiery Red Coating
Now we’re moving on to our second round of deliciousness—melting those vibrant red candy melts! Just like before with the blue melts, place these beauties into a clean double boiler over low heat or use another microwave-safe bowl if that’s easier for you. Stir regularly every 30 seconds until they become fluid and glossy; this step transforms our simple ingredients into something utterly intoxicating! You want that perfect consistency—smooth enough to coat but thick enough to hold its shape once applied.
Once melted, take a deep breath because this part is where magic happens! Remove your second tray of chilled Oreo balls from the refrigerator—yes, they are looking fabulous already—and dip each one completely into that striking red coating using a fork just as before. Again, make sure every inch gets covered; this red exterior will create such an eye-catching contrast against those white stars we added earlier! Tap off any excess coating by gently shaking it back and forth—it’s amazing how just a little movement can help achieve that perfect finish without being overly messy.
After dipping each ball in red chocolate goodness and placing them back on your parchment-lined tray, take a moment to admire your handiwork before we move on to giving these treats their final touches!
Conclusion:
As we wrap up this delicious journey together, I can’t help but feel excited about the memories you’ll create making these Patriotic Oreo Balls! From the moment you crush those Oreos to the last drizzles of white chocolate, every step is infused with love and creativity. This recipe isn’t just about combining ingredients; it’s about crafting something truly extraordinary that brings together family and friends in celebration. The rich chocolatey goodness paired with creamy cream cheese creates a symphony of flavors that dances on your palate, while the vibrant red and blue coatings add a festive flair that elevates any occasion.
Why is this recipe a must-try? It’s not only about how delicious these treats are; it’s also about the joy of making something simple yet impressive. They are perfect for celebrations like Fourth of July picnics or summer barbecues but versatile enough to brighten up any day. Imagine pulling out these stunning little bites from your fridge or freezer, presenting them with pride, and watching everyone’s faces light up at the sight of such colorful delights—it’s pure magic!
For serving suggestions, think beyond just enjoying them solo! Imagine savoring one alongside your afternoon coffee or tea—the smoothness of cream cheese complements the rich cocoa perfectly. For a truly decadent experience, pair them with vanilla ice cream on a hot summer day; it’s like biting into happiness itself! You could even use these festive bites as toppings on cupcakes or incorporate them into dessert charcuterie boards—the possibilities are virtually endless!
Feeling adventurous? This recipe is wonderfully adaptable too! You might try swapping out different flavored melting wafers or adding crushed nuts for added texture and crunch. Or perhaps you’re inspired to incorporate other flavors—think mint or almond extracts mixed into your cream cheese filling! Whatever direction you choose, I encourage you not only to try these but also to experiment with variations that speak to your palate. Share your creations with friends and family; I can assure you each bite will spark joy, laughter, and connection around the table.
Patriotic Oreo Balls

Experience the joy of celebration with these delightful Patriotic Oreo Balls! Bursting with flavor and festivity, each bite brings a smooth, creamy interior wrapped in vibrant chocolate coatings. Perfect for any gathering or just a cozy night in, this no-bake treat is easy to make and customize. Ideal for occasions like Fourth of July picnics or Memorial Day BBQs, these colorful dessert bites not only satisfy your sweet tooth but also bring everyone together in joyous indulgence.
- Prep Time: 20 minutes
- Cook Time: None
- Total Time: 0 hours
- Yield: Approximately 24 servings 1x
- Category: Dessert
- Method: No-Bake
- Cuisine: American
Ingredients
- 1 lb 2.12 oz Family Size package Oreo Cookies
- 8 oz block cream cheese (softened to room temperature)
- 12 oz bag red candy melts
- 12 oz bag blue candy melts
- ⅓ cup Ghirardelli white melting wafers
- White star confetti sprinkles for topping
Instructions
- Prepare your workspace by lining two baking trays with parchment paper.
- Crush the Oreo cookies in a food processor until fine crumbs form.
- In a large mixing bowl, blend softened cream cheese until smooth.
- Gradually mix cookie crumbs into the cream cheese until well combined.
- Scoop and roll mixture into uniform balls, placing them on the prepared trays.
- Chill in the refrigerator for at least 2 hours (or 15-20 minutes in the freezer).
- Melt red candy melts and dip half the chilled balls; let excess drip off.
- Immediately sprinkle with star confetti before coating sets.
- Repeat with blue candy melts for the remaining balls, then drizzle melted white wafers over all.
- Chill again briefly until set.
Nutrition
- Serving Size: 1 ball (40g)
- Calories: 180
- Sugar: 14g
- Sodium: 60mg
- Fat: 8g
- Saturated Fat: 4g
- Unsaturated Fat: 3g
- Trans Fat: 0g
- Carbohydrates: 24g
- Fiber: 1g
- Protein: 2g
- Cholesterol: 15mg