Grilled BBQ Chicken
Grilled BBQ Chicken is more than just a recipe; it’s a cherished memory, a tradition that warms the heart and satisfies the soul. Imagine the tantalizing aroma wafting through your backyard as juicy chicken thighs sizzle over an open flame, their surfaces caramelizing to perfection while basking in a smoky, tangy marinade. Each bite is a revelation—a delightful explosion of flavors that dances on your palate, evoking memories of summer gatherings with loved ones. The first taste is always the most unforgettable; it’s where succulent meat meets that euphoric blend of sweet and smoky goodness, creating an experience that lingers long after the meal is done. I promise you, this Grilled BBQ Chicken will not only fill your belly but also warm your heart.
This recipe comes from countless summers spent huddled around the grill with friends and family, sharing laughter and stories while waiting for that first bite. The beauty of this dish lies in its simplicity—using fresh ingredients and straightforward techniques allows the natural flavors of the chicken to shine through. With each marinated piece turning into liquid gold on the grill, it becomes abundantly clear why BBQ chicken holds such a special place in our hearts and kitchens. Whether you’re hosting a weekend gathering or enjoying a cozy weeknight dinner, this dish is versatile enough to elevate any occasion. Trust me; once you try this grilled masterpiece, you’ll be coming back for seconds!
Grilled BBQ Chicken: A Flavorful Hug on a Plate
Let’s embark on this culinary journey together! This Grilled BBQ Chicken recipe is not just about cooking; it’s about crafting something truly extraordinary from simple ingredients that come together to create magic. The marinade is rich and complex, yet unbelievably easy to whip up—all you need is a few pantry staples! If you’ve ever wondered how to achieve that perfect balance of sweet and tangy, you’re in for a treat.
Ingredients:
As we gather our ingredients for this flavorful adventure, remember that each component plays a vital role in creating the ultimate grilled experience. Let’s dive into what you’ll need!
- 2 lb skinless boneless chicken thighs. Ah, the star of our show! Chicken thighs are my personal favorite for grilling because they’re incredibly juicy and forgiving—they won’t dry out as easily as breasts might during cooking. When shopping for chicken thighs, look for pieces with firm flesh and an even color; avoiding any that appear discolored or have an off smell is absolutely paramount. Plus, their rich flavor pairs beautifully with all those smoky BBQ notes we’re about to infuse!
- ¼ cup tomato paste. This concentrated form of tomato brings deep umami flavors to our marinade—it’s like liquid sunshine! Tomato paste not only adds richness but also contributes to that glossy finish we all adore on grilled meats. When selecting tomato paste, opt for brands without added sugars or preservatives if possible; they’re usually purer and allow us to control sweetness better.
- ¼ cup brown sugar. This ingredient adds just the right amount of sweetness to balance out the acidity from our other components. It caramelizes beautifully when grilled, creating delightful crusts on each piece of chicken. I prefer using light brown sugar because it has a softer flavor profile compared to dark brown sugar; however, if all you have is dark brown sugar at home—don’t worry! It will still work wonderfully.
- 3 tbsp balsamic vinegar. Balsamic vinegar brings an incredible depth of flavor with its tangy sweetness—it’s like magic in a bottle! Not only does it enhance the overall taste of our marinade but also helps tenderize the meat as it sits and soaks up all those flavors. When choosing balsamic vinegar, look for one labeled aged or traditional for richer notes that will elevate your dish further.
- 1 tbsp Worcestershire sauce. This sauce adds complexity with its blend of savory spices and tanginess—it’s truly indispensable in marinades! It complements both the sweetness from the brown sugar and acidity from balsamic vinegar perfectly, creating an enticing symphony of flavors that make your chicken utterly irresistible.
- ½ tbsp Dijon mustard. Just a hint of Dijon mustard lends a lovely sharpness without overpowering other flavors—it acts almost like glue for our marinade! Mustard helps emulsify the other ingredients while infusing them with subtle spice notes that will leave everyone guessing what makes your BBQ chicken so special.
- 1 tsp sweet smoked paprika. Ah yes—the secret ingredient that transports us straight to barbecue heaven! Sweet smoked paprika provides warmth without heat; its distinct flavor melds beautifully with our savory elements while imparting that gorgeous reddish hue we seek in grilled foods. Be generous here—this spice will give your chicken an unforgettable smoky essence.
- ½ tsp salt. Salt is crucial in enhancing every flavor present in our dish—it’s nature’s amplifier! While we want to avoid over-salting (which can overwhelm), this modest amount ensures our marinade penetrates deeply into the meat while allowing all those other delicious elements to shine through.
Equipment You’ll Need:
Now that we’ve gathered our ingredients let’s talk about some essential tools you’ll need for this culinary endeavor! Having the right equipment makes cooking smoother—and trust me; it can turn what might feel overwhelming into something joyful!
- Grill (Charcoal or Gas): Your grill is your best friend here! Whether you prefer charcoal or gas depends on personal preference—charcoal lends more smokiness while gas offers convenience and quick heating times. Regardless of which type you choose, ensure it’s clean before starting so nothing interferes with those beautiful char marks we’re going for!
- Large shallow dish or bowl: You’ll need something substantial enough to hold both your marinade and chicken comfortably—this allows every piece to get well-coated without spilling over! A glass or ceramic dish works beautifully as they’re non-reactive materials ensuring no unwanted chemical reactions occur during marination time.
- Whisk: An essential tool for mixing up that luscious marinade until it’s smooth as silk! Whisks come in various sizes; pick one that’s comfortable for you but large enough to blend everything thoroughly without making too much mess.
- Tongs: These handy tools are non-negotiable when handling hot food on the grill—you want something robust yet gentle enough not to tear apart delicate meats like ours here! Choose tongs with silicone tips if possible—they help grip better while protecting delicious marinades from being scraped off prematurely!
Preparing the Grilled BBQ Chicken
Step 1: Crafting Your Magical Marinade
Let’s start by combining all those beautiful flavors into one harmonious mix! In your large shallow dish (or bowl), add together the tomato paste, brown sugar, balsamic vinegar, Worcestershire sauce, Dijon mustard, sweet smoked paprika, and salt—this combination is truly aromatic bliss as each ingredient mingles together like old friends meeting at a reunion! Whisk these components until they form a smooth paste; don’t rush this step because achieving proper consistency allows everything else to coat evenly later on! Once mixed thoroughly (it should be glossy), take those fabulous skinless boneless chicken thighs and gently toss them into this rich concoction until they are well coated—every nook should glisten under its magical spell!
Step 2: Patience Is Key
After marinating those sumptuous thighs comes my favorite part: letting them soak up all those incredible flavors by refrigerating them for at least an hour—or better yet—overnight if time permits! Why chill? The cold environment allows meat fibers to relax while absorbing moisture from our marinade which leads us towards maximum juiciness later during grilling time—trust me on this one! If you decide upon overnight marination (which I highly recommend!), cover tightly with plastic wrap or transfer everything into resealable bags before placing them gently inside your refrigerator—you’ll wake up dreaming about tomorrow’s meal!
Step 3: Prepping Your Grill
The next morning—or whenever you’re ready—is when magic happens again as we prepare our grill! Set it up over direct heat by lighting coals (if using charcoal) or turning burners (for gas) until they reach medium-high levels—this temperature creates ideal conditions where searing occurs quickly while retaining moisture within each thigh piece being cooked later down below hot flames below us! Consider creating zones within your grill—a direct heat area alongside cooler spots—to ensure there’s space available if pieces become too browned before reaching desired internal temperatures—we don’t want burnt bottoms ruining dinner now do we?
Step 4: Time To Grill!
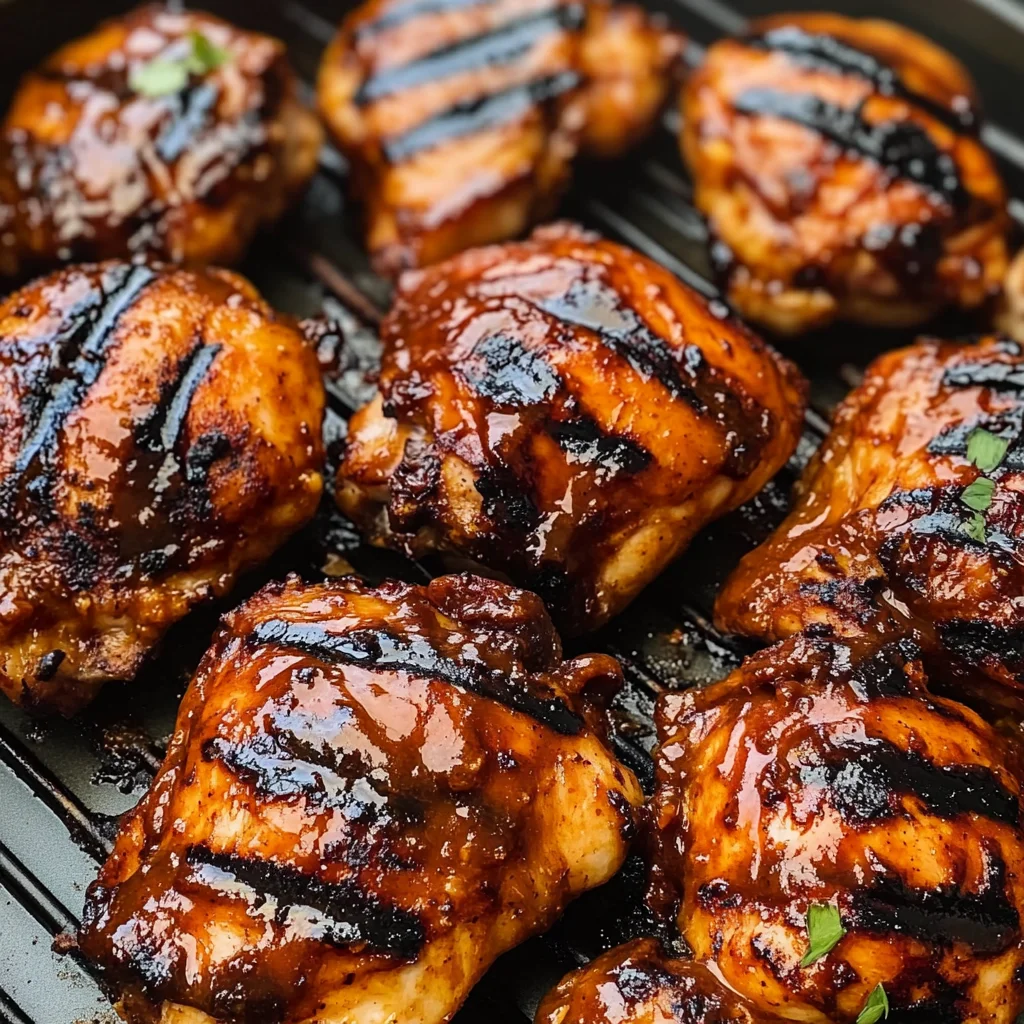
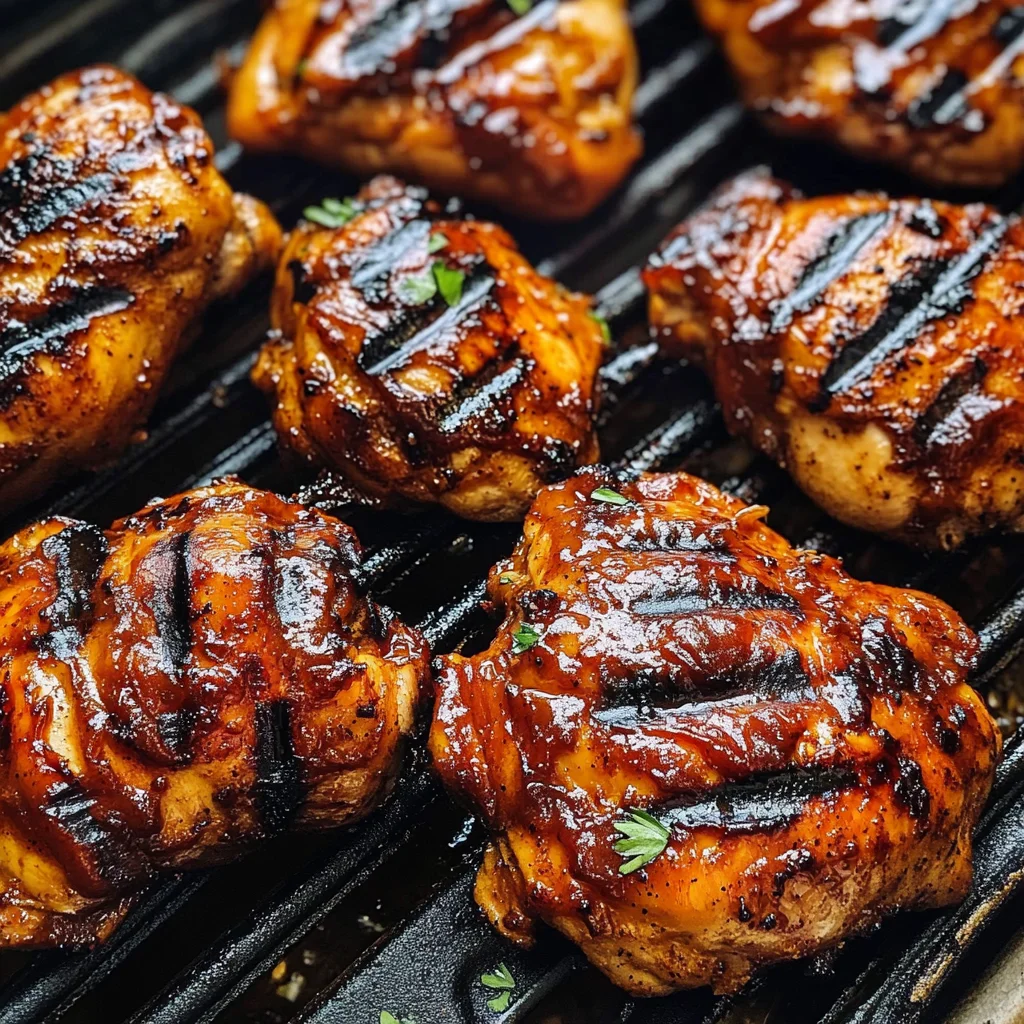
It’s showtime! Working in batches based upon how much space you’ve got available on top grates (I often cook four pieces at once), lay down those marinated beauties directly onto hot grate surfaces where instant sizzling sounds greet us enthusiastically like fireworks going off above skies during celebrations—oh how intoxicatingly glorious does this feel already? Grill these delectable thighs until browned caramelization forms outside edges—about 15 minutes total per batch depending upon thickness levels involved & heat intensity experienced beneath them!
Each flip reveals stunning golden exteriors—the kind that’ll make anyone passing by stop in their tracks wondering what heavenly aromas permeate air around them now?! And just when you’re concerned about burning exterior coatings formed thus far… remember: move any partially cooked ones toward cooler areas if necessary whilst keeping fully cooked pieces warm nearby until everyone else has finished cooking too!
Now we’ve embarked upon quite an exciting journey already filled with love—but stay tuned because we’re just getting started here…
Grilling Your BBQ Chicken to Perfection
Step 5: Preparing the Grill – The Heart of the BBQ Experience
Now that your chicken has marinated beautifully, it’s time to prepare the grill—a crucial step that sets the stage for those irresistible char marks and smoky flavors. If you’re using a charcoal grill, light your coals and allow them to burn until they’re covered with a fine layer of ash; this indicates they’ve reached the perfect cooking temperature. For gas grills, preheat on high for about 10-15 minutes before reducing to medium-high heat. You want a searing hot grill for that initial cook, as it’s essential for creating the Maillard reaction—this is when proteins caramelize and develop that deeply satisfying flavor profile we all crave in grilled meats.
Once your grill is ready, create zones for cooking. This means having one side of your grill hot and direct while leaving another cooler—this indirect heat zone will be invaluable if you find the chicken is browning too quickly on the outside but still needs more time to cook through. Trust me, this method allows you to manage your cooking much better, ensuring juicy pieces of chicken without burnt bits. It’s all about balance; too much heat can lead to charring before the insides are properly cooked.
Step 6: The Art of Grilling – Mastering Temperature and Timing
With everything set, it’s time to lay those marinated chicken thighs onto the hot grill. Listen closely! That sizzle is music to any food lover’s ears; it means you’re achieving that wonderful sear we all adore. Place your chicken thighs on the hottest part of the grill, making sure not to overcrowd them—this will prevent steaming and ensure they get that beautiful golden-brown crust. Cook each thigh for about 4-5 minutes on one side without moving them; this allows them to form a lovely crust that locks in moisture.
After about 4-5 minutes, gently flip each piece over using tongs—never a fork, as piercing the meat releases its precious juices! Continue grilling for another 4-5 minutes. At this point, start checking for doneness by using an instant-read thermometer inserted into the thickest part of the thigh; you’re looking for an internal temperature of 165°F (75°C). If you find your chicken is browning too quickly but isn’t fully cooked inside yet, don’t fret! Simply move those pieces over to the cooler side of the grill so they can finish cooking gently without burning—patience here really pays off!
Step 7: The Resting Phase – Essential for Juiciness
Once your chicken has reached that magical temperature of 165°F (and it looks utterly delectable), remove it from the grill and place it on a cutting board or platter. Now comes one of my favorite parts—the resting phase! I know it’s tempting to dive right in, especially with all those amazing smells wafting toward you, but I promise this step is non-negotiable if you want every bite to be succulent and juicy.
Cover your grilled BBQ chicken loosely with foil and let it rest for at least 5-10 minutes. Why does this matter? Well, resting allows the juices inside each piece of chicken to redistribute evenly throughout the meat rather than spilling out onto your cutting board when you cut into it. Think of it as giving your chicken a moment to breathe after its intense workout on the grill! When you slice into rested chicken thighs, you’ll experience tender bites bursting with flavor—trust me; it’s worth every second!
Step 8: Slicing and Serving – The Grand Finale
As you finally approach serving time, grab a sharp knife and carefully slice into those beautifully grilled thighs. Notice how effortlessly they yield under your blade? That’s exactly what you want! Serve them whole or sliced against the grain for added tenderness—this little trick makes such a difference in texture and mouthfeel.
Plating is an art in itself! Consider serving your grilled BBQ chicken alongside some fresh summer corn on the cob or a bright salad drizzled with olive oil and lemon juice; these sides perfectly complement those rich flavors from our marinade while adding a refreshing crunch. And let’s not forget about presentation! A sprinkle of fresh herbs like cilantro or parsley can transform your dish from ordinary to extraordinary visually—and I promise those bright colors will entice everyone at the table.
Final Thoughts on Your Grilled BBQ Chicken Adventure
Now you’ve mastered grilled BBQ chicken like a true culinary artist! Each step—from marinating in that luscious sauce bursting with sweet and tangy notes to achieving perfect grill marks—is vital in creating a dish that’s simply unforgettable. Remember these tips well; whether you’re hosting friends at a backyard barbecue or enjoying a cozy family dinner at home, this recipe guarantees deliciousness every single time. So gather around that dining table with loved ones, share stories filled with laughter, and take pride in knowing you’ve created something truly special!
Happy grilling! I can’t wait for you all to enjoy this delightful dish as much as I do!
Storage and Enjoyment Tips for Your Grilled BBQ Chicken
Now that your Grilled BBQ Chicken is sizzling on the grill, and the tantalizing aroma fills the air, it’s time to talk about how to savor every last bite! Whether you’re hosting a backyard barbecue or simply enjoying a cozy dinner at home, knowing how to store and enjoy leftovers will ensure that this utterly delicious dish stays in your heart (and your fridge) for days to come. Trust me when I say, you’ll want to keep those juicy, well-marinated chicken thighs around because they’re perfect for meal prep or quick lunches throughout the week!
Storing Leftover Grilled BBQ Chicken
To store your leftover Grilled BBQ Chicken properly, place it in an airtight container—this is absolutely crucial for maintaining that mouthwatering flavor and moisture. You can also wrap each piece individually in plastic wrap before placing them in the container; this extra layer helps prevent freezer burn. If stored correctly in the refrigerator, your delicious chicken will stay fresh for up to four days. Now, if you want to take it a step further, here’s a little pro tip: pop a slice of bread into the container with your chicken. The bread will absorb any excess moisture and keep your chicken juicy and tender. When you find yourself reaching for a piece later on, you’ll be delighted by how flavorful it still is! For reheating, simply warm it gently in the oven or on the stovetop with a splash of water to keep it moist—trust me, you’ll be amazed at how it retains its original charm.
Freezing Grilled BBQ Chicken for Later
If you’re thinking ahead and want to save some of this fantastic grilled goodness for later, freezing is an excellent option! To freeze your grilled chicken perfectly, allow it to cool completely first—this prevents condensation from forming inside the packaging. Wrap each piece tightly in aluminum foil or freezer-safe plastic wrap before placing them in a freezer bag; squeeze out as much air as possible before sealing. This way, your Grilled BBQ Chicken can remain frozen for up to three months without losing flavor or texture! When you’re ready to enjoy it again, simply transfer the chicken from the freezer to the refrigerator overnight to thaw—no need for any complicated defrosting methods! The convenience of having these scrumptious bites on hand makes weeknight dinners a breeze. Picture this: it’s a busy Wednesday evening, and all you have to do is warm up some grilled chicken while whipping up a quick salad—a truly effortless meal that brings joy back into cooking.
Grilled BBQ Chicken

Experience the joy of summertime grilling with this mouthwatering Grilled BBQ Chicken recipe. Each bite of succulent chicken thighs is infused with a smoky, tangy marinade that elevates any occasion, whether it’s a backyard barbecue or a cozy weekday dinner. The rich flavors of tomato paste, balsamic vinegar, and sweet smoked paprika create a deliciously balanced profile that will have everyone asking for seconds. Perfectly charred on the grill and bursting with flavor, this dish is an absolute crowd-pleaser. Let’s dive into making your new favorite grilled dish that’s sure to bring warmth and happiness to your table!
- Prep Time: 10 minutes
- Cook Time: 20 minutes
- Total Time: 30 minutes
- Yield: Serves approximately 4 people 1x
- Category: Main
- Method: Grilling
- Cuisine: American
Ingredients
- 2 lb skinless boneless chicken thighs
- ¼ cup tomato paste
- ¼ cup brown sugar
- 3 tbsp balsamic vinegar
- 1 tbsp Worcestershire sauce
- ½ tbsp Dijon mustard
- 1 tsp sweet smoked paprika
- ½ tsp salt
Instructions
- In a large shallow dish, whisk together tomato paste, brown sugar, balsamic vinegar, Worcestershire sauce, Dijon mustard, sweet smoked paprika, and salt until smooth.
- Add chicken thighs to the marinade and toss until well-coated. Cover and refrigerate for at least one hour or overnight for best results.
- Preheat grill over medium-high heat. Create hot and cooler zones for grilling.
- Grill marinated chicken thighs for about 4-5 minutes per side, or until internal temperature reaches 165°F (75°C).
- Remove from grill and let rest for 5-10 minutes before slicing.
Nutrition
- Serving Size: 1 thigh (approximately 170g)
- Calories: 330
- Sugar: 9g
- Sodium: 520mg
- Fat: 15g
- Saturated Fat: 3g
- Unsaturated Fat: 10g
- Trans Fat: 0g
- Carbohydrates: 26g
- Fiber: 1g
- Protein: 25g
- Cholesterol: 110mg