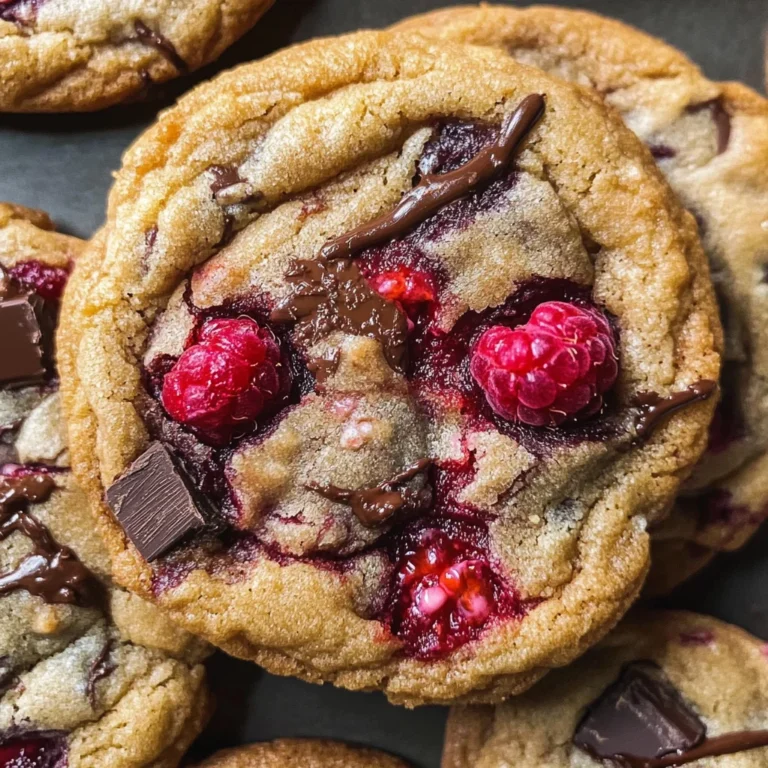
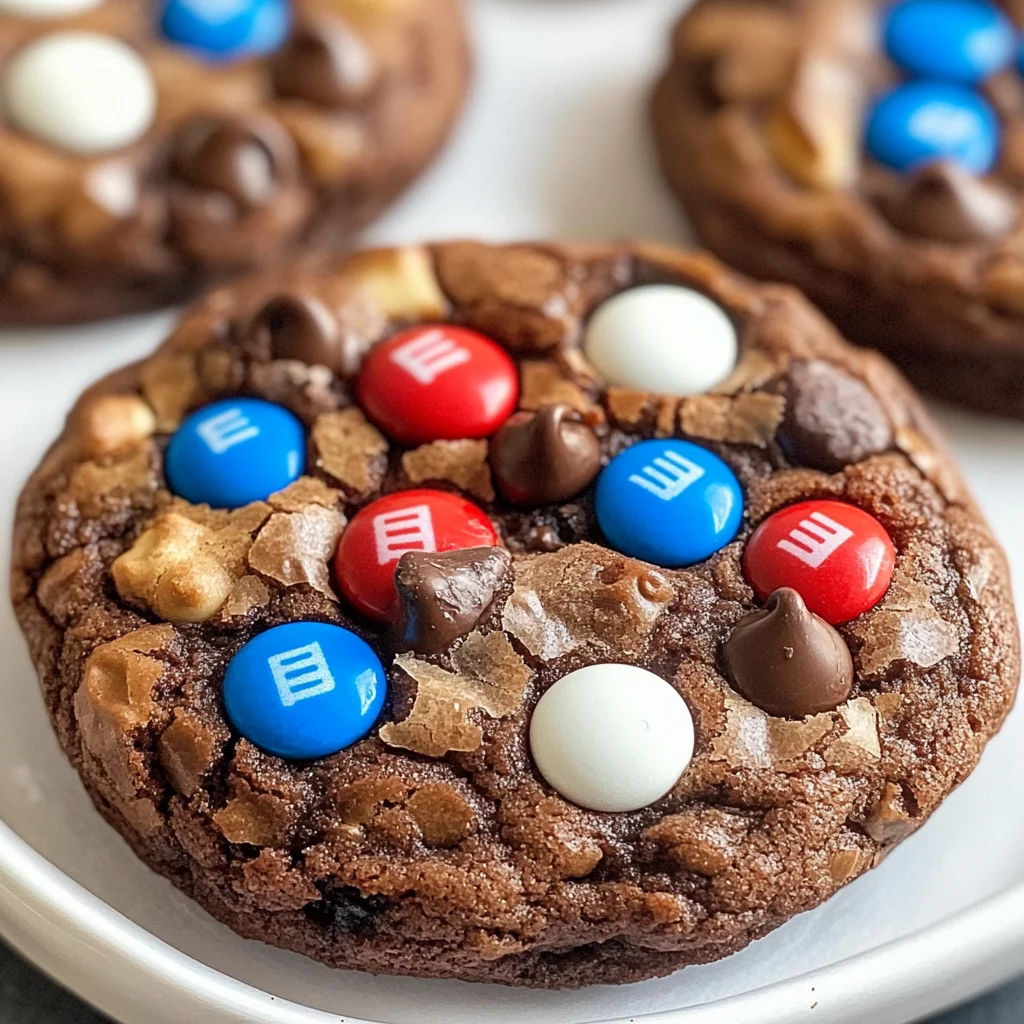
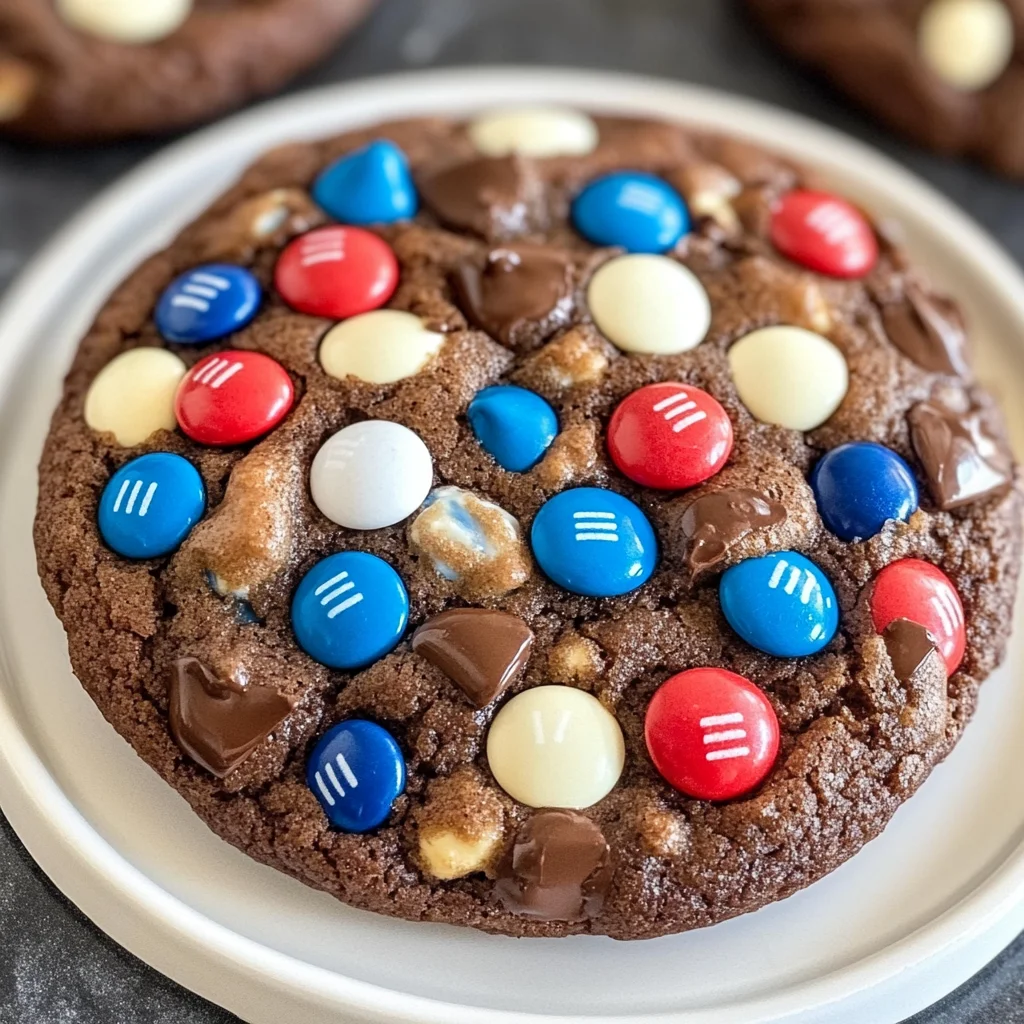
Red, White & Blue Brownie Cookies
There’s something profoundly magical about baking that transcends mere ingredients; it’s an experience steeped in warmth, nostalgia, and love. When I think of the Red, White & Blue Brownie Cookies, I’m transported to sun-drenched afternoons where laughter fills the air, and the sweet aroma of chocolate wafts through the kitchen. These cookies are not just a delightful dessert; they represent celebration and togetherness, embodying the spirit of joy that comes with sharing something homemade with those you cherish. Each bite is a symphony of flavors—rich brownie goodness cradled by bursts of colorful M&M’s—that evokes feelings of happiness and comfort. I promise you, once you take that first bite, you’ll be hooked on not just the taste but the memories they inspire.
What makes these Red, White & Blue Brownie Cookies so special? It’s all in the layers of flavor and texture that come together harmoniously. The rich chocolate base is complemented by the crunch and burst of sweetness from the M&M’s, creating a delightful contrast that dances on your palate. Whether you’re celebrating a holiday or simply indulging in a cozy night at home with loved ones, this recipe is perfect for any occasion. It’s quick to whip up yet delivers results that feel incredibly thoughtful and homemade—an ideal balance that every baker strives for. Trust me; these cookies will become a cherished part of your dessert repertoire.
Red, White & Blue Brownie Cookies: Sweet Treats for Every Occasion
Get ready to embark on a delightful culinary journey as we dive into making these scrumptious Red, White & Blue Brownie Cookies! They are perfect for gatherings or simply to satisfy your sweet tooth on any day. With their vibrant colors and rich flavors, they capture the essence of celebration in each delicious bite.
Ingredients:
Before we dive into baking bliss, let’s gather our ingredients. Each one plays a vital role in crafting these unforgettable cookies, so let’s take a moment to appreciate what they bring to our sweet creation.
-
18.9 ounces brownie mix: This is our star ingredient; it sets the foundation for our cookies’ rich chocolate flavor. A good brownie mix will often have high-quality cocoa powder and sugar balanced perfectly to achieve that fudgy texture we adore. When choosing a mix, look for one without unnecessary additives or preservatives—after all, we want our cookies to embody purity and simplicity! If you’re feeling adventurous or want to control sugar levels more closely, you can swap this with homemade brownie batter following your favorite recipe.
-
2 large eggs: Eggs are absolutely paramount in this recipe; they act as binding agents while also contributing moisture and richness. When combined with other ingredients during mixing, eggs help create that wonderfully chewy texture we crave in cookies. It’s essential to use large eggs at room temperature for even mixing; if your eggs are too cold from the fridge, it can affect how they blend into your dough.
-
¼ cup (half stick) unsalted butter (melted): Butter brings richness and depth of flavor to our cookies like nothing else can! Melting it ensures easy incorporation into our mixture while providing that lovely moistness we seek. Always opt for unsalted butter so you can control the overall saltiness—this allows all flavors to shine through without being overwhelmed by saltiness.
-
¼ cup all-purpose flour: While our brownie mix provides structure, adding just a touch of flour helps achieve that cookie-like consistency rather than just gooey brownies on a tray! Flour adds body while ensuring our cookies hold their shape as they bake. Look for good-quality all-purpose flour without any added chemicals or bleaches for best results.
-
1 cup M&M’s (plus extra for topping): These colorful candies are what give our cookies their festive flair! Not only do they add sweetness and crunch but also a pop of color that makes them visually appealing—perfect for any gathering! If you’d like an alternative flavor twist or wish to avoid certain colors due to dietary preferences, feel free to experiment with different types of chocolate or candy-coated treats!
-
½ cup semi-sweet chocolate chips: Chocolate chips intensify that luscious chocolate flavor within each cookie bite! They melt slightly during baking but still retain their shape—creating pockets of melty goodness throughout each cookie that will have everyone coming back for more. Make sure to choose high-quality chocolate chips as they make all the difference in taste!
-
1 Tbsp water: Just a small splash goes a long way in helping combine dry ingredients smoothly into thick dough without making it overly wet or sticky—a crucial element when crafting perfect cookie dough!
Equipment You’ll Need:
Having the right tools makes baking not only easier but also more enjoyable! Each piece contributes uniquely to helping you create something wonderful without unnecessary hassle.
-
Mixing bowls: A set of mixing bowls is essential because they provide ample space for combining ingredients without spilling over—a must when working with thick dough like ours! Opt for glass or sturdy plastic bowls; glass allows you to see your mixtures clearly while plastic tends to be lighter if you’re moving around the kitchen often.
-
Rubber spatula: This handy tool is perfect for folding ingredients gently without deflating air bubbles too much—a key aspect when blending delicate mixtures like ours! Silicone spatulas are especially great because they’re heat-resistant and flexible enough to scrape down every last bit from your bowl.
-
Baking sheet: A good quality baking sheet helps ensure even cooking across all cookies while preventing sticking—non-stick options work well here! Make sure it’s rimmed so you can easily transfer batches in and out of your oven safely.
-
Parchment paper: This simple paper serves as a protective barrier between delicious dough and hot metal surfaces so nothing sticks while baking! It also aids with cleanup afterward—you’ll thank yourself when it comes time!
Preparing the Red, White & Blue Brownie Cookies
Step 1: Preheat Your Oven
First things first—let’s preheat your oven to 375°F (190°C). Preheating is crucial because it ensures your cookies start baking instantly once placed inside; this helps them rise beautifully rather than spread out too thinly across the pan. While waiting for it to warm up fully—and trust me; don’t rush this step—we’ll prepare our baking sheet by lining it with parchment paper. This not only prevents sticking but makes cleanup easier afterward!
Step 2: Combine Dry Ingredients
In a large mixing bowl, combine your brownie mix with the all-purpose flour until well blended. This step might seem simple enough but trust me—it’s essential! The addition of flour gives structure along with additional lift needed when baking into cookie form instead of just dense brownies sitting flat on trays trying desperately not ooze everywhere! After whisking together thoroughly until no dry lumps remain visible (the mixture must appear uniform), set aside while we move on…
Step 3: Mix Together Wet Ingredients
Now grab another bowl because it’s time for some wet magic! In this separate bowl (which should ideally be medium-sized), whisk together those two large eggs along with melted butter and one tablespoon water until everything combines smoothly—it may take about thirty seconds or so before achieving complete harmony among liquids here! You’ll notice how beautifully golden-yellow color emerges—the yolks giving life back into otherwise dusty brown mixes awaiting transformation ahead!
Step 4: Combine Wet & Dry Mixtures
Here comes my favorite part—the melding together! Pour those luscious liquid ingredients straight into your bowl filled previously held dry components then gently fold them using either spatula/ wooden spoon until no streaks remain visible anymore (but don’t overdo it!). The dough will be thick which means we’re on track towards greatness already; this thickness ensures ultimate chewiness once baked properly later down line…
And there you have it—the beginning steps toward creating these indulgent Red, White & Blue Brownie Cookies! I can’t wait to guide you through folding in those wonderful M&M’s next… Stay tuned as we continue crafting these sweet delights together!
Step 5: The Art of Shaping Your Cookies
Now comes the moment where we bring our dough to life! Using a tablespoon, scoop out the rich, thick brownie dough and roll it into a ball in your hands. Picture this: each little ball is a promise of gooey chocolatey goodness waiting to burst forth as it bakes. It’s essential to keep these cookie balls about two inches apart on your prepared baking sheet; this isn’t just for aesthetics—it allows room for the cookies to spread while they bake, ensuring they maintain that sought-after chewy texture in the center with slightly crispy edges. As you place them down, take a moment to admire their glossy surface glistening with melted butter and chocolate chips, which is already setting the stage for what’s to come.
Trust me on this—don’t rush this step! Making sure each cookie is uniform not only creates that delightful presentation but also ensures even baking. If they’re too close together, you might end up with a giant brownie cookie rather than individual delights. So, take your time as you roll each one. When you’re finished, step back and give yourself a moment to appreciate that gorgeous tray of love you’ve just prepared. You’re on the brink of creating something truly extraordinary.
Step 6: The Baking Symphony Begins
Preheat your oven to 375°F (190°C) because we’re about to embark on an aromatic journey that will leave your kitchen smelling utterly intoxicating! Once the oven reaches temperature, it’s time to slide your baking sheet inside and let those cookie balls transform into glorious treats. Bake them for about 10-13 minutes—this time frame is critical as it allows the outside of the cookies to set while keeping the insides delectably fudgy and soft.
The key visual cue here is watching for that signature cracked top; it should appear dry and slightly crinkled when they’re ready to come out. The aroma wafting through your home will be nothing short of addictive—like a warm hug for your senses! Keep an eye on those last few minutes because every oven is unique; some may require more or less time depending on how evenly they heat. Just remember, these cookies will continue cooking slightly after they’re out of the oven due to residual heat, so if they look perfect at around 11 minutes, don’t hesitate—trust your instincts!
Step 7: A Colorful Burst of M&M’s
Here comes one of my favorite parts! As soon as you pull those warm trays from the oven, grab those remaining M&M’s—you’ll want them handy because it’s time for some beautiful decoration. While the cookies are still warm and slightly soft, gently press a few M&M’s into the tops of each cookie. This not only adds an eye-catching pop of color but also enhances that sweet crunch we all crave in every bite. Imagine breaking into one of these beauties and seeing that vibrant red, white, and blue peeking through—a real feast for both the eyes and taste buds!
This step is absolutely paramount because pressing them in while warm means they’ll embed themselves nicely into the center without rolling off later when you’re indulging in these treats. Don’t skimp on this—make sure each cookie gets its fair share of M&M’s! It’s these little touches that elevate what could be just another cookie into something special that you’ll want to share with friends at gatherings or simply enjoy all by yourself with a glass of milk.
Step 8: Cooling Down with Care
Once you’ve adorned your cookies with those delightful candies, let them cool on the baking sheet for about 3 minutes before transferring them to a cooling rack. This cooling period is crucial; during these initial moments off heat, they will firm up just enough without becoming hard or overbaked. You might notice that they look a little puffy right after coming out—don’t worry! As they cool down, they’ll settle into that perfect shape we all adore.
When you do move them over to a wire rack (this step allows air circulation), make sure you’re gentle; these cookies can be quite delicate right out of the oven due to their fudgy nature. I recommend using a spatula to help lift each one without compromising its integrity. The anticipation builds as you await their transformation from warm doughy delights into perfectly baked Red, White & Blue Brownie Cookies ready for indulgence! And trust me—once they cool completely and you take that first bite? You’ll find it was worth every second spent waiting.
Conclusion:
As we wrap up our journey through creating these scrumptious Red, White & Blue Brownie Cookies together, I can’t help but feel excited about sharing this recipe with you! It represents not just a dessert but an experience—a celebration of flavors and textures that meld together to create something truly special. The combination of rich brownie-like softness paired with vibrant pops of color from M&M’s makes every bite feel like an occasion worth celebrating. These cookies are more than just visually stunning; they evoke nostalgia and warmth—think of summer barbecues or festive gatherings where everyone gathers around for sweet bites filled with laughter.
So why is this recipe a must-try? Not only do these cookies burst with flavor and joy when made fresh from your kitchen, but they also embody versatility! They shine brightly at any occasion—birthdays, holidays, or simply as a pick-me-up during your afternoon slump. Just imagine pulling them out of the oven; the aroma fills your home like a warm hug! Each crackled top promises gooey chocolate within while those bright colors invite smiles and happy memories.
When it comes time to serve these beauties, let your imagination run wild! Imagine savoring one with a scoop of vanilla ice cream melting over it—heavenly! For an afternoon pick-me-up alongside your favorite cup of coffee or tea? Absolutely ideal! And if you’re feeling indulgent (who wouldn’t?), drizzle some melted chocolate over the top or sprinkle with sea salt for an utterly intoxicating contrast of flavors.
Feeling adventurous? This recipe is wonderfully adaptable! How about swapping out M&M’s for seasonal candies like pumpkin spice ones in autumn or pastel-colored eggs during spring? You could even add nuts for an extra crunch or try incorporating different flavored chips—white chocolate or mint would add another layer of delight! Whatever direction you choose to take this recipe will surely lead to delicious outcomes; I can’t wait to hear how yours turn out! So get baking today—share those beautiful creations with loved ones—and don’t forget to connect with me about your experience; I’d love nothing more than to celebrate this culinary adventure together!
Red, White & Blue Brownie Cookies

Red, White & Blue Brownie Cookies are a delightful treat that brings joy and celebration to any occasion. With their rich chocolate base and vibrant M&M’s, these cookies are perfect for summer gatherings, holidays, or simply satisfying your sweet cravings. Each bite combines the fudgy goodness of brownies with the colorful crunch of candy-coated chocolates, creating a symphony of flavors that will leave everyone wanting more. Easy to make and visually stunning, these cookies are sure to become a favorite in your dessert repertoire.
- Prep Time: 15 minutes
- Cook Time: 12 minutes
- Total Time: 27 minutes
- Yield: Approximately 24 cookies 1x
- Category: Dessert
- Method: Baking
- Cuisine: American
Ingredients
- 18.9 ounces brownie mix
- 2 large eggs
- ¼ cup unsalted butter (melted)
- ¼ cup all-purpose flour
- 1 cup M&M's (plus extra for topping)
- ½ cup semi-sweet chocolate chips
- 1 tablespoon water
Instructions
- Preheat oven to 375°F (190°C) and line a baking sheet with parchment paper.
- In a mixing bowl, combine brownie mix and flour until evenly blended.
- In another bowl, whisk together eggs, melted butter, and water until smooth.
- Fold wet ingredients into dry mixture until no streaks remain.
- Scoop tablespoon-sized balls of dough onto the prepared baking sheet, spacing them two inches apart.
- Bake for 10-13 minutes or until tops are cracked; remove from oven and press additional M&M's on top while warm.
- Let cool on the baking sheet for three minutes before transferring to a wire rack.
Nutrition
- Serving Size: 1 cookie
- Calories: 190
- Sugar: 14g
- Sodium: 95mg
- Fat: 8g
- Saturated Fat: 4g
- Unsaturated Fat: 3g
- Trans Fat: 0g
- Carbohydrates: 28g
- Fiber: 1g
- Protein: 2g
- Cholesterol: 20mg