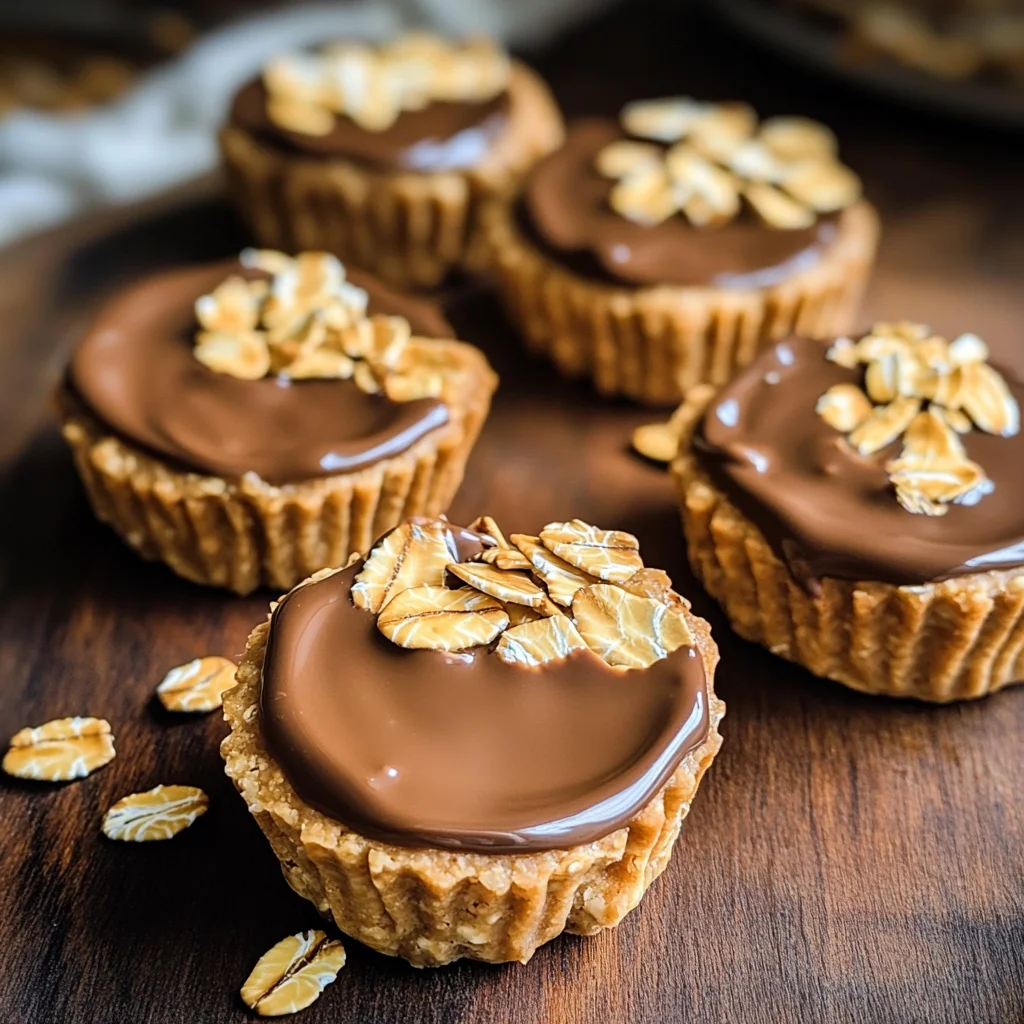
No-Bake Peanut Butter Oat Cups
There’s something profoundly satisfying about creating a treat that feels indulgent yet is healthy at its core. You know that feeling when you take a bite of something that dances on your taste buds, awakening all your senses? That’s exactly what you get with these No-Bake Peanut Butter Oat Cups. Imagine creamy peanut butter mingling with wholesome oats, all sweetened just right with honey or maple syrup, and then topped off with a luscious drizzle of dark chocolate. It’s not just food; it’s a comforting embrace in a cup, reminiscent of childhood snacks but crafted for today’s health-conscious palate.
These oat cups are more than just a delightful dessert; they represent simplicity and joy in the kitchen. With only a handful of ingredients that you might already have in your pantry, they come together in a flash—just 10 minutes of hands-on time! And let me tell you, there’s no baking involved, which means you can skip the oven preheating and focus on the fun part: mixing and molding those tasty treats into existence. Trust me, once you make these No-Bake Peanut Butter Oat Cups, they will become your go-to snack for any occasion—be it a midday pick-me-up, an after-school treat for the kids, or even a delightful addition to your meal prep routine.
No-Bake Peanut Butter Oat Cups: The Ultimate Guilt-Free Indulgence
I can’t wait to share this recipe with you! It’s one of those gems that combines nutrition with pure bliss. Perfectly chewy yet satisfying crunchy bits from the oats work harmoniously with the rich peanut butter, and if you’re feeling fancy (or just love chocolate), the melted dark chocolate on top is simply irresistible. Let’s dive into this culinary journey together!

Ingredients:
As we embark on this delicious adventure to create our No-Bake Peanut Butter Oat Cups, let’s take a moment to appreciate each ingredient that plays a crucial role in crafting these delightful little bites.
- 1 cup rolled oats. These humble grains are the backbone of our oat cups, providing not only texture but also wholesome goodness. Rolled oats are minimally processed and packed with fiber, which aids digestion and keeps us feeling full longer. When selecting your oats, look for organic varieties if possible; they tend to be fresher and more flavorful. Plus, they meld perfectly with the creamy peanut butter and sweetener to create that wonderful chewiness we adore.
- 1/2 cup natural peanut butter. Ahh, peanut butter—the liquid gold of our recipe! This nutty spread brings an utterly intoxicating richness to our oat cups while also contributing healthy fats and protein that fuel our bodies. When choosing peanut butter, opt for natural varieties without added sugars or hydrogenated oils; you want pure peanuts (and maybe a pinch of salt), so it balances beautifully with our other ingredients. I promise you, this step is crucial; the quality of your peanut butter will shine through in every bite.
- 1/4 cup honey or maple syrup. Here’s where we infuse sweetness into our creation! Both honey and maple syrup offer unique flavors—honey has floral notes while maple syrup brings warmth—but either choice will bind our ingredients together beautifully. If you’re opting for honey, consider local sources as they often have more nuanced flavors. On the other hand, pure maple syrup (not imitation) is like nature’s caramel; it adds depth to our oat cups that’s simply extraordinary.
- 1/4 cup dark chocolate chips (optional for topping). Now we’re getting to the fun part! Dark chocolate chips add an element of indulgence that transforms these oat cups from mere snacks into decadent treats. Look for high-quality chocolate with at least 70% cacao content; it brings both richness and antioxidants to your diet. Melting them down allows us to drizzle that smoothness over each cup—a non-negotiable step for any true chocoholic!
- 1/2 tsp vanilla extract (optional). While not essential, vanilla extract elevates our recipe by adding aromatic depth—a little bit like whispering sweet nothings into your dish! It enhances all flavors involved without overpowering them; think of it as the secret ingredient that makes everything taste even better.
- Pinch of salt (if using unsalted peanut butter). Salt might seem like an afterthought here, but don’t underestimate its power! A pinch brightens flavors across the board; it balances out sweetness and rounds out our dish beautifully—almost like magic happening in your mixing bowl!
Equipment You’ll Need:
Having the right tools at your disposal can make all the difference in ensuring your cooking experience is enjoyable and stress-free. While we often focus on ingredients when preparing food, having reliable equipment acts as essential partners in crafting something wonderful.
- Mixing bowl – A sturdy bowl will be your best friend throughout this process as you’ll need enough space to mix everything thoroughly without spilling overboard! A glass or stainless-steel bowl works wonderfully since they’re easy to clean and won’t absorb odors.
- Spoon or spatula – You’ll need something strong enough to withstand mixing thick peanut butter into oats seamlessly. A rubber spatula is particularly handy here because it helps scrape down sides effectively while ensuring no sticky goodness goes wasted!
- Mini muffin tin – This will be crucial when forming those adorable cups! I recommend using either silicone molds for easy release or lining metal tins with cupcake liners because who wants sticky fingers when enjoying their creations?
- Microwave-safe bowl – If you’re opting for melted chocolate as topping (and really why wouldn’t you?), having an appropriate vessel is essential for safe melting without any fuss!
Now that we’ve gathered all our ingredients and equipment together like old friends reuniting over dinner plans let’s get started on preparing these delightful No-Bake Peanut Butter Oat Cups!
Step 1: Mixing Magic Begins
In a mixing bowl—your canvas—start by combining the rolled oats and natural peanut butter until they begin merging into one cohesive mixture. The texture will vary at first as you’ll see clumps forming; don’t worry about achieving perfection right away! Next comes honey or maple syrup along with that optional splash of vanilla extract—the aroma will instantly ignite feelings of nostalgia as memories flood back from baking days gone by! Stir everything until it’s sticky yet holds shape nicely when pressed between fingers; trust me, this step sets up perfect binding later.
Step 2: Forming Your Oat Cups
Now comes one of my favorite moments—the molding process! Grab either your mini muffin tin lined with cupcake liners or silicone molds (my personal favorite since they pop right out). Use a spoonful of mixture per cup; press firmly downwards so each little creation takes form snugly within its new home—this ensures they hold shape once set later on in refrigeration time! Don’t rush this step; tightly packed cups give structure while allowing them room to expand slightly during chilling.
Step 3: The Chocolate Drizzle
As if those lovely oat cups weren’t already enticing enough…we’re about to elevate them further with melted chocolate drizzles atop each one! Take some dark chocolate chips placed carefully into microwave-safe bowls before microwaving them slowly at fifteen-second intervals until velvety smooth consistency forms—this technique prevents burning while retaining flavor integrity beautifully! Once ready stir well before pouring over cooled oatmeal delights—you’ll feel like Picasso decorating his masterpiece!
Step 4: Chilling Out
After you’ve adorned each oat cup generously with warm chocolatey goodness…it’s time for patience—a virtue especially important here! Pop those pans into the refrigerator where cooling occurs magic happens: allow them ample time (minimum one hour) to firm up properly before serving—you deserve rewards after waiting patiently through all previous steps too!
I hope you’re as excited as I am about diving into these No-Bake Peanut Butter Oat Cups because trust me—they’re absolutely worth every minute spent crafting them together! Enjoy every bite knowing how simple yet savory celebration awaits ahead—and feel free to share this joy amongst family & friends alike—you may just become their new favorite chef in town!
Crafting Your Irresistible No-Bake Peanut Butter Oat Cups
Step 5: Pressing for Perfection
Now that you’ve mixed the delightful ingredients into a sticky, cohesive mass, it’s time to bring your vision to life by forming them into lovely cups. Grab your mini muffin tin and, if you haven’t already, consider lining it with cupcake liners or using a silicone muffin tray—this will make your life so much easier later on! Using a spoon or your fingers (which I find is the best way), start scooping out small portions of the mixture and firmly pressing it into each muffin cup. This step is crucial because how well you pack the mixture determines whether they hold together once chilled. You want to apply enough pressure to create a solid base that won’t crumble apart during munch time.
As you press down, think about how satisfying it feels to create something from scratch. The oats should stick together with the peanut butter and honey, forming a sturdy little cup that will cradle all that deliciousness. Don’t rush this step—take your time to ensure that each cup is evenly filled and tightly packed. Trust me on this: a well-formed cup makes all the difference when it comes to texture and presentation! Keep an eye out for any spots where the mixture seems sparse; fill them in as needed because we want every bite to be utterly intoxicating.
Step 6: Melting Chocolate Magic
Next up is the fun part—chocolate! If you’re choosing to add those luscious dark chocolate chips on top (and why wouldn’t you?), grab a microwave-safe bowl and pour in your chocolate chips. Now, here’s where patience comes into play again! Microwave the chocolate in 15-second intervals, giving it a gentle stir in between each session. This technique is known as tempering, which is absolutely paramount for achieving that dreamy, silky-smooth texture. Be mindful because overheated chocolate can seize up and turn grainy, which we definitely don’t want!
As you watch the chocolate melt slowly into liquid gold, allow yourself to get excited about how this will elevate your oat cups from simple snacks to sweet sensations. Once it’s completely melted and glossy—aim for that perfect pourable consistency—remove it from the microwave and let it cool just slightly before drizzling or spreading it over each oat cup. This extra layer not only adds an appealing visual contrast but also creates a beautiful balance of flavors—the richness of the dark chocolate perfectly complements the nutty sweetness of the peanut butter.
Step 7: Chilling Out with Purpose
Now that your cups are beautifully adorned with melted chocolate, we arrive at one of the most important steps in our journey: chilling them in the fridge. Place your muffin tin carefully in the refrigerator for at least one hour—that’s right; patience is key here! This time allows everything to firm up properly; it’s during this chilling period that magic happens—the flavors meld together beautifully while also ensuring that our cups set properly.
You might wonder why chilling is so significant? Well, when we cool these beauties down, we’re allowing all those sticky ingredients—including oats, peanut butter, and sweetener—to bond tightly together, creating an irresistible texture that’s both chewy and satisfying. Plus, if you’ve gone through all this effort, you want them to hold their shape when you take that first bite! So resist any temptation to sneak one early; I promise you they will be worth every moment of wait.
Step 8: The Grand Reveal
After patiently waiting for what might feel like an eternity (I know!), it’s finally time for the grand reveal! Once those glorious no-bake peanut butter oat cups have chilled adequately in the fridge—just check by gently pressing one with your finger (you want them firm yet slightly soft)—it’s time to remove them from their cozy resting place. Carefully peel away any liners if used or gently pop them out of your silicone tray. As they come free, take a moment to marvel at how perfectly they’ve held their shape—the smooth chocolate topping glistening under soft light really makes them look like little gourmet treats.
If you’re feeling adventurous—and who wouldn’t after all this hard work?—consider garnishing them with a sprinkle of sea salt or some crushed nuts on top before serving. This final touch can elevate their flavor profile even further and adds an extra crunch that contrasts beautifully with their creamy interior. And there you have it—the culmination of patience and passion has resulted in these delightful no-bake peanut butter oat cups! Trust me when I say that not only are these treats easy to make but they also provide profound satisfaction with every single bite.
Final Touches: Serving Up Joy
Gather your friends or family around because it’s time for everyone to experience these extraordinary gems! You can serve them straight from the fridge for a refreshing snack or dessert—they’re perfect for picnics or as quick energy boosters throughout your busy day. The best part? They can be stored in an airtight container for up to a week (if they last that long!). Each day they’ll remind you of how simple ingredients can transform into something so delightful.
So go ahead—delight in every nibble and enjoy sharing these no-bake peanut butter oat cups with those you love! They’re not just snacks; they’re little tokens of joy crafted from heartwarming ingredients designed to nourish both body and soul. Happy munching!
Storage and Enjoyment Tips for Your No-Bake Peanut Butter Oat Cups
Now that you’ve crafted these delightful No-Bake Peanut Butter Oat Cups, it’s time to revel in their deliciousness! I can already imagine you taking your first bite, feeling that perfect blend of creamy peanut butter and chewy oats—it’s nothing short of bliss. But what if there are some left? Fear not! These treats are perfect for storing so you can enjoy them all week long, or even beyond. Let’s dive into how to keep these treasures fresh and ready for snacking.
Storing Leftover No-Bake Peanut Butter Oat Cups
To ensure your No-Bake Peanut Butter Oat Cups maintain their fabulous taste and texture, store them in an airtight container—you want to keep that freshness locked in! Ideally, pop them in the fridge where they’ll stay perfectly firm and delicious for up to one week. If you’ve used a cupcake liner, they’ll come out easily without any fuss. If you’d like to maintain extra moisture, consider placing a slice of bread in the container; it works wonders at keeping things soft. After a few days in storage, they still taste incredible—almost as if they’ve matured flavorfully! When you’re ready to indulge again, there’s no need to reheat; simply take one out and enjoy it chilled, or let it sit at room temperature for a few minutes for an even creamier experience.
Freezing No-Bake Peanut Butter Oat Cups for Later
If you find yourself with a bounty of these delightful oat cups—or if you simply want to prep snacks for the week ahead—freezing them is an absolute game-changer! To freeze your cups properly, just place them on a baking sheet lined with parchment paper and pop them in the freezer until they’re solid. Once frozen, transfer them into a freezer-safe zip-top bag or container, separating layers with parchment paper if needed. They’ll keep wonderfully frozen for up to three months! When you’re ready to enjoy one (or more!), just grab from the freezer and allow them to thaw in the fridge overnight or on the counter for about 30 minutes. This method is not only convenient but also ensures you have healthy snacks on hand whenever cravings strike—doesn’t that sound amazing?
No-Bake Peanut Butter Oat Cups
Enjoy delicious No-Bake Peanut Butter Oat Cups made with just a few ingredients. Try this easy recipe today and satisfy your cravings!
- Prep Time: 10 minutes
- Cook Time: 0 minutes
- Total Time: 10 minutes
- Yield: Approximately 12 servings 1x
- Category: Dessert
- Method: No-Bake
- Cuisine: American
Ingredients
- 1 cup rolled oats
- 1/2 cup natural peanut butter
- 1/4 cup honey or maple syrup
- 1/4 cup dark chocolate chips (optional)
- 1/2 tsp vanilla extract (optional)
- Pinch of salt (if using unsalted peanut butter)
Instructions
- In a mixing bowl, combine rolled oats and natural peanut butter until well blended.
- Add honey or maple syrup and optional vanilla extract; mix until sticky.
- Press the mixture firmly into a mini muffin tin lined with cupcake liners or silicone molds.
- For added indulgence, melt dark chocolate chips in a microwave-safe bowl at 15-second intervals until smooth.
- Drizzle melted chocolate over each cup.
- Refrigerate for at least one hour to set before enjoying.
Nutrition
- Serving Size: 1 cup (45g)
- Calories: 180
- Sugar: 6g
- Sodium: 60mg
- Fat: 10g
- Saturated Fat: 2g
- Unsaturated Fat: 8g
- Trans Fat: 0g
- Carbohydrates: 18g
- Fiber: 3g
- Protein: 5g
- Cholesterol: 0mg