Grilled California Avocado Chicken Recipe
There’s something incredibly special about a dish that not only nourishes the body but also warms the soul, and that’s precisely what the Grilled California Avocado Chicken Recipe embodies. As I think back to summer evenings spent in the backyard, the air filled with laughter, and the enticing aroma of grilled chicken wafting through the air, I can’t help but feel a deep connection to this vibrant meal. The creamy California avocados paired with juicy tomatoes and perfectly grilled chicken create a symphony of flavors that dance across your palate, making each bite an experience rather than just sustenance. Trust me when I say, this dish is more than just food; it’s a celebration of life, a moment shared with loved ones, and a bridge between our kitchens and cherished memories.
What makes this recipe stand out is its simplicity intertwined with bold flavors. You see, grilling isn’t just about cooking; it’s about infusing ingredients with that delightful smoky essence while maintaining their natural freshness. The marinade is straightforward yet packed with personality—olive oil and lime juice add depth, while garlic brings an irresistible aromatic quality that draws everyone to the table. As you take your first bite of this Grilled California Avocado Chicken, you might just find yourself transported to sun-soaked afternoons or cozy gatherings under twinkling fairy lights. This dish is perfect for weeknight dinners when time is short yet you still want to impress or for outdoor cookouts where friends gather to enjoy good food and great company.
Grilled California Avocado Chicken Recipe: A Summer Delight on Your Plate
Let’s dive into creating this delicious masterpiece together! With its marinated grilled chicken breasts lovingly topped with creamy avocado slices, juicy tomatoes, and melty cheese, this recipe is not just quick to prepare but also packed with flavor. It’s a go-to for busy weeknights or those sun-drenched weekends when you want to share something extraordinary without spending all day in the kitchen.
Ingredients:
Embarking on this culinary journey requires some wonderful ingredients that will elevate your Grilled California Avocado Chicken into something truly memorable.
- 4 boneless (skinless) chicken breasts (or thighs). This protein serves as the canvas for our dish. Choosing boneless cuts allows for easier cooking and ensures that every piece of chicken remains juicy and tender throughout the grilling process. If you opt for thighs instead of breasts, you’ll enjoy an even richer flavor due to their higher fat content—both options are fantastic!
- 3 tablespoons olive oil. Often referred to as “liquid gold,” olive oil not only adds richness but also helps tenderize the chicken during marination. It carries flavors beautifully; choosing high-quality extra virgin olive oil can make a world of difference in flavor profile. Look for oils that have low acidity and fruity notes—they’ll enhance our dish’s overall taste.
- 2 tablespoons fresh lime juice. The zestiness from fresh lime juice brightens up all the flavors in our marinade while acting as a natural tenderizer for the chicken. Freshly squeezed is non-negotiable! Bottled varieties often lack vibrancy and can introduce unwanted preservatives into your dish—so trust me on this one!
- 2 cloves garlic (minced). Garlic adds an aromatic punch that transforms simple ingredients into something magical. When minced finely, it releases essential oils that marry beautifully with our olive oil and lime juice during marination. Be sure not to rush this step; letting garlic sit after mincing allows its flavor to develop further.
- 1 teaspoon paprika. This spice introduces warmth and subtle smokiness without overwhelming other flavors—it’s like a warm hug in spice form! Paprika can vary from sweet to hot; we’re using sweet paprika here to keep things balanced yet flavorful.
- 1 teaspoon ground cumin. Cumin brings an earthy note that complements our spices perfectly; it’s like adding depth to a beautiful painting. Make sure you’re using freshly ground cumin if possible—its aroma will be utterly intoxicating compared to pre-ground versions!
- 1/2 teaspoon salt & 1/2 teaspoon black pepper. These two seasonings are essential! Salt enhances all those lovely flavors we’ve layered together while black pepper adds just the right amount of heat without overpowering our beautiful ingredients.
- 2 California avocados (sliced). Ahh, avocados—the creamy jewels of any summer dish! Their buttery texture balances out our grilled chicken beautifully while adding healthy fats that keep us satisfied longer. Choose ripe avocados: they should yield slightly under gentle pressure without feeling mushy.
- 1 cup cherry tomatoes (halved). Sweet cherry tomatoes bring bursts of juiciness with every bite! They add not only vibrant color but also a refreshing contrast against our savory elements—a combination that’s simply divine!
- 1 cup shredded mozzarella or Monterey Jack cheese. Melty cheese takes everything up another notch! Mozzarella offers mild creaminess while Monterey Jack has a slightly sharper edge—either will work wonderfully here; just ensure it’s freshly shredded for optimal melting.
- Chopped cilantro, balsamic glaze, & diced red onion for garnish add bright freshness and complexity to each plateful! Cilantro contributes an herbaceous lift; balsamic glaze adds sweetness; diced red onion gives crunch—all elements matter greatly in achieving balance!

Equipment You’ll Need:
Before we dive into preparation, having the right tools at your disposal makes all the difference in creating culinary magic! While these items may not be ingredients, they are essential partners in crafting your Grilled California Avocado Chicken effortlessly.
- Grill or Grill Pan: A grill provides that fantastic charred flavor we crave from barbecued meats while allowing excess fat to drip away—perfect for keeping things light yet satisfying! If you don’t have outdoor space available, a cast iron grill pan works wonders indoors too!
- Mixing Bowl: You’ll need a sturdy mixing bowl large enough to hold all your marinade ingredients as well as those beautiful chicken pieces soaking up all those delicious flavors—trust me: this step is vital!
- Whisk or Fork: For combining your marinade thoroughly—you want every bit of flavor incorporated before introducing it to your protein! Avoid lumpy marinades by whisking until smooth.
- Sharp Knife & Cutting Board: These are crucial tools not only for prepping your ingredients but also ensuring safety while slicing those ripe avocados perfectly! A sharp knife glides through soft flesh effortlessly without squishing it—this precision matters!
Now that we have everything lined up beautifully let’s get started on preparing our mouthwatering Grilled California Avocado Chicken Recipe!
Step 1: Marinating Magic
To kick things off, start by making your marinade—a crucial step since it infuses every bite with flavor! In your mixing bowl, combine olive oil, fresh lime juice, minced garlic cloves, paprika, cumin, salt, and black pepper—each ingredient plays its part in building complexity within our dish! Whisk everything together until well combined; you’ll notice how aromatic this mixture becomes almost instantly—it’s absolutely paramount that you let it sit briefly so those flavors meld together nicely before moving on.
Next comes my favorite part: introducing the chicken into this flavorful concoction! Place your boneless (skinless) chicken breasts or thighs directly into the bowl ensuring they’re generously coated on all sides by massaging them lightly with your hands—don’t rush this step! Take time here because allowing them ample time (at least 30 minutes if possible) in their zesty bath will yield profoundly satisfying results later on when grilled—they’ll be bursting with juiciness!
Step 2: Preheating Your Grill
While your chicken absorbs all those delicious flavors from its marinade blissfully mingling together like old friends catching up after years apart—you’ll want now turn attention toward preheating your grill (or grill pan). Aim for medium-high heat so we achieve golden-brown sear marks which provide both rich flavor and visual appeal—it elevates simple grilled meats into gourmet experiences!
If using an outdoor grill, give it roughly 10 minutes preheat time before placing anything onto its grates—but if working indoors consider heating that cast iron pan over similar temperatures until hot enough water droplets sizzle upon contact—a clear sign you’re ready to rock n’ roll!
Step 3: Grilling Perfection
Once preheated adequately applies oil lightly onto the grates/pan surface using paper towels dipped in vegetable oil held by tongs—that’ll prevent sticking issues down line when placing marinated chicken pieces onto hot surfaces where they’ll begin cooking immediately upon contact generating gorgeous sear marks—we’re talking about captivating visuals here folks!
Now place each piece carefully onto heated surface spacing them out evenly allowing room around each cutlet—for even cooking throughout their entire duration on fire—we don’t want overcrowding happening here resulting uneven doneness levels leading unwanted chewiness instead tenderness we crave most! Cook each side for approximately six minutes depending thickness until golden brown formed beautifully outside while remaining juicy inside reaching internal temperatures around 165°F—I highly recommend investing in instant-read thermometer if haven’t already done so ensuring precise doneness every single time!
Step 4: Adding Toppings
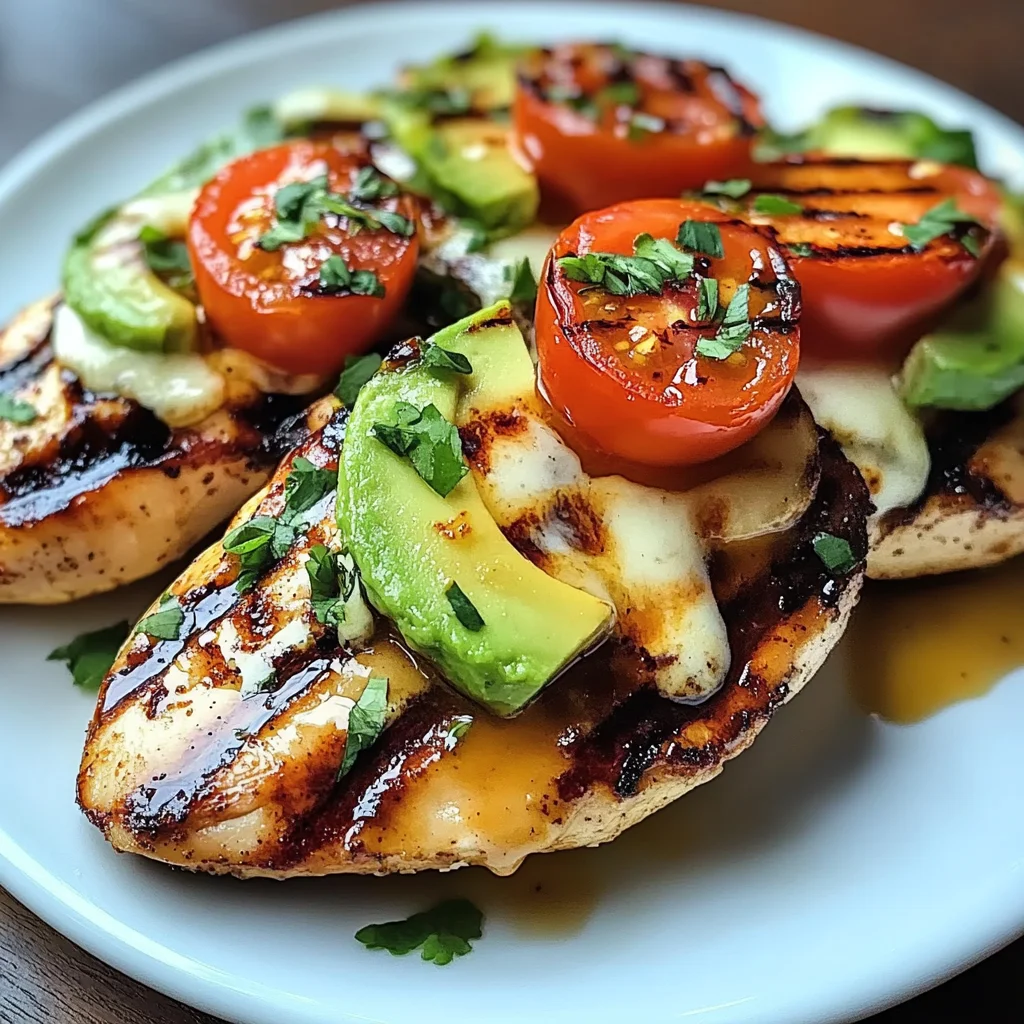
After removing succulent pieces off heat source allow resting couple minutes before topping them generously alongside sliced Californian avocados halved cherry tomatoes melted cheese sprinkled atop creating gorgeous layers right before eyes melting into each other forming heavenly medley above perfectly cooked proteins below—we want everything harmonizing effortlessly at once inviting guests’ taste buds awaken simultaneously awakening senses around table setting atmosphere entirely vibrant filled laughter joy shared amongst loved ones gathered round celebrating good food togetherness—and isn’t that what life’s all about?
As you can see folks—the steps taken towards creating these delightful plates weren’t merely tasks checked off quickly—they were moments infused love care passion resulting something utterly extraordinary worthy sharing anyone finds themselves lucky enough join experience savoring every single bite crafted thoughtfully through deliberate actions undertaken joyously along way … I promise they won’t regret trying out this incredible Grilled California Avocado Chicken Recipe alongside family friends alike sharing memories made bonds strengthened through culinary delights served straight home kitchen filled warmth laughter heart truly inspiring moments continue unfold long after meals finished enjoyed together!
Grilling to Perfection: The Heart of the Grilled California Avocado Chicken Recipe
Step 5: Marinating Magic
Now that we’ve prepped our juicy chicken, it’s time to dive into the world of marinades. This step is absolutely paramount because marinating not only infuses the chicken with flavor but also helps tenderize it, making every bite utterly divine. In a mixing bowl, whisk together 3 tablespoons of olive oil, 2 tablespoons of fresh lime juice, minced garlic, paprika, ground cumin, salt, and black pepper until you have a beautifully blended marinade that resembles liquid gold. The oil acts as a carrier for flavors while the acidity of lime juice breaks down the proteins in the chicken, allowing those spices to penetrate deeply. I promise you; this infusion is what transforms simple grilled chicken into something truly extraordinary.
Once your marinade is ready, place the chicken breasts (or thighs) in a resealable plastic bag or a shallow dish. Pour the marinade over the chicken and make sure each piece is generously coated. Don’t rush this step! I recommend letting your chicken marinate for at least 30 minutes—though if you can swing it, an hour or even overnight in the fridge will elevate those flavors to celestial heights. While it sits, give yourself a moment to enjoy that intoxicating aroma wafting from your kitchen—it’s like a warm hug from summer itself! When you’re ready to grill, remember to bring the chicken back to room temperature before cooking; this ensures even cooking throughout and avoids that frustrating rubbery texture that can happen when cold meat hits hot grill grates.
Step 6: Prepping Your Grill
While your chicken is soaking up all those delicious flavors, let’s talk about preparing your grill for action. Whether you’re using a gas grill or charcoal, achieving the perfect grilling temperature is crucial. Preheat your grill to medium-high heat—around 375°F to 400°F is ideal for these beautiful pieces of poultry. If you’re using charcoal, aim for an even layer of white-hot coals that will provide consistent heat. This step ensures that your chicken will sear beautifully and develop those gorgeous grill marks while locking in moisture.
Before placing your marinated chicken on the grill, don’t forget to lightly oil your grates with a paper towel dipped in vegetable oil—this non-stick trick makes flipping easier and helps avoid any unwelcome sticking disasters! Once everything is piping hot and ready to go, place your marinated chicken on the grill grates at a slight angle; this little detail not only creates appealing diamond marks but also allows for more surface area contact with the heat. I always say grilling should be as much about art as it is about science!
Step 7: The Art of Grilling Chicken
As you place your marinated chicken onto the hot grates, listen closely—you should hear that beautiful sizzle! This sound is music to any cook’s ears; it signals that Maillard reaction we all crave—the browning process where sugars and amino acids create complex flavors and enticing aromas. Grill each side for about 6-7 minutes without touching them; trust me on this one! Resist the urge to poke or flip too soon—patience here allows those lovely charred marks to form while sealing in juices.
To ensure even cooking without drying out those delicious pieces of protein, use tongs to flip them only once halfway through grilling. After about 12-15 minutes total cooking time (depending on thickness), check for doneness by inserting an instant-read thermometer into the thickest part of each breast—you’re looking for an internal temperature of 165°F. Remember that carryover cooking happens; so if it’s close but not quite there yet (around 160°F), pull them off and let them rest covered with foil while they finish cooking off heat. At this stage, I often take a moment just to admire my work—it’s all part of the joy!
Step 8: The Resting Phase
Now comes one of my favorite steps—the resting phase! This might seem trivial but trust me when I say it’s absolutely essential for achieving juicy grilled chicken that melts in your mouth. After removing those perfectly grilled beauties from the heat source, let them rest on a cutting board for at least 5-10 minutes before slicing into them. Why? Well, during cooking, juices are forced toward the center of the meat due to heat expansion; if you slice right away, all those succulent juices will spill out onto your cutting board instead of remaining within each slice.
During this resting period, cover your chicken loosely with foil—it traps warmth without steaming away that glorious crispiness we worked so hard to achieve on the grill. As you wait patiently (and believe me when I say it’s worth it), take this time to prepare your toppings and gather everything else you need for assembly—sliced California avocados waiting eagerly for their moment in the spotlight alongside cherry tomatoes and melted cheese!
Final Touches: Building Your Flavorful Creation
Step 9: Assemble Your Masterpiece
With everything prepped and ready—a symphony of flavors awaits! Begin by placing each rested grilled chicken breast on individual serving plates or a large platter if you’re serving family-style—remember how gorgeous they look with their charred exterior glistening under a drizzle of olive oil? Now comes one of my most cherished moments: topping these beauties! First up are those creamy slices of California avocado; their buttery texture adds richness that contrasts so beautifully against our seasoned grilled base.
Next, sprinkle halved cherry tomatoes over each piece—these little gems burst with sweetness as they mingle with other ingredients creating harmony on every plate. And let’s not forget about that melty cheese—we’re aiming for approximately one cup here—you can’t go wrong with mozzarella or Monterey Jack; both melt divinely under gentle heat! Add generous handfuls atop each piece so it cascades down gracefully like soft snowflakes melting into springtime warmth.
Finally—and trust me on this—it’s time for fresh cilantro and diced red onion sprinkled liberally as finishing touches which bring brightness and crunch into play while balsamic glaze drizzled artfully across takes us over the edge into flavor town! Such vibrant colors create an irresistible visual feast—making it hard not to dig right in!
Step 10: Savor Every Bite!
You’ve made it! As you sit down at your table adorned with this stunning Grilled California Avocado Chicken Recipe masterpiece before you—a celebratory feeling washes over me every time I serve this dish up because I know what comes next—a shared meal filled with laughter and connection around food made from love! Each bite offers layers upon layers of flavor ranging from smoky charred notes mingling effortlessly with creamy avocado richness punctuated by zesty lime hints transforming dinner into an experience rather than just another meal.
So grab a fork (or two) and delight in every morsel—you deserve it! Share these moments with friends and family because food tastes better when enjoyed together. And remember—this recipe isn’t just about satisfying hunger; it reflects passion brought forth through thoughtful preparation merging delightful ingredients into something truly magnificent. Enjoy every savoring moment—I can’t wait for you to experience just how profoundly satisfying this grilled creation truly is!
Storage and Enjoyment Tips for Your Grilled California Avocado Chicken Recipe
Now that your Grilled California Avocado Chicken is ready to grace your table, it’s time to dive into the deliciousness! The vibrant colors, the intoxicating aroma wafting through the kitchen, and the anticipation of that first bite—it’s all part of the joy. But let’s not forget about those moments when you might have leftovers or want to prepare in advance. Proper storage can keep this dish tasting just as delightful as it did fresh off the grill. So, let’s explore how to preserve this culinary masterpiece!
Storing Leftover Grilled California Avocado Chicken Recipe
To keep your leftover Grilled California Avocado Chicken fresh and flavorful, I recommend using airtight containers. These are crucial for maintaining moisture and preventing any unwanted odors from mingling with your food. When stored properly in the refrigerator, your chicken will remain delectable for up to three days—though I doubt it’ll last that long! To maintain its quality, consider placing a slice of bread in with the chicken; this little trick helps absorb excess moisture and keeps everything nice and tender. When you’re ready to enjoy it again, simply reheat it gently in the oven or on a skillet over medium heat. I promise you, even after a few days, it will still be bursting with flavor—just like that first bite!
Freezing for Later
If you’re looking to extend the life of your Grilled California Avocado Chicken even further, freezing is a fantastic option! Just make sure to let your chicken cool completely before wrapping it tightly in plastic wrap or placing it in freezer-safe bags. This way, you can avoid freezer burn and preserve all those glorious flavors. It can safely stay frozen for up to three months without losing its charm. When you’re ready to indulge again, simply thaw it overnight in the fridge before reheating. This is such a convenient method for busy weeknights or unexpected guests—you get to impress everyone with a delicious meal without any fuss!
I hope these tips inspire you not only to savor every last bite but also to embrace the joy of cooking ahead. After all, nothing feels quite as satisfying as knowing you have something scrumptious waiting for you!
Grilled California Avocado Chicken
Grilled California Avocado Chicken is a delightful dish that perfectly marries tender grilled chicken with the creamy richness of fresh avocados, juicy tomatoes, and melty cheese. Ideal for summer gatherings or quick weeknight dinners, this recipe is not only easy to prepare but also bursting with vibrant flavors. The zesty lime marinade elevates the chicken, while the avocado topping adds a luxurious touch that everyone will love. Gather your friends and family around the table to enjoy this flavorful meal that brings joy and connection through food.
- Prep Time: 30 minutes
- Cook Time: 15 minutes
- Total Time: 45 minutes
- Yield: Serves 4
- Category: Dinner
- Method: Grilling
- Cuisine: American
Ingredients
- 4 boneless skinless chicken breasts or thighs
- 3 tablespoons olive oil
- 2 tablespoons fresh lime juice
- 2 cloves garlic (minced)
- 1 teaspoon paprika
- 1 teaspoon ground cumin
- 1/2 teaspoon salt
- 1/2 teaspoon black pepper
- 2 California avocados (sliced)
- 1 cup cherry tomatoes (halved)
- 1 cup shredded mozzarella or Monterey Jack cheese
- Chopped cilantro
- Balsamic glaze
- Diced red onion for garnish
Instructions
- In a mixing bowl, whisk together olive oil, lime juice, minced garlic, paprika, cumin, salt, and pepper.
- Place chicken in a resealable bag or dish and pour the marinade over it. Ensure each piece is coated well. Let marinate for at least 30 minutes.
- Preheat your grill to medium-high heat.
- Lightly oil the grill grates before placing marinated chicken on them.
- Grill each side for about 6–7 minutes until golden brown and internal temperature reaches 165°F.
- Remove from grill and let rest for a few minutes before topping with avocado slices, cherry tomatoes, melted cheese, and garnishes.
Nutrition
- Serving Size: 1 piece of chicken (170g)
- Calories: 410
- Sugar: 3g
- Sodium: 480mg
- Fat: 24g
- Saturated Fat: 5g
- Unsaturated Fat: 19g
- Trans Fat: 0g
- Carbohydrates: 10g
- Fiber: 6g
- Protein: 36g
- Cholesterol: 95mg