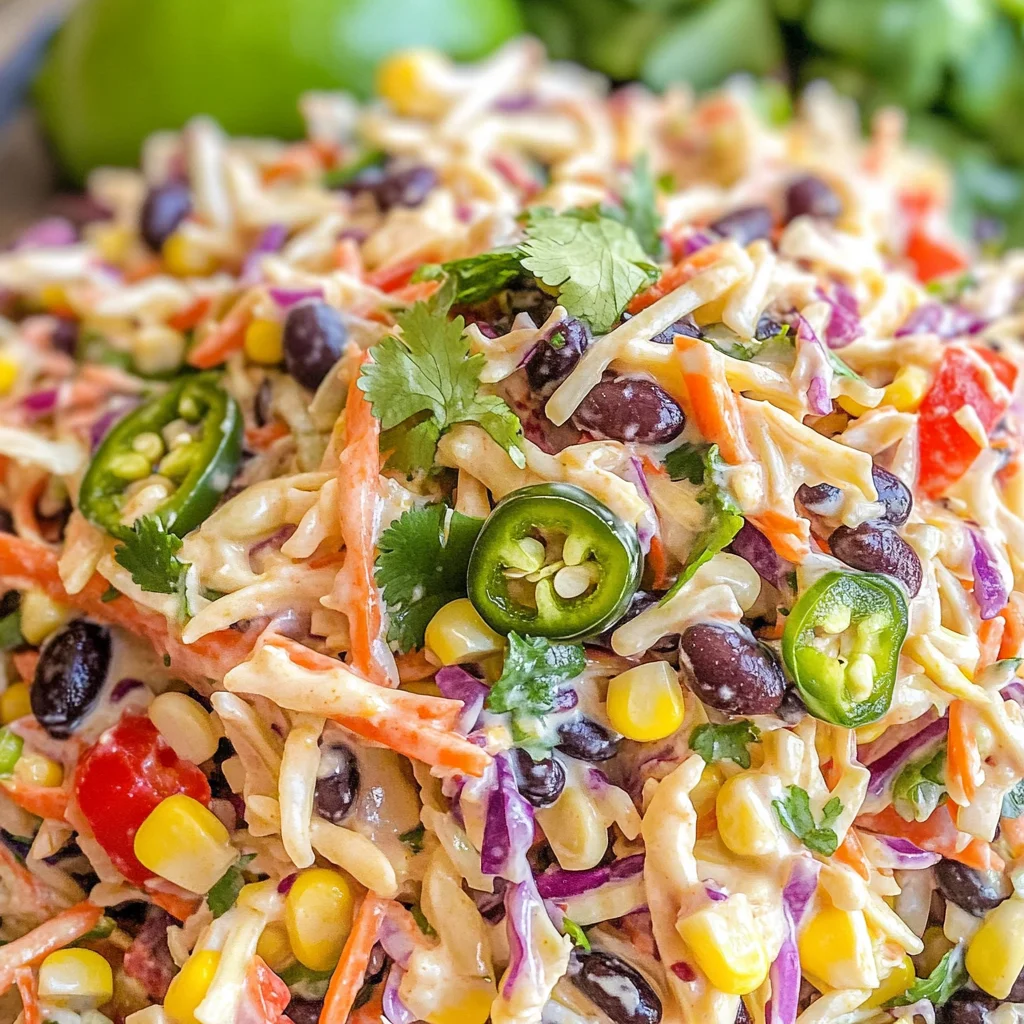
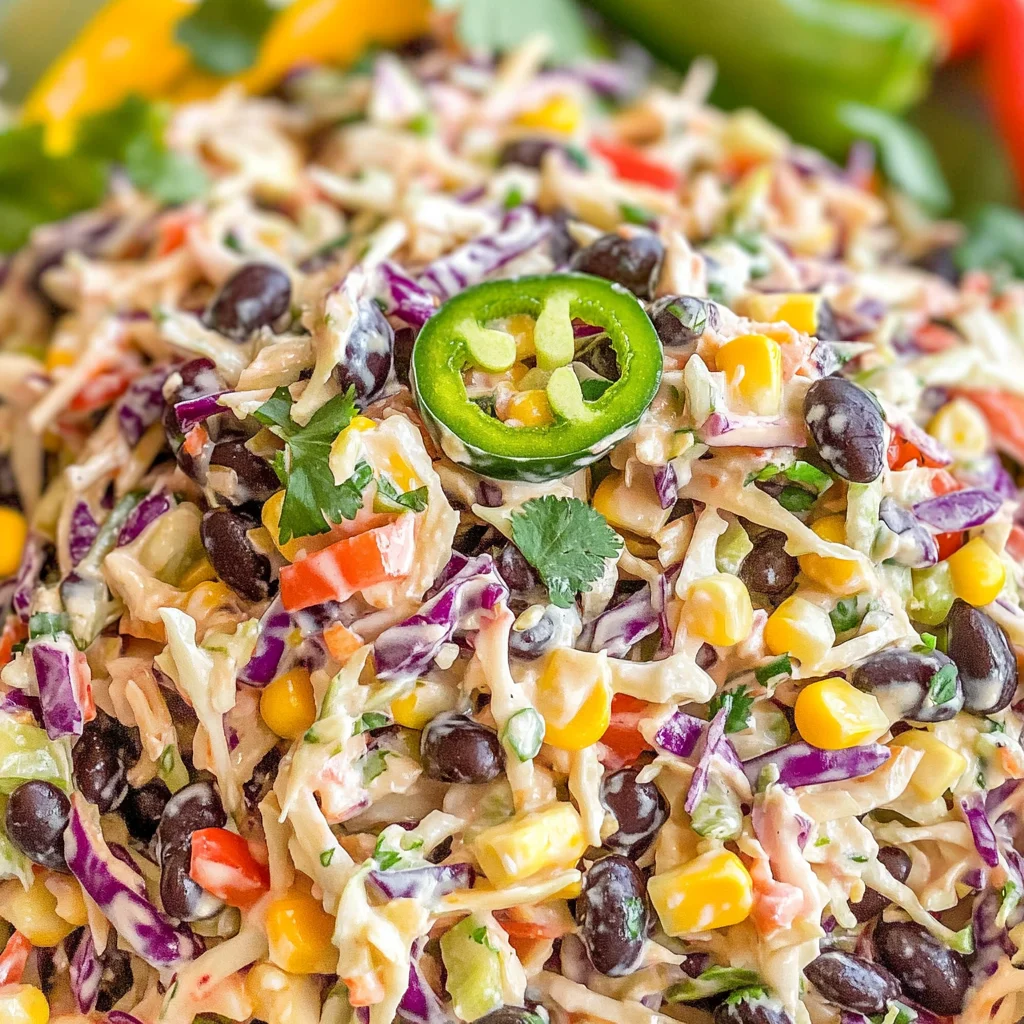
Mexican Coleslaw
There’s something undeniably enchanting about food that brings people together, isn’t there? It’s not just about nourishment; it’s about the stories we share and the memories we create in the kitchen. As I sit down to write about this Mexican Coleslaw, I’m transported to sunny afternoons filled with laughter, where vibrant flavors danced on our plates and love was served alongside every bite. This dish is a celebration of life itself—a symphony of crisp vegetables tossed in a creamy lime dressing that bursts with freshness. The moment you take your first bite, you’ll find yourself enveloped in a world where each ingredient plays its part to perfection, creating an experience that’s as delightful as it is satisfying.
And oh, how versatile this coleslaw is! Whether you’re hosting a lively cookout, attending a potluck, or simply looking for a refreshing side dish to complement your weeknight meals, this recipe never disappoints. Imagine it as a colorful topping for tacos or pulled beef sandwiches—its crunchy texture and zesty flavor elevate any dish to extraordinary heights. Trust me when I say this isn’t just another salad; it’s an invitation to indulge in flavors that are as bright as the sun and as comforting as home-cooked food can be.
Mexican Coleslaw: A Flavorful Fiesta in Every Bite
This easy Mexican Coleslaw recipe is one that I truly adore! With just a handful of ingredients and minimal prep time, you’ll whip up something that’s not only delicious but also visually stunning. The combination of crunchy coleslaw mix with vibrant bell peppers, juicy tomatoes, and hearty black beans creates a melody of textures and tastes that will have everyone coming back for seconds—maybe even thirds! So grab your apron, and let’s embark on this culinary journey together!
Ingredients:
As we dive into this delightful recipe, let’s take a moment to appreciate each ingredient’s role in creating our Mexican Coleslaw masterpiece. Each component brings its unique character to the dish, making it more than just food—it becomes an experience!
-
1 cup mayonnaise. This creamy base serves as the heart of our dressing. It creates that luscious texture that clings beautifully to the fresh vegetables while adding richness without overwhelming other flavors. When selecting mayonnaise, choose one made with high-quality oils for a smoother finish—this will elevate your coleslaw immensely.
-
⅔ cups sour cream. Adding sour cream introduces a tangy note that balances perfectly against the richness of mayonnaise. This blend not only makes our dressing delightfully creamy but also gives it depth and complexity. Look for full-fat sour cream; it will yield the most luxurious mouthfeel and flavor.
-
3 Tbsp lime juice. Fresh lime juice is absolutely non-negotiable! It infuses brightness and acidity into our slaw that cuts through the creaminess of the dressing while enhancing all the other ingredients’ flavors. Trust me; squeezing fresh limes instead of using bottled juice makes all the difference here—it’s like adding sunshine to your dish.
-
2 Tbsp taco seasoning. This spicy blend is what truly sets our coleslaw apart from any ordinary salad! Taco seasoning adds layers of flavor—warm spices like cumin and chili powder bring a subtle heat that complements the other ingredients beautifully. You can use store-bought seasoning or make your own at home for an extra personal touch.
-
1 (16-oz) bag tri-color coleslaw. Using pre-packaged coleslaw mix saves time without sacrificing flavor or crunch! The colorful blend adds visual appeal while providing a variety of textures—from crunchy cabbage to delicate carrots—that keeps each bite interesting.
-
1 red bell pepper (diced). Sweet and juicy, red bell peppers brighten up both visually and flavor-wise! Their natural sweetness balances out the tangy dressing and adds another layer of crunch that contrasts nicely with the soft beans.
-
1 (10-oz) can Rotel diced tomatoes and green chiles (drained). These canned tomatoes bring vibrant color and zestiness into our slaw! Not only do they add moisture to the mix, but their mild spiciness enhances every bite without being overpowering. Make sure to drain them well so they don’t water down your dressing.
-
1 (11-oz) can corn kernels (drained). Sweet corn contributes delightful pops of sweetness along with added texture—a perfect complement to everything else going on in this delicious mix! Use high-quality canned corn or frozen corn if you prefer; both will work wonderfully here.
-
1 (15-oz) can black beans (drained and rinsed). Black beans are not just for tacos; they add protein, fiber, and earthy notes that ground our coleslaw beautifully! Rinsing them helps remove excess sodium while enhancing their natural taste.
-
1 jalapeño pepper (seeded and finely chopped). If you enjoy heat in your dishes (I know I do!), adding finely chopped jalapeño provides just enough spice without overwhelming the palate. Removing seeds will tone down the heat for those who prefer milder flavors.
-
½ cups chopped fresh cilantro. Fresh cilantro ties everything together with its herbaceous aroma and bright flavor profile! Be generous with it—cilantro brings an invigorating freshness that elevates this coleslaw from good to truly extraordinary!
Equipment You’ll Need:
Having the right tools on hand makes preparing this Mexican Coleslaw not only easier but also more enjoyable! While these items may not be ingredients per se, think of them as essential partners in creating something wonderful together.
-
Large mixing bowl: A good-sized bowl is crucial for combining all those lovely ingredients without spilling over! It gives you room to stir vigorously without worrying about mess—trust me; no one wants coleslaw everywhere except on their plate!
-
Measuring cups and spoons: Precision matters when it comes to cooking; these tools ensure you get just the right amounts of each ingredient for perfect balance in flavor—especially vital for components like lime juice or taco seasoning!
-
Cutting board: A sturdy cutting board provides stability while chopping veggies like bell peppers or jalapeños safely. Choose one made from wood or plastic depending on your preference—both serve well!
-
Chef’s knife: A sharp chef’s knife allows you to slice through vegetables easily without mashing them—a must-have tool that’ll make your prep work quicker while keeping everything uniform in size!
Now that we’ve gathered all our ingredients and tools—it’s time to prepare this beautiful Mexican Coleslaw!
Step 1: Whip Up Your Creamy Dressing
First things first: let’s start by creating our creamy base! In a large mixing bowl, combine 1 cup mayonnaise with ⅔ cup sour cream along with 3 tablespoons fresh lime juice and 2 tablespoons taco seasoning. This process involves mixing until smooth—a step that’s important because it ensures all those beautiful flavors meld together harmoniously before we introduce our veggies into the mix. You want everything evenly distributed so every bite has that delicious tangy goodness we’re aiming for!
Step 2: Add Your Colorful Veggies
Once your dressing is ready—and oh boy does it smell divine—you’ll want to add some fun colors into play! Toss in 1 bag (16 ounces) tri-color coleslaw along with diced red bell pepper, drained Rotel tomatoes & green chiles, drained corn kernels, rinsed black beans, finely chopped jalapeño pepper, and chopped fresh cilantro into your creamy concoction—it feels like throwing a party right there in your bowl! Gently fold everything together using two spatulas or large spoons until each piece gets coated beautifully by that luscious dressing—we’re talking about a vibrant medley here!
Step 3: Chill Out
Now comes one crucial step: covering up your bowl tightly with plastic wrap or transferring everything into an airtight container before placing it in the refrigerator for at least 30 minutes—or longer if possible! Why chill? Allowing time allows flavors to deepen while letting those crispy veggies soak up all that creamy goodness—it transforms simple ingredients into something truly special over time!
Step 4: Serve & Enjoy!
After waiting patiently—or maybe sneaking tastes along the way—you’ll finally be able to dig into this fiesta-inspired salad once it’s chilled properly! Grab a serving spoon—dishing out portions onto plates alongside tacos or pulled beef sandwiches will surely impress anyone lucky enough to join you at mealtime today—they won’t believe how easy yet incredibly flavorful homemade sides can be!
So there you have it—your guide through making my beloved Mexican Coleslaw from scratch! I promise you it’ll become one of those go-to recipes you’ll cherish forever—it’s refreshing yet hearty enough for any occasion while always bringing smiles around every table setting shared among loved ones near & dear alike!
Creating Your Flavorful Mexican Coleslaw
Let’s dive deeper into crafting this vibrant and utterly delightful Mexican Coleslaw. Each step is like a note in a beautiful melody, harmonizing together to create a dish that not only pleases the palate but also brightens up any occasion. So roll up your sleeves, gather your ingredients, and let’s make some magic happen!
Step 5: The Creamy Base – Building Flavors with the Dressing
Begin by taking a large mixing bowl; this is where the symphony of flavors begins to unfold. You’ll want to add one cup of mayonnaise to the bowl—a luscious and creamy foundation that brings richness to our coleslaw. Then, measure out two-thirds of a cup of sour cream; this tangy addition not only enhances the creaminess but also balances the flavors, giving our coleslaw that addictive taste that keeps everyone coming back for more. Next, squeeze in three tablespoons of fresh lime juice—trust me, this is crucial! The acidity from the lime cuts through the richness of the mayo and sour cream, providing a refreshing brightness that elevates each bite. And for an extra punch, sprinkle in two tablespoons of taco seasoning; it’s non-negotiable when it comes to infusing our dressing with that classic Mexican flavor profile.
As you mix these ingredients together, take a moment to enjoy how they come together—what you’re creating is more than just a dressing; it’s an explosion of flavor waiting to envelop your crunchy veggies! Use a whisk or a spatula to blend them until smooth, ensuring there are no lumps left behind. This step is essential because it guarantees that every inch of your coleslaw will be coated in this heavenly creamy lime dressing. Set this bowl aside for now; we’ll bring it back into play shortly.
Step 6: The Colorful Medley – Adding Fresh Ingredients
Now comes the fun part—transforming those fresh vegetables into something truly extraordinary! Grab your bag of tri-color coleslaw (a delightful mix of green cabbage, purple cabbage, and carrots) and pour it directly into the bowl with your creamy dressing. Make sure you have a 16-ounce bag; trust me when I say using tri-color adds not just flavor but visual appeal as well! As you gently toss the slaw in the dressing with your spatula or hands (I often prefer my hands for better control), watch as those vibrant colors mingle beautifully with that rich creamy base.
Next up, introduce one diced red bell pepper into the mix. Its sweet crunch will add another layer of texture and flavor that complements the coleslaw wonderfully. After that, open a can of Rotel diced tomatoes and green chiles (10 ounces), draining them first before tossing them in—you want to avoid excess moisture here so that your coleslaw doesn’t get soggy! The burst of flavor from these juicy tomatoes paired with the subtle heat from the chiles creates an utterly intoxicating combination that makes this dish unforgettable.
Don’t forget about adding one can each of drained corn kernels (11 ounces) and black beans (15 ounces)—these not only contribute fiber and protein but also provide delightful textures. Finally, toss in one finely chopped jalapeño pepper for just the right amount of spice—if you’re sensitive to heat, feel free to reduce or omit this ingredient entirely because trust me, we want every bite to be enjoyable for everyone at your table.
Step 7: The Magic Touch – Tossing Everything Together
With all those beautiful ingredients nestled together in your mixing bowl, it’s time for my favorite part: tossing everything together! Using two large spoons or even clean hands (I always find it easier!), gently mix everything until each piece is thoroughly coated with that luscious creamy dressing we made earlier. This step isn’t just about combining ingredients; it’s about ensuring each bite delivers a perfectly balanced flavor explosion. Don’t rush this process—take your time and enjoy mixing those colors and textures together.
You’ll know you’ve done it right when you see all those vibrant colors peeking through the dressing—this is visually stunning! Make sure everything feels evenly distributed while being cautious not to crush any veggies; we want our slaw pieces crisp rather than mushy! Once everything is combined beautifully, take a moment to taste-test—adjust seasonings if necessary because every palate is different. You may want an extra dash of taco seasoning or perhaps a bit more lime juice; don’t hesitate!
Step 8: Chill Out – Why Resting Matters
Now comes one of the most important steps—the chilling phase! Cover your coleslaw tightly with plastic wrap or transfer it into an airtight container and place it in the refrigerator for at least thirty minutes before serving. Why chill? Well, during this resting period, something truly magical happens—the flavors meld together beautifully! Allowing all those delicious components time to soak up each other’s essence transforms what could be good into something profoundly satisfying.
If time allows (and I highly recommend letting it chill longer if possible), aim for up to two hours or even overnight if you’re planning ahead for a gathering. The longer it sits, the better it gets as those zesty flavors develop further complexity over time while keeping all ingredients nice and crisp—this balance is absolutely paramount! When you’re ready to serve your coleslaw after chilling, give it another gentle toss before plating so everything stays well-mixed.
Conclusion:
As we wrap up our exciting journey through this vibrant Mexican Coleslaw recipe, I can’t help but feel a surge of enthusiasm! From the very first bite, you’ll experience that beautiful dance of flavors—the refreshing crunch of cabbage alongside sweet bell peppers, zesty lime dressing mingling with creamy goodness. Each mouthful transports you to sunny afternoons filled with laughter and joy, making this dish truly extraordinary as both a sidekick at cookouts or a star atop tacos or sandwiches.
This recipe is undeniably a must-try because it’s not just about what goes into it; it’s about creating an experience filled with love and camaraderie. Picture yourself serving this at backyard barbecues or picnics with friends—it brings everyone together around the table for laughter-filled moments over delicious food. The ease of preparation means that anyone can join in on the fun without feeling overwhelmed—just grab your ingredients and let your creativity shine!
Imagine savoring one delightful serving alongside spicy grilled chicken or even atop fish tacos; they create such a wonderful contrast with their textures and flavors! For an afternoon pick-me-up during those lazy weekends, pair this coleslaw with some crispy tortilla chips or enjoy it as part of a hearty burrito bowl layered with grains and fresh toppings—each mouthful bursting with sunshine!
Feeling adventurous? This recipe is wonderfully adaptable! You could swap out vegetables based on what’s freshest at your local market or even add fruits like mango for that extra sweet twist! Or perhaps throw in some diced avocados for creaminess without losing that refreshing crunch? The possibilities are endless—and I’d love for you to take this base and make it your own! Please try this out yourself, enjoy every moment in the kitchen crafting this delicious dish, and don’t forget to share your experiences—I can’t wait to hear how your creations turn out!
Mexican Coleslaw

Mexican Coleslaw is a vibrant and refreshing side dish that brings together crisp vegetables and a zesty lime dressing, creating a delightful explosion of flavors in every bite. This easy-to-make salad is perfect for summer cookouts, potlucks, and weeknight dinners alike. With its colorful medley of tri-color coleslaw mix, sweet bell peppers, juicy tomatoes, and hearty black beans, this coleslaw not only looks stunning on your plate but also complements a variety of main dishes. The creamy dressing, infused with tangy lime juice and flavorful taco seasoning, ties all the ingredients together, making it an irresistible addition to any meal. Whip up this Mexican Coleslaw to brighten your gatherings and share the joy of delicious food with friends and family!
- Prep Time: 15 minutes
- Cook Time: None
- Total Time: 0 hours
- Yield: Approximately 6 servings 1x
- Category: Side Dish
- Method: No cooking required
- Cuisine: Mexican
Ingredients
- 1 cup mayonnaise
- ⅔ cup sour cream
- 3 tablespoons lime juice
- 2 tablespoons taco seasoning
- 1 (16-oz) bag tri-color coleslaw mix
- 1 red bell pepper (diced)
- 1 (10-oz) can Rotel diced tomatoes and green chiles (drained)
- 1 (11-oz) can corn kernels (drained)
- 1 (15-oz) can black beans (drained and rinsed)
- 1 jalapeño pepper (seeded and finely chopped)
- ½ cup chopped fresh cilantro
Instructions
- In a large mixing bowl, combine mayonnaise, sour cream, lime juice, and taco seasoning. Mix until smooth.
- Add the tri-color coleslaw mix, diced red bell pepper, drained Rotel tomatoes & green chiles, drained corn kernels, rinsed black beans, chopped jalapeño pepper, and cilantro into the bowl.
- Gently fold everything together until well combined.
- Cover the bowl with plastic wrap or transfer to an airtight container. Refrigerate for at least 30 minutes to allow flavors to meld.
- Serve chilled as a side dish alongside tacos or grilled meats.
Nutrition
- Serving Size: 1 serving
- Calories: 320
- Sugar: 5g
- Sodium: 300mg
- Fat: 25g
- Saturated Fat: 4g
- Unsaturated Fat: 20g
- Trans Fat: 0g
- Carbohydrates: 24g
- Fiber: 6g
- Protein: 6g
- Cholesterol: 15mg