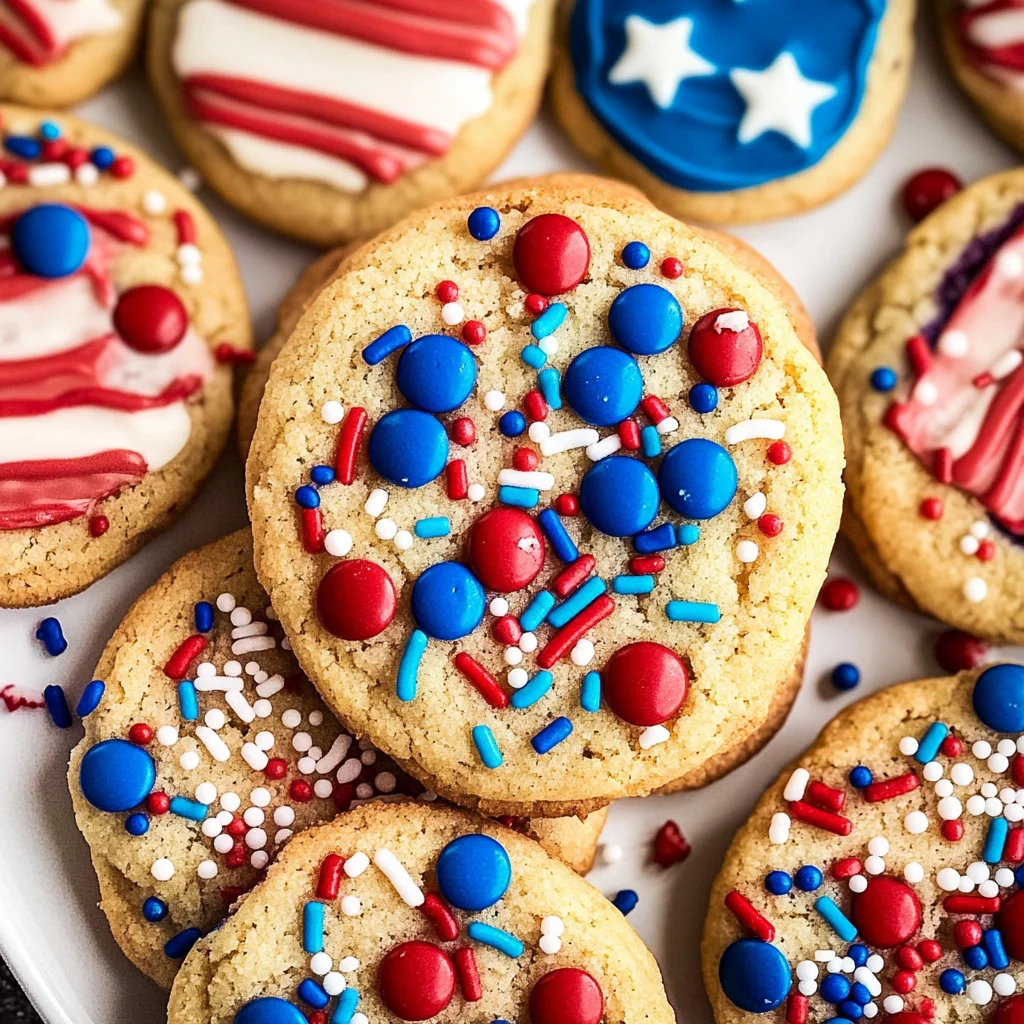
4th of July Fireworks Cookies
There’s something undeniably magical about baking, especially when it comes to creating sweet treats that not only tantalize the taste buds but also ignite a sense of nostalgia and celebration. When I think of the 4th of July, I envision bright fireworks lighting up the sky, laughter echoing through warm summer nights, and the aroma of freshly baked cookies wafting through the air. These 4th of July Fireworks Cookies are more than just a dessert; they are an experience, a joyful explosion of flavors and colors that bring friends and family together. With every bite, you’ll enjoy the soft, puffy texture combined with vibrant red, white, and blue M&Ms and delightful sprinkles that make this cookie a true showstopper at any holiday gathering.
As we gather to celebrate our nation’s birthday, these cookies become the perfect centerpiece on your dessert table. Imagine kids (and adults!) eagerly reaching for these colorful treats as they bounce with excitement over their favorite summer festivities. What makes these Fireworks Cookies so special is not just their festive appearance but also their profound flavor profile. The combination of vanilla cake mix with cream cheese creates an irresistibly soft dough that melts in your mouth. Trust me; once you take a bite out of one of these delicious gems, you’ll understand why they vanish so quickly — they’re utterly intoxicating!
Ingredients:
Let’s embark on this delightful culinary journey together! Each ingredient plays a crucial role in crafting these festive cookies that will surely light up your 4th of July celebrations.
- 1 – 15.25 ounce vanilla cake mix. This is where our cookie magic begins! The vanilla cake mix serves as the foundation for these cookies, providing sweetness and a tender crumb that’s both soft and puffy. It also saves time by eliminating the need for measuring flour or sugar separately, which is particularly handy when you’re juggling multiple tasks in the kitchen during holiday festivities. Look for high-quality mixes without artificial flavors to ensure each cookie is as delicious as possible.
- 8 tablespoons unsalted butter, softened. Butter is essential for creating that rich flavor and delightful texture we all crave in cookies. Make sure your butter is perfectly softened; this means it should feel slightly cool to the touch but not greasy or melted. The reason we use unsalted butter is simple: it allows you to control the salt levels in your recipe while helping to achieve that beautifully creamy consistency when mixed with other ingredients.
- 1 large egg. Eggs are often referred to as nature’s binding agent because they provide structure and stability to baked goods. In our Fireworks Cookies, one large egg helps create moisture and richness while contributing to that perfect chewiness we adore in cookies. Be sure to use room temperature eggs; they incorporate into the batter more easily, leading to a smoother dough.
- 1 teaspoon vanilla extract. Ahh, vanilla—the elixir of life! This liquid gold adds warmth and depth of flavor to our cookies that’s simply non-negotiable if you want those enchanting aromas wafting through your kitchen. Look for pure vanilla extract rather than imitation for more authentic taste; it’s worth it! A good quality vanilla elevates everything from cakes to cookies, making them profoundly satisfying.
- 4 ounces cream cheese, softened. Cream cheese adds moisture and creaminess while giving our cookies an extra layer of flavor that’s just out-of-this-world delicious! It contributes to that irresistible softness we’re after in these Fireworks Cookies—trust me on this one! Make sure your cream cheese is soft enough to blend easily into the dough; otherwise, you might end up with lumps instead of that smooth texture we want.
- 2 cups Oreo cookie chunks (14 chocolate cream-filled). Who doesn’t love Oreos? Incorporating chocolate cream-filled Oreos into our cookie dough creates wonderful pockets of chocolatey goodness throughout each cookie—an absolute delight! To get those perfect chunks without too much crumbling, I recommend breaking them gently with your hands rather than using a food processor so you can maintain some larger pieces for added texture.
- 3/4 cup red, white & blue M&M’s, divided. These colorful candies are not just eye candy—they add bursts of sweetness and crunch with every bite! Dividing them means we’ll use some in the dough and some on top for decoration later; it ensures our cookies are visually stunning while enhancing the overall flavor experience.
- 1/2 cup red, white & blue sprinkles, divided. Sprinkles are like confetti for cookies! They bring joy and festivity into each bite while also adding a fun crunch factor that contrasts beautifully against the soft cookie base. Again, dividing them allows us to incorporate some into the dough while saving a bit for sprinkling atop each dough ball before baking—it’s all about maximizing both flavor and presentation!
Equipment You’ll Need:
Now that we’ve gathered our ingredients let’s talk about some essential tools you’ll need along this baking adventure! Having the right equipment makes everything smoother—and trust me; it can be a game-changer when you’re whipping up something wonderful like these Fireworks Cookies.
- Mixing bowl – A large mixing bowl is key here! You’ll be combining quite a few ingredients together so choose one that’s sturdy enough to handle vigorous mixing without tipping over or cracking under pressure. Glass bowls are great because they allow you to see everything coming together beautifully as you mix!
- Electric mixer – While you could mix by hand (which I absolutely commend if you’re feeling ambitious!), using an electric mixer saves time and energy—especially when blending cream cheese until it’s smooth and fluffy. A stand mixer works wonders if you have one; otherwise handheld mixers do just fine too!
- Cookie scoop – A 2-tablespoon cookie scoop is your best friend here—it ensures uniformity in size across all your cookies which translates into even baking times—a crucial aspect if you want perfectly baked treats every time. If you don’t have one handy though no worries—you can always use two spoons instead!
- Baking sheet – Opt for non-stick or lined baking sheets (parchment paper works wonders) because nothing’s worse than having delicious cookies stick stubbornly to the pan after you’ve put all this love into making them! Your baking sheet should have enough space between each cookie so they have room to spread out nicely while baking without merging into one another—trust me on this one!
Step 1: Mixing Up That Dough
The first step in crafting your delectable Fireworks Cookies involves mixing together all those wonderful ingredients we’ve gathered—the dry cake mix paired with softened butter creates a beautiful base that’s rich yet fluffy at the same time! Begin by placing your cake mix into a large mixing bowl alongside softened butter (remember how crucial it was for creaming?) along with cream cheese—a glorious addition that will provide moisture—and your egg plus vanilla extract as well! Using either an electric mixer or wooden spoon (I won’t judge!), blend everything until it forms a soft dough that feels cohesive yet still slightly sticky—this will take about 2 minutes if using an electric mixer on medium speed.
As you’re mixing away don’t rush this step; it’s absolutely paramount because it’s where all those flavors meld together harmoniously before introducing any additional goodies such as cookie chunks or M&Ms later on down this tasty path we’re paving together!
Step 2: Stirring in Delicious Additions
Once your dough has come together beautifully—a lovely symphony of textures now—you get to add another layer of fun by folding in those chopped Oreo chunks along with half of both M&Ms and sprinkles we’ve set aside earlier so they mingle throughout every morsel when baked later on down this journey!
Gently stir everything until evenly distributed; be careful not too overmix here since doing so could lead us astray from achieving maximum fluffiness within each individual cookie—we want them light yet chewy after all!
Step 3: Chilling Out
Now comes an important part: refrigerating our cookie dough for about 60 minutes before scooping out those glorious balls onto baking sheets prepped ahead earlier—instead try letting it chill first instead which gives time for flavors develop further while also ensuring they’ll hold their shape better when placed directly onto hot sheets later during baking process!
This process allows gluten strands relax giving rise (pun intended) softer textures once baked—you’ll thank yourself trust me!
Step 4: Preheating & Scooping Perfection
While waiting patiently during refrigeration period—take advantage opportunity preheat oven set at 350 degrees Fahrenheit so it’s nice & hot ready receive our soon-to-be scrumptious creations straight out cold fridge right before popping into oven give them life!
Once chilled thoroughly remove dough from refrigerator then grab trusty cookie scoop ready measure out equal portions onto prepared sheets spaced apart enough allowing room spread evenly without merging too closely during bake time—we’re going aim towards perfection here after all!
Continue following along as we head towards bringing these beautiful creations alive through heat soon…
Step 5: Scoop and Shape Your Cookie Dough
Now that your dough has chilled, it’s time to bring these delightful cookies to life! Using a 2-tablespoon cookie scoop, gently portion out the dough—this is where the magic begins. As you release each mound of dough onto your prepared cookie sheet, take a moment to admire the vibrant colors and textures within each scoop. You’ll want to space them about two inches apart because they will spread while baking, transforming into those puffy, soft cookies we all adore.
While you’re at it, let’s add some extra flair. Take the remaining M&Ms and press a few into the tops of each dough ball. This not only enhances their visual appeal with pops of color but also ensures that every bite contains that sweet chocolatey goodness. If you’re feeling festive (and I hope you are!), sprinkle a little extra red, white, and blue sprinkles on top for good measure. Trust me on this—these little touches make all the difference when it comes to presentation and flavor. It’s like giving your cookies a stunning outfit before they hit the stage of your holiday dessert table!
Step 6: Bake to Perfection
Preheat your oven to a cozy 350 degrees Fahrenheit—the perfect temperature for creating that golden-brown exterior while keeping the insides soft and chewy. Once your oven is ready and your cookie sheet is filled with those adorable dough balls, pop them in for about 10 minutes. Now, here’s an important tip: resist the urge to overbake! The cookies may look slightly underbaked when you pull them out of the oven; this is exactly what we want! They will continue to firm up as they cool on the hot pan, which leaves them perfectly soft in the center.
As they bake, your kitchen will fill with an utterly intoxicating aroma—sweet cream cheese mingling with vanilla and chocolate from those Oreos, creating a symphony of flavors that’s simply irresistible. Keep an eye on them during those last couple of minutes; you want them to be just set around the edges but still look slightly glossy in the center. This delicate balance is absolutely crucial for achieving that dreamy texture we’re after.
Step 7: Cooling Down – The Key to Texture
Once you’ve baked your cookies for that perfect ten-minute window (or until they’re just barely set), it’s time for an essential step: cooling! Carefully remove the pan from the oven and let those beauties rest on it for about two minutes before transferring them to a piece of parchment paper or wire rack to cool completely. This resting time allows residual heat from the pan to finish cooking the cookies gently without overdoing it.
Why is this step so important? Well, allowing them to cool too quickly can result in a crumbly texture instead of that satisfying chewiness we crave in a cookie. Plus, this waiting period lets all those flavors meld together beautifully as they firm up ever so slightly. So take a deep breath and don’t rush this step; patience truly pays off here!
Step 8: Storing Your Cookies – Keeping Them Fresh
After letting your cookies cool completely (which can feel like an eternity, I know!), it’s vital to store them correctly so they remain fresh and delicious for days—and believe me, you’ll want these treats around as long as possible! Place your cooled cookies in a tightly sealed container; I recommend using one with an airtight seal if you have it handy. This helps keep moisture in while warding off any unwanted air exposure that could cause them to dry out.
If you’ve made it this far without devouring half of them (a true testament to your self-control!), remember that these 4th of July Fireworks Cookies will stay fresh at room temperature for about five days—if they last that long! Alternatively, if you’re looking ahead or planning for future gatherings, you can freeze them as well; just layer parchment paper between each cookie before sealing them in a freezer-safe bag or container. When you’re ready for another round of festive fun (and trust me—you will be), simply let them thaw at room temperature or pop them in the microwave for about 10-15 seconds for that warm-from-the-oven experience.
Conclusion:
As we wrap up our delicious journey through making these festive 4th of July Fireworks Cookies, I can’t help but feel an overwhelming sense of joy and excitement! Each step—from mixing those vibrant ingredients to watching them puff up in the oven—has been not just about creating a treat but about crafting memories that will linger long after the last crumbs have been devoured. The combination of flavors—the rich chocolate from the Oreo chunks mingling with the sweetness of M&Ms and sprinkles—creates a symphony that dances on your palate with every bite. It’s truly extraordinary how something so simple can bring such profound satisfaction.
These cookies are more than just a dessert; they’re an experience waiting to unfold at your next gathering! Whether you’re celebrating Independence Day or simply looking for something fun to bake with loved ones, this recipe embodies everything joyous about summer festivities. Imagine pulling these beauties from the oven while laughter fills the air and everyone gathers around—a moment where time stands still as you all reach for another cookie, enchanted by their soft texture and vibrant colors.
For serving suggestions, imagine savoring one with a cool glass of lemonade on a warm afternoon or pairing it with vanilla ice cream for an indulgent twist—perhaps even crumbling some over yogurt for breakfast (I promise it’s delicious!). The versatility doesn’t stop there; these cookies are perfect alongside fresh fruit salads or even enjoyed solo while lounging on your patio under twinkling fairy lights as fireworks light up the night sky.
Feeling adventurous? This recipe is wonderfully adaptable! You could swap out the M&Ms for pastel shades during Easter celebrations or even incorporate seasonal spices like cinnamon around Thanksgiving. Want to give it a tropical flair? Toss in some shredded coconut or crushed pineapple bits—the possibilities are as endless as your creativity allows! I invite you wholeheartedly to try this recipe, make it your own, and share your delightful creations with friends and family. Let’s spread joy through baking together!
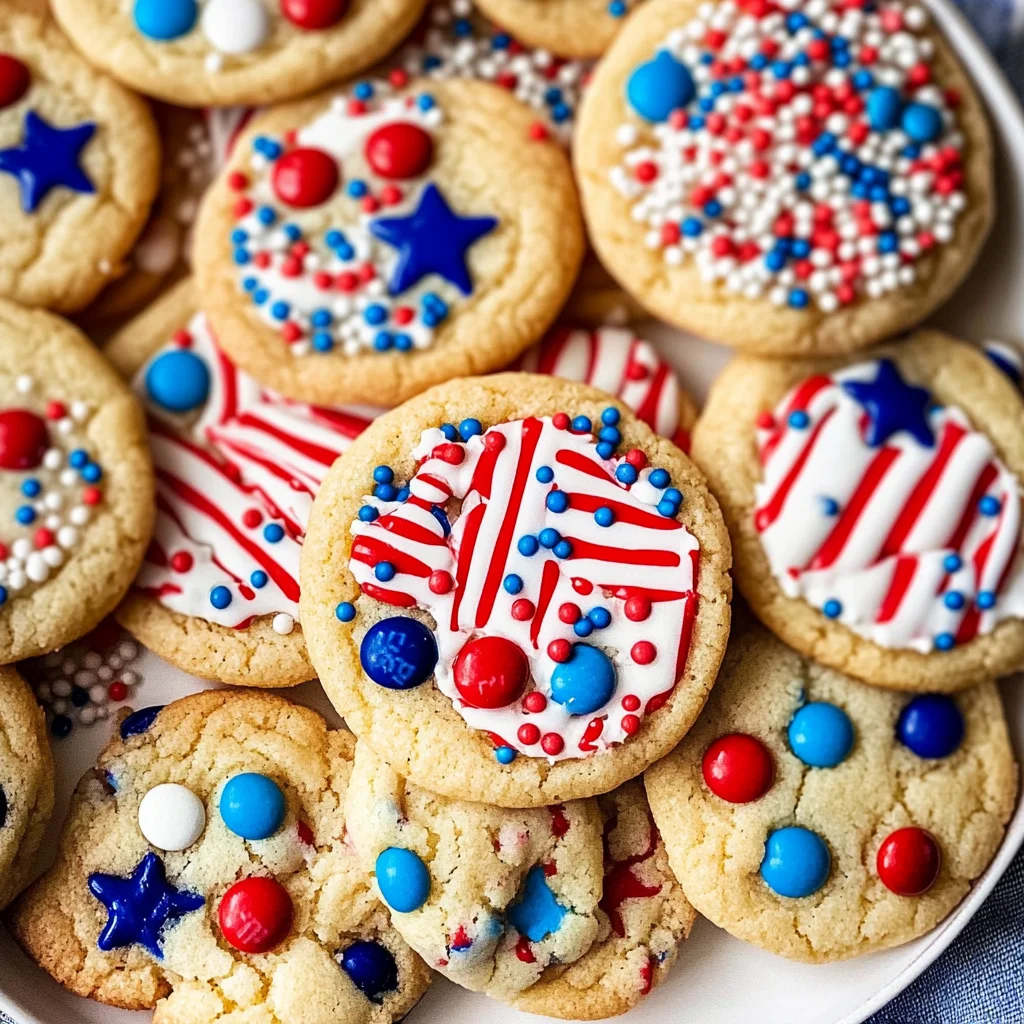
4th of July Fireworks Cookies

Celebrate summer with vibrant 4th of July Fireworks Cookies! Soft, colorful treats perfect for gatherings—bake some today!
- Prep Time: 20 minutes
- Cook Time: 10 minutes
- Total Time: 30 minutes
- Yield: Approximately 24 cookies 1x
- Category: Dessert
- Method: Baking
- Cuisine: American
Ingredients
- 1 package (15.25 oz) vanilla cake mix
- 8 tablespoons unsalted butter, softened
- 1 large egg
- 1 teaspoon pure vanilla extract
- 4 ounces cream cheese, softened
- 2 cups Oreo cookie chunks
- 3/4 cup red, white & blue M&Ms, divided
- 1/2 cup red, white & blue sprinkles, divided
Instructions
- In a large mixing bowl, combine the vanilla cake mix and softened butter until creamy.
- Mix in the egg, vanilla extract, and cream cheese until fully incorporated.
- Gently fold in the Oreo cookie chunks, half of the M&Ms, and half of the sprinkles.
- Chill the dough in the refrigerator for 60 minutes.
- Preheat your oven to 350°F (175°C). Line baking sheets with parchment paper.
- Scoop out portions of dough onto prepared baking sheets, spacing them about two inches apart.
- Press remaining M&Ms and sprinkles on top of each dough ball.
- Bake for approximately 10 minutes or until edges are barely set.
- Let cookies cool on the pan for two minutes before transferring them to a wire rack.
Nutrition
- Serving Size: 1 cookie (38g)
- Calories: 160
- Sugar: 10g
- Sodium: 100mg
- Fat: 7g
- Saturated Fat: 4g
- Unsaturated Fat: 3g
- Trans Fat: 0g
- Carbohydrates: 22g
- Fiber: <1g
- Protein: 2g
- Cholesterol: 15mg