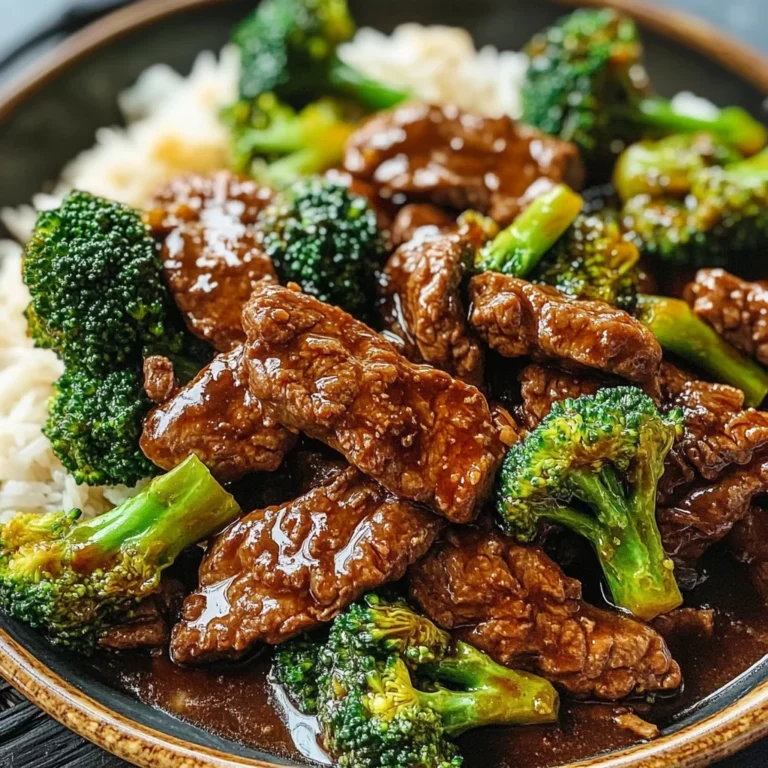
Blackstone Steak Fajitas
There’s something truly magical about the way food brings people together, isn’t there? When I think of my cherished moments in the kitchen, one dish that always stands out is Blackstone Steak Fajitas. This recipe isn’t just a meal; it’s an experience that ignites my senses and fills my heart with warmth. As the steak sizzles on the grill, releasing its savory aroma, and the vibrant colors of the peppers and onions come to life, I can almost hear the laughter and chatter of friends gathered around the table. Each bite is a celebration—a symphony of flavors that dances on your palate, reminding us of warm summer evenings spent outdoors. Trust me when I say that these Blackstone Steak Fajitas are not just another weeknight dinner; they are a journey into a world where love for cooking meets the joy of sharing.
Cooking on my outdoor griddle has become a beloved ritual, one that marries tradition with innovation in such a delightful way. The vibrant hues of red and yellow bell peppers juxtaposed against the deep browns of perfectly seared steak create an enticing visual feast that tempts even the pickiest eaters. And let’s not forget about those warm tortillas—blank canvases ready to cradle all that goodness! Whether it’s a casual family night or a festive gathering with friends, these fajitas effortlessly elevate any occasion. They remind us that food is more than sustenance; it’s an expression of love and connection.
Blackstone Steak Fajitas: A Flavorful Adventure Awaits!
I am thrilled to share this recipe for Blackstone Steak Fajitas with you! It’s quick, it’s easy, and it brings so much joy to the table. Trust me; once you try making these fajitas, you’ll find yourself coming back to this recipe again and again as it becomes a staple in your home.
Ingredients:
Embarking on this culinary journey requires some wonderful ingredients that each contribute their unique character to our delicious dish. Let’s dive into what we need for our Blackstone Steak Fajitas!
- 1 ½ pounds flank steak (or steak of your choice cut into ½ strips). Flank steak is my go-to choice for fajitas because it boasts incredible flavor while being tender enough when sliced correctly. Look for cuts with good marbling—those little streaks of fat enhance juiciness during cooking. If flank steak isn’t available, feel free to substitute it with skirt steak or even sirloin; just remember to slice against the grain for maximum tenderness!
- 2 Tablespoons olive oil (divided). Olive oil serves as both a flavor enhancer and a cooking medium in our fajitas. Its rich flavor complements the beef beautifully while also helping to achieve that lovely char on the grill. Opt for extra virgin olive oil if possible—it’s made from pure, cold-pressed olives and adds depth to our dish. Remember to reserve half of this oil for tossing with our vegetables!
- 1 red bell pepper (sliced) & 1 yellow bell pepper (sliced). The bright colors of these bell peppers not only make our fajitas visually stunning but also add sweetness and crunch! Freshness is key here—choose peppers that feel firm and have shiny skin. They’ll caramelize beautifully on the griddle, enhancing their natural sweetness while providing that perfect contrast to the savory beef.
- 1 red onion (sliced). Red onions bring a slightly sweet yet sharp flavor profile that balances wonderfully with our other ingredients. They’ll soften as they cook but still retain just enough bite to keep things interesting! Look for onions with bright skin and no soft spots; freshness is everything.
- 3 cloves garlic (minced). Garlic is like liquid gold in cooking! It infuses our fajitas with an irresistible aroma and depth of flavor when added at just the right time during cooking. Always choose fresh garlic bulbs over pre-minced varieties; nothing beats peeling those cloves yourself—the fragrance alone will awaken your taste buds!
- 2 Tablespoons vegetable oil (to add to hot grill). Vegetable oil has a high smoke point, which means it can withstand high heat without burning—we want that gorgeous sear on our meat! While olive oil is fantastic for flavoring, vegetable oil is perfect for grilling since it allows us to achieve those coveted char marks without worry.
- Tortillas (flour or corn, to serve). Tortillas are essential as they hold everything together beautifully! Flour tortillas offer a soft texture that’s perfect for wrapping around hearty fillings, while corn tortillas lend an authentic touch with their slightly nutty flavor profile—choose whichever you prefer! Warming them up on the griddle enhances their pliability and makes them even more enjoyable.
- 1 teaspoon chili powder & 1 teaspoon cumin & ½ teaspoon smoked paprika & ½ teaspoon kosher salt & ¼ teaspoon ground black pepper. These spices form our fajita seasoning blend—the secret weapon in achieving those bold flavors we crave! Chili powder adds warmth without overwhelming heat; cumin introduces earthy notes; smoked paprika gives us that intoxicating smokiness reminiscent of outdoor grilling; kosher salt enhances all flavors harmoniously while black pepper rounds everything off with its gentle kick.
Together, these ingredients create magic on your plate—a harmony of tastes and textures promising satisfaction in every bite!

Equipment You’ll Need:
Before we get started on making these fabulous Blackstone Steak Fajitas, let’s take a moment to gather our tools because having the right equipment elevates our cooking experience tremendously! While they may not be ingredients, these tools are essential partners in creating something wonderful.
- Blackstone Griddle – This outdoor griddle is crucial for achieving those perfectly seared steak strips and beautifully charred vegetables. The large surface area allows you to cook everything simultaneously without overcrowding—a game changer when serving multiple people! If you don’t have a Blackstone specifically, any flat-top grill will do—just make sure it gets nice and hot.
- Spatula – A sturdy spatula is essential when flipping meat and veggies around on your griddle surface without losing any bits along the way! Look for one with wide slats; this helps drain excess grease while allowing easy maneuverability.
- Mixing Bowls – You’ll want at least two mixing bowls—one for seasoning your meat and another for tossing your veggies together before hitting the grill! Glass or stainless-steel bowls work best because they’re durable yet easy to clean afterward.
- Knife Set – A sharp chef’s knife will make slicing through meat & vegetables effortless! Always prioritize using quality knives—they’re worth investing in since they make prep work smoother and safer overall!
With these tools at your side—and all those delicious ingredients prepped—you’re ready to embark on this flavorful adventure together!
Preparing the Blackstone Steak Fajitas
Step 1: Whipping Up Our Flavorful Seasoning
To begin crafting these extraordinary fajitas, we first need to create our seasoning blend—a step often overlooked but absolutely paramount in ensuring robust flavors throughout every bite! In a small mixing bowl, combine 1 teaspoon chili powder, 1 teaspoon cumin, ½ teaspoon smoked paprika, ½ teaspoon kosher salt, and ¼ teaspoon ground black pepper until evenly mixed—this takes mere seconds but sets up everything else beautifully! Each spice plays its part: chili powder provides warmth without dominating; cumin delivers earthy tones reminiscent of distant lands; smoked paprika infuses smokiness akin to outdoor grilling—all together creating an irresistible medley sure to tantalize taste buds from first whiff onwards.
Step 2: Marinating Our Flank Steak
With our spices ready, let’s move onto preparing the star ingredient—our flank steak! You’ll want to slice against the grain into half-inch strips; this technique breaks down muscle fibers resulting in tender bites bursting with flavor once cooked properly—not something you want skimped upon here! Place these glorious slices into either a bowl or resealable gallon-sized bag before drizzling them with 1 tablespoon olive oil followed by half of your seasoning mix—toss well until every piece is coated generously—that fragrant aroma already wafting up? That’s just a hint at what’s coming next!
Step 3: Prepping Our Colorful Veggies
While letting our marinated steak soak up those flavors—don’t rush this step—it’s time we turn attention towards prepping those vibrant vegetables destined alongside them during cooking time! In another bowl or resealable gallon-sized bag combine sliced red bell pepper(s), sliced yellow bell pepper(s), along with sliced red onion—those three beauties form such an exquisite trio full-on color & crunch delivering delightful contrasts alongside juicy beef strips later on! Add remaining tablespoon olive oil along with last bit remaining from earlier seasoning mix then toss until everything feels happily coated—oh how radiant this looks already!
Step 4: Heating Up That Griddle
Now comes perhaps one of my favorite parts—the sound of sizzling as everything hits hot metal bringing life into what was once raw ingredients lying quiet under cover hours prior… Preheat your trusty Blackstone griddle over medium-high heat for about five minutes until it glistens invitingly beneath sunlight rays dancing overhead inviting you closer towards culinary bliss waiting patiently ahead… Once preheated pour two tablespoons vegetable oil across its surface spreading evenly using spatula until fully coated—a non-stick barrier ensuring nothing sticks whatsoever later down line allowing those glorious caramelized edges develop naturally as each ingredient cooks away effortlessly yielding delightful results we crave so dearly…
Stay tuned as we continue crafting these delicious Blackstone Steak Fajitas together—I promise you won’t regret diving deeper into this flavorful journey filled with warmth shared amongst friends enjoying every bite along way…
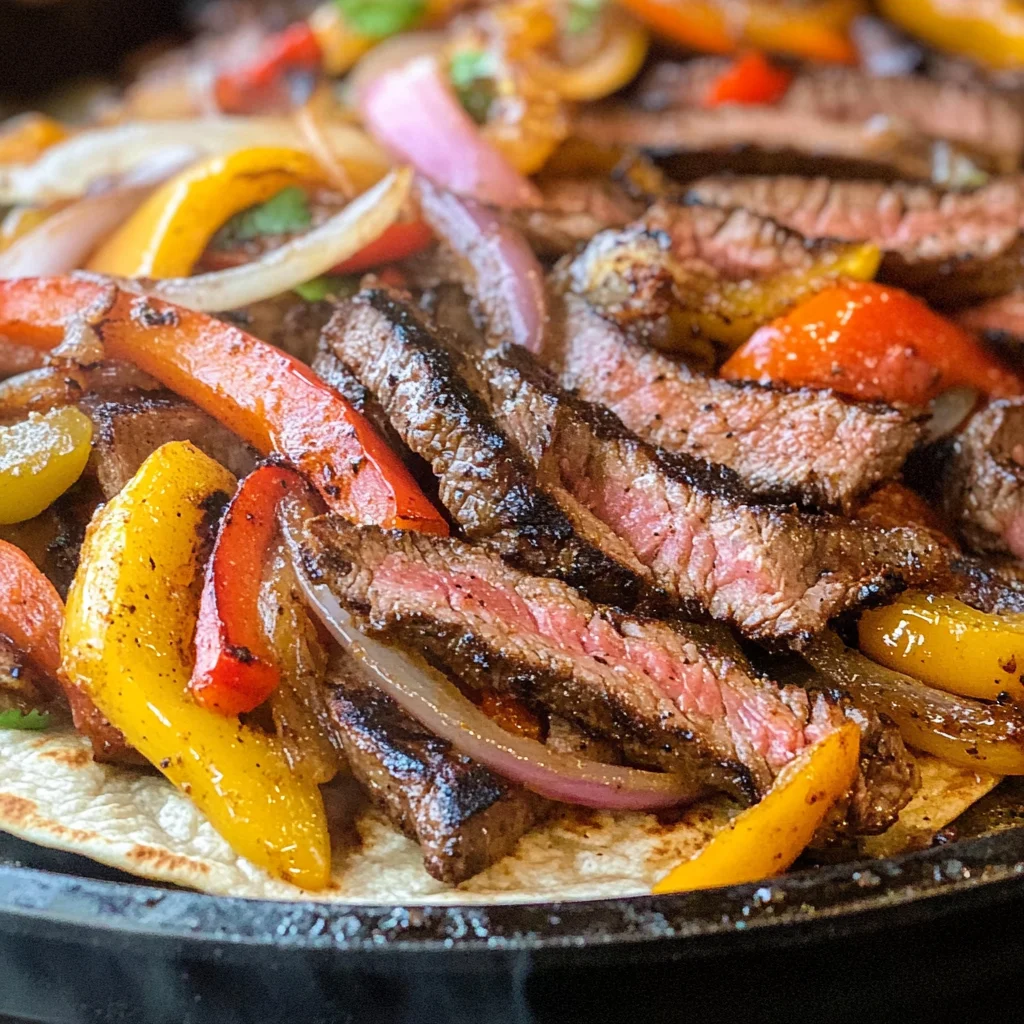
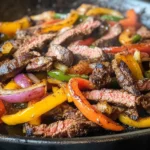
Cooking Your Blackstone Steak Fajitas to Perfection
Step 5: Sizzle and Seer – Bringing Your Ingredients to Life
Now that your Blackstone is preheating beautifully, it’s time to bring the magic of cooking to life. Carefully pour about two tablespoons of vegetable oil onto the hot griddle—this step is crucial! The oil acts as a barrier to prevent sticking and ensures that your ingredients achieve that delightful, charred texture we all crave. You’ll notice the oil shimmering almost like liquid gold, which tells you it’s ready for action. Once you’ve spread the oil evenly across the surface, it’s time to add your marinated steak and colorful vegetables.
As you introduce the steak and veggies onto your griddle, listen closely for that glorious sizzle—it’s music to any home cook’s ears! Spread them out in a single layer to maximize contact with the hot surface; this will help develop those beautiful caramelized edges that contribute a symphony of flavors. Now, resist the urge to stir too early; allow them to sear undisturbed for about 3-4 minutes. This step is paramount because it’s during this time that the Maillard reaction occurs—this is where those deep, rich flavors come from as proteins and sugars interact under high heat. After that initial sear, toss everything together gently using a spatula, ensuring even cooking while still retaining some of that gorgeous char.
Step 6: Aromatic Infusion – Adding Garlic for Depth
As your steak and vegetables continue to cook for another 4-6 minutes, it’s time for an aromatic boost with garlic! Add in the minced garlic during the final few minutes of cooking; this timing is intentional. Garlic cooks quickly and can burn easily if added too soon, turning bitter instead of enhancing your dish beautifully. When you toss in those fragrant cloves, they release an utterly intoxicating aroma that fills the air with warmth and comfort—trust me on this one!
Stir everything together gently but effectively so that each piece gets kissed by that garlicky goodness. At this stage, keep an eye on your steak—you’re looking for a perfect medium doneness, which means a nice pink center without being overly chewy. You should also check the veggies; they should be tender yet crisp, retaining their vibrant colors. Visual cues are key here: think bright greens from bell peppers and soft caramel hues from the onions. If you find things are getting too dark or crispy before they’re done cooking through, don’t hesitate to lower the heat slightly.
Step 7: Warm Embrace – Heating Those Tortillas
While everything is reaching its peak deliciousness on your griddle, it’s time to turn your attention to those lovely tortillas. As you approach the finish line of this culinary journey, warming your tortillas is non-negotiable—they deserve a moment of love! Simply place them on one edge of the griddle during the last minute of cooking and let them warm up for about 30 seconds per side.
It’s important not just for temperature but also for texture; warmed tortillas become pliable and can better cradle all those fantastic fillings without tearing apart when you’re ready to serve. If you’re using flour tortillas—which tend to be softer—you might want a slightly shorter warming time than corn tortillas, which can handle a bit more heat. Just watch them closely; you want them warm but not crispy! When they’re perfectly heated through—glistening ever so slightly—you know they’re ready.
Step 8: Assemble Your Masterpiece
Now comes one of my favorite parts—the assembly! Take a moment to remove everything from the griddle and set it aside on a large platter or individual plates if you’re feeling fancy. This presentation can elevate your meal from simply tasty to completely extraordinary! Grab those warm tortillas and start building your fajitas by placing down generous portions of steak followed by heaps of sautéed peppers and onions.
The textures here are profoundly satisfying—the tender steak against crunchy veggies wrapped in soft tortilla creates an experience that’s simply divine. Don’t forget about garnishing! Consider serving these beauties with fresh toppings like diced avocado or guacamole, zesty lime wedges for spritzing brightness over everything, or even some fresh cilantro if you love that herby kick (though I know it’s not everyone’s cup of tea). It’s all about personal preference here—I promise you will feel like a culinary artist as each plate comes together!
Final Touches: Savor Every Bite
As you prepare to dive into these Blackstone Steak Fajitas, take a moment to appreciate what you’ve created—the vibrant colors on your plate mirror the love poured into every step along the way. Don’t rush through this experience; savor each bite as it dances across your palate—a melody of flavors from smoky spices mingling with juicy steak wrapped in soft tortillas.
Serve immediately while everything is warm—and consider pairing with sides like Mexican-style rice or black beans if you’re feeling particularly inspired! Remember that cooking is about joy; enjoy sharing these creations with friends or family who will appreciate every bite as much as you do. You’ve crafted something truly extraordinary today—a meal filled with love, flavor, and memories waiting to be made around your table.
Serving Suggestions
For an extra special touch or if you’re entertaining guests, consider setting out small bowls filled with various toppings such as sliced jalapeños for heat or shredded lettuce for crunch—this adds an interactive element where everyone customizes their own fajitas just how they like them! And there you have it—my beloved Blackstone Steak Fajitas ready for devouring! Enjoy every moment—you’ve earned it!
Storage and Enjoyment Tips for Your Blackstone Steak Fajitas
Now that you’ve skillfully crafted your Blackstone Steak Fajitas, I can almost hear the sizzle of the grill in the background as you imagine sharing this delicious meal with friends or family! But wait—before you dig in, let’s talk about how to preserve any leftovers (if there are any, because trust me, they’ll be hard to resist!). Proper storage will ensure that every bite remains as flavorful and vibrant as when it first came off the griddle.
Storing Leftover Blackstone Steak Fajitas
If you find yourself with any leftover Blackstone Steak Fajitas (which is a small miracle in itself!), the key to keeping them fresh lies in your choice of container. Opt for an airtight glass or plastic container; this is crucial because it locks in moisture and flavor while preventing unwanted odors from invading your delicious creation. You can expect these delectable fajitas to stay good in the refrigerator for about 3-4 days. My pro tip? Toss in a slice of bread before sealing the container; this little trick will help absorb excess moisture and keep everything nice and tender! When reheated, those succulent strips of steak paired with perfectly sautéed peppers and onions will retain their flavors beautifully. To reheat, simply warm them up on low heat in a skillet or microwave until they’re heated through—this way, you’ll enjoy that same profoundly satisfying experience!
Freezing Components for Later
Now, if you’re looking to extend the life of your Blackstone Steak Fajitas even further, consider freezing them! This is not only a fantastic option but also a game-changer for meal prep enthusiasts. To freeze, simply allow the cooked fajita mixture to cool completely before transferring it into freezer-safe bags or containers. Flatten the bags for easier stacking, and don’t forget to squeeze out as much air as possible to prevent freezer burn—that’s absolutely paramount! You can store them frozen for up to 2-3 months. When you’re ready to use them, just thaw overnight in the fridge and then reheat on your stovetop or griddle until warmed through. Imagine having a quick, mouthwatering weeknight dinner at your fingertips without any hassle; it’s convenience at its finest!
Blackstone Steak Fajitas
Experience mouthwatering Blackstone Steak Fajitas bursting with flavor! Discover how to make them at home and enjoy every delightful bite.
- Prep Time: 15 minutes
- Cook Time: 15 minutes
- Total Time: 30 minutes
- Yield: Serves approximately 4 people 1x
- Category: Dinner
- Method: Grilling
- Cuisine: Mexican
Ingredients
- 1 ½ pounds flank steak (or steak of your choice)
- 2 tablespoons olive oil (divided)
- 1 red bell pepper (sliced)
- 1 yellow bell pepper (sliced)
- 1 red onion (sliced)
- 3 cloves garlic (minced)
- 2 tablespoons vegetable oil (for grilling)
- Tortillas (flour or corn, for serving)
- 1 teaspoon chili powder
- 1 teaspoon cumin
- ½ teaspoon smoked paprika
- ½ teaspoon kosher salt
- ¼ teaspoon ground black pepper
Instructions
- In a small bowl, mix chili powder, cumin, smoked paprika, kosher salt, and black pepper.
- Slice the flank steak against the grain into thin strips and marinate with 1 tablespoon olive oil and half of the spice mix.
- In another bowl, combine sliced bell peppers and onion with remaining olive oil and spice mix.
- Preheat your Blackstone griddle over medium-high heat for about 5 minutes; add vegetable oil once hot.
- Spread marinated steak and vegetables in a single layer on the griddle. Sear undisturbed for 3-4 minutes.
- Stir gently and cook for an additional 4-6 minutes until cooked through; add minced garlic during the last few minutes.
- Warm tortillas on the griddle briefly before assembling fajitas with beef and veggies.
Nutrition
- Serving Size: 2 fajitas (approximately 300g total)
- Calories: 540
- Sugar: 4g
- Sodium: 800mg
- Fat: 27g
- Saturated Fat: 6g
- Unsaturated Fat: 18g
- Trans Fat: 0g
- Carbohydrates: 45g
- Fiber: 5g
- Protein: 40g
- Cholesterol: 95mg