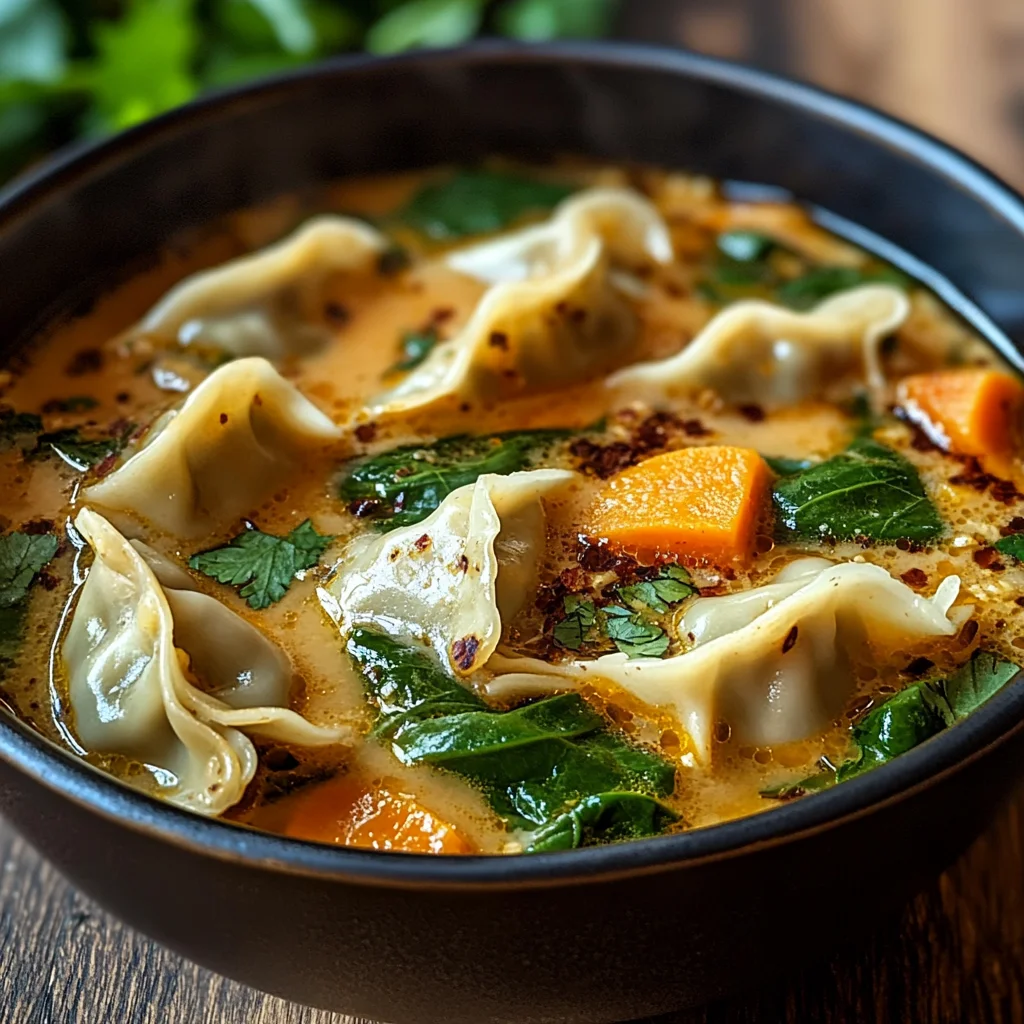
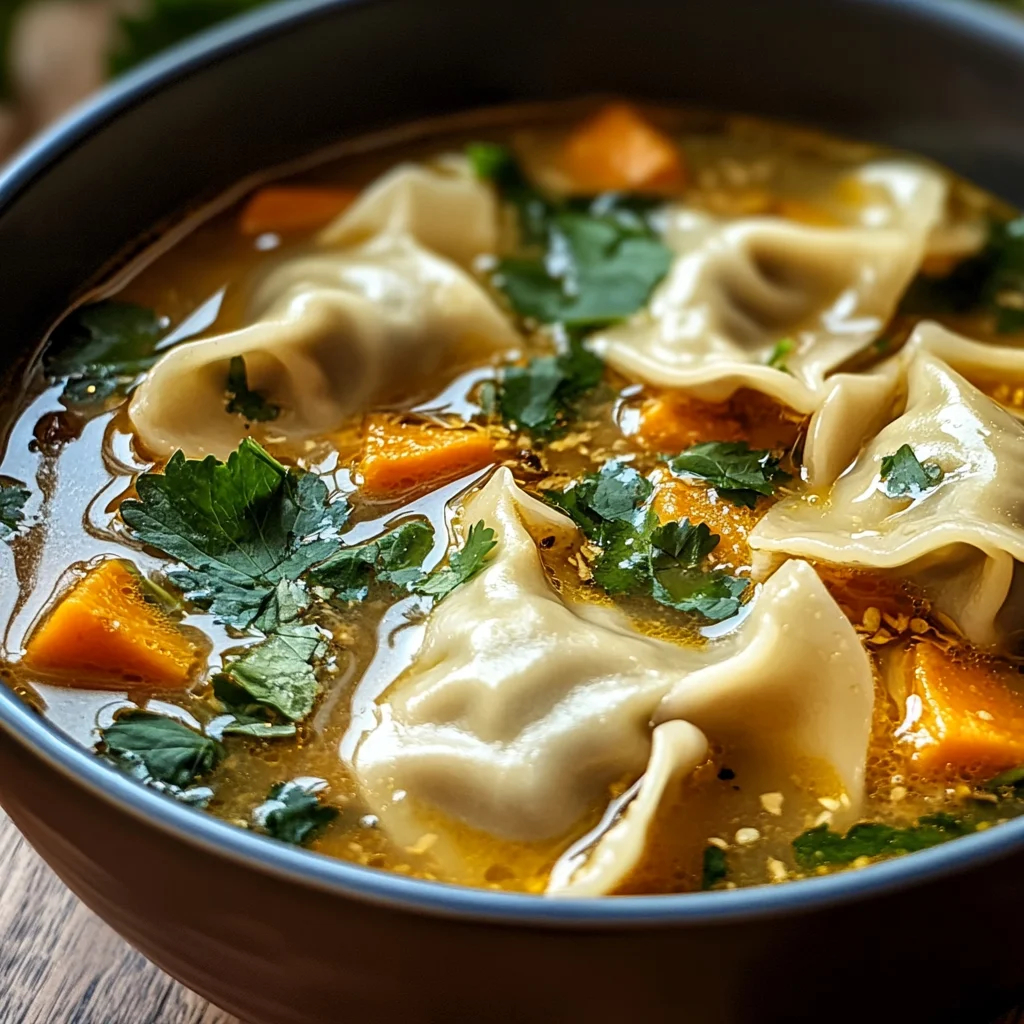
Thai Potsticker Soup
There’s something profoundly comforting about a warm bowl of soup, especially when that soup is infused with the vibrant flavors of Thai cuisine. This isn’t just any soup; this is a Thai Potsticker Soup that wraps you in a cozy embrace, inviting you to savor each spoonful as if it were a cherished memory from your childhood kitchen. Imagine creamy coconut milk swirling around a medley of colorful vegetables, fragrant garlic and onion teasing your senses, and delightful potstickers adding a satisfying bite that makes this dish truly extraordinary. This recipe is more than just nourishment; it’s an experience—a celebration of flavors that transports you straight to the bustling streets of Thailand with every sip.
Now, let me tell you why this Thai Potsticker Soup has earned such a special place in my heart. Growing up, I was always captivated by the balance of flavors in Thai cooking—the perfect marriage of spice, sweetness, and acidity that dances on your palate like no other cuisine can. Whenever I needed comfort after a long day or wanted to impress friends at dinner parties, this was my go-to dish. The contrast between the tender potstickers and the vibrant broth creates a symphony of textures that feels like a warm hug in a bowl. It’s perfect for cozy weeknights or spontaneous gatherings because it comes together so effortlessly without compromising on flavor.
Thai Potsticker Soup: A Warm Embrace in Every Bowl
This recipe for Thai Potsticker Soup is perfect for those chilly evenings when all you want is something hearty and fulfilling. It’s quick to prepare but feels indulgent enough to serve on special occasions. With creamy coconut curry flavors paired with fresh spinach and beautifully seasoned potstickers, every bowl promises warmth and satisfaction. So roll up your sleeves, grab your favorite apron, and let’s dive into this delightful culinary adventure!
Ingredients:
As we embark on this delicious journey together, let’s take a moment to appreciate each ingredient that plays an essential role in crafting our Thai Potsticker Soup. Each one brings unique qualities to the dish, creating layers of flavor and texture that elevate our meal from simple to spectacular.
- 2 tablespoons olive oil: Olive oil serves as the foundation for building flavor in our soup. It’s not just about cooking; it’s about creating depth right from the start! When heated, it releases its rich aroma and helps sauté our vegetables perfectly without burning them. If you’re looking for an alternative, avocado oil can also bring in that buttery richness without overpowering the other ingredients.
- 2 cloves garlic, minced: Ah, garlic—the fragrant superstar of so many dishes! Minced garlic infuses our broth with its pungent essence while mellowing beautifully as it cooks. There’s something utterly intoxicating about the scent of garlic sizzling away in oil; it signals the beginning of something wonderful! For those who enjoy milder flavors, feel free to reduce the amount or use roasted garlic for a sweeter touch.
- 1 onion, diced: Onions are another key player here—when they caramelize slightly during sautéing, they develop sweetness that balances out the richness of coconut milk later on. Diced onions should be cooked until they’re translucent and soft but not browned; this way we ensure they contribute their natural sugars without becoming bitter.
- 1 red bell pepper, diced: Bright and sweet red bell peppers add both color and crunch to our soup. They’re also packed with vitamins and antioxidants! Look for peppers with shiny skin—this indicates freshness—and feel free to swap them out for yellow or orange varieties if that’s what you have on hand!
- 1 sweet potato, scrubbed and chopped into bite-sized chunks: Sweet potatoes introduce a lovely creaminess to our broth while offering natural sweetness that complements the savory elements beautifully. They cook down into tender bites that are oh-so-satisfying! When choosing sweet potatoes, look for firm ones without any soft spots; these will yield better texture once cooked.
- 2 tablespoons red curry paste: This is where we really start bringing the magic! Red curry paste adds warmth and complexity to our soup with its blend of spices like lemongrass and galangal—it’s truly essential for creating an authentic flavor profile. Don’t skimp here; it’s what makes this dish sing! If you’re sensitive to spice levels, feel free to adjust according to taste.
- 1 (14-ounce) can unsweetened coconut milk: Coconut milk is liquid gold in this recipe—it adds creaminess while balancing out heat from the curry paste with its luscious texture. Be sure to choose unsweetened coconut milk so we maintain control over the overall flavor profile without unwanted sweetness.
- 4 cups vegetable stock: A well-seasoned vegetable stock serves as our soup’s base—it’s where all those delicious flavors meld together beautifully! Homemade stock can elevate this dish even further if you have some on hand; otherwise store-bought works just fine too! For extra depth, look for low-sodium options so you can control salt levels effectively.
- 1 (13-ounce) package potstickers (vegetarian or meat-filled): These delightful dumplings are the star attraction in our soup! Whether vegetarian or meat-filled, they soak up all those fantastic flavors while providing chewy bites that contrast wonderfully with tender veggies. Make sure they’re fully cooked according to package instructions before adding them into the mix!
- 2 heaping cups fresh spinach: Fresh spinach not only brightens up our soup visually but also adds vital nutrients! Tossing it in at the end wilts it just enough while keeping some texture intact—trust me when I say it’s essential for balance!
- Juice of 1 lime: A squeeze of lime juice at the end brightens everything up remarkably—it cuts through richness nicely while providing a refreshing zing! Choose limes that feel heavy for their size; they’ll be juicier!
- Fresh cilantro, for garnish: Finally—a sprinkle of fresh cilantro takes this dish over-the-top! Its herbal notes elevate everything else going on in your bowl—always add it right before serving so it retains its vibrant color and fragrance.
Equipment You’ll Need:
Now that we’ve gathered all our ingredients—each one more important than the last—let’s talk about tools! Having the right equipment not only makes cooking easier but also enhances your overall experience in the kitchen. Trust me; when everything runs smoothly because you have what you need at hand? It’s pure joy!
- Large stockpot or Dutch oven – This sturdy vessel is perfect for simmering soups since it distributes heat evenly across its base. A Dutch oven retains heat exceptionally well which helps develop those rich flavors as everything cooks down together.
- Wooden spoon or spatula – A good wooden spoon is essential for stirring up all those delicious ingredients without scratching your cookware’s surface! It allows you gentle control over how much mixing occurs—you want things combined while avoiding mushiness!
- Sharp knife & cutting board – Having sharp knives makes prep work safer and more efficient; there’s nothing worse than struggling through tough vegetables with dull blades! A sturdy cutting board provides stability while chopping away—it’s worth investing time into selecting quality tools here!
Now we’re set up beautifully to begin making our Thai Potsticker Soup; every component carefully chosen contributes toward crafting something genuinely special today…
Step 1: Sautéing Aromatics – Building Flavor From The Ground Up
Let’s kick things off by heating two tablespoons of olive oil in your large stockpot over medium-high heat until shimmering invitingly—this process sets us up perfectly for developing layers upon layers of flavor right from square one! As soon as your oil shimmers gently (but doesn’t smoke!), toss in minced garlic followed closely by diced onions along with red bell pepper chunks along with sweet potato pieces too—give them room so they can breathe during cooking rather than overcrowding which may lead towards steaming instead sautéing!
This step is crucial because we’re looking to extract every bit possible outta those aromatics—garlic should become fragrant within just thirty seconds while onions turn translucent after three minutes indicating they’ve softened nicely allowing natural sugars to emerge bringing sweetness forward against spiciness later introduced through red curry paste added shortly after—all these components work harmoniously towards creating depth within broth itself…
Step 2: Infusing Flavors – The Symphony Begins
Once you’ve had fun stirring until everything’s softened nicely (about four minutes total), it’s time we stir-in two tablespoons worth red curry paste into mixture allowing two minutes pass by letting aroma rise high filling air around us… Trust me—you’ll want everyone nearby joining-in drooling uncontrollably over scents wafting around kitchen now!
By incorporating curry paste at this stage rather than later ensures maximum exposure allowing spices bloom fully releasing volatile oils trapped inside each jar ensuring no morsel escapes unscathed during simmering period ahead… Once fragrant enough (you’ll know!), whisk-in fourteen ounces worth unsweetened coconut milk along four cups vegetable stock ensuring seamless incorporation transforming mixture into silky broth ready carry us onward toward heartier additions ahead…
Step 3: Introducing Heartiness – Cooking Potstickers
With aromatic base established firmly beneath us now—we bring forth package filled with potstickers directly taking care ensure they sit comfortably within bubbling cauldron awaiting fate ahead… Bringing entire concoction back up-to-boil initially then reducing heat low enough create gentle simmer allows steam envelop dumplings causing them plump-up beautifully whilst absorbing rich broth surrounding them ensuring maximum taste achieved throughout every bite!
Cooking time varies depending upon type selected usually ranges anywhere between six-eight minutes—but keep close watch lest they overcook turning soggy instead firm yet yielding… You want texture maintained throughout entire cooking period avoid rushing through step skipping would yield disappointing results later down line trust me here…
Step 4: Finishing Touches – Adding Spinach & Brightness
At long last we’re nearing finish line folks—with potstickers cooked perfectly nestled amongst tender veggies bathing luxuriantly within golden-hued broth—we stir-in two heaping cups freshly washed spinach leaving mere moments elapsing witnessing transformation occur right before eyes… Those bright green leaves wilt quickly under heat releasing nutritional gems into surrounding area elevating overall profile dramatically yet maintaining crispness throughout ensuring mouthfeel remains remarkable even till last drop consumed…
Finally squeezing juice extracted from freshly cut lime atop everything brings balance forward cutting richness striking harmony across palette delivering delightful zing alongside garnish sprinkled generously atop cilantro leaves completing visual appeal alongside aromatic qualities emanating forth enticing everyone present whether family friends neighbors whoever stopping-by…
And there you have it—a bowl full captivating goodness ready warm hearts satisfy cravings alike every single evening when loved ones gather ‘round table sharing stories laughter memories made passionately indulging together amidst delicious fare served lovingly crafted hands-on… Enjoy every moment dear friends—I promise you won’t regret diving headfirst into adventure laid-out before us today!
Step 5: Cooking the Potstickers – The Heart of Your Soup
Now it’s time to introduce the stars of this culinary show—the potstickers! Once your aromatic broth is bubbling away, and the flavors are dancing together in perfect harmony, gently add the potstickers right into your pot. You’ll want to check the packaging to see how many you have; typically, a 13-ounce package offers a delightful assortment. I love using vegetarian potstickers, but if you have meat-filled ones that suit your taste, feel free to use those! The key here is to bring the entire mixture back to a gentle boil and then reduce the heat to let everything simmer together. This simmering process is absolutely paramount, as it allows the potstickers to cook through while soaking up every bit of that rich coconut curry flavor. Trust me on this—the moment you pierce one of those potstickers later and unveil its steamy goodness will be utterly intoxicating!
As you let everything simmer for about 6–8 minutes, keep an eye on the soup’s consistency; it should begin to thicken slightly as those wonderful flavors meld together. Visual cues are important here; look for bubbles gently rising and breaking at the surface while also ensuring that the potstickers are cooked through. If they float to the top, that’s generally a good sign they’re almost done! Remember not to rush this step; allowing those flavors to deepen is what makes this soup so profoundly satisfying.
Step 6: Adding Spinach and Lime – Brightening Your Bowl
With your potstickers now perfectly cooked and nestled in that creamy broth, it’s time for one last flourish—introducing fresh spinach and a splash of bright lime juice. Gently fold in two heaping cups of fresh spinach right into your simmering soup. As you do this, you’ll notice the vibrant green leaves wilting gracefully into the warm liquid, transforming your bowl into a feast for not just your palate but also your eyes! This step is crucial because spinach adds a delightful earthiness and a pop of color that complements all those rich flavors beautifully.
Now comes the zesty twist—squeeze in the juice of one lime! This addition does wonders; it cuts through the richness of the coconut milk and provides an uplifting brightness that harmonizes with those deep curry notes. As you stir everything together, take a moment to inhale deeply—you’ll be greeted with an exhilarating aroma that is simply irresistible. Allow this mixture to cook for another 1–2 minutes just until your spinach is wilted but still vibrant green; overcooking can lead to a sad, wilted pile of greens that lacks life. The contrast between creamy soup and fresh greens is what makes each spoonful such an extraordinary experience.
Step 7: Garnishing with Love – Elevating Your Creation
Now we arrive at one of my favorite moments—the finishing touch! Ladle that gorgeous Thai Potsticker Soup into bowls, making sure each serving gets its fair share of glorious potstickers and tender vegetables. But hold on—before diving in headfirst (and I know how tempting it can be!), you must garnish with fresh cilantro! This simple yet impactful step elevates your dish from everyday comfort food to something truly special.
Sprinkle a handful of chopped cilantro over each bowl; its fragrant aroma will waft up invitingly as you serve. Cilantro not only adds a burst of freshness but also enhances all those rich flavors you’ve worked so hard to create. I promise you, that final touch transforms each bite into a symphony of flavors that dance joyfully across your palate! Take care not to skip this step—it’s non-negotiable if you want your soup to shine bright in both taste and presentation.
Step 8: Serving Up Comfort – Enjoying Every Last Drop!
Finally, it’s time for everyone’s favorite part—digging in! Serve your Thai Potsticker Soup immediately while it’s still steaming hot and fragrant. The warmth radiates from each bowl like a comforting hug on a chilly evening; there’s something deeply satisfying about savoring every spoonful as it warms both body and soul. Encourage your friends or family members to take their time tasting all those complex layers you’ve created—the creaminess from coconut milk mingles with spicy curry undertones while those tender vegetables provide lovely bites throughout.
Before you serve up seconds (because trust me, you’ll want them), take a moment to appreciate what you’ve created—a nourishing meal that’s quick enough for weeknight dinners yet comforting enough for cozy gatherings around the table. And don’t forget—this soup keeps well in the refrigerator for about three days if there are any leftovers (which is rare at my house!). Just reheat gently on low heat when you’re ready for round two; remember, slow heating helps maintain all those beautiful textures without turning them mushy.
So gather everyone around and watch their faces light up with joy as they enjoy this incredible Thai Potsticker Soup—comfort food redefined! Each bite promises warmth and happiness, making it an unforgettable addition to your culinary repertoire. Now go ahead—enjoy every last drop!
Storage and Enjoyment Tips for Your Thai Potsticker Soup
Now that you’ve created this comforting bowl of Thai Potsticker Soup, it’s time to relish every delightful spoonful! But what happens when you find yourself with leftovers? Fear not, my friend, because this soup is not only delicious when freshly made, but it also shines in its ability to be stored and enjoyed later. Let’s dive into how to preserve this flavorful concoction and keep those taste buds dancing long after dinner is over!
Storing Leftover Thai Potsticker Soup
When it comes to storing your Thai Potsticker Soup, the best approach is to use an airtight container. This will keep the essence of the soup intact, protecting it from any unwanted odors in your fridge. If you’ve got a glass container handy, that’s a fantastic choice since it won’t absorb any flavors or smells and can go straight from the fridge to the microwave. You can store your soup for about 3-4 days, which is perfect for those busy weeknights when you need a quick meal ready to go. To maintain peak freshness, consider placing a slice of bread in the container; it absorbs excess moisture that could lead to soggy potstickers. And trust me—the flavor only gets better as the ingredients meld together! When you’re ready to indulge again, simply reheat on the stove or pop it in the microwave until steaming hot, and enjoy a taste of comfort that feels just as good as the first time around.
Freezing for Later
If you want to take things a step further, freezing your Thai Potsticker Soup is an incredibly convenient option! To do this properly, let the soup cool completely before transferring it into freezer-safe bags or containers—this helps prevent ice crystals from forming. Make sure to leave a little space at the top of containers since liquids expand when frozen. Your delightful soup will stay fresh in the freezer for up to 2-3 months, making it an excellent option for meal prep or unexpected cravings down the line. Whenever you’re ready for another delicious bowl of warmth, simply thaw in the refrigerator overnight and reheat gently on low heat. The beauty of freezing this soup lies in its ability to bring joy and comfort back into your life with minimal effort on your end—what could be more wonderful than having a homemade meal waiting for you?
Thai Potsticker Soup
Warm, inviting, and bursting with flavor, Thai Potsticker Soup is the ultimate comfort food that promises to wrap you in a cozy embrace. This delightful dish combines creamy coconut milk with vibrant vegetables and tender potstickers, creating a harmonious blend of textures and tastes that will transport you straight to the heart of Thailand. Perfect for chilly evenings or casual gatherings, this easy-to-make soup not only nourishes the body but also warms the soul. With a rich coconut curry broth and fresh ingredients, every spoonful is an experience to savor. Gather your loved ones around the table and enjoy this delicious soup that’s sure to become a favorite!
- Prep Time: 15 minutes
- Cook Time: 25 minutes
- Total Time: 40 minutes
- Yield: Serves 4
- Category: Dinner
- Method: Simmering
- Cuisine: Thai
Ingredients
- 2 tablespoons olive oil
- 2 cloves garlic, minced
- 1 onion, diced
- 1 red bell pepper, diced
- 1 sweet potato, scrubbed and chopped into bite-sized chunks
- 2 tablespoons red curry paste
- 1 (14-ounce) can unsweetened coconut milk
- 4 cups vegetable stock
- 1 (13-ounce) package potstickers (vegetarian or meat-filled)
- 2 heaping cups fresh spinach
- Juice of 1 lime
- Fresh cilantro, for garnish
Instructions
- In a large stockpot, heat olive oil over medium-high heat. Add minced garlic, diced onion, red bell pepper, and sweet potato. Sauté until fragrant and softened.
- Stir in red curry paste and cook for 2 minutes until aromatic.
- Add unsweetened coconut milk and vegetable stock; bring to a gentle boil.
- Add potstickers and simmer for 6–8 minutes until cooked through.
- Fold in fresh spinach and lime juice; cook for an additional 1–2 minutes until spinach is wilted.
- Garnish with fresh cilantro before serving.
Nutrition
- Serving Size: 1 serving
- Calories: 380
- Sugar: 6g
- Sodium: 720mg
- Fat: 20g
- Saturated Fat: 9g
- Unsaturated Fat: 11g
- Trans Fat: 0g
- Carbohydrates: 40g
- Fiber: 7g
- Protein: 10g
- Cholesterol: 0mg