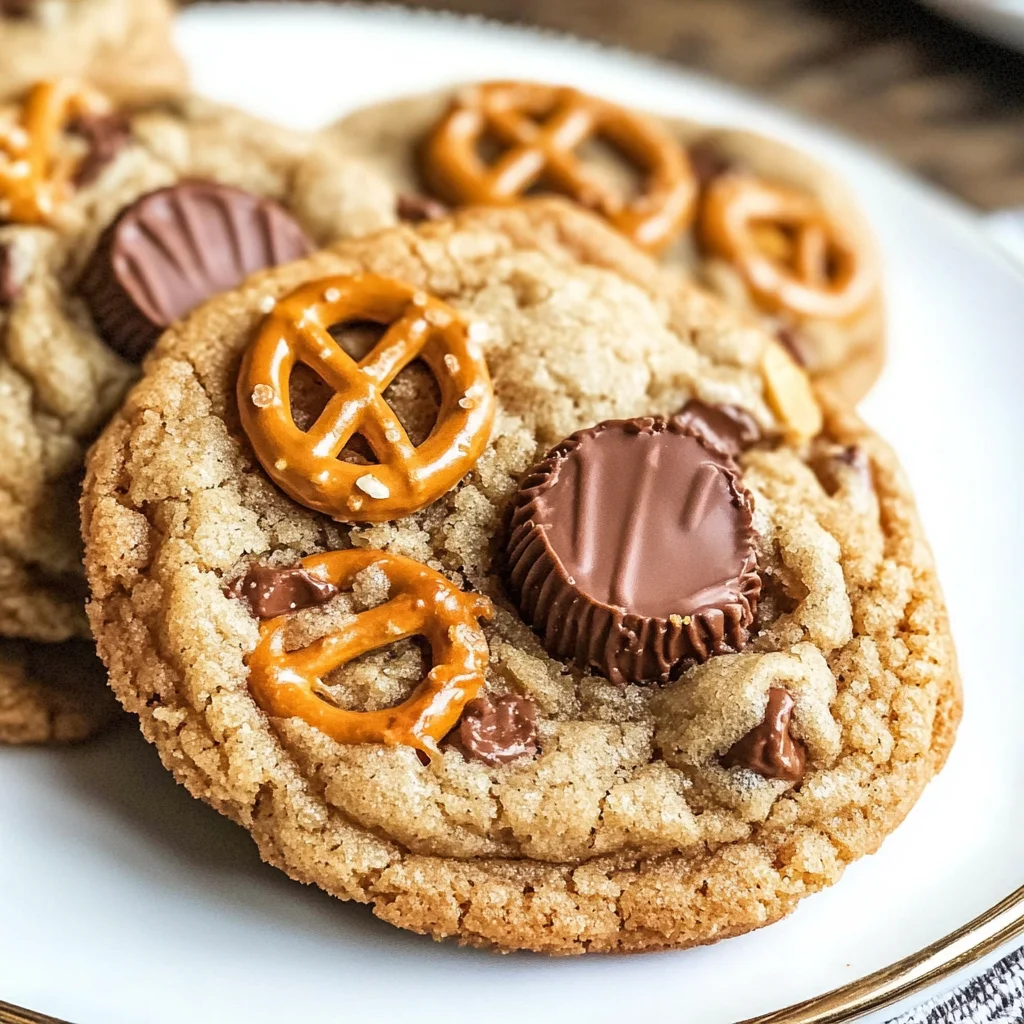
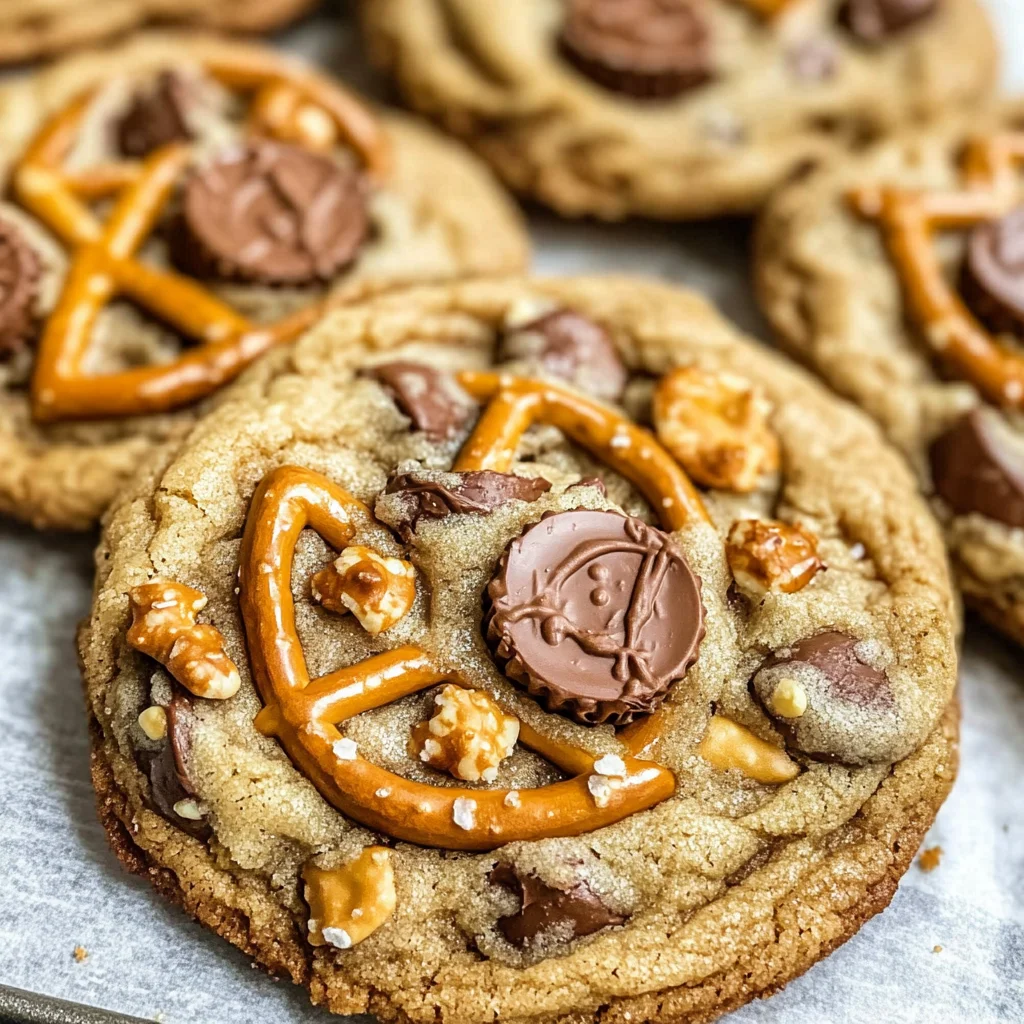
Peanut Butter Cup Cookies with Pretzels
The aroma of freshly baked cookies wafting through the kitchen is one of life’s most comforting experiences, wouldn’t you agree? When I think about baking these Peanut Butter Cup Cookies with Pretzels, I can almost feel the warmth of the oven enveloping me, a gentle reminder that something magical is about to happen. This recipe is more than just a delightful treat; it’s a beautiful symphony of flavors that playfully dances between sweet and salty. Imagine biting into a cookie that offers a soft, chewy texture, punctuated by tiny bursts of chocolate and crunchy bits of pretzel. It’s an experience that transcends mere sustenance—it’s pure joy in cookie form.
You see, every time I whip up these cookies, I’m reminded of family gatherings where laughter and stories intertwine over shared plates. They have this wonderful knack for bringing people together—whether it’s kids clamoring for another taste or adults reminiscing about their own childhood baking adventures. The combination of creamy peanut butter and crunchy pretzels creates an irresistible contrast that makes these cookies unforgettable. Trust me when I say, once you try this warm batch right out of the oven, you’ll be hooked! Let’s dive into this recipe that promises not just deliciousness but also the creation of cherished memories.
Peanut Butter Cup Cookies with Pretzels: A Sweet Symphony of Flavors
In my kitchen, this recipe has become a staple—a testament to how simple ingredients can come together to create something truly extraordinary. The beauty lies in its simplicity and the way each element harmonizes beautifully. With just a handful of pantry staples and a bit of love, you can whip up cookies that are destined to be crowd-pleasers!
Ingredients:
As we embark on this delicious culinary journey, let’s explore the ingredients that make these Peanut Butter Cup Cookies with Pretzels so special. Each element plays a crucial role in crafting the final masterpiece.
- 1 1/4 Cup All Purpose Flour – This is the foundation upon which our cookies are built. All-purpose flour provides just the right balance of structure and tenderness. It absorbs moisture perfectly while allowing the cookies to rise appropriately without becoming too dense or heavy. If you’re looking for alternatives due to dietary restrictions or preferences, you can experiment with gluten-free flour blends, but do keep in mind that they may alter texture slightly.
- 1/4 Tsp Sea Salt – Salt might seem like an afterthought in sweet recipes, but it’s absolutely paramount here! A pinch of sea salt enhances all those lovely flavors in the cookies—sweetness from sugars and richness from peanut butter—while also balancing them out beautifully. The subtle crunch from larger grains adds an additional layer of texture that’s just delightful.
- 1 Tsp Baking Soda – This little powerhouse is what gives our cookies their lift! Baking soda reacts with acidic components in our ingredients (like brown sugar) to produce carbon dioxide bubbles which cause our dough to rise during baking. It’s essential for achieving those wonderfully chewy edges while keeping the centers soft and gooey.
- 1/2 Cup Unsalted Butter (Melted) – There’s nothing quite like melted butter—it brings richness and depth to baked goods that simply can’t be matched! It also helps create that perfect chewy texture we all crave in cookies. Using unsalted butter allows you to control the salt content in your recipe precisely; if using salted butter instead, just omit any extra salt from your mix.
- 2/3 Cup Brown Sugar – The deep caramel notes from brown sugar add moisture and flavor complexity to our cookies. Its hygroscopic nature ensures our cookies remain soft even days after baking! You can substitute it with coconut sugar if you’re looking for a refined sugar alternative; however, the flavor profile will slightly change.
- 2 Tbsp Granulated White Sugar – While brown sugar is fantastic for moisture and richness, granulated sugar contributes sweetness and helps create crispy edges as it caramelizes during baking. It’s like having two best friends—each one bringing their strengths to make something truly special!
- 1 Egg – Eggs are essential not only for binding our ingredients together but also for adding moisture and fat which contribute to texture. They help create that luscious chewiness we all adore! If you’re egg-free or looking for alternatives due to allergies, consider using flaxseed meal mixed with water as a great binding agent.
- 1 1/2 Tsp Vanilla Extract – Ahh, vanilla—the secret weapon in many desserts! This liquid gold infuses our cookie dough with warmth and aromatic sweetness. Always opt for pure vanilla extract when possible; imitation vanilla lacks the depth and complexity needed to elevate your cookies.
- 1/3 Cup Peanut Butter – The star ingredient! Creamy peanut butter adds nutty flavor along with rich fats that enhance both taste and texture. For a fun twist, try using crunchy peanut butter for added texture or almond butter if you’re feeling adventurous!
- 1/2 Cup Mini Peanut Butter Cups – These little gems take our cookies over the top! Melting slightly during baking creates pockets of gooey goodness that pair perfectly with the cookie base. You could substitute them with chocolate chips if you’re unable to find mini peanut butter cups—but trust me on this one; they are worth seeking out!
- 1/2 Cup Pretzels (Roughly Chopped) – Here comes our delightful surprise element—the pretzels! Their salty crunch provides a wonderful contrast against the sweet cookie dough while adding an exciting textural component that’s utterly intoxicating!
- 1/4 Cup Mini Chocolate Chips (Semi-Sweet or Milk/Dark Chocolate) – Lastly, who could resist adding chocolate? These mini morsels melt beautifully into each bite while enhancing both sweetness and decadence without overwhelming other flavors involved.
Equipment You’ll Need:
Now let’s talk about some essential tools you’ll want on hand before diving into this delightful baking adventure! Having the right equipment makes all the difference between good cookies and extraordinary ones.
- Mixing Bowls – You’ll need at least two good-sized mixing bowls: one for your dry ingredients and another for your wet ingredients. Opt for sturdy glass or stainless steel bowls as they provide durability against heat while ensuring thorough mixing without any worries about scratching surfaces.
- Whisk & Wooden Spoon – A whisk will help combine your dry ingredients efficiently while aerating them at the same time—a vital step in achieving fluffy cookies! Use a wooden spoon when combining wet ingredients into dry; it gives you greater control over mixing without overworking your dough.
- Measuring Cups & Spoons – Precision matters when baking, so invest in quality measuring cups and spoons! Accurate measurements ensure consistent results every time—a non-negotiable aspect if you want magical outcomes from your Peanut Butter Cup Cookies with Pretzels.
- Parchment Paper or Silicone Baking Mat – Line your cookie sheets with parchment paper or use silicone mats—both provide non-stick surfaces making cleanup easier while preventing any unwanted sticking during baking!
- Cookie Sheet/Baking Tray – A sturdy cookie sheet is essential here—not too thin nor flimsy—to ensure even heat distribution throughout each batch preventing burnt bottoms yet perfectly baked tops!
With these tools ready at hand alongside those fantastic ingredients we’ve gathered together already… let’s jump right into preparing those scrumptious Peanut Butter Cup Cookies with Pretzels!
Step 1: Whisking Together Dry Ingredients
First things first—we need to bring together all those dry elements which will serve as our building blocks later on! In a large bowl (preferably one made from glass), combine your all-purpose flour, baking soda, and sea salt using either a whisk or fork until evenly distributed throughout—this step is crucial as it prevents any clumps forming within your dough later down line causing uneven textures post-baking! Take care not rush through this process—properly aerating flour allows air pockets develop leading towards lighter fluffier results hence creating irresistibly chewy bites once those cookies come out golden brown from oven!
Step 2: Mixing Wet Ingredients
In another mixing bowl (this time let’s go big!), pour in melted unsalted butter along with both sugars—the brown sugar should almost dissolve into buttery goodness creating what we call ‘creaming’ effect here allowing air bubbles form resulting airy textures afterwards whilst simultaneously adding rich flavor profiles too thanks oh-so-lovely molasses present inside each grain itself! Stir until well combined before introducing egg along side vanilla extract; continue whisking until everything melds beautifully together—it should feel smooth silky almost like liquid gold cascading down sides bowl effortlessly!
Step 3: Bringing It All Together
Now comes where magic truly happens—as we gently fold dry mixture into wet blend gradually incorporating flour little by little ensuring no lumps remain behind whilst avoiding overmixing which could lead toughened outcomes instead delicate heavenly bites we desire ultimately end up savoring later on! Once all flour disappears without trace left behind—that’s when we begin folding in mini peanut butter cups alongside chopped pretzels plus chocolate chips—this stage allows flavors intermingle thoroughly giving rise extraordinary concoction ready hit oven shortly thereafter!
Step 4: Chill Out Time
Here’s where patience pays off big time; cover up bowl tightly wrap plastic film around top allowing dough chill refrigerator ideally around hour although if pressed time could skip entirely though don’t underestimate importance resting period brings forth richer developed flavor profiles plus enhanced chewiness overall texture achieved post-baking through slight refrigeration processes occurring naturally within colder environment provided fridge offers us—it would make all difference come crunch time later!
And there we have it—a delightful journey thus far filled full impressive milestones already reached towards crafting delectable Peanut Butter Cup Cookies With Pretzels ahead… stay tuned as next step involves rolling shaping portions onto lined sheets creating masterpieces await final moments transformation happening inside oven itself before indulging mouthwatering treats coming soon enough right around corner!
Step 5: Chilling the Dough for Cookie Perfection
Now that we have our glorious dough mixed to perfection, it’s time to take a moment and show it some love—by chilling it. This step might seem a bit tedious, but I promise you, it’s absolutely paramount to achieving that ideal cookie texture that will leave everyone raving about your Peanut Butter Cup Cookies with Pretzels. When you chill the dough for at least an hour, you’re allowing the fats in the melted butter and peanut butter to solidify slightly. This means when you bake them, they won’t spread too much, resulting in chewy centers and perfectly crisp edges. Picture biting into a cookie where the outside is beautifully golden and the inside is a warm, gooey haven of chocolate and peanut butter bliss—trust me, this patience pays off!
As you cover your bowl with plastic wrap or a clean kitchen towel, feel free to imagine all the delightful moments these cookies will create when they’re finally ready! Don’t rush this step; if you can manage an extra hour or two in the fridge, do it! The longer chilling time enhances the flavors as well. Just think about all those exquisite layers of flavor melding together—the brown sugar deepening its caramel notes while the salt from the pretzels becomes even more pronounced against the sweetness of those mini peanut butter cups. It’s like letting a fine wine breathe—totally worth it!
Step 6: Preheating Your Oven: The Heart of Baking
While your cookie dough is enjoying its rest in the refrigerator, let’s get your oven preheated to a cozy 350°F (175°C). This temperature is like a warm hug for your cookies; it ensures they bake evenly and develop that irresistible texture we’re after. Preheating is crucial because it allows for an even heat distribution throughout your oven, which is essential for baking success. If you toss those cookies into an unheated oven, they might spread unevenly or end up overbaked on the edges while remaining raw in the center—yikes!
After about 10-15 minutes of preheating, your kitchen will begin to smell heavenly as that warmth envelops everything within. You can almost taste the anticipation in the air! While waiting for this magical moment, consider preparing your baking sheet by lining it with parchment paper or giving it a light spritz of cooking spray—this will keep those scrumptious cookies from sticking and help them maintain their perfect shape once baked.
Step 7: Scooping That Delicious Dough
With our dough now chilled and our oven preheated, we’re ready for one of my favorite parts—scooping out those delightful cookie mounds! Using a tablespoon or a medium-sized cookie scoop (about 2 tablespoons worth), gently portion out your dough onto your prepared cookie sheet. You’ll want to place them in three rows while ensuring there are at least 2 inches between each mound. Why the space? Oh dear friend, this is where magic happens! As they bake, these beauties will expand beautifully into soft and chewy cookies that are nothing short of extraordinary.
If you’re feeling particularly adventurous (and I know you are!), add a few extra chopped pretzels and mini peanut butter cups on top before sliding them into the oven. This little touch not only elevates their visual appeal but also gives each bite that tantalizing crunch and burst of peanut buttery goodness. Just imagine pulling these cookies out of the oven—golden-brown tops adorned with glistening chocolate chips peeking through—a feast for both the eyes and palate!
Step 8: Baking Your Perfect Peanut Butter Cup Cookies with Pretzels
Now comes perhaps one of the most thrilling moments in baking—watching your Peanut Butter Cup Cookies with Pretzels transform into golden delights in the oven! Place your cookie sheet on the center rack and set a timer for 8-10 minutes. As they bake, keep an eye on them; you want to see just how they puff up ever so slightly before settling down into their final form. The aroma wafting through your kitchen will be utterly intoxicating; it’s like a warm embrace that invites everyone nearby to gather around.
Here’s where knowing your oven comes into play—some ovens may run hotter or cooler than others. So keep an eye on those cookies as they approach that golden mark; you’re looking for edges that are firm yet still soft in the middle when touched lightly. Remember not to overbake; taking them out too late can lead to dry cookies instead of chewy ones filled with that delightful melt-in-your-mouth experience we crave! Allow them to cool on the pan for about 10 minutes after pulling them from the oven—this resting time lets them set up wonderfully before transferring them onto a cooling rack.
Conclusion:
As we wrap up this delightful journey through making Peanut Butter Cup Cookies with Pretzels together, I hope you feel as excited as I do about this recipe! It’s more than just mixing ingredients; it’s about creating an experience that delights all senses—the warmth of melted chocolate mingling with the creamy richness of peanut butter and that glorious crunch from the pretzels. Each cookie is truly extraordinary, offering a symphony of flavors that dance beautifully on your palate—a perfect savory-sweet balance that has captivated my taste buds time after time.
I wholeheartedly believe this recipe is a must-try not only for its mouthwatering taste but also because it brings joy during its creation. Whether it’s a cozy family gathering or an afternoon snack while binge-watching your favorite show, these cookies are versatile enough to fit any occasion. Picture yourself pulling a tray from the oven, golden edges beckoning you closer; the smell wafting through your home feels like a warm hug on a chilly day. That’s what makes these Peanut Butter Cup Cookies so special—they create moments worth sharing!
For serving suggestions, I can’t help but imagine savoring one alongside a tall glass of cold almond milk or perhaps crumbling one over creamy vanilla ice cream for an indulgent dessert experience that takes comfort food to new heights. If you’re in need of an afternoon pick-me-up or want something sweet after dinner, pairing these cookies with brewed coffee creates an utterly satisfying moment where flavors unite beautifully.
Feeling adventurous? This recipe is wonderfully adaptable! You could swap out mini peanut butter cups for chunks of dark chocolate or even add crushed pretzels right into the dough for extra crunch throughout each bite. If you’re craving something fruity, consider incorporating dried cranberries or cherries—the tartness would elevate those sweet notes in such an exciting way! I encourage you to explore these variations and make this recipe truly yours; share your experiences with me because nothing brings me more joy than hearing how these cherished cookies find their way into your lives!
Peanut Butter Cup Cookies with Pretzels
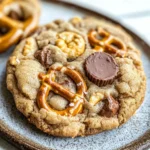
Indulge in the delightful world of Peanut Butter Cup Cookies with Pretzels—a perfect treat that beautifully combines sweet and salty flavors. These cookies are soft, chewy, and feature a satisfying crunch from pretzels, making them irresistible for both kids and adults alike. The creamy peanut butter pairs harmoniously with mini peanut butter cups and chocolate chips, creating pockets of gooey goodness in every bite. Whether you’re baking for a family gathering or simply treating yourself, this recipe is sure to impress!
- Prep Time: 15 minutes
- Cook Time: 10 minutes
- Total Time: 25 minutes
- Yield: Approximately 24 cookies 1x
- Category: Dessert
- Method: Baking
- Cuisine: American
Ingredients
- 1 1/4 cup all-purpose flour
- 1/4 tsp sea salt
- 1 tsp baking soda
- 1/2 cup unsalted butter (melted)
- 2/3 cup brown sugar
- 2 tbsp granulated sugar
- 1 egg
- 1 1/2 tsp vanilla extract
- 1/3 cup creamy peanut butter
- 1/2 cup mini peanut butter cups, chopped
- 1/2 cup pretzels, roughly chopped
- 1/4 cup mini chocolate chips
Instructions
- Preheat your oven to 350°F (175°C) and line a cookie sheet with parchment paper.
- In a large bowl, whisk together flour, baking soda, and sea salt.
- In another bowl, combine melted butter with brown sugar and granulated sugar until smooth. Add the egg and vanilla extract; mix well.
- Gradually incorporate the dry ingredients into the wet mix until just combined.
- Fold in peanut butter, mini peanut butter cups, chopped pretzels, and chocolate chips.
- Chill the dough for at least one hour in the refrigerator.
- Scoop tablespoon-sized portions onto the prepared cookie sheet, leaving space between each cookie.
- Bake for 8-10 minutes until edges are golden but centers remain soft.
- Allow cookies to cool on the pan for a few minutes before transferring to a cooling rack.
Nutrition
- Serving Size: 1 cookie
- Calories: 140
- Sugar: 9g
- Sodium: 90mg
- Fat: 7g
- Saturated Fat: 3g
- Unsaturated Fat: 4g
- Trans Fat: 0g
- Carbohydrates: 18g
- Fiber: 1g
- Protein: 3g
- Cholesterol: 20mg