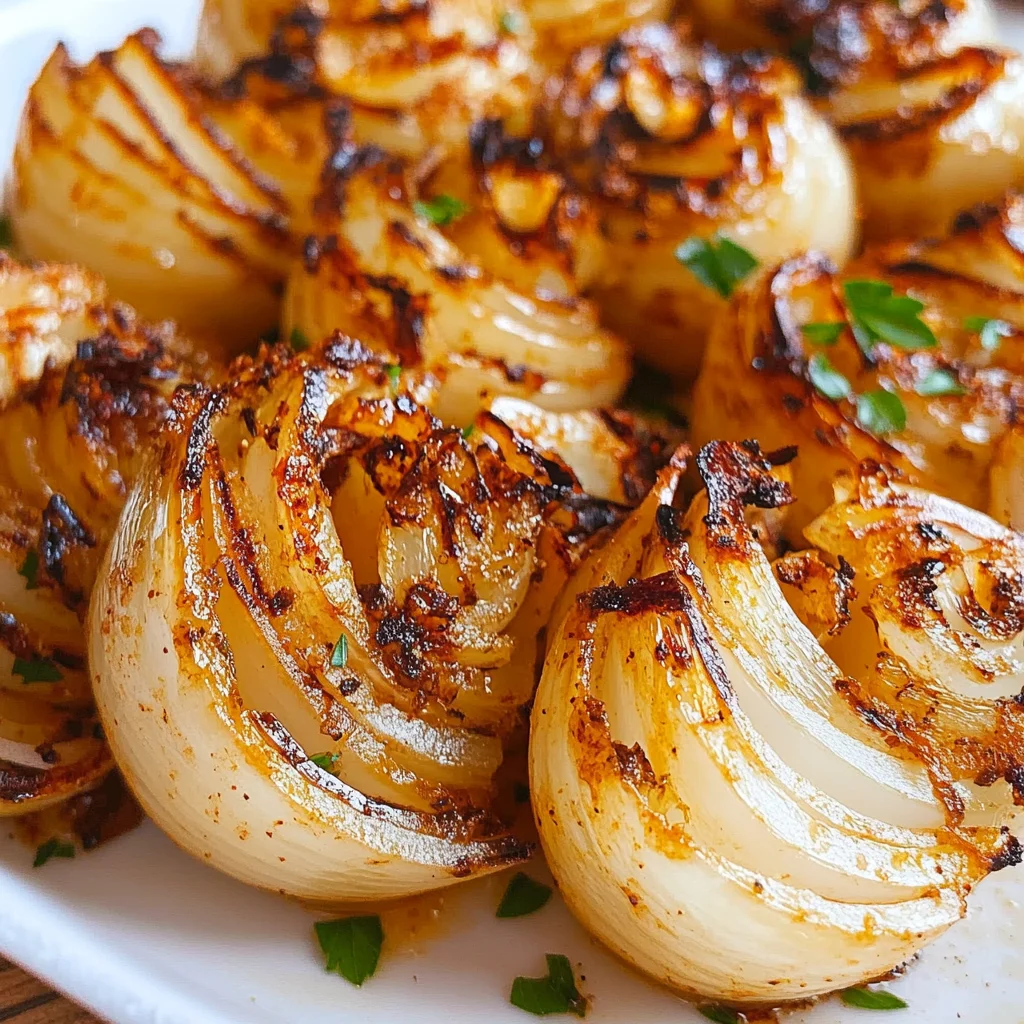
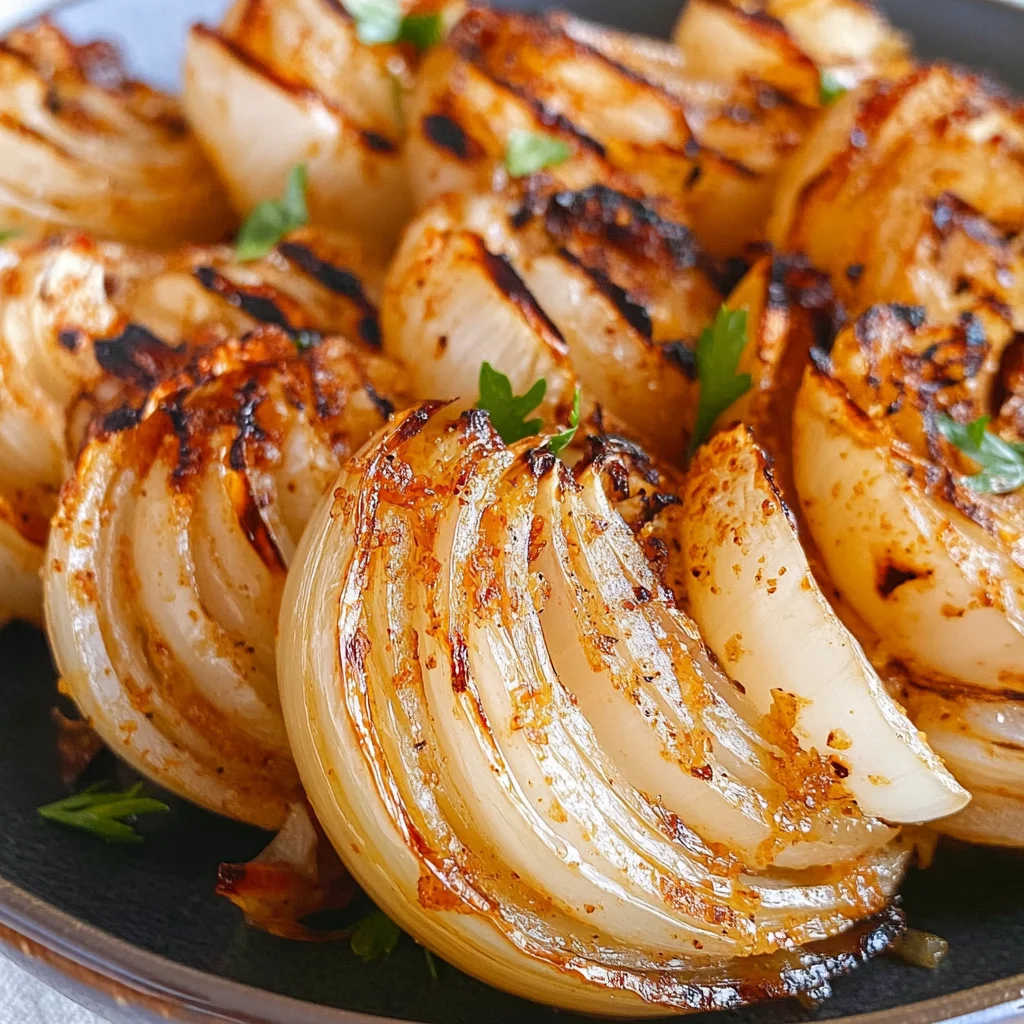
Grilled Onion Blossoms
There’s something utterly enchanting about being in the kitchen, isn’t there? It’s not just about the food; it’s a sacred space where memories are made, and flavors come alive. As I reflect on my culinary adventures, I can’t help but feel a deep connection to the recipes that have graced my table—each one telling a story, each ingredient holding a memory. And today, I’m thrilled to share with you an experience that goes beyond mere cooking: Grilled Onion Blossoms. Picture this: sweet Vidalia onions transformed into delicate, blooming petals of flavor, kissed with the heat of the grill and paired with a creamy dipping sauce that’s simply irresistible. Trust me when I say that these blossoms are not just appetizers; they’re a celebration of home-cooked love that will leave your guests in awe.
Cooking is all about creating connections, and what better way to do so than by serving up something as visually stunning as it is delicious? The contrast between the caramelized sweetness of the onions and the tangy kick from our special sauce creates a symphony of flavors that dances on your palate. Can you imagine biting into one of these grilled beauties? The layers unfold like petals revealing their treasures—oozy cheese, fragrant herbs, and spices mingling together in perfect harmony. This recipe is perfect for gatherings or even a cozy dinner at home; it brings everyone together as they dip and savor each delightful bite. So let’s embark on this culinary journey together—I promise you won’t regret it!
Grilled Onion Blossoms: A Blooming Delight for Any Occasion
Welcome to an exciting adventure in flavor! These Grilled Onion Blossoms are not only easy to prepare but also bring a touch of elegance to your table. Whether you’re hosting friends for game night or just want to impress your family during dinner, these beauties will certainly steal the show and earn you rave reviews.
Ingredients:
As we dive into this recipe, let’s take a moment to appreciate each ingredient that contributes to our delectable dish. Every element plays its part in creating that unforgettable experience we’re aiming for.
- 1/4 cup mayonnaise. This creamy delight serves as a luscious base for our dipping sauce, adding richness and moisture while balancing out the other flavors beautifully. When selecting mayonnaise, opt for high-quality brands made with simple ingredients; you’ll taste the difference! Mayonnaise provides an emulsion that helps keep everything smooth and cohesive in flavor—a non-negotiable for creating sauces that sing.
- 1/4 cup sour cream. Sour cream adds a delightful tanginess that cuts through the richness of mayonnaise, making our dipping sauce wonderfully balanced. It also contributes to the creamy texture we desire! If you’re feeling adventurous, Greek yogurt can serve as a fantastic substitute here—offering similar creaminess but with added protein. This balance elevates our dip from ordinary to extraordinary.
- 1 tablespoon ketchup. While it may seem simple, ketchup brings both sweetness and acidity to our sauce, enhancing its complexity. Ketchup’s tang complements the savory notes beautifully while blending seamlessly with the creamy base. Choose a quality brand with minimal additives if possible; it really does make all the difference!
- 1 teaspoon Worcestershire sauce. This magical elixir packs an umami punch with its complex blend of flavors—from tangy vinegar to savory spices—that will deepen our dip’s character. It brings everything together in harmony while adding depth without overpowering other ingredients. Just remember: a little goes a long way!
- 1/2 teaspoon paprika. Paprika isn’t just for color—it introduces subtle smokiness and warmth that will elevate our dish further. Sweet paprika works beautifully here; however, if you’re feeling adventurous, try using smoked paprika for an intriguing twist! It adds dimension and complexity that’s simply irresistible.
- Pinch of cayenne pepper. This tiny pinch delivers just enough heat to wake up your taste buds without overwhelming them—think of it as seasoning magic! Adjust according to your spice tolerance; just remember that we’re aiming for warmth rather than fire here!
- 1/2 cup finely grated Parmesan cheese. Ahh, cheese—the heart of many great dishes! Parmesan adds nutty flavor and richness alongside its beloved saltiness which enhances every bite of onion blossom. When choosing Parmesan cheese, look for blocks rather than pre-grated varieties; freshly grated cheese melts better and has superior flavor.
- 1 tablespoon paprika (for seasoning). Yes—more paprika! Here it acts as part of our seasoning mix along with cayenne and Italian herbs; we’re layering flavors throughout this recipe which is absolutely paramount for achieving maximum impact in taste!
- 1/8 teaspoon cayenne pepper (for seasoning). Just like before—with careful measure—you’ll be able to control how much heat you want in this mix while ensuring balanced flavor across all components!
- 1/2 teaspoon Italian seasoning. This blend typically includes dried basil, oregano, thyme—and sometimes rosemary—perfectly complementing sweet onions while enhancing their natural flavors as they caramelize on the grill! Make sure you choose high-quality herbs here because freshness matters greatly when it comes down to enhancing overall taste!
- 4 sweet Vidalia onions, peeled with root end intact. Oh my goodness—these beauties are truly special! Vidalia onions are known for their sweetness and mild flavor profile—they caramelize beautifully when grilled! Make sure they’re firm yet slightly squishy when squeezed—not too hard or soft—and don’t forget: keep those roots intact so they hold together during grilling!
- Fresh chopped parsley, for serving. Not only does parsley add vibrant color contrast against those golden-brown grilled onions but provides freshness too! Plus, garnishing dishes always makes them more appealing visually—it’s like putting icing on top of cake!
Equipment You’ll Need:
Before we get started on preparing these incredible grilled onion blossoms, let’s gather our essential tools! Having the right equipment makes cooking smoother and more enjoyable—it’s like having trusted partners in creating something wonderful.
- Grill – Whether using gas or charcoal doesn’t matter much here—the goal is achieving those beautiful char marks while infusing smoky flavor! Make sure it’s preheated properly before placing onions on it; this ensures even cooking resulting in tender blossoms bursting with flavor.
- Small mixing bowls – You’ll need several bowls for combining sauces and seasonings—a smaller bowl works best since we’re dealing with relatively small quantities here which keeps things organized too!
- Knife – A sharp chef’s knife is crucial when slicing through those lovely Vidalia onions without compromising their structure! Dull knives can lead not only to frustration but uneven cuts; trust me—you want clean slices so everything cooks evenly!
- Basting brush – This handy tool helps apply oil generously over our onion blossoms before grilling—ensuring they get crispy edges while preventing sticking onto grill grates!
- Grill basket or foil (optional) – If you prefer not risking any onion pieces slipping through grate openings during grilling time (and who would?), using either option provides peace-of-mind so nothing gets wasted—just remember: if using foil make some holes poked through beforehand allowing smoke access needed for flavor infusion!
Now that we have all our ingredients gathered along with equipment ready at hand—it’s time roll up sleeves dive right into preparing these stunning Grilled Onion Blossoms!
Step 1: Preheat Your Grill
First things first—we need to preheat our grill over medium-high heat before doing anything else! This step is crucial because starting off hot ensures proper caramelization occurs once those stunning Vidalia onions hit those grates—a critical factor leading towards achieving flavorful results! While waiting patiently (don’t rush!) let’s prepare some delicious dipping sauce by combining mayo,sour cream,ketchup,Worcestershire,paprika & cayenne pepper until smooth—incredibly satisfying already right?
Step 2: Crafting Our Special Seasoning
As your grill heats up nicely (you’ll know it’s ready when you can hold your palm above grate comfortably for about four seconds), let’s create seasoning mix by combining finely grated parmesan,paprika,cayenne & Italian seasoning within another bowl until evenly distributed—all whilst enjoying aroma wafting from fresh ingredients surrounding us—it almost feels poetic doesn’t it?
Step 3: Preparing The Onions
Next comes perhaps my favorite part—the preparation of those stunning Vidalia onions themselves! After peeling them carefully retaining root ends intact (this helps hold petals together), cut stem off onion placing flat side down then slice downwards into twelve-to-sixteen sections carefully avoiding cutting through root itself—this way petals will separate perfectly once flipped over allowing sprinkle magic mixture evenly across surface later on which leads us towards next exciting step…
Step 4: Grilling Time!
Now comes one last detail before hitting grill—drizzle olive oil generously atop prepared onions ensuring every inch gets coated before placing directly onto heated surface covered tightly (could use lid if possible) allowing them cook gently until tender/lightly charred approximately fifteen minutes depending upon size/thickness achieved earlier during prep phase…don’t forget check periodically ensuring even cook throughout keeping everything intact whilst enhancing gorgeous caramelization happening right before eyes…
I hope you’re as excited about these Grilled Onion Blossoms as I am! They are sure to delight anyone who tries them—a true testament showcasing beauty found within simplicity itself… Enjoy every single bite filled warmth created amongst friends & family around table filled laughter shared together through culinary experiences woven intimately over time spent cooking side-by-side… Let me know how yours turn out—I can’t wait hear back from ya soon!
Step 5: The Art of Cutting Your Onions
Now, let’s dive into one of the most crucial steps in creating those stunning Grilled Onion Blossoms. Begin by taking your sweet Vidalia onions and cutting off the stem end, placing them flat side down on your cutting board. Here’s where precision meets artistry! You want to make cuts about half an inch deep, slicing into the onion to create 12 to 16 sections. However, be careful not to cut all the way through the root; it serves as a crucial anchor that keeps your petals beautifully intact, allowing them to bloom with grace as they cook.
This technique is often called “petal cutting,” and it’s absolutely paramount for achieving that wow factor when you unveil your grilled masterpiece. As you slice, watch how each section begins to separate slightly from its neighbors; this is exactly what you want! This separation allows heat to penetrate deeply into the onion while grilling, transforming those layers into sweet, caramelized goodness that will make your taste buds sing. Remember, don’t rush this step—taking your time ensures each blossom gets the love it deserves.
Step 6: Seasoning with Love
Next up is where the magic really begins—the seasoning! In a medium-sized bowl, combine the finely grated Parmesan cheese with paprika, cayenne pepper, and Italian seasoning. With a generous pinch of salt added in, mix everything together until you have a vibrant blend that sings of flavor and warmth. Trust me on this: this seasoning is what elevates your onions from simple vegetables to absolute stars of the show! The salty nuttiness of Parmesan melds beautifully with the smoky paprika and zesty Italian herbs.
Once your seasoning is ready, gently pull apart those onion petals you’ve so carefully cut earlier; it’s like coaxing a flower to bloom! Sprinkle this cheesy spice mixture generously over every nook and cranny of the onion blossom. The reason for such thorough seasoning is two-fold: not only does it enhance the natural sweetness of the onions as they grill, but it also creates a delectable crust that adds texture and flavor with each bite. Don’t shy away—make sure every petal is kissed with seasoning!
Step 7: The Drizzle That Makes It Sizzle
The next step is where we introduce a little liquid gold—olive oil! Drizzling your seasoned onion blossoms with olive oil before grilling is an essential technique that serves multiple purposes. First and foremost, oil acts as a conductor of flavor; it helps those exquisite spices cling to our blooms while also ensuring they don’t stick to the grill grates. You want just enough oil to coat them lightly; think of it as giving your onions a silky bath before their big performance on the grill!
As you drizzle, keep an eye on how it glistens under the light—it should look inviting and tantalizingly rich. This step not only enhances flavors but also prevents those delicate onion petals from drying out during cooking. Don’t skimp here; if you see any dry spots or bare patches after drizzling, feel free to add a touch more oil—this will ensure even cooking and help achieve that beautiful char we’re aiming for.
Step 8: Grilling Magic – Patience Makes Perfect
Now comes the moment we’ve all been waiting for—grilling! Preheat your grill over medium-high heat (you’re looking for around 375°F) because we want our onions to cook evenly without burning too quickly. Once it’s preheated, carefully place your prepared onion blossoms directly onto the grill grates. Close the lid and let them work their magic for about 15 minutes; during this time, resist the urge to peek too often!
Patience here is key—this resting period allows heat to circulate around each blossom gently cooking through layers while also developing those coveted char marks that add depth of flavor and visual appeal. You’ll know they’re ready when they become tender and start showing signs of beautiful caramelization at their edges; this means they’re reaching peak deliciousness! If you’re unsure about doneness, give one a gentle poke with tongs; if it’s soft all around yet holds its shape well—voilà! You’ve achieved grilled perfection!
Final Touches
Step 9: Garnishing Your Grilled Onion Blossoms
As you take these glorious grilled onion blossoms off the grill, allow yourself a moment to bask in their beauty—the golden-brown petals glistening in all their glory are truly something special! Now comes one last flourish before serving: garnish these beauties with freshly chopped parsley for an added pop of color and brightness. Not only does parsley lend an aesthetic touch but its fresh flavor cuts through any richness from the cheese sauce beautifully.
While they are still warm from grilling, serve them alongside your zesty dipping sauce made earlier—a perfect companion that complements those sweet charred flavors in remarkable ways. I promise you; watching friends tear into these onion blossoms will be nothing short of magical as laughter fills the air along with delightful flavors wafting through every bite.
So there you have it—a recipe brimming with love and passion for cooking that’s bound to impress anyone lucky enough to join you at your table. Whether as an appetizer at gatherings or simply as a flavorful side dish at dinner time, these Grilled Onion Blossoms are destined to make mouths water and hearts full! Enjoy every moment spent creating—and savoring—this truly extraordinary dish!
Storage and Enjoyment Tips for Your Grilled Onion Blossoms
Now that you’ve gone through the delightful process of creating your very own Grilled Onion Blossoms, it’s time to dig in and savor every moment! But wait—let’s talk about how to hold onto that culinary magic a little longer. Whether you’re planning to share them with friends or want to enjoy them solo over the next few days, knowing how to store these beauties is key to keeping that flavor explosion intact.
Storing Leftover Grilled Onion Blossoms
When it comes to storing your delicious Grilled Onion Blossoms, the right container can make all the difference. I recommend using an airtight glass or plastic container, as this helps maintain their tenderness and prevents any unwanted moisture from ruining their delightful texture. If you find yourself with leftovers, they’ll keep well in the refrigerator for up to three days—though I promise they won’t last that long once you taste them! To keep those blossoms as fresh as possible, consider placing a slice of bread in the container; this little trick helps absorb excess moisture, ensuring your onions don’t turn soggy. Imagine biting into one later and being greeted by that sweet, smoky flavor all over again—bliss! When you’re ready to enjoy them again, simply reheat them in the oven at a low temperature until warmed through; this will help restore their glory without losing that beautiful char.
Freezing Grilled Onion Blossoms for Later
If you want to save some of your Grilled Onion Blossoms for a later date (which is a fantastic idea), freezing is a great option! Before freezing, allow them to cool completely, then wrap each blossom tightly in plastic wrap and place them in a freezer-safe bag or container. This way, you can enjoy their flavor weeks down the line—up to three months if stored properly! When you’re ready to indulge again, there’s no need for defrosting; simply pop them directly onto a grill or into an oven until heated through. Trust me on this one: having these flavorful gems on hand not only adds convenience but also gives you an instant appetizer or side dish for any occasion.
In conclusion, whether you’re enjoying these onion blossoms fresh off the grill or savoring some from the freezer later on, they are bound to bring joy and delight every single time!
Grilled Onion Blossoms
Grilled Onion Blossoms are a delightful culinary experience that brings both flavor and visual appeal to your table. Imagine sweet Vidalia onions, beautifully cut to create blooming petals, grilled to perfection with a stunning char. These blossoms are not only easy to prepare, but they also serve as an elegant appetizer or side dish that will impress family and friends alike. Paired with a creamy, zesty dipping sauce made from mayonnaise and sour cream, these grilled delights offer a perfect blend of sweetness and savory warmth. Whether for game night or a cozy dinner at home, Grilled Onion Blossoms are sure to be the star of any occasion.
- Prep Time: 15 minutes
- Cook Time: 15 minutes
- Total Time: 30 minutes
- Yield: Serves 4
- Category: Appetizer
- Method: Grilling
- Cuisine: American
Ingredients
- 4 sweet Vidalia onions
- 1/4 cup mayonnaise
- 1/4 cup sour cream
- 1 tablespoon ketchup
- 1 teaspoon Worcestershire sauce
- 1/2 teaspoon paprika
- Pinch of cayenne pepper
- 1/2 cup finely grated Parmesan cheese
- Olive oil for drizzling
Instructions
- Preheat your grill over medium-high heat.
- In a bowl, mix mayonnaise, sour cream, ketchup, Worcestershire sauce, paprika, and cayenne until smooth.
- Combine Parmesan cheese with paprika and Italian seasoning in another bowl.
- Peel onions and cut off the stem end; slice into 12–16 sections without cutting through the root.
- Drizzle olive oil over the onion blossoms and sprinkle the seasoning mixture generously over them.
- Grill onions for about 15 minutes until tender and charred.
Nutrition
- Serving Size: 1 onion blossom (approx. 80g)
- Calories: 120
- Sugar: 2g
- Sodium: 230mg
- Fat: 9g
- Saturated Fat: 3g
- Unsaturated Fat: 5g
- Trans Fat: 0g
- Carbohydrates: 8g
- Fiber: 2g
- Protein: 4g
- Cholesterol: 10mg