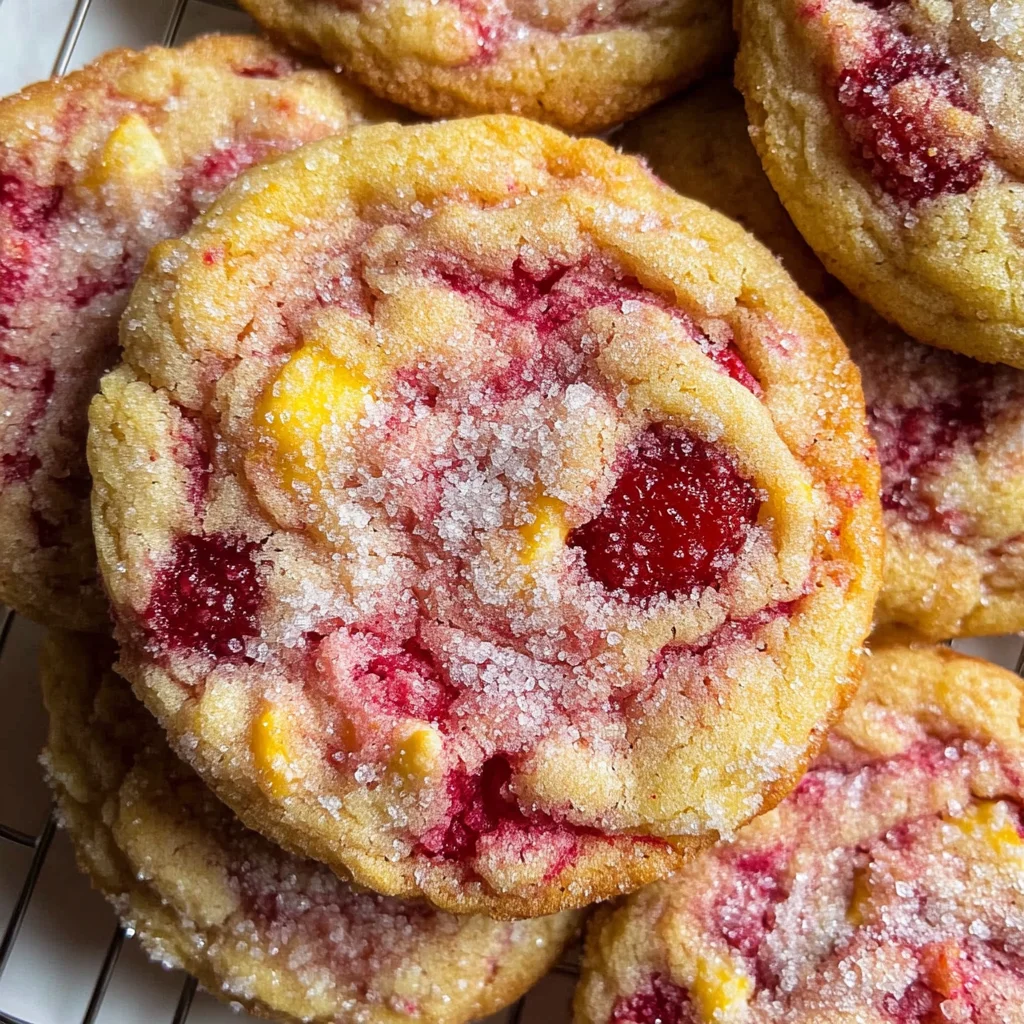
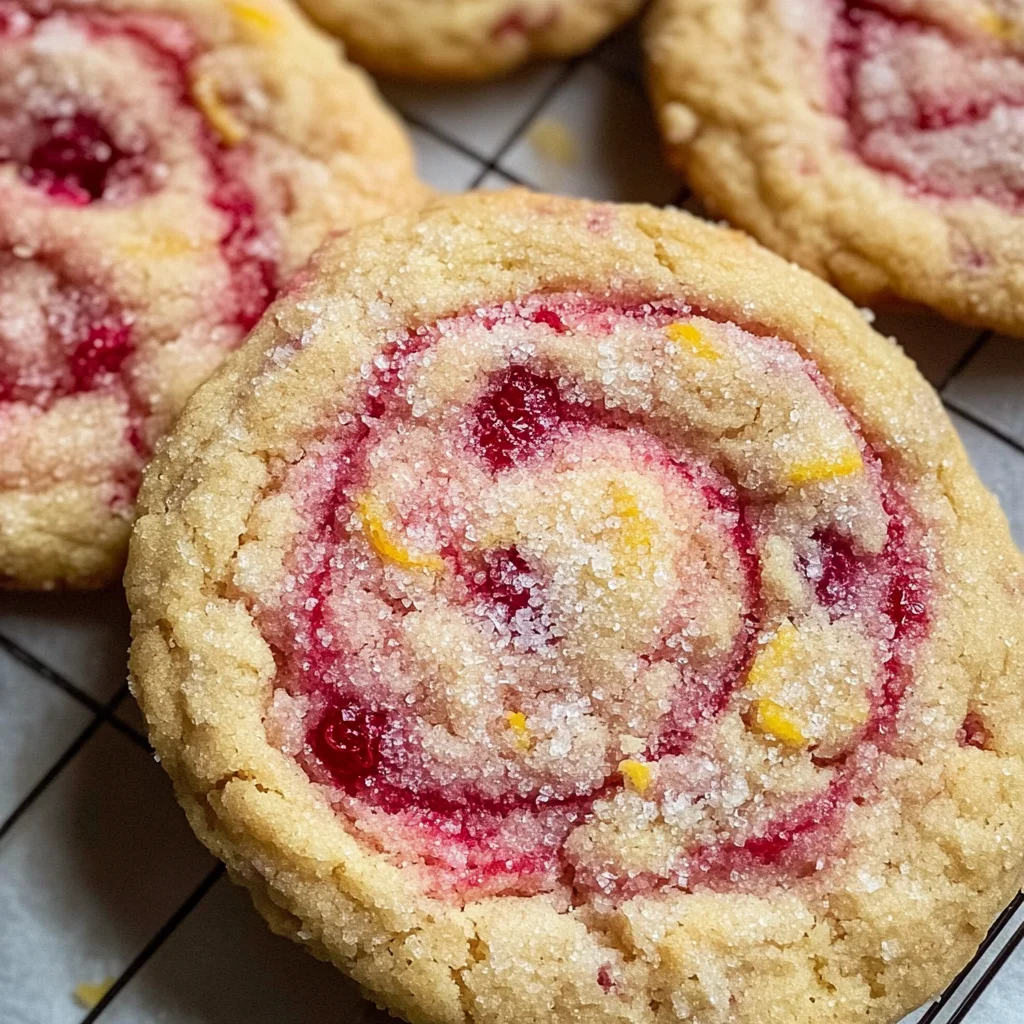
Raspberry Lemonade Cookies
There’s something truly magical about baking that transcends mere ingredients and oven temperatures. It’s a journey, a delightful dance of flavors, aromas, and memories that envelop us in warmth and happiness. One bite into these Raspberry Lemonade Cookies, and you’ll find yourself transported to sun-drenched picnics and lazy summer afternoons, where laughter mingles with the sweet scent of citrus and berries. The moment you pull them from the oven, your kitchen will be filled with an utterly intoxicating fragrance—think of vibrant lemons kissed by the sweetness of ripe raspberries, all harmonizing together to create a truly extraordinary experience. I promise you, this is not just about baking cookies; it’s about capturing the essence of summer in every bite.
These Raspberry Lemonade Cookies are not only a treat for your taste buds but also a celebration of simplicity and joy. With a pillowy softness that melts in your mouth and bursts of tangy flavor that dance on your palate, they embody everything we adore about summertime sweets. Making them is as easy as pie—or should I say cookie? You’ll find they can be whipped up in just one bowl in under half an hour! As we dive into this recipe together, trust me when I say that each step is infused with love and care, ensuring that you craft cookies that will be cherished by friends and family alike.
Ingredients:
As we embark on this delightful culinary journey together, let’s take a moment to appreciate each ingredient that will come together to create these marvelous cookies. Each one plays an essential role in delivering flavor, texture, and sheer deliciousness.
- ½ cup (1 stick or 113g) butter (use dairy-free if needed) – Butter is the heart of these cookies, providing richness and moisture while contributing to their soft texture. When softened properly at room temperature, it cremes beautifully with sugar, creating tiny air pockets that help our cookies rise perfectly in the oven. If you’re opting for dairy-free butter, choose high-quality brands that mimic the creamy texture well—this is crucial for achieving those dreamy results.
- 1 cup (200g) sugar – Sugar isn’t just a sweetener; it’s what gives these cookies their lovely structure and golden edges. It caramelizes during baking to impart subtle flavors that deepen the overall taste experience. I always recommend using granulated sugar for this recipe as it dissolves well into the batter, ensuring that our cookies remain light and fluffy instead of dense.
- 1 large egg – Eggs are vital players in baking—they act as binders while also helping to leaven our cookie dough slightly. This makes them tender yet sturdy enough to hold onto those beautiful raspberry pieces we’re adding later. Make sure your egg is at room temperature; this helps it incorporate more seamlessly into the batter.
- 1 tsp vanilla extract – A splash of good-quality vanilla extract enhances the flavors like nothing else! It adds warmth and depth to our cookie dough, complementing both the tartness of the lemon and the sweetness of the raspberries beautifully. Always opt for pure vanilla extract over artificial varieties for a richer aroma and flavor.
- 1 Tbsp lemon juice (approx. 1 lemon) – Freshly squeezed lemon juice brightens up our cookie dough with its lively acidity. It’s what brings out those refreshing notes reminiscent of lemonade on a hot day! Trust me on this: using fresh juice rather than bottled will make all the difference—it’s like liquid gold!
- 2 Tbsp lemon zest – Zest adds an intense burst of citrus oil without any extra moisture—this is absolutely paramount for infusing vibrant flavor throughout our cookies. When zesting lemons, use a microplane or zester to capture just the outer peel while avoiding bitter pith underneath.
- 1 ½ cups gluten-free 1:1 flour (or all-purpose flour) – If you’re going gluten-free, this blend allows you to enjoy these cookies without sacrificing texture or taste! It mimics all-purpose flour quite well thanks to its balanced mix of gluten-free flours and starches. If using all-purpose flour instead, you can expect similar results—these cookies will still be soft yet chewy!
- ½ tsp baking powder – Baking powder acts as a leavening agent in our cookie dough; it helps create the lift we desire while keeping our cookies fluffy rather than overly dense. Be sure it’s fresh; old baking powder won’t provide enough lift!
- ¼ tsp baking soda – A pinch here balances our cookie dough’s acidity from both the lemon juice and zest while also aiding in browning during baking! Together with baking powder, they ensure our cookies rise beautifully without losing their tender quality.
- ⅔ cup raspberries (frozen and broken into smaller pieces) – Raspberries add bursts of fruity goodness throughout each bite! Using frozen ones means you get those luscious flavors even when they’re out of season; just break them into smaller pieces before folding them into your dough so they distribute evenly without turning everything pink!
- Coarse sugar (optional) – Sprinkling coarse sugar on top before baking creates an eye-catching sparkle while adding a delightful crunch to each cookie’s surface—who could resist that?
Equipment You’ll Need:
Having the right tools at hand makes all the difference when you’re creating something special in your kitchen! While they aren’t ingredients per se, think of these tools as essential partners guiding you toward success—a bit like trusty companions on this delicious adventure!
- Mixing bowl – A large mixing bowl is fundamental for combining your ingredients effortlessly without spills or messes along the way! Choose one that’s sturdy enough for vigorous mixing but easy enough to handle comfortably.
- Hand mixer or stand mixer – While you can absolutely mix by hand if you’re feeling adventurous (and have some serious arm strength!), having either a hand mixer or stand mixer makes creaming butter and sugar an absolute breeze! This ensures even incorporation while saving energy for all those exciting steps ahead.
- Rubber spatula – A rubber spatula is perfect for scraping down sides of bowls while gently folding in ingredients like raspberries. Its flexibility allows you to incorporate everything thoroughly without overmixing—the key to achieving those gorgeous swirls!
- Cookie scoop – This handy tool makes portioning out your cookie dough easy-peasy! Whether you’re making large or regular-sized cookies, using a scoop ensures uniformity—no more surprise giants amongst dainty treats!
- Parchment paper – Line your baking sheets with parchment paper for effortless cleanup afterward while preventing sticking during baking! It helps create evenly baked bottoms so every batch comes out perfectly golden brown.
Now that we’re ideally equipped let’s dive deep into preparing these Raspberry Lemonade Cookies—the excitement builds as we transform simple ingredients into little bites bursting with sunshine!
Step 1: The Creamy Foundation
Begin by placing your softened butter into your mixing bowl along with granulated sugar—a beautiful pairing where magic happens! Using either your hand mixer or stand mixer fitted with paddle attachment set at medium speed; beat them together until creamy—this process known as creaming incorporates air into our mixture which creates those delicate textures we crave in cookies! Aim for about 2 minutes until everything is smooth—don’t rush this step because developing proper aeration here lays vital groundwork for maintaining softness throughout every bite later on!
Step 2: Building Flavor Layers
Next up comes incorporating an egg along with vanilla extract followed closely by freshly squeezed lemon juice—oh my goodness does this smell divine already?! Mix on medium speed until fully incorporated; watch how quickly things come together here—it’s almost mesmerizing! You want everything blended nicely but avoid over-mixing since too much agitation can lead us down an unwanted path toward tough cookies instead of tender delights!
Step 3: Adding Zesty Goodness
Now it’s time to fold in zest from two whole lemons along with gluten-free flour combined previously measured baking powder & soda—all dry elements ready for action! Gently stir using your rubber spatula until most flour pockets disappear; please don’t worry if there are still some visible—it’s important not overwork at this stage so resist temptation even though seeing swirls might feel satisfying initially!
Step 4: The Berry Surprise
Here comes one of my favorite parts: adding frozen raspberries broken gently apart by hand before carefully incorporating them into dough mixture through gentle folds—not more than four or five swipes max here folks—as we want beautiful pink ribbons running through batter instead of complete blending transforming things entirely color-wise would ruin visual appeal entirely wouldn’t it? Once done chilling dough briefly aids initial shaping before hitting hot oven heat later too—which provides extra tenderness while helping prevent spreading excessively once placed within warm confines shortly after preheating oven ahead!
Stay tuned because next we’ll explore how simple scooping transforms humble dollops into heavenly rounds awaiting their golden-brown destiny inside warm embrace provided by heated air swirling around crispy edges forming ever-so-perfectly crispy yet soft centers cradling those juicy raspberry gems…
And trust me—you won’t want to miss indulging alongside loved ones once backed up well enough served fresh outta oven too!!
Step 5: Chill Your Dough – The Secret to Perfect Texture
After you’ve lovingly folded in the raspberries, it’s time for a crucial step that elevates your Raspberry Lemonade Cookies from good to utterly extraordinary: chilling the dough. Trust me on this one; a little patience goes a long way here! By chilling the dough for at least 10 minutes, you’re allowing the butter to firm up, which helps prevent your cookies from spreading too much during baking. This results in cookies that are soft and pillowy in the center while maintaining those perfectly golden edges we all crave.
While your dough is chilling, preheat your oven to 350°F (175°C). This step is essential because it ensures that when your cookies hit that hot oven, they immediately start to bake evenly, giving you those delightful puffs and chewy bites. As you wait, take a moment to admire the vibrant pink swirls of raspberry peeking through your cookie dough—this visual will only get better once they’re baked. So set a timer, grab a cup of tea or coffee, and prepare yourself for the deliciousness that is about to unfold!
Step 6: Scoop with Love – Shaping Your Cookies
Now comes one of my favorite parts: scooping out the cookie dough! Using a large cookie scoop (or a heaping tablespoon if you prefer), gently plop dollops of dough onto a baking sheet lined with parchment paper. It’s important to give each cookie space—at least 2 inches apart—so they can spread beautifully without merging into one another. You want each cookie to have its own identity; after all, these little treasures deserve their moment in the spotlight!
As you’re scooping, think about how each cookie will puff up and create those delightful edges that contrast so beautifully with the soft centers. If you like larger cookies—who doesn’t?—go ahead and use that big scoop! Just keep an eye on them as they bake since larger cookies may take an extra minute or two in the oven. This process should feel joyous; envision those warm cookies emerging from the oven, filling your kitchen with an intoxicating aroma that’ll have everyone asking what’s baking.
Step 7: Bake Until Golden – The Art of Timing
With your cookies carefully placed on the baking sheet, it’s time to slide them into the preheated oven and let magic happen! Bake for about 14 to 16 minutes until you notice those lovely edges puffing up and turning golden brown. Keep an eye on them during this time; every oven is unique, and I promise you don’t want these delectable treats overbaked or underbaked! A good visual cue is watching for the edges—that golden hue signifies they’re almost ready.
As they bake, take a moment to savor that rising scent of lemon mingled with raspberry wafting through your kitchen—it’s truly uplifting! When you see slight cracks forming on top and those edges look just right but still soft in the middle, pull them out of the oven. Remember, they will continue cooking slightly even after being removed due to residual heat (known as carryover cooking), so don’t be alarmed if they seem a tad soft at first—they’re supposed to be!
Step 8: Cool Down – The Patience Factor
Ahh, now we reach another pivotal moment—the cooling phase. Once you remove those beautiful Raspberry Lemonade Cookies from the oven, let them cool on the baking sheet for about 5 minutes before transferring them to a wire rack. This initial cooling allows them to set just enough so that when you move them, they won’t crumble apart in your hands—nobody wants a crumbled cookie experience!
After transferring them to the wire rack, allow them to cool completely before diving in (if you can resist!). This step is absolutely paramount because it gives time for all those flavors to meld together beautifully while also ensuring their texture reaches its peak perfection—a crispy outer edge combined with an incredibly soft interior awaits! And while you wait for this tantalizing transformation, sprinkle some coarse sugar on top if desired; it adds not only sweetness but also a delightful crunch that complements those luscious raspberry notes wonderfully.
Next Major Phase – Final Touches
Step 9: The Finishing Touch – Sweeten Up with Coarse Sugar
As your cookies cool on their racks and fill your home with their inviting fragrance, it’s time for that final flourish—the sprinkle of coarse sugar! This optional step is where you can truly elevate your Raspberry Lemonade Cookies from delightful treats into showstoppers worthy of any dessert table. The coarse sugar glistens like tiny crystals under light and adds a satisfying crunch that contrasts beautifully against the tender softness of each bite.
The reason why this finishing touch matters goes beyond mere aesthetics; it enhances both flavor and texture. Each crunch provides an unexpected layer of sweetness right when you think you’ve tasted it all—a true delight! You can choose how much sugar you’d like to add based on your personal preference; just sprinkle lightly over each cooled cookie before serving or storing.
Once finished dusting these beauties with sugar, gather friends or family around and serve these astonishing Raspberry Lemonade Cookies warm or at room temperature—the choice is yours! I promise you they’ll vanish quickly as people enjoy every last crumb while reminiscing about summer memories filled with laughter and sunshine. Enjoy each bite knowing you’ve created something truly special—a treat filled with love and bursting with flavor that’s sure to become a cherished recipe in your collection!
Storage and Enjoyment Tips for Your Raspberry Lemonade Cookies
Now that you’ve crafted these delightful Raspberry Lemonade Cookies, it’s time to dig into their zesty goodness! But what happens if you find yourself with a few leftover cookies—or perhaps you’re a planner like me, wanting to save some for later? Don’t worry; these sweet treats are just as enjoyable after a little time in storage. Let’s explore how to preserve their delectable flavor and soft texture!
Storing Leftover Raspberry Lemonade Cookies
To keep your Raspberry Lemonade Cookies fresh and delicious, place them in an airtight container. I love using glass containers with tight-sealing lids, which truly help maintain that pillowy softness we’re aiming for. If you’re storing them at room temperature, they’ll happily last for about 3-5 days. For those of us who have a knack for indulgence (guilty as charged!), here’s a pro tip: placing a slice of bread in the container can work wonders! It keeps the cookies moist by absorbing excess air without drying them out. The flavors will meld beautifully over time, creating an even deeper raspberry-lemon melody that’s profoundly satisfying. When you’re ready to enjoy them again, simply pop one in the microwave for about 10-15 seconds to bring back that fresh-from-the-oven warmth—trust me, it’s like wrapping yourself in a cozy blanket of flavor!
Freezing Raspberry Lemonade Cookies for Later
If you find yourself with more cookies than you can munch on in a few days (or if you’re planning ahead for a special occasion), freezing is your best friend! To freeze your cookies properly, allow them to cool completely before placing them in a single layer on a baking sheet lined with parchment paper. Once frozen solid, transfer them into a freezer-safe bag or container and label it with the date. They can stay frozen for up to three months, maintaining their lovely taste and texture. When you’re ready to enjoy these gems again, there’s no need to thaw; simply bake from frozen at 350°F for an extra couple of minutes until heated through. This method is not just practical but also oh-so-exciting when you get to surprise yourself with homemade treats on a whim!
I hope you feel encouraged to make the most of your delicious Raspberry Lemonade Cookies by following these simple storage tips. No matter how you choose to enjoy them—freshly baked or slightly aged—each bite is sure to evoke sunshine and joy.
Raspberry Lemonade Cookies

Indulge in the delightful flavors of Raspberry Lemonade Cookies, where the vibrant tang of lemon meets the sweetness of ripe raspberries in a pillowy-soft treat. These cookies are perfect for summer gatherings, picnics, or simply enjoying with a cup of tea. Easy to make in just one bowl and ready in under half an hour, they capture the essence of sunny days and joyful memories. With their lovely golden edges and refreshing flavor, these cookies will quickly become a favorite for friends and family alike!
- Prep Time: 10 minutes
- Cook Time: 16 minutes
- Total Time: 26 minutes
- Yield: Approximately 24 cookies 1x
- Category: Dessert
- Method: Baking
- Cuisine: American
Ingredients
- ½ cup butter (use dairy-free if needed)
- 1 cup sugar
- 1 large egg
- 1 tsp vanilla extract
- 1 Tbsp lemon juice
- 2 Tbsp lemon zest
- 1 ½ cups gluten-free 1:1 flour (or all-purpose flour)
- ½ tsp baking powder
- ¼ tsp baking soda
- ⅔ cup raspberries (frozen, broken into smaller pieces)
- Coarse sugar (optional)
Instructions
- Preheat your oven to 350°F (175°C).
- In a mixing bowl, cream together softened butter and sugar until smooth.
- Add in the egg, vanilla extract, lemon juice, and mix until combined.
- Fold in lemon zest and dry ingredients (flour, baking powder, baking soda) gently until just incorporated.
- Add frozen raspberries and fold carefully to maintain their shape.
- Chill dough for at least 10 minutes.
- Scoop dough onto a parchment-lined baking sheet, spacing them apart.
- Bake for 14 to 16 minutes until golden brown around the edges.
- Allow to cool on the baking sheet for 5 minutes before transferring to a wire rack.
Nutrition
- Serving Size: 1 cookie (approx. 30g)
- Calories: 120
- Sugar: 10g
- Sodium: 50mg
- Fat: 5g
- Saturated Fat: 3g
- Unsaturated Fat: 2g
- Trans Fat: 0g
- Carbohydrates: 18g
- Fiber: 0g
- Protein: 1g
- Cholesterol: 15mg