Greek Yogurt Bark
There’s something truly magical about the way food can evoke memories and emotions, isn’t there? When I think of summer afternoons spent lounging in the sun, I often find myself reminiscing about sweet, creamy treats that helped cool me down while igniting a delicious symphony of flavors on my tongue. That’s exactly what my Greek Yogurt Bark brings to the table. This delightful creation is more than just a snack; it’s a tender love letter to those sun-soaked days, an irresistible blend of creamy Greek yogurt and rich peanut butter, all topped off with luscious dark chocolate. Each bite offers a tantalizing contrast of sweet and salty, making it an experience that’s both deeply satisfying and refreshingly indulgent.
As we dive into this recipe together, I want you to feel the joy that comes from crafting something both nourishing and delightful. In less than ten minutes of prep time, you’ll be on your way to whipping up this protein-packed Peanut Butter Chocolate Greek Yogurt Bark—perfect for those moments when you need a quick pick-me-up or a cooling treat on a hot day. It’s not just about quenching your hunger; it’s about creating something special that nourishes both body and soul. Trust me when I say this treat will become your new favorite go-to snack!
The Irresistible Allure of Sweet and Salty
Why do we find ourselves so enchanted by the interplay of sweet and salty? Perhaps it’s because this combination taps into our most primal cravings, drawing us in with its enchanting balance. Imagine biting into a piece of this bark: the creamy texture of peanut butter mingled with the coolness of Greek yogurt dances across your palate while that hint of sea salt elevates everything to new heights. It’s a simple yet profound reminder that some of life’s greatest pleasures come from beautifully contrasting flavors working harmoniously together.
This Greek Yogurt Bark is also versatile! Whether you’re prepping for an afternoon snack or looking for something special to share at gatherings, it fits the bill perfectly—it’s easy to make ahead and store in your freezer until you’re ready to indulge. Picture how impressed your friends will be when they learn how simple it was to create such a delightful treat! So let’s embark on this culinary journey together; I promise you won’t regret it.
Greek Yogurt Bark: A Creamy Delight
Welcome to one of my favorite recipes! This Peanut Butter Chocolate Greek Yogurt Bark is not just easy—it’s an absolute game-changer in the world of snacking.
Ingredients:
As we prepare to create this wonderful bark together, let’s take a moment to appreciate each ingredient that contributes to its unique flavor profile.
- 1 cup plain Greek yogurt (whole milk/full fat). This ingredient is absolutely paramount for our bark’s creamy base. Opting for whole milk or full-fat yogurt ensures that we achieve that luxurious texture which is both satisfying and indulgent. Greek yogurt also packs a protein punch, making this treat not only delicious but also nourishing! When selecting your yogurt, look for brands with minimal ingredients—just milk and live cultures are ideal—to ensure you’re getting quality without unnecessary additives.
- 3/4 cup peanut butter. Ahh, liquid gold! Peanut butter lends its heavenly creaminess and rich flavor to our bark while providing healthy fats and added protein. For this recipe, I recommend using natural peanut butter with no added sugar or hydrogenated oils; trust me when I say you’ll appreciate the authentic nutty taste it brings. Stir well before measuring since natural peanut butters tend to separate—this will help ensure every bite is infused with that glorious flavor!
- 1/4 cup vanilla protein powder. Adding protein powder is like giving our bark an extra boost! Not only does it increase the overall protein content—which helps keep you full longer—but it also adds a subtle sweetness that complements our other flavors beautifully. Choose a high-quality vanilla powder that aligns with your dietary preferences; many plant-based options are available if that’s what you’re after.
- 1-2 tablespoons maple syrup or honey. This natural sweetener brings warmth and depth to our Greek Yogurt Bark while enhancing its overall flavor profile. Depending on your preference for sweetness, feel free to adjust the amount as needed—just remember that maple syrup offers a lovely caramel-like note while honey provides floral undertones. Both are excellent choices!
- 1/4 teaspoon vanilla extract. Vanilla extract is another essential ingredient here—it acts as an aromatic enhancer that ties all the flavors together in perfect harmony. Look for pure vanilla extract rather than imitation for an authentic flavor experience; it really makes all the difference in elevating your dish.
- 1 cup dark chocolate chips. Dark chocolate takes our bark over-the-top delicious! Its rich bitterness beautifully contrasts with the sweetness of peanut butter and yogurt, creating an utterly intoxicating experience with each bite. When choosing chocolate chips, opt for one that’s at least 70% cocoa content for health benefits without sacrificing flavor—plus, you’ll enjoy those little bursts of decadence throughout!
- Flaked sea salt (optional). The finishing touch—a sprinkle of flaked sea salt—amplifies all those wonderful flavors we’ve layered into our bark while adding textural contrast as well. Don’t skip this step; trust me when I say it transforms ordinary snacks into extraordinary ones!
Equipment You’ll Need:
Having the right tools makes all the difference in creating smooth sailing during our culinary adventure together! Think of these essentials as your partners in success—they’ll help ensure every step goes off without a hitch.
- Parchment paper: Essential for lining your baking pan so that once everything freezes up beautifully; you’ll have no trouble releasing your bark when it’s time to dig in! If you don’t have parchment paper handy, consider using silicone baking mats as an alternative—they work wonders too!
- Offset spatula: This handy tool is perfect for spreading our yogurt mixture evenly across the pan—its angled blade provides excellent control as we create that dreamy layer we desire! While any spatula will do in theory, having one designed specifically for spreading will make life much easier.
- Microwave-safe bowl: We’ll need this beauty to melt our dark chocolate chips gently without burning them—a crucial step since overheating can make chocolate seize up rather than melt smoothly.
- Quarter sheet pan (or 9×13-inch baking dish): While we ideally want a quarter-sheet pan for perfectly-sized portions, feel free to use what you’ve got! Just know that using larger pans may require adjusting spreading techniques slightly—but don’t worry; we’ll figure it out together!
Now let’s roll up our sleeves and get started on crafting this deliciously creamy treat!
Preparing the Greek Yogurt Bark
Step 1: Creating Our Creamy Base
Begin by combining the plain Greek yogurt, peanut butter, protein powder, maple syrup (or honey), and vanilla extract in a mixing bowl—this process creates what I like to call our creamy base. Using either hand-held electric mixers or simply mixing by hand with sturdy spatula works well here; choose whatever feels comfortable for you! As you mix these ingredients together, take care not to rush through this step—allowing them enough time ensures everything blends smoothly into one harmonious mixture without lumps left behind.
Once fully combined into a luscious consistency resembling cake batter (oh yes!), transfer this dreamy concoction onto parchment-lined quarter sheet pan using an offset spatula if available—that tool makes spreading easy-peasy! Aim for even distribution throughout so each bite holds equal delight—don’t worry if it’s not perfect; rustic charm adds character too!
Step 2: Spreading Into Perfection
Now comes part two: spreading out our mixture evenly between 1/4 inch—and 1/2 inch thickness based on personal preference! A thicker layer yields creamier bites while thinner gives room for more crunch from melted chocolate later on—it truly depends on what tickles YOUR taste buds best! Just remember not to rush through this step either; taking care allows us greater control over texture upon freezing down later!
While you’re working diligently toward spreading perfection (and possibly sneaking tastes along way), it’s time now turn attention toward melting those beautiful dark chocolate chips—this process requires patience since too much heat can ruin their silky smooth nature altogether!
Step 3: Melting Chocolate Chips
To melt those chocolate chips successfully without burning them beyond recognition (we wouldn’t want anything disappointing here!), place them inside microwave-safe bowl then pop them into microwave oven set at low power levels like medium-high heat setting—for intervals lasting thirty seconds each time until melted fully stirring gently after every round so they distribute heat evenly throughout instead clumping up unexpectedly later down road causing disappointment upon tasting too soon…
You’ll know they’re ready once completely melted down resembling glossy liquid gold flowing effortlessly from bowl—you may even want dip fingers just see how irresistible looks like before pouring over creamy base below waiting patiently nearby…
Step 4: Creating A Chocolate Topping
With melted dark chocolate now ready & awaiting final touch above creamy mixture patiently residing beneath its layer—we’re moving forward onto pouring across surface evenly ensuring every inch gets covered nicely giving us beautiful glossy finish alongside additional richness promised earlier whilst keeping taste buds happy afterwards…
After pouring melted goodness across carefully crafted layers underneath allowing slight drizzle motions while doing so prevents pooling too heavily within certain areas leading uneven bites down line later…
Once completed nicely spread around evenly let cool slightly before placing entire tray inside freezer where magic happens next few hours transforming everything solidifying beautifully awaiting final garnishing touches before serving soon thereafter…
I hope you’re enjoying yourselves thus far because trust me once frozen solid ready serve friends family alike everyone will be raving about how stunning flavors come alive within each bite—all thanks YOU taking initiative create such scrumptious masterpiece today!
Stay tuned as we wrap everything up in style shortly…
The Art of Freezing: Crafting the Perfect Greek Yogurt Bark
Step 5: Melting the Chocolate – A Decadent Layer of Indulgence
Now that you have your creamy, dreamy peanut butter yogurt mixture spread evenly on your parchment-lined quarter sheet pan, it’s time to elevate this delightful concoction with a luxurious layer of dark chocolate. The process of melting chocolate might seem straightforward, but trust me—there are some nuances that can make or break this step. Start by measuring out one cup of dark chocolate chips and placing them in a microwave-safe bowl. Microwaving in 30-second increments is crucial here; this technique allows you to control the temperature and prevents the chocolate from seizing up—a common culinary mishap that can leave you with a grainy mess instead of silky smooth goodness.
As you microwave, give the chocolate a gentle stir after each interval. You’re looking for that perfect state where most of the chips have melted, and only a few stubborn pieces remain. This is important because stirring introduces air into the chocolate and helps distribute heat evenly, ensuring a uniform melt. Once you reach that glorious moment where the chocolate is glossy and completely melted, go ahead and pour it over your peanut butter yogurt base. Spread it evenly using an offset spatula or the back of a spoon, creating a luscious top that adds both flavor and texture to your Greek Yogurt Bark. This layer not only enhances visual appeal but also contributes to the overall taste experience—it’s like putting on a cozy blanket over your favorite dish!
Step 6: Freezing – The Magical Transformation
With your beautiful layers now assembled, it’s time for the real magic to happen—the freezing! Gently slide your pan into the freezer, allowing it to chill for at least two to three hours. I know it’s tempting to rush this step, but I promise you, patience is key! During this time, the yogurt mixture solidifies into a creamy bark while melding perfectly with the rich chocolate on top. This transformative process not only sets the textures just right but also allows all those incredible flavors to dance together harmoniously.
Why is freezing so essential? Well, when you freeze your bark properly, you’re not just creating a solid snack; you’re locking in that creamy texture that makes each bite utterly satisfying. You want it firm enough to hold its shape when cut but still soft enough to melt deliciously in your mouth. Visual cues are simple: after 2-3 hours in the freezer, check if it’s firm by gently pressing down with your finger—if it springs back without leaving an indentation, it’s ready! If not quite there yet, don’t hesitate to give it another 30 minutes. Trust me on this; the result will be worth every second of waiting.
Step 7: Adding Finishing Touches – A Pinch of Elegance
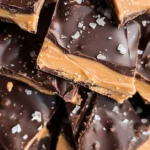
Once your Greek Yogurt Bark has frozen solid and transformed into an enticing treat worthy of any occasion, it’s time for one final flourish—flaked sea salt! This small touch brings an extraordinary depth to your creation by balancing out the sweetness from the chocolate and syrup while enhancing all those nutty flavors from the peanut butter. Simply sprinkle a generous pinch over the top before cutting or breaking into pieces; it’s like performing a little magic trick where simplicity meets sophistication.
Now comes an equally important part: how do we cut or break up this beautiful creation? For those who prefer precision (and let’s be honest, if you want Instagram-worthy pieces), grab a sharp knife and run it under hot water for about 10 seconds before drying it off—this will help slice through without creating too much crumbly chaos! Alternatively, if you’re feeling adventurous (or simply hungry), feel free to break it apart with your hands for rustic chunks that exude homemade charm. Each method offers its own appeal—just imagine serving these delightful pieces at gatherings or enjoying them solo during a peaceful afternoon!
Step 8: Serving Your Greek Yogurt Bark – A Celebration of Flavor
With everything finally complete, it’s time for the best part—serving and savoring! You’ve put love into every step of this process; now it’s time to taste that love in every bite. Arrange your Greek Yogurt Bark pieces on a beautiful platter or store them in an airtight container for those moments when sweet cravings strike (and trust me—they will!). The beauty here lies in versatility—you can serve these delightful bites as an energizing snack post-workout or as dessert after dinner; they fit seamlessly into any occasion.
Before diving in, take a moment to appreciate what you’ve created here—a protein-packed snack that’s not only delicious but also incredibly satisfying. Each bite offers that perfect balance of creamy peanut butter and rich dark chocolate with just enough crunch from those flakes of salt. And let’s not forget about how easy they were to whip up! As you take that first bite, allow yourself to experience that blissful moment when sweet meets salty—a truly extraordinary combination that feels indulgent yet nourishing at the same time.
Conclusion:
What an incredible journey we’ve taken together through this recipe! From gathering ingredients to crafting this beautiful Greek Yogurt Bark, I hope my excitement has been contagious for you. The wonderful blend of creamy peanut butter meets rich dark chocolate creates an irresistible symphony of flavors that dances delightfully across your palate. And let’s not forget that hint of vanilla—a truly extraordinary touch that elevates this snack beyond mere indulgence into something remarkably special.
This recipe isn’t just about taste; it’s about joyfully creating something delicious and sharing it with loved ones. It shines brightly during gatherings as an impressive yet simple treat. Imagine pulling a tray of these colorful bites from your freezer at a summer barbecue or serving them at game night—the smiles on everyone’s faces will be absolutely priceless! The experience is enhanced by their visually appealing layers and enticing aromas filling your kitchen as they set—it’s downright euphoric!
Pairing your Greek Yogurt Bark is where the fun continues! Imagine savoring one with a hot cup of herbal tea as an afternoon treat, letting its coolness contrast beautifully with warmth. Or perhaps serving alongside some fresh fruit—think strawberries or blueberries—that complement its flavors while adding bursts of freshness! For those cozy evenings in, consider indulging in one while curled up with your favorite book; trust me when I say there’s nothing more comforting than that combination after a long day.
Feeling adventurous? This recipe is wonderfully adaptable! You could swap out peanut butter for almond butter if you’re seeking something different or even add crushed nuts or seeds for an extra crunch! Want to turn up the flavor? Try mixing in some cinnamon or drizzling honey over top before freezing—it’s going to be incredible! I wholeheartedly invite you to experiment with these variations and make this recipe uniquely yours. So go ahead, give it a try, share your experience with friends and family, and let’s connect over our love for delicious creations!
Greek Yogurt Bark
Indulge in the delightful experience of Greek Yogurt Bark, a creamy treat that beautifully balances sweet and salty flavors. This no-bake snack combines rich peanut butter with velvety Greek yogurt and is topped with luscious dark chocolate, making it not only delicious but also protein-packed and nutritious. Perfect for warm summer days or as a quick pick-me-up, this versatile treat can be made ahead of time and stored in the freezer for a refreshing dessert anytime. Each bite offers a satisfying crunch and a delightful medley of flavors, making it ideal for sharing at gatherings or enjoying solo!
- Prep Time: 10 minutes
- Cook Time: 0 minutes
- Total Time: 10 minutes
- Yield: Approximately 12 servings 1x
- Category: Dessert
- Method: Freezing
- Cuisine: Greek
Ingredients
- 1 cup plain Greek yogurt (whole milk/full fat)
- 3/4 cup natural peanut butter
- 1/4 cup vanilla protein powder
- 1–2 tablespoons maple syrup or honey
- 1/4 teaspoon vanilla extract
- 1 cup dark chocolate chips
- Flaked sea salt (optional)
Instructions
- In a mixing bowl, blend Greek yogurt, peanut butter, protein powder, maple syrup (or honey), and vanilla extract until smooth.
- Spread the mixture evenly onto a parchment-lined quarter sheet pan.
- Melt dark chocolate chips in a microwave-safe bowl in 30-second increments, stirring after each until smooth.
- Pour melted chocolate over the yogurt mixture and spread evenly.
- Sprinkle with flaked sea salt if desired.
- Freeze for at least 2-3 hours until solid.
- Cut into pieces or break into chunks to serve.
Nutrition
- Serving Size: 1 piece (30g)
- Calories: 130
- Sugar: 4g
- Sodium: 50mg
- Fat: 9g
- Saturated Fat: 2g
- Unsaturated Fat: 7g
- Trans Fat: 0g
- Carbohydrates: 10g
- Fiber: 2g
- Protein: 5g
- Cholesterol: 0mg