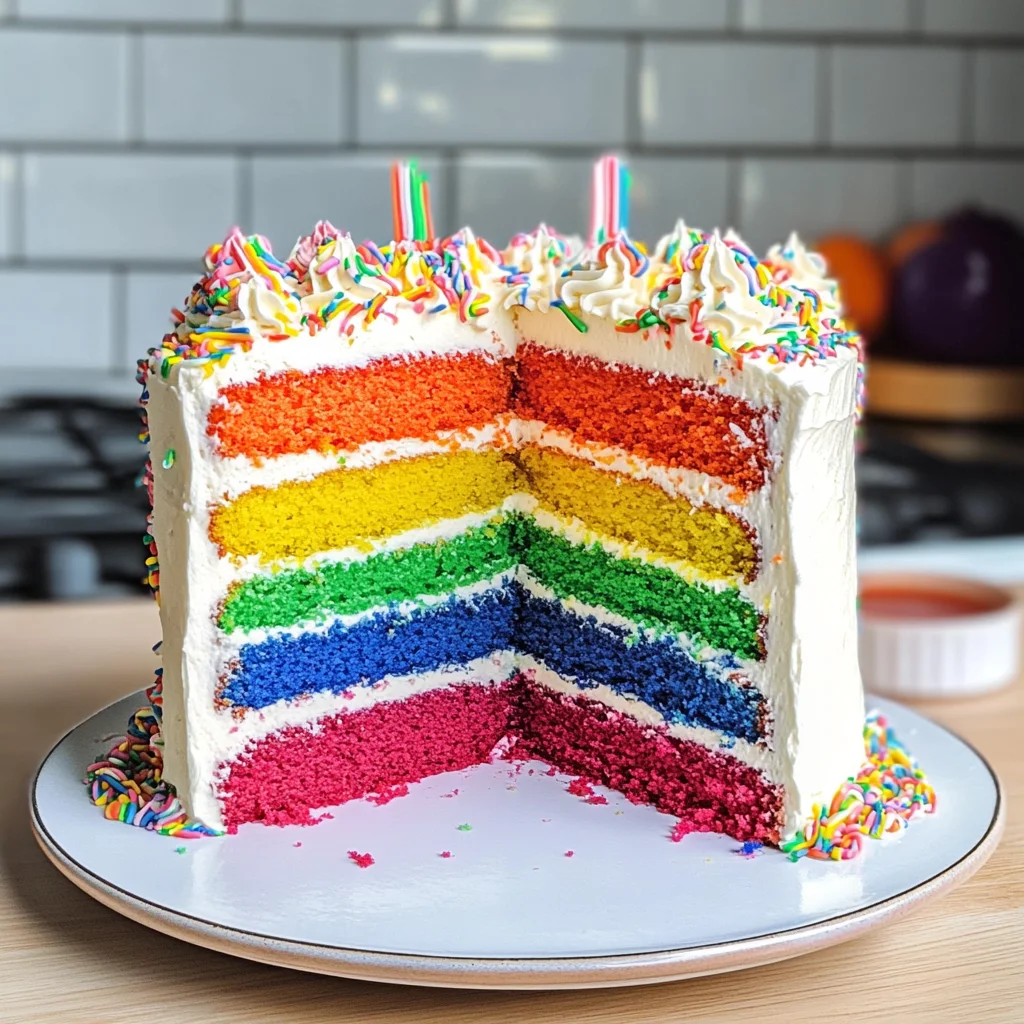
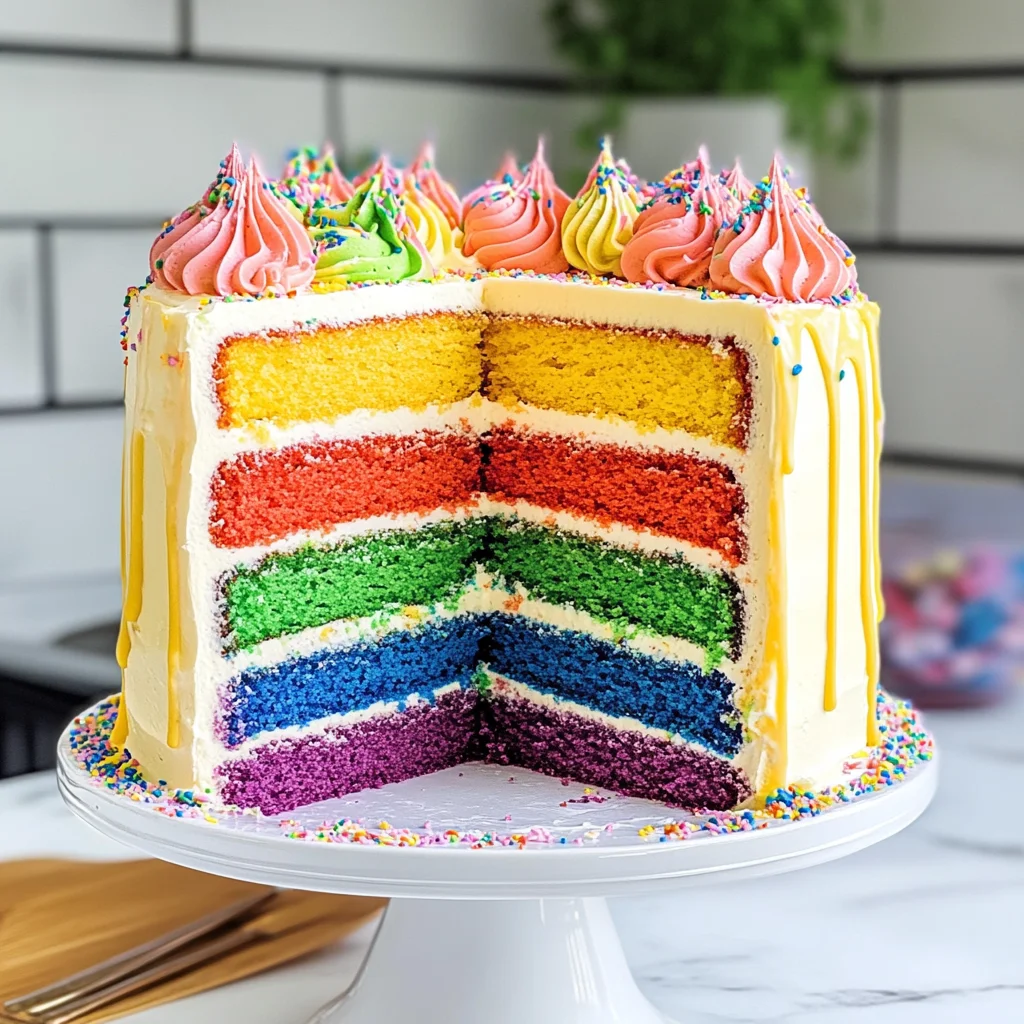
6 Layer Rainbow Cake Recipe with Easy Buttercream Frosting
There’s something utterly enchanting about a cake that embodies the vibrant shades of a rainbow, isn’t there? It’s more than just a dessert; it’s an invitation to celebrate life, love, and all the little moments that make our hearts sing. This 6 Layer Rainbow Cake Recipe with Easy Buttercream Frosting is not just a feast for the eyes; it’s a symphony of flavors and textures that transports you back to childhood birthdays, carefree picnics, and family gatherings filled with laughter. Each slice reveals colorful layers that bring joy and excitement, making it the perfect centerpiece for any occasion. I promise you, once you dive into this culinary adventure, you’ll find yourself mesmerized by the sheer beauty and deliciousness of this cake!
Imagine standing in your kitchen as the aroma of baking cakes wafts through the air, each layer taking on its own unique hue thanks to vibrant gel food coloring. The anticipation builds as you stack those colorful layers with creamy buttercream frosting in between. This isn’t just about baking; it’s about creating something special. Whether it’s for a birthday party, anniversary celebration, or simply because you want to indulge in something delightful, this recipe will surely become one of your cherished favorites. So let’s roll up our sleeves and embark on this delightful journey together!
6 Layer Rainbow Cake Recipe with Easy Buttercream Frosting: A Celebration in Every Slice
This homemade dessert recipe is truly easier than it looks—thanks to boxed cake mix! The beautiful and vibrant colored layers really make a statement especially when topped off with our delicious homemade buttercream frosting. Trust me when I say that every bite is like tasting pure happiness.
Ingredients:
As we gather our ingredients for this joyous creation, remember that each component plays a vital role in crafting our stunning masterpiece. Let’s explore what we need to bring this rainbow wonder to life:
- 2 boxes white cake mix. Using boxed cake mix is an absolute game-changer for this 6 Layer Rainbow Cake Recipe with Easy Buttercream Frosting! It simplifies the process while still yielding moist and fluffy layers. When selecting your cake mix, look for brands known for their quality—some even boast added flavorings or natural ingredients. If you prefer a more personalized touch, feel free to use homemade white cake recipe instead; just be sure to adjust baking times accordingly.
- 6 eggs. Eggs are non-negotiable in our cake batter as they provide structure and stability while also contributing moisture and richness. I recommend using large eggs for consistency across the board; they help bind all our ingredients together beautifully. Plus, the proteins in eggs play a crucial role during baking by trapping air and helping our cakes rise perfectly.
- 2/3 cup canola oil. This liquid gold brings moisture to our cakes while ensuring they remain tender and soft even after cooling! Canola oil has a neutral flavor that allows other ingredients’ flavors to shine through without overpowering them. If you want an alternative with similar properties, vegetable oil works great too—but avoid oils like olive oil which might impart unwanted flavors.
- 2.5 cups water. Water hydrates our dry ingredients, allowing them to bond effectively during mixing and baking; think of it as the essential glue holding everything together! Using room temperature water can help activate the leavening agents in your cake mix more efficiently—so don’t skip this little detail!
- Wilton Gel Food Coloring. Oh my goodness—this is where the magic happens! These gel colors are incredibly concentrated so just a small amount goes miles in creating those vivid hues we’re after. They blend beautifully into batters without altering their consistency or taste too drastically like liquid food coloring might do.
- 1 cup unsalted butter (2 sticks), room temperature. Butter is absolutely paramount when making buttercream frosting! Be sure it’s softened properly so it creams well with powdered sugar later on—this creates that light texture we all adore in frostings! I advise using good quality unsalted butter since it allows us to control the saltiness of our frosting better than salted varieties would.
- 4 tbsp milk. This creamy liquid adds richness to our buttercream frosting while also helping achieve the desired spreadable consistency we crave! Feel free to use whole milk for extra creaminess or almond milk if you’re looking for a dairy-free alternative—it blends beautifully!
- 4 tsp clear vanilla extract. Vanilla extract elevates both flavor profiles of our cake and frosting significantly! Clear vanilla extract is particularly useful here because it won’t darken our beautiful frosting as we work—keeping everything looking pristine!
- 4 cups powdered sugar. This sweet ingredient is essential for creating that silky smooth buttercream frosting we want so badly! Powdered sugar dissolves quickly into mixtures without graininess, which gives us that dreamy finish atop our cake layers.
Now that we’ve gathered these joyful ingredients together, we’re ready to create something extraordinary!
Equipment You’ll Need:
Having the right tools at your disposal makes all the difference when preparing this vibrant masterpiece! While they may not be ingredients, these essential partners will ensure your cooking experience is smooth sailing from start to finish:
- 9-inch round cake pans (x3) – These are crucial for layering your rainbow creations evenly! Using three pans allows you to bake multiple layers simultaneously rather than waiting batch by batch—so you’ll save time when assembling your colorful delight later on.
- Mixing bowls (multiple sizes) – You’ll need various mixing bowls for combining different elements: one large bowl for your batter preparation and smaller ones for dividing colors during assembly! Make sure they’re sturdy enough to handle vigorous mixing without bending or tipping over.
- Electric mixer or whisk – An electric mixer will save you time and energy while achieving fluffy batters effortlessly; however, if you’d rather channel your inner chef’s strength by whisking manually—that works too! Just be prepared for a little more elbow grease involved.
- Spatula (rubber or offset) – A spatula allows easy mixing of ingredients while preventing waste from sticking around edges of bowls—and it’s essential when applying buttercream frosting smoothly onto layered cakes!
- Bench scraper or serrated knife – For leveling off baked cakes post-baking (which helps maintain even layers), having either tool handy is invaluable! A serrated knife cuts through soft cakes gently without squishing them down too much—while bench scrapers can help smooth out surfaces before icing starts.
With these trusty tools by your side, you’re set up for success as we proceed into preparing the delightful layers of this 6 Layer Rainbow Cake Recipe with Easy Buttercream Frosting!
Step 1: Preparing Your Wax Paper Templates
The night before diving into this beautiful project, let’s take some time to prepare wax paper templates—a step many overlook but trust me on this: it’s absolutely worth it! Start by grabbing a piece of wax paper along with a pencil; trace around the base of your 9-inch round cake pan until you have at least fourteen circles ready (you’ll need some extras just in case!). The reason why we go through this process is simple: these templates will guide us perfectly when layering those luscious frozen rounds of buttercream later on—as they form an ideal shape beneath each colorful layer of cake itself!
Step 2: Cutting Out Your Circles
Once you’ve traced all fourteen circles onto wax paper, carefully cut them out using scissors—you should end up with perfectly shaped templates ready for action tomorrow morning! Don’t rush through cutting… take your time ensuring clean edges because precision matters here—it keeps everything neat throughout assembly day ahead!
Step 3: Mixing Your Buttercream Frosting
Next up: let’s make that utterly intoxicating buttercream frosting which will hold everything together beautifully between those colorful layers! In a large mixing bowl (preferably one suited for electric mixers), combine unsalted butter at room temperature along with milk, clear vanilla extract & powdered sugar until combined thoroughly into creamy perfection—this process typically takes around two minutes if using an electric mixer or five minutes by hand via whisking technique… whichever method suits you best! Now here’s where it gets fun: if at any point during mixing things seem overly thick? Just add additional tablespoons of milk gradually until desired consistency achieved—it should spread easily yet hold its shape nicely once applied atop cakes themselves later.
Step 4: Preparing Your Frozen Layers
Lastly—but definitely not least—we’ll turn those circles into frozen rounds that’ll elevate this entire dessert experience beyond words imaginable! Spread thin layers of freshly made buttercream onto each wax circle template you’ve prepped earlier before stacking them together neatly—you’ll repeat until only one wax circle remains available at end which acts simply as final capstone layer atop stack itself—trust me when I say having one extra layer ensures nothing falls apart during assembly phase tomorrow!!! Once stacked neatly away inside freezer overnight? They’ll solidify beautifully—making assembly day smoother than silk come morning light!
Now that we’ve covered these initial steps towards creating something magical together? Get ready—for tomorrow promises even more delightful color explosions paired alongside decadent textures awaiting us ahead… stay tuned my friends!!
Step 5: Building Your Frosting Foundations
Now that your buttercream frosting is prepared and chilling comfortably in the refrigerator, let’s take a moment to talk about one of the most important steps in this rainbow journey—layering your frosting with precision. Start by taking out those wax paper circles you prepared earlier; they will act as our guides to ensure your layers are perfectly aligned and stunningly uniform. Begin by placing one of the wax paper circles on a flat surface or a cake stand. Then, spread a thin layer of buttercream frosting on top of it, using an offset spatula for that smooth touch. It doesn’t have to be perfect; think of it as a canvas where you’ll be painting your vibrant masterpiece.
This step is crucial because it serves two purposes: first, it acts as a barrier to keep the cake layers from sticking together when you assemble them later, and second, it helps create an even distribution of frosting between each cake layer. Trust me on this—taking the time to ensure each layer has its own cushion of frosting will make all the difference when it comes time to slice into this beauty. Plus, you’ll have an extra layer of buttercream left over in case any mishaps occur during assembly—because we know baking can sometimes throw us curveballs!
Step 6: The Building Blocks of Flavor
Once you’ve placed that first layer of buttercream down, gently lay another wax paper circle on top and repeat the process until you’ve stacked all but one layer of buttercream. This is where patience becomes paramount—allow these layers to chill in the freezer while we prepare for the grand assembly tomorrow. Why freeze? Freezing solidifies your buttercream just enough so that when you assemble the cake, everything holds together beautifully without sliding around like a game of Jenga! This method not only provides stability but also enhances the flavors as they meld together while resting. So take a moment to appreciate how this simple act transforms what could be chaos into a harmonious creation.
Don’t forget to refrigerate any remaining buttercream at this stage; we want everything at its best for frosting our cake later! When you’re ready to assemble your cake, remove those frozen layers from the freezer and set aside your remaining wax circles—you’ll need them soon.
Step 7: Prepping for Perfection
As we transition to baking day, let’s ensure our pans are prepped to perfection. Take those wax circles you saved from yesterday’s work and lightly coat them with cooking spray; this non-stick barrier will help release those delicate cakes seamlessly after baking—a critical step that ensures all your hard work doesn’t stick to the pan! After spraying the wax circles, place them at the bottom of each disposable baking pan, giving yourself peace of mind during the un-molding process.
Next comes another coat of cooking spray for the sides of each pan; this is absolutely non-negotiable because it creates an easy release point once your cakes are done baking. Remember, we’re dealing with delicate layers here that deserve every bit of love and care! You wouldn’t want any part of these beautiful cakes left behind in their metal homes now would you?
Step 8: The Artful Alchemy of Baking
With everything prepped and ready, it’s time to preheat your oven according to the instructions on your cake mix box—usually around 350 degrees Fahrenheit is what we’re aiming for here. While waiting for that delightful warmth to fill your kitchen, let’s get our batter ready! Combine your cake mixes with eggs, canola oil, and water in a mixing bowl—this is where science meets art! Mix gently but thoroughly for about two minutes until everything is well blended and coherent; we want no lumps here!
As you mix, observe how the ingredients come together—this combination creates an airy texture that will rise beautifully in the oven. Once fully mixed, evenly divide your batter among different bowls according to how many colors you’re making; don’t rush this step! Each color deserves its moment in the spotlight as we elevate our cakes into vibrant shades that scream fun and joy.
Adding gel food coloring is akin to painting on a blank canvas; start small and gradually introduce more pigment until you achieve those eye-popping hues that make this cake so special. Pour each colored batter into its respective lined pan and pop them all into the oven at once if space allows. Keep an eagle eye on them as they bake! The cooking times may vary due to differences in oven temperature or pan materials—check them around 8-12 minutes by inserting a toothpick into their centers; it should come out clean or with just a few crumbs attached.
Baking these colorful layers requires keen attention—not only do they bake quickly due to their thinness but they also need just enough time to set without becoming dry or overcooked. As soon as they’re done baking—and you’ll know because they’ll spring back slightly when touched—allow them to cool in their pans for about 10 minutes before carefully turning them out onto cooling racks.
Conclusion:
This journey through crafting your very own 6 Layer Rainbow Cake has been nothing short of exhilarating! I hope my excitement has rubbed off on you because creating such a beautiful dessert is truly an adventure worth embarking on. The way each layer harmonizes with the next—the light sponge cake intermingling with that luscious buttercream—is nothing less than extraordinary. You’re not just baking; you’re creating memories filled with laughter and joy that will linger long after the last crumb has disappeared.
Why is this recipe a must-try? Well beyond its eye-catching appearance lies an experience that brightens any occasion—from birthdays bursting with cheer to simple afternoons when you need a little pick-me-up. Imagine pulling this vibrant cake from the oven; your kitchen fills with an intoxicating aroma as friends gather around in anticipation. As they dig into those colorful layers, their faces light up—a priceless moment that only comes from sharing food made with love.
When it comes to serving suggestions, picture this: enjoying a slice alongside freshly brewed coffee for that perfect afternoon indulgence or pairing it with a scoop of dairy-free vanilla ice cream for an extra touch of decadence—heavenly! For those looking for something special to elevate their gatherings further, consider serving this rainbow delight at picnics or celebrations where smiles are guaranteed all around.
Feeling adventurous? This recipe is wonderfully adaptable—consider swapping out some gel food coloring for natural options like beet juice or matcha powder; each brings its unique flavor profile while still maintaining that stunning visual appeal. Or why not try layering different fillings between your cake layers? A tangy lemon curd could add brightness amidst all those sweet notes! Whatever direction you choose, I encourage you to unleash your creativity and make this cake uniquely yours! So roll up those sleeves and dive into this delightful journey; I can’t wait to hear how yours turns out!
6 Layer Rainbow Cake Recipe with Easy Buttercream Frosting
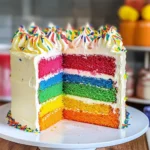
Experience the joy of baking with this vibrant 6 Layer Rainbow Cake Recipe with Easy Buttercream Frosting. This stunning dessert features six colorful layers that will brighten any celebration, from birthdays to family gatherings. Each layer is infused with a delightful sweetness and paired with a creamy buttercream frosting that makes every bite a nostalgic trip down memory lane. Perfect for both novice and experienced bakers, this recipe offers an easy method to create a show-stopping centerpiece that everyone will adore. Get ready to impress your friends and family with this dazzling cake that not only looks fantastic but tastes delicious too!
- Prep Time: 30 minutes
- Cook Time: 30 minutes
- Total Time: 1 hour
- Yield: Serves approximately 12 slices 1x
- Category: Dessert
- Method: Baking
- Cuisine: American
Ingredients
- 2 boxes white cake mix
- 6 large eggs
- 2/3 cup canola oil
- 2.5 cups water
- Wilton Gel Food Coloring (assorted colors)
- 1 cup unsalted butter (room temperature)
- 4 tbsp milk (dairy or non-dairy)
- 4 tsp clear vanilla extract
- 4 cups powdered sugar
Instructions
- Preheat your oven to 350°F (175°C). Prepare three 9-inch round cake pans by greasing them and lining the bottoms with wax paper.
- In a large mixing bowl, combine the white cake mix, eggs, canola oil, and water. Mix until smooth.
- Divide the batter evenly into separate bowls based on how many colors you want. Add gel food coloring to each bowl to achieve desired hues.
- Pour each colored batter into the prepared pans and bake for 8-12 minutes or until a toothpick inserted comes out clean.
- Allow cakes to cool in pans for about 10 minutes before transferring them to cooling racks.
- For the buttercream frosting, beat room temperature butter until creamy, then gradually add powdered sugar, milk, and vanilla extract until smooth.
- Assemble your cake by placing one layer on a serving platter, spreading buttercream between layers, and stacking them up.
- Frost the entire cake with a crumb coat first, then chill it in the refrigerator for about 30 minutes before applying a final layer of frosting.
Nutrition
- Serving Size: 1 slice
- Calories: 360
- Sugar: 40g
- Sodium: 180mg
- Fat: 15g
- Saturated Fat: 7g
- Unsaturated Fat: 8g
- Trans Fat: 0g
- Carbohydrates: 56g
- Fiber: <1g
- Protein: 3g
- Cholesterol: 45mg