4th of July Cookie Bars
There’s something profoundly magical about baking, isn’t there? It’s not just about the ingredients or the end result; it’s about the experience, the aromas that waft through your kitchen, and the joy of sharing a sweet creation with those you love. Today, I want to share a recipe that embodies all these feelings—4th of July Cookie Bars. These delightful bars are like a hug for your taste buds, bringing together simplicity and joy in every bite. With just four easy ingredients, you’ll find that this recipe is not only incredibly straightforward but also a canvas for creativity and celebration. Imagine vibrant colors reminiscent of fireworks exploding in the sky, each bite bursting with flavor and nostalgia.
The 4th of July isn’t simply a day on the calendar; it’s an occasion steeped in tradition, family gatherings, and delightful treats that make our hearts swell with pride and joy. These cookie bars encapsulate that spirit perfectly. Picture yourself at a backyard barbecue, laughter mingling with the scent of grilled burgers as you slice into these golden delights. The chewy texture paired with crunchy M&M’s creates a symphony of flavors that is both comforting and celebratory. It’s an easy dessert that invites everyone to indulge without any fuss—a true testament to how food can bring people together.
4th of July Cookie Bars: A Sweet Celebration in Every Bite
I am beyond excited to walk you through this recipe! It’s perfect for any summer gathering or casual get-together where you want something sweet without spending all day in the kitchen. Plus, who can resist those colorful M&M’s? They add not just sweetness but also a playful flair to these bars. Trust me when I say this is one recipe you’ll want to keep close to your heart—and your recipe box!
Ingredients:
Let’s dive into our ingredient lineup! Each one plays a vital role in making these 4th of July Cookie Bars truly special.
- 1 box yellow cake mix. This is where our magic begins! Using a boxed cake mix simplifies our endeavor significantly without compromising on flavor or texture. The cake mix acts as the foundation for our cookie bars, providing sweetness, moisture, and structure with minimal effort—perfect for busy bakers or those just starting out. When selecting your cake mix, look for one that has no artificial colors or flavors if possible; quality matters even here! If you’re feeling adventurous, you could substitute it with other flavors like lemon or vanilla to create different variations.
- 2 large eggs. Eggs are the glue that holds everything together—quite literally! They contribute moisture and richness while helping set the structure as they bake in the oven. The proteins in eggs coagulate when heated, giving our cookie bars that lovely chewy texture we crave. Make sure your eggs are at room temperature before you start mixing; this helps them incorporate better into the batter for smoother results.
- 1/2 cup butter (1 stick), melted. Butter brings so much joy to baking! Its liquid gold nature adds richness and flavor while providing moisture to our cookie bars. Melting it allows for easier incorporation into our batter and gives us that desirable soft texture we all love in cookies. If you’re looking for healthier alternatives, you could use coconut oil or even unsweetened applesauce for a lighter twist—but keep in mind it may change the final flavor slightly.
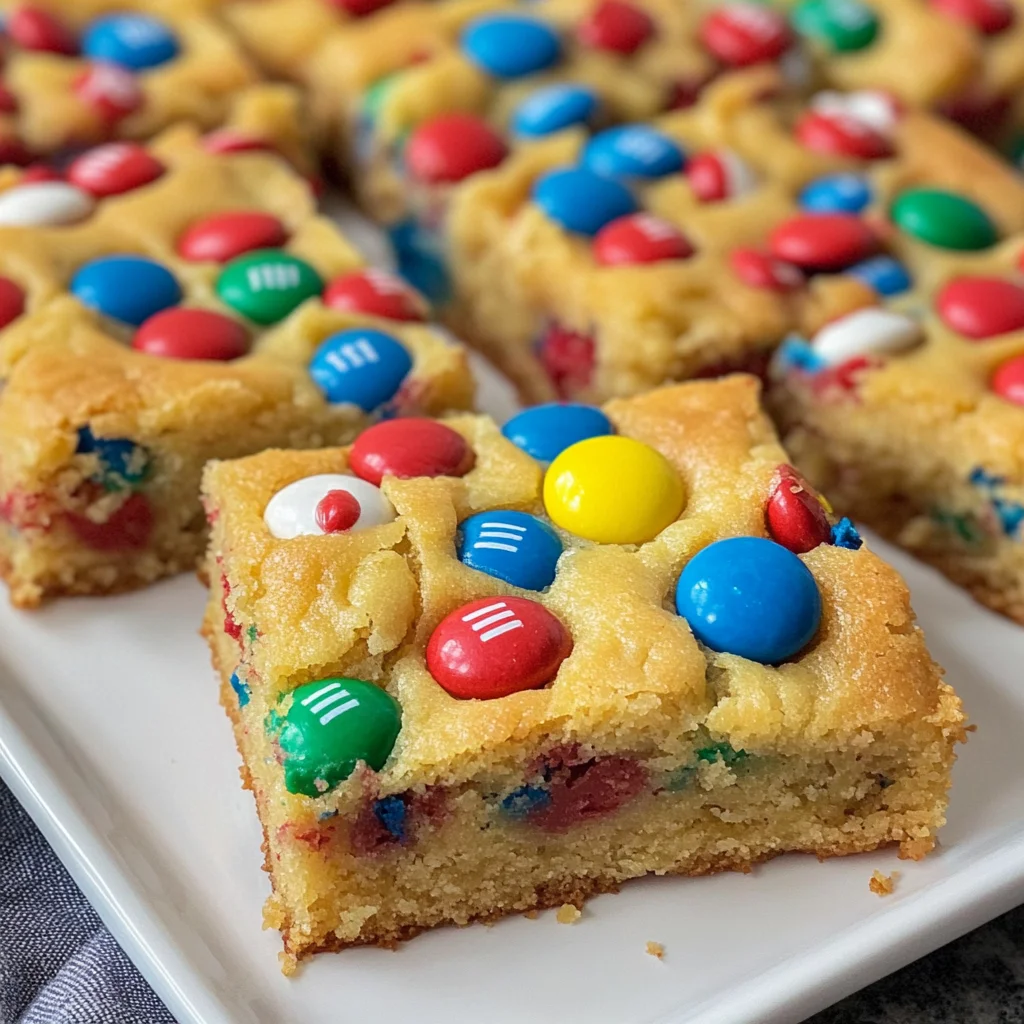
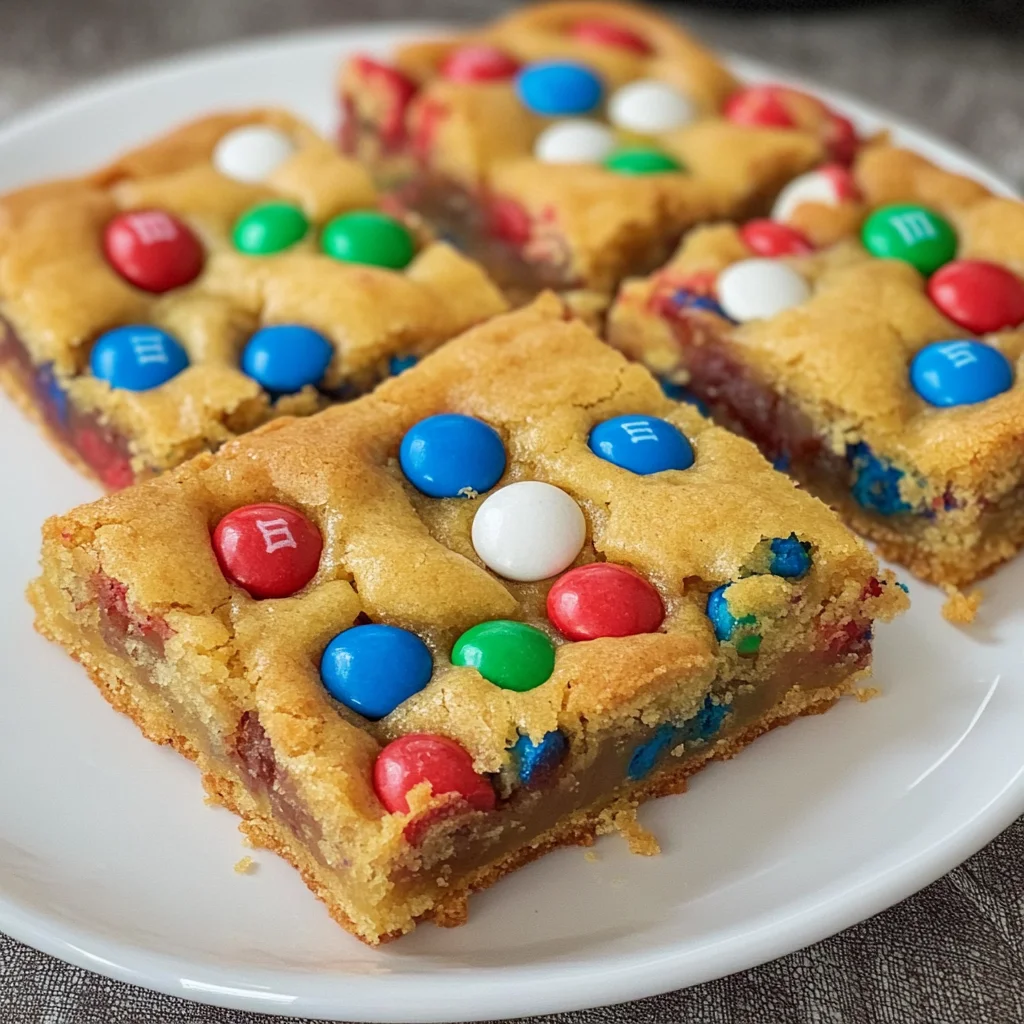
- 2 cups M&M’s. Now we get to the fun part! These colorful candies not only add sweetness but also visual appeal—think vibrant bursts of color against golden bars! You can use classic milk chocolate M&M’s or opt for peanut butter ones if you’re feeling bold (just ensure they’re suitable based on dietary needs). Don’t be shy about mixing in other add-ins like chopped nuts or dried fruits if you’d like; after all, this recipe is all about personal expression!
Equipment You’ll Need:
Before we embark on this baking adventure together, let’s ensure you’ve got all the right tools at hand—it makes everything smoother and more enjoyable! While these items aren’t ingredients per se, they are essential partners in creating something wonderful.
- 9×13-inch baking pan – This size is non-negotiable for achieving those perfect cookie bar dimensions! It allows enough space for spreading while ensuring even baking throughout. If you don’t have this specific size on hand, feel free to use another rectangular dish—but be mindful of adjusting baking time accordingly since different sizes can affect how quickly they cook through.
- Parchment paper – You’ll thank yourself later for using this little wonder! Lining your pan with parchment paper prevents sticking and makes cleanup a breeze—this is crucial when dealing with sticky cookie bars. Just cut it to fit snugly inside your pan before pouring in that gooey batter!
- Mixing bowl – A medium-sized mixing bowl will be your best friend here as we combine our ingredients seamlessly into one delicious mixture. Choose one that’s sturdy enough to withstand some vigorous stirring; no one wants their bowl flying off the counter!
- Spatula – A good spatula will help you spread out your batter evenly into the pan and can double as an excellent tool for scraping down sides during mixing—essentially ensuring every bit of goodness makes it into those cookie bars!
Now that we have gathered our ingredients and equipment let’s get started on creating these scrumptious 4th of July Cookie Bars!
Step 1: Preheat Your Oven and Prepare Your Pan
First things first—let’s warm up that oven to 350°F (175°C)! This step is absolutely paramount because preheating ensures even cooking from start to finish; nothing worse than unevenly baked treats! While that’s heating up, grab your 9×13-inch baking pan and spray it lightly with cooking spray before lining it with parchment paper—this will create an easy release once baked. Make sure there’s enough overhang on either side so it acts like handles when lifting out those gorgeous cookie bars later on.
Step 2: Mix Your Base Ingredients
In a medium mixing bowl (the one we discussed earlier), combine your yellow cake mix, two large eggs, and melted butter together until well blended—you want everything fully incorporated without any dry pockets left behind; trust me on this one! Use your spatula or whisk vigorously until you achieve a smooth consistency reminiscent of thick pancake batter; don’t rush this step as it’s crucial for achieving those delightfully chewy bars we’re aiming for.
Step 3: Fold In The M&M’s
Now comes my favorite part: adding those colorful M&M’s! Gently fold them into your batter using that trusty spatula until they’re evenly distributed throughout—it should feel almost like folding confetti into cake batter as they cascade through each scoop! This step not only enhances texture but also visually transforms our mixture into something festive—so take a moment here to appreciate what you’re creating!
Step 4: Spread And Bake
Carefully pour your delightful mixture into prepared baking pan—you’ll want every last bit because waste is never fun when baking something so scrumptious! Using the spatula again, spread it out evenly until smooth across all corners (don’t forget those edges!). Once satisfied with its appearance, pop it straight into preheated oven where it’ll bake away contentedly for about 20-25 minutes—or until golden brown around edges—that lovely aroma wafting through will be irresistible!
As we go along together making these 4th of July Cookie Bars, remember to savor each moment—not just because of what you’re creating but also because it’s an opportunity to connect with family traditions while crafting something new altogether… And believe me when I say these gorgeous treats will be worth every minute spent waiting patiently by the oven door!
Step 5: Spreading the Joy of Batter
Now that you’ve mixed together the cake mix, eggs, and melted butter until it resembles a thick, luscious dough, it’s time to bring this creation to life in your baking pan. Using a spatula—preferably one with a nice, flexible edge—gently spread the batter into an even layer across the bottom of your prepared 9×13 baking pan. This step is truly crucial because achieving an even distribution ensures that every single bite will have that delightful, gooey texture we all crave. As you spread it out, don’t rush; take your time to make sure every corner of the pan is filled with your sweet concoction. If you notice any lumps or dry spots in your batter, simply use the spatula to work them out—this is where your attention will pay off later!
Once you’ve completed this step, you’ll want to take a moment to admire your work. The batter should look smooth and slightly glossy—a sign that it’s ready for its colorful friends! In a moment, we’ll fold in the M&Ms, but first, let’s revel in this beautiful base we’ve created. It’s already giving me butterflies thinking about how these will transform into a treat that radiates joy and festivity on your 4th of July celebration.
Step 6: The Colorful Addition
Now comes the fun part! Grab those two cups of M&Ms—the vibrant colors are not just for show; they add a pop of festive spirit perfect for any gathering. Gently fold them into your batter using the spatula; this is where you’ll feel the excitement build as each candy gets enveloped in that sweet mixture. Why do we fold instead of stir vigorously? Well, folding allows us to maintain the airiness of our batter while evenly distributing those delightful chocolatey gems throughout without crushing them. You want those M&Ms intact for maximum crunch and burst of flavor when you take a bite.
As you mix, keep an eye on the colors swirling together—it’s like an artist painting their masterpiece! Ensure that no clumps of M&Ms are sticking together; they should be evenly scattered throughout so every piece feels like a special surprise when it comes time to indulge. Once everything is beautifully combined and looking irresistibly tempting, it’s time to move on to the next step.
Step 7: Into the Oven We Go!
With everything prepped and mixed beautifully, it’s finally time to send our cookie bar creation into the oven—a magical place where raw ingredients transform into something utterly intoxicating! Carefully transfer your baking pan into the preheated oven set at 350 degrees Fahrenheit. Make sure it’s centered on the middle rack; this positioning allows for even heat circulation around your bars for consistent baking results.
Set your timer for 20 minutes but don’t wander too far just yet! You’ll want to keep an eye on those bars as they bake—after about 15 minutes, start checking for doneness by inserting a toothpick into the center. When it comes out clean or with just a few moist crumbs clinging to it (but not wet batter), it’s time to pull those beauties out! Remember that every oven can be a bit different; if yours tends to run hot or cool, these baking times may vary slightly. The edges should be golden brown while still appearing soft and slightly puffed in the center—trust me when I say that perfectly baked cookie bars are truly extraordinary!
Step 8: Cooling Down Before Cutting
Once you’ve pulled those gorgeous bars from the oven and inhaled that heavenly aroma wafting through your kitchen—the anticipation is real! But hold on just a moment before diving in; patience is essential here. Allow them to cool in the pan for about 10-15 minutes before attempting to cut them into squares. This cooling period is absolutely paramount as it allows them to firm up slightly, making cutting much easier without losing their shape or becoming crumbly.
While they cool, take this opportunity to gather any friends or family around—the excitement will only grow as you share stories and laughter while waiting for those cookie bars to become ready for their glorious reveal! Once they’ve cooled sufficiently but are still warm enough that they smell divine (you can almost taste them!), grab those trusty parchment paper edges and gently lift them out of the pan onto a cutting board. With their edges crisped up just right and their centers softening beautifully during cooling, you’re now poised to slice these treats into squares.
Final Touches: Enjoying Your Patriotic Delight!
Step 9: Cutting & Serving with Love
Now comes one of my favorite parts—cutting these delightful bars into squares! Using a sharp knife (warmed under hot water if necessary), slice through those cookie bars with confidence; aim for generous squares so everyone can enjoy their fair share of sweetness during your festivities. I recommend cutting about nine large pieces—these are rich enough that everyone will savor each bite—and remember: presentation matters too! Arrange them on a festive plate or platter that echoes the colors of red, white, and blue—we want these cookie bars not only delicious but also visually stunning.
The moment has arrived when you get to serve these up during your celebration—imagine everyone’s faces lighting up as they bite into these chewy delights bursting with chocolatey goodness from those M&Ms! It’s such a joy watching friends and family come together over food; there’s nothing quite like sharing homemade treats at gatherings like these. And trust me on this: once you share these 4th of July Cookie Bars with loved ones, they’ll be asking for seconds—and maybe even thirds!
So go ahead and bask in all that love and happiness you’ve created through baking — each bar embodies joy and celebration perfect for Independence Day festivities or any occasion worth commemorating. Celebrate deliciously my friends—you deserve every scrumptious bite!
Storage and Enjoyment Tips for Your 4th of July Cookie Bars
Now that your kitchen is filled with the delightful aroma of your freshly baked 4th of July Cookie Bars, it’s time to revel in the joy of enjoying this delicious treat! As you cut into the golden squares, the colors from the M&M’s pop against the buttery base, making them not only a feast for your taste buds but also a visual delight. Remember, these cookie bars are perfect for sharing at your 4th of July festivities or simply enjoying as a sweet pick-me-up throughout the week! But if you find yourself with some leftovers (which I highly doubt!), let’s talk about how to store them properly to maintain their mouthwatering appeal.
Storing Leftover 4th of July Cookie Bars
To keep your cookie bars fresh and utterly irresistible, it’s best to store them in an airtight container. A good quality plastic or glass container will work wonders here! Simply layer parchment paper between the bars if you’re stacking them, so they don’t stick together—trust me, no one wants to deal with that sticky situation! If stored correctly at room temperature, these delectable treats should last about 3 to 5 days. But here’s a little pro tip: adding a slice of bread to the container can help keep them moist and chewy—don’t ask me how it works, but it does! After storing for a while, you’ll notice they develop a deeper flavor; the M&Ms become slightly softer, creating an intriguing texture contrast with the cake base. When you’re ready to indulge again, simply enjoy them as is or warm them up for a few seconds in the microwave for that gooey goodness that feels like a warm hug on a plate.
Freezing 4th of July Cookie Bars for Later
If you’re looking to save some of this joy for later (and who wouldn’t?), freezing these cookie bars is an excellent option. To do this properly, allow the bars to cool completely before wrapping them tightly in plastic wrap or aluminum foil. Then place them in a freezer-safe bag or container—ensuring all air is pressed out is absolutely paramount here to prevent freezer burn. When done right, your cookie bars can stay frozen for up to three months! The convenience factor is off the charts; just imagine pulling them out on a whim when unexpected guests arrive or when you’re craving something sweet after dinner. To enjoy from frozen, simply let them thaw at room temperature for about 30 minutes or pop them in a preheated oven at 350°F (175°C) for about 10 minutes—this method will revive their crisp edges and soft center beautifully!
4th of July Cookie Bars
Celebrate summer with easy-to-make 4th of July Cookie Bars! Whip up this festive treat today and bring joy to every gathering!
- Prep Time: 10 minutes
- Cook Time: 25 minutes
- Total Time: 35 minutes
- Yield: Approximately 12 servings 1x
- Category: Dessert
- Method: Baking
- Cuisine: American
Ingredients
- 1 box yellow cake mix
- 2 large eggs
- 1/2 cup melted butter
- 2 cups M&Ms
Instructions
- Preheat your oven to 350°F (175°C) and prepare a 9×13-inch baking pan by lining it with parchment paper.
- In a medium mixing bowl, combine the yellow cake mix, eggs, and melted butter until well blended.
- Gently fold in the M&Ms until evenly distributed throughout the batter.
- Pour the mixture into the prepared baking pan and spread it out evenly.
- Bake for 20-25 minutes or until golden brown around the edges. Allow them to cool before cutting into squares.
Nutrition
- Serving Size: 1 serving
- Calories: 180
- Sugar: 12g
- Sodium: 120mg
- Fat: 7g
- Saturated Fat: 4g
- Unsaturated Fat: 2g
- Trans Fat: 0g
- Carbohydrates: 29g
- Fiber: 0g
- Protein: 2g
- Cholesterol: 20mg