Whipped Feta with Honey Dip
There’s something truly magical about sharing food that goes beyond just nourishment—it’s a moment of connection, an experience wrapped in flavors and textures that bring people together. This Whipped Feta with Honey Dip is more than just a recipe; it’s a celebration of the delightful dance between savory and sweet, where creamy feta meets the luxurious sweetness of honey. Imagine dipping your favorite crackers or fresh veggies into this velvety concoction, the flavors swirling together in a way that feels almost ethereal. Each bite is like a warm hug, inviting you to linger a little longer at the table, to share stories and laughter. I promise you, this dip will become your go-to for gatherings, a dish that transforms any occasion into something special.
What truly captivates me about this Whipped Feta with Honey Dip is how it beautifully straddles the line between different flavor profiles. The salty richness of the feta contrasts so wonderfully with the luscious honey, creating an utterly intoxicating balance that makes your taste buds sing. It’s as if each ingredient has been carefully chosen to play its part in this symphony of flavors, and when they all come together, it’s nothing short of extraordinary. Whether you’re hosting a casual get-together or looking for that perfect appetizer to impress your friends at dinner parties, this dip fits seamlessly into any setting. It’s easy enough for weeknight snacks yet sophisticated enough to elevate your hosting game.
Whipped Feta with Honey Dip: A Savory-Sweet Sensation
Let me take you on this delightful culinary journey where we whip up this decadent dip that’s quick yet profoundly satisfying. Just five minutes is all it takes to create something that tastes like you’ve spent hours in the kitchen! With minimal ingredients and straightforward steps, we’re blending textures and flavors into one cohesive dip that’s sure to be the star of your next gathering. So let’s dive right in!
Ingredients:
As we embark on this culinary adventure together, let’s gather our ingredients—the heartbeats of our Whipped Feta with Honey Dip. Each element plays a vital role in crafting this delicious experience.
- 4 oz feta cheese: This briny cheese brings a depth of flavor that’s simply irresistible. When selecting feta, look for one that’s fresh and made from sheep’s milk or goat’s milk; they offer a creamier texture and richer taste than cow’s milk varieties. Crumbling it into our mix allows its tangy essence to shine through while providing that unmistakable backbone to our dip.
- 4 oz cream cheese, room temperature: Using cream cheese gives our dip an incredibly smooth base that melds beautifully with the feta. Be sure to let it soften at room temperature before mixing; this is crucial for achieving that light and airy consistency we crave. If you’re looking for lighter alternatives, consider using Greek yogurt instead—it provides creaminess while adding a delightful tang.
- 1 tablespoon olive oil: This liquid gold adds richness and helps emulsify our mixture into an ultra-smooth dip. Opt for high-quality extra virgin olive oil for its robust flavor profile; it enhances every bite while ensuring we don’t lose any creaminess during blending.
- ½ teaspoon minced garlic: Garlic adds aromatic depth and warmth without overpowering the other flavors. Freshly minced garlic is preferred here as it releases essential oils that elevate the overall taste—don’t rush chopping! If you desire milder garlic notes, feel free to roast it beforehand; roasted garlic offers sweetness rather than sharpness.
- ½ teaspoon dried basil: Dried herbs provide an earthy note that perfectly complements both the feta and honey. While fresh basil would add vibrancy, dried basil works wonders here because it’s more concentrated in flavor—just be sure it’s not expired for optimal freshness!
- ¼ cup honey: This golden nectar ties everything together with its sweet allure. Look for raw or local honey if possible; its unique floral notes will elevate your dip from ordinary to extraordinary! Drizzling it into our whipped feta creates a beautiful visual when serving—a well filled by liquid sunshine!
- 1 tablespoon chopped pistachios: These little green gems add crunch and nutty undertones which contrast nicely against the smoothness of our dip. Make sure they’re roughly chopped so you get bites of their delightful texture throughout—feel free to experiment with other nuts like almonds if you have them on hand.
- 1 teaspoon finely chopped chives: Chives bring a mild onion flavor that brightens up every mouthful without being overwhelming. Their vibrant green color also adds visual appeal—plus they’re super easy to grow if you’re feeling adventurous!
- ½ teaspoon cracked black pepper: The finishing touch! A sprinkle of freshly cracked black pepper adds just enough heat to balance out the sweetness from honey while enhancing all those wonderful flavors we’ve layered throughout.
Equipment You’ll Need:
Before we dive into preparing our Whipped Feta with Honey Dip, let’s make sure we have all the right tools at hand! Having these essentials will streamline your cooking process and ensure everything comes together smoothly.
- Food processor: This is absolutely paramount for achieving that silky-smooth texture we’re after in our whipped feta dip. A high-powered food processor makes quick work of blending everything until it’s perfectly creamy; if you don’t have one, a hand mixer can work too but may require more elbow grease!
- Shallow bowl or small plate: Presentation matters! Using a shallow bowl allows us to create an inviting well for the honey while also showcasing those beautiful garnishes around the edges—this step transforms our dip from simple to stunning!
With your ingredients prepped and equipment ready, we’re just moments away from indulging in this heavenly Whipped Feta with Honey Dip! Trust me when I say each step is worth savoring…
Step 1: Blending Bliss
Begin by placing your crumbled feta cheese into the food processor along with softened cream cheese and olive oil—that smoothness is essential! Blend these three ingredients until they form an incredibly creamy mixture; you’ll know you’ve achieved perfection when there are no visible lumps left behind—it should resemble soft serve ice cream! This process allows each component to meld beautifully while enhancing their individual flavors.
Step 2: Infusing Flavor
Next comes my favorite part—adding minced garlic and dried basil! These two ingredients infuse aromatic layers into our base mix as they combine seamlessly within those creamy confines we’ve created earlier. Blend until fully incorporated; take a moment here—breathe in those enticing aromas wafting from your processor—it’s pure magic!
Step 3: Transfer & Create
Now it’s time to transfer this dreamy mixture into your chosen shallow bowl or plate (remember presentation!). Use a large spoon or spatula to spread it out evenly across the surface—don’t rush through this step! Creating an inviting well in the center not only showcases where we’ll pour our luscious honey later but also adds rustic charm visually—a culinary masterpiece awaiting its grand reveal.
Step 4: The Sweet Finale
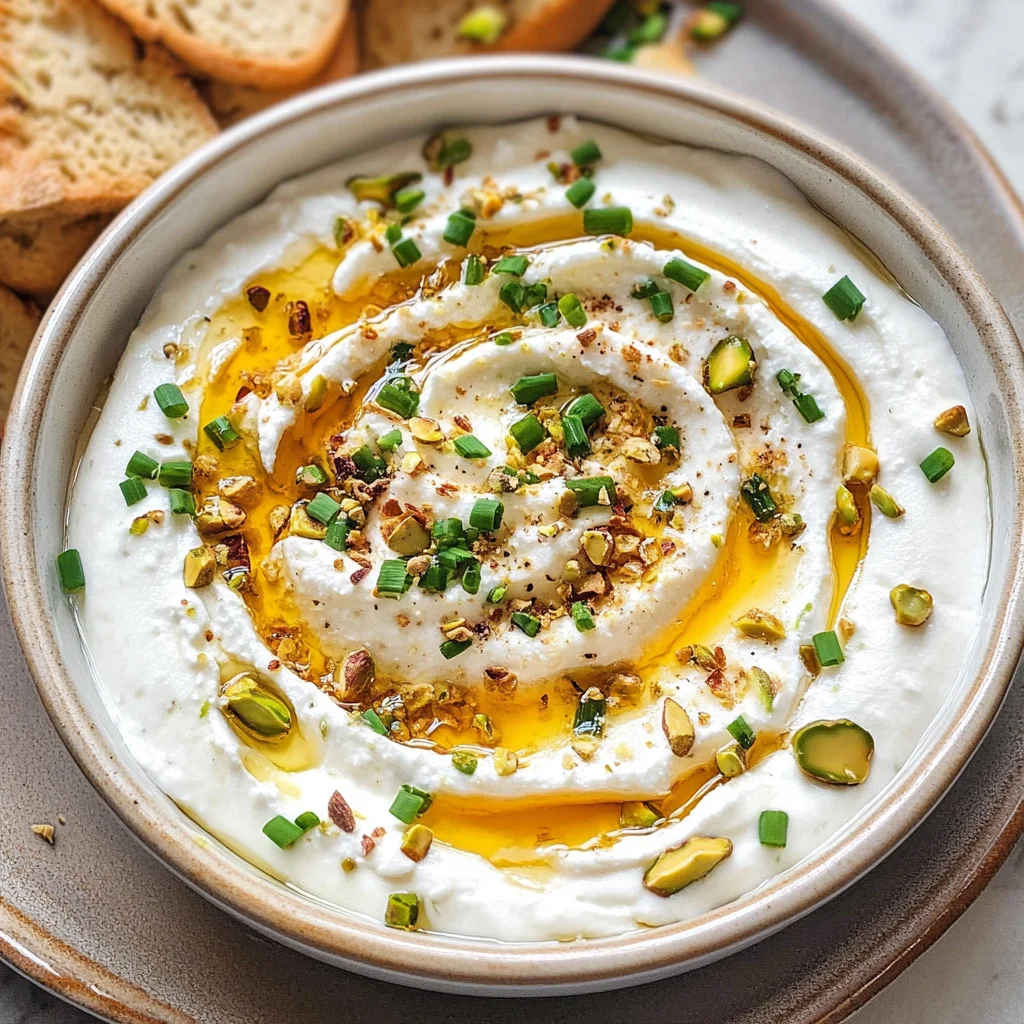
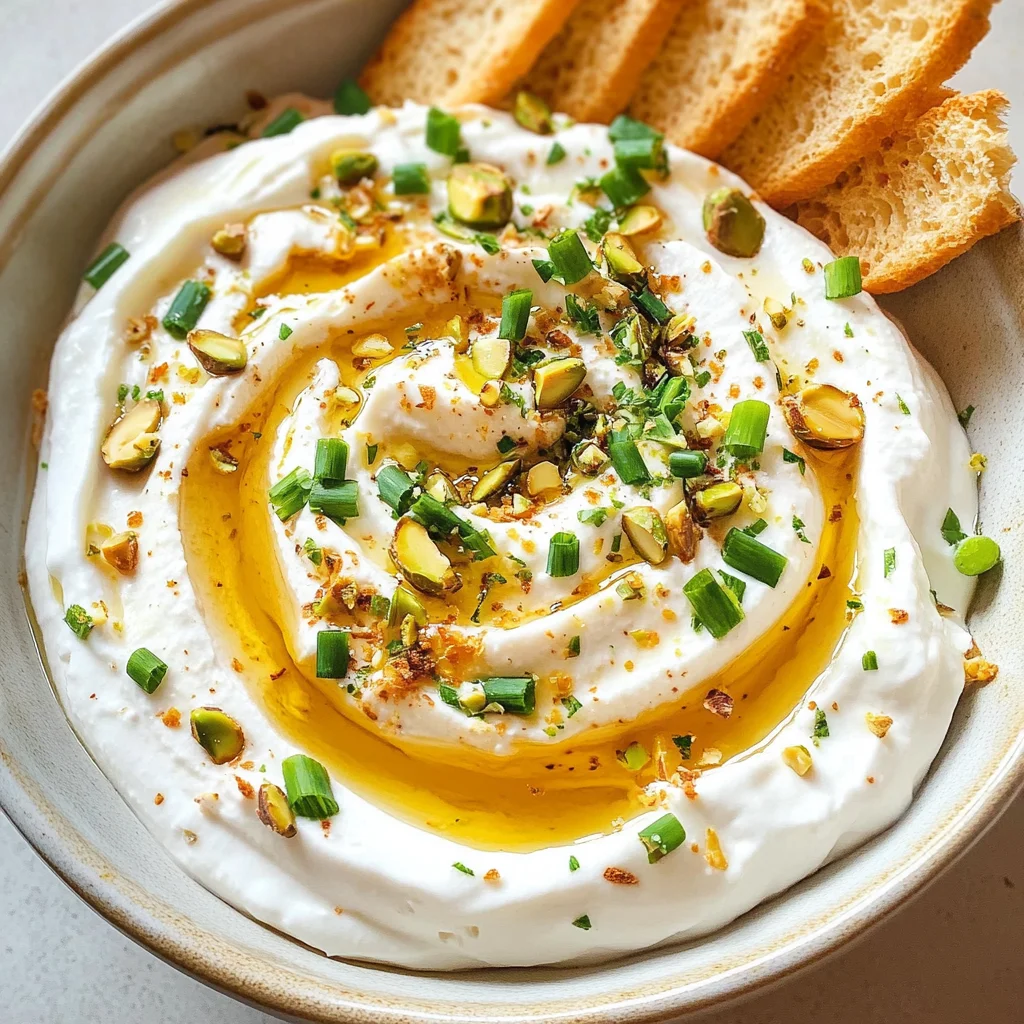
Once you’ve shaped your well perfectly (trust me—it makes all difference!), gently pour that golden honey right into its center like nature’s luxurious drizzle over artful pottery—it’ll be glorious! Now take those chopped pistachios and sprinkle them generously around the edges along with finely chopped chives—they bring vibrant color contrast alongside crackling texture which elevates both taste & appearance dramatically!
And just like that… you’ve created something truly remarkable—a Whipped Feta with Honey Dip that’s bound to steal hearts wherever it’s served! Stay tuned as we wrap up these final touches before diving deep into tasting…
The Art of Crafting Your Whipped Feta with Honey Dip
Step 5: Blending Blissfully
Now that your ingredients are prepped and ready, it’s time to unleash the power of the food processor—a kitchen gadget that I simply adore. Begin by adding the crumbled feta cheese and room-temperature cream cheese into the bowl of your food processor. Trust me, using room-temperature cream cheese is crucial here; it blends seamlessly with the feta, creating that luxuriously creamy texture we’re after. Then, drizzle in that golden olive oil; this isn’t just a fat—it’s a flavor enhancer that will elevate your dip from ordinary to extraordinary! As you pulse everything together, listen for the satisfying whirring sound as the ingredients begin to meld into a rich concoction. You’ll want to blend this until it’s perfectly smooth and free of lumps—about 30 seconds to a minute should do the trick.
Why is this step so vital? Well, blending these cheeses not only combines their flavors but also introduces air into the mixture, resulting in a light and fluffy dip. The olive oil adds not only moisture but also richness that balances the saltiness of the feta beautifully. So take your time here—don’t rush this step! The goal is silky perfection, and with a little patience, you’ll achieve that creamy consistency that makes every bite feel indulgent.
Step 6: Infusing Flavor
Next up in our culinary adventure is incorporating those aromatic herbs and garlic that will transform your whipped feta into a savory masterpiece. With your blended mixture still in the processor, sprinkle in the minced garlic and dried basil. These ingredients are more than just add-ons; they are flavor powerhouses! Garlic brings an earthiness that complements the salty feta while basil imparts a lovely herbal note that rounds out the dip beautifully.
Pulse the mixture again until everything is well integrated—this should take another 15-20 seconds. You’ll notice how fragrant your kitchen becomes, filling the air with an utterly intoxicating aroma that hints at what’s to come. Make sure to scrape down the sides of your food processor bowl halfway through if any bits cling stubbornly; we don’t want any flavor left behind! This infusion of flavors is absolutely paramount for achieving depth in taste; without it, you might end up with something bland rather than spectacular.
Step 7: Creating Your Culinary Canvas
Now we arrive at an exciting part: transferring your luscious whipped feta mixture into a shallow bowl or small plate! This step may seem simple, but how you present this dip can make all the difference when serving at gatherings or intimate dinners alike. Use a spatula or large spoon to gently scoop out your whipped feta; it should glide out effortlessly due to its creamy consistency. As you spread it onto your chosen dish, aim for an even layer—think canvas for a beautiful painting.
Once you’ve laid it out nicely, take a large spoon and create a well right in the center of your dip. This well isn’t just for show—it serves as a reservoir for our sweet honey! This juxtaposition of savory and sweet is what makes this dish so special. Visualize it: an inviting pool of honey nestled within creamy goodness just waiting for someone to dive in! It’s not only visually appealing but also prepares your mind (and taste buds) for what’s about to happen!
Step 8: Drizzling Liquid Gold
Ah, now comes my favorite part—the honey! Pouring this liquid gold into the well you’ve created transforms our whipped feta dip from delightful to downright heavenly. Use high-quality honey if possible; I promise you, it makes all the difference in flavor! As you drizzle it in, watch how it flows gracefully around the edges of your dip—this isn’t just decoration; it’s an invitation to savor each bite.
Why use honey? Its sweetness balances out the salty tang of feta while enhancing every herbaceous note you’ve incorporated earlier. Plus, there’s something profoundly satisfying about dipping fresh veggies or crusty bread into this harmonious blend of flavors—sweetness meeting savory like old friends sharing stories over dinner. Take care not to rush through this step either; let each drizzle cascade gently into place so that when friends gather around, they can marvel at both its beauty and deliciousness before diving in!
Final Touches
Step 9: Garnishing with Love
We’re almost there, my friend! To finish off our Whipped Feta with Honey Dip and truly elevate it from delightful to gourmet status, it’s time to add those finishing touches—garnishing isn’t just optional here; it’s essential! Sprinkle chopped pistachios around the edges for added crunch and texture; their earthy flavor contrasts beautifully with both sweet honey and creamy feta while also bringing vibrant green color against that rich white backdrop.
Then, finish with finely chopped chives sprinkled artfully over top along with cracked black pepper for some visual flair—and let’s be honest—a touch of sophistication too! These garnishes do more than just please the eye; they also introduce new layers of flavor which enhance every scoop taken from this beautiful dish. Make sure to step back and admire your creation before serving because trust me—everyone will be as impressed by its appearance as they will be by its taste!
And there you have it—a stunning Whipped Feta with Honey Dip that’s perfect for entertaining or simply enjoying on a cozy night in. It embodies everything I love about food: warmth, connection, and joy shared around a table filled with laughter and delicious bites. Whether you’re hosting friends or treating yourself on movie night, I promise you’ll find profound satisfaction in every delectable morsel! Enjoy every moment spent making (and sharing) this recipe—it’s one you’ll cherish forever!
Storage and Enjoyment Tips for Your Whipped Feta with Honey Dip
Now that you’ve created this tantalizing Whipped Feta with Honey Dip, it’s time to dig in! The creamy, savory-sweet concoction is truly a party for your taste buds. But wait—what if you have leftovers? Trust me, you’ll want to savor every last bite, and I’ve got some great tips to make sure your dip stays fresh and delicious.
Storing Leftover Whipped Feta with Honey Dip
To preserve the magic of your Whipped Feta with Honey Dip, transfer any leftovers into an airtight container. It’s crucial to seal it well; otherwise, the flavors can diminish or even absorb unwanted odors from your fridge. When stored properly, this delightful dip can keep up to a week in the refrigerator. You might wonder how it tastes after storage; well, let me tell you, the flavors actually deepen and become more harmonious over time! A little pro tip: if you’re worried about dryness or texture changes, place a slice of bread inside the container before sealing it. This non-negotiable step helps maintain moisture and keeps your dip creamy. When you’re ready to enjoy it again, simply take it out of the fridge and give it a gentle stir; no reheating is necessary—this dip is best served chilled or at room temperature.
Freezing Whipped Feta with Honey Dip for Later
If you find yourself with an abundance of this delectable dip—or simply want to prepare ahead—freezing is an absolutely fantastic option! To freeze your Whipped Feta with Honey Dip properly, scoop it into a freezer-safe container, leaving a bit of space at the top since it will expand as it freezes. Make sure to label the container with the date; it’ll keep beautifully frozen for about three months. When you’re ready to use it, just transfer it to the refrigerator overnight; I promise you’ll be amazed at how well the flavors hold up even after freezing! This convenience factor means you can whip up a batch now and relish that creamy goodness whenever you desire—whether it’s for unexpected guests or simply a cozy night in.
Dinner
Whipped Feta with Honey Dip

Indulge in creamy Whipped Feta with Honey Dip—a savory-sweet delight that’s perfect for gatherings. Try it now!
- Prep Time: 5 minutes
- Cook Time: 0 minutes
- Total Time: 5 minutes
- Yield: About 8 servings 1x
- Category: Appetizer
- Method: Blending
- Cuisine: Mediterranean
Ingredients
- 4 oz feta cheese
- 4 oz cream cheese or Greek yogurt
- 1 tbsp olive oil
- ½ tsp minced garlic
- ½ tsp dried basil
- ¼ cup honey
- 1 tbsp chopped pistachios
- 1 tsp finely chopped chives
- ½ tsp cracked black pepper
Instructions
- In a food processor, combine crumbled feta cheese, softened cream cheese, and olive oil. Blend until smooth and creamy.
- Add minced garlic and dried basil; pulse until well integrated.
- Transfer the mixture to a shallow bowl and create a well in the center.
- Pour honey into the well and garnish with chopped pistachios, chives, and cracked black pepper.
Nutrition
- Serving Size: 2 tablespoons
- Calories: 100
- Sugar: 10g
- Sodium: 250mg
- Fat: 8g
- Saturated Fat: 3g
- Unsaturated Fat: 5g
- Trans Fat: 0g
- Carbohydrates: 9g
- Fiber: 0g
- Protein: 2g
- Cholesterol: 15mg