The Best Chicken Scallopini Recipe
There’s something profoundly special about stepping into the kitchen, isn’t there? The air thick with anticipation, the comforting aroma of ingredients merging together, and the brilliant colors that dance before your eyes all come together to create an experience that transcends mere sustenance. Cooking is like painting on a blank canvas, where every brushstroke—or in this case, every ingredient—plays a crucial role in crafting a masterpiece. Today, I want to share with you my heart’s delight: The Best Chicken Scallopini Recipe. This dish is not just a meal; it’s a heartfelt embrace from Italy, bringing together tender chicken breasts and a luscious lemon-butter sauce that sings with brightness and depth. It’s about capturing that perfect balance between savory and tangy, resulting in a dish that is utterly intoxicating and nourishing to the soul.
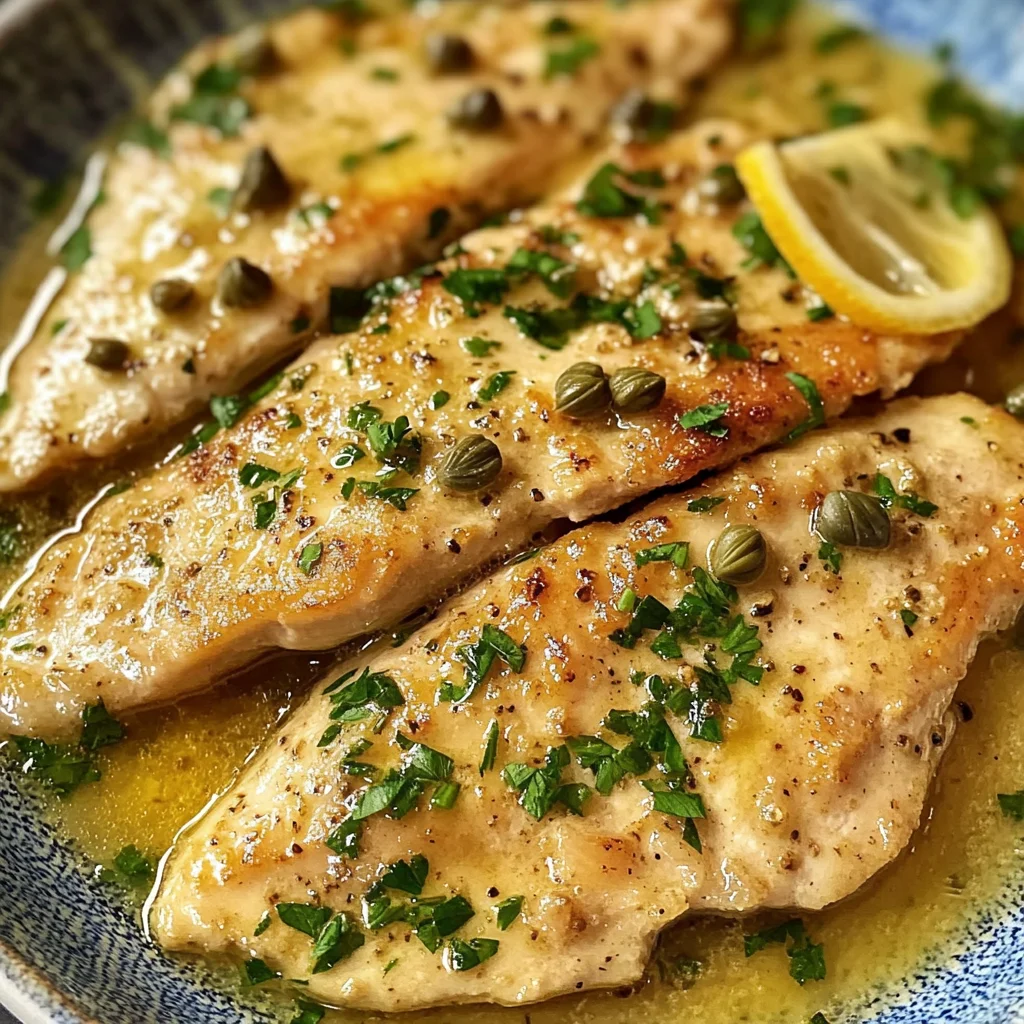
Imagine plating this beautiful dish for dinner; the golden-brown chicken glistens under the light, draped with a silky sauce speckled with capers and garnished with fresh parsley. Just the thought makes my mouth water! This recipe is perfect for those busy weeknights when you crave something special yet easy to whip up. It’s quick, taking only about 30 minutes from start to finish—and I promise you, it will become one of those go-to meals you return to time and again. Why? Because it embodies everything we love about cooking: simplicity, flavor, and comfort—all within reach. So grab your apron, and let’s dive into this culinary journey together!
The Best Chicken Scallopini Recipe: A Taste of Italian Comfort
This Chicken Scallopini recipe is not just another entry in your collection; it’s an experience waiting to unfold on your dinner table. With its vibrant flavors and effortless preparation, it has become a staple for family dinners in my home. Trust me when I say that each bite transports you straight to an Italian bistro where laughter fills the air and everyone’s plate is brimming with joy. Let’s bring that energy into our kitchen as we prepare this delightful dish!
Ingredients:
Now that I’ve whetted your appetite for this incredible Chicken Scallopini recipe, let’s gather our cast of characters! Each ingredient has its own story to tell—one that contributes to the symphony of flavors we’re about to create.
- 4 boneless, skinless chicken breasts, cut into slices and pounded thin. This is crucial because ensuring even thickness means our chicken cooks uniformly—no one wants dry spots or undercooked edges! When purchasing chicken breasts, look for ones that are plump and pale pink without any unpleasant odor. If you’re feeling adventurous or looking for alternatives, turkey cutlets work wonderfully as well.
- Salt and pepper to taste. These two humble seasonings are absolutely paramount; they enhance all other flavors present in the dish. Don’t skimp on seasoning your chicken before cooking—it’s your first chance to build flavor right from the start.
- ½ cup all-purpose flour. Dredging the chicken in flour before frying gives us that irresistible crispy exterior while locking in moisture. Look for finely milled flour for the best results; if you’re gluten-sensitive, feel free to use a gluten-free flour blend instead.
- 2 tablespoons olive oil. Not only does olive oil add richness but it also helps achieve that beautiful golden color when sautéing our chicken. Choose extra virgin olive oil for its robust flavor profile—it adds depth that’s simply divine.
- 4 tablespoons butter, divided. Butter brings an unparalleled creaminess to our sauce—think of it as liquid gold! Using cold butter at the end of cooking creates a glossy finish on your sauce while enriching its flavor; trust me on this step—it’s non-negotiable!
- 2 garlic cloves, minced. Ahh, garlic—the wonderful aromatic friend we all know and love! Sautéing garlic infuses our oil with fragrance and sweetness; however, be careful not to burn it—burnt garlic can turn bitter quickly.
- ½ cup white grape juice (or chicken broth). Here’s where we introduce sweetness balanced by acidity! If using grape juice (which I adore), choose unsweetened varieties for a more complex flavor profile; alternatively, plain chicken broth works beautifully as well.
- 1 cup chicken broth. This adds depth and richness—essentially it’s our flavorful backdrop against which everything else plays out. Always opt for low-sodium broth so you can control the saltiness of your dish more effectively.
- Juice of 1 lemon. Fresh lemon juice brightens up our dish like nothing else—it cuts through richness while adding vibrancy that dances on your palate! Don’t rush out for bottled juice; fresh lemons are always superior.
- 1 tablespoon capers (optional). These little bursts of briny goodness add an unexpected zing—like tiny flavor bombs scattered throughout! If you’re unsure about their unique taste or simply don’t have them on hand, feel free to omit them without fear—they’re not essential but certainly elevate the dish!
- Fresh parsley for garnish. Think of parsley as nature’s confetti—it adds freshness both visually and in flavor! A sprinkle just before serving makes everything look more inviting—who doesn’t love a pop of color?

Equipment You’ll Need:
Before we don our chef hats and get started on this delicious adventure, let’s make sure we have all our trusty tools ready at hand! Having the right equipment can transform cooking from a chore into an enjoyable experience.
- Meat mallet or rolling pin – This handy tool helps flatten our chicken breasts evenly so they cook through perfectly without drying out or burning on the outside while remaining raw inside—a critical step worth taking time over!
- Large skillet – A good-quality skillet ensures even heat distribution which is vital when sautéing chicken. Non-stick or stainless-steel options are fantastic; just make sure it’s big enough to hold all four pieces without crowding them too much!
- Tongs – Perfect for flipping those delicate pieces of chicken without tearing them apart! Tongs offer great control while keeping your hands clean and safe from hot oil splatters.
- Measuring cups & spoons – Accurate measuring is key in any recipe—the last thing we want is imbalanced flavors! Invest in quality measuring tools so you can replicate this dish flawlessly every time.
Now that we’ve set ourselves up for success with all these wonderful ingredients and tools at hand let’s embark on making The Best Chicken Scallopini Recipe come alive right before our eyes!
Step 1: Flattening Your Chicken Breasts
The very first step towards achieving perfectly cooked Chicken Scallopini begins with properly preparing those lovely chicken breasts! Using either a meat mallet or rolling pin (my personal favorite), take each breast one by one and pound them down gently until they’re about half an inch thick—or even thinner if you’re feeling bold! This process ensures even cooking throughout each piece while maintaining juiciness; uneven thickness will lead to some parts becoming dry while others may remain undercooked—a scenario we definitely want to avoid!
Once flattened nicely (and perhaps slightly stressed out from imagining their fate!), season both sides generously with salt and pepper—the foundation upon which all other flavors build upon rests here! Don’t be shy; think of seasoning as giving these beauties their personality boost before they hit the pan!
Step 2: Dredging Your Chicken
Now comes the fun part: dredging each seasoned piece in flour until fully coated! Use a shallow dish so it’s easy to toss them around without much fuss—a small bowl will suffice if needed but larger plates tend to work better as it allows room for maneuvering without messes everywhere! The flour serves two purposes here: it creates that delightful crust during frying while also helping thicken up our sauce later on—not an ingredient we want missing from our culinary adventure!
Once coated properly (shake off any excess), set these floured beauties aside momentarily so we can focus next on heating things up—the excitement builds as we prepare ourselves for sautéing magic!
Step 3: Searing That Chicken
It’s time now to bring some heat into play by heating up olive oil alongside half of our butter within that trusty large skillet over medium-high heat until shimmering occurs (that beautiful moment when you know things are getting serious!). When ready—as indicated by gentle bubbling sounds happening—you’ll carefully place those beautifully dredged pieces onto hot surface one at a time (don’t crowd them!). Hear that sizzle?! That sound signifies happiness coming alive in flavor form right there!
Cook each side diligently until golden brown—about 4 minutes per side should do—but keep an eye out; nobody likes burnt offerings here! Once done (and oh-so-golden), remove them gently onto another plate lined with paper towels—they need rest after such hard work—but don’t forget those tasty drippings left behind—they hold secrets worth unlocking later!
Step 4: Creating That Luscious Sauce
With those gorgeous pieces resting comfortably aside now comes perhaps my favorite part—the creation of what I like to call ‘liquid gold’—our lemon-butter sauce! Start by lowering heat slightly beneath remaining drippings still lingering within skillet (the aroma wafting upwards already promises greatness!). Toss minced garlic into this fragrant mixture allowing it time only until fragrant hits nose—that’s roughly 30 seconds tops as burnt garlic will ruin things quickly!
Next up? Time for deglazing—a fancy term describing scraping off bits stuck onto bottom using flavorful components—we’ll pour either white grape juice (my go-to pick) OR chicken broth depending upon preference alongside stirring vigorously whilst scraping away stubborn remnants stuck beneath surface—a signifier not only enhances taste but also lends depth needed within finished product too! Allow mixture simmer down slightly until reduced by half before adding remaining butter along with optional capers if using…you’ll notice how everything transforms into pure bliss at this moment—it truly feels magical watching flavors meld together seamlessly like old friends reunited once again after years apart!
In no time at all—you’ll have yourself something incredibly special awaiting final touches—so stay tuned because we’re almost there…
I’m overflowing with excitement just thinking about how incredible this dish will turn out once served alongside your favorite sides—it really does embody comfort food at its absolute finest! Remember though—to savor every step taken along way too…after all cooking isn’t merely about end result but rather enjoying entire process involved leading us towards such delicious destination ahead…
Step 5: Creating the Flavorful Sauce
Now that your chicken is perfectly sautéed and set aside, it’s time to turn your attention to the sauce that will bring this dish together in a truly extraordinary way. In the same skillet where you cooked the chicken, you’ll want to add a bit more butter—2 tablespoons should do the trick—and let it melt gently over medium heat. This step is crucial because using the same pan means you’re capturing all those delicious browned bits left behind by the chicken, also known as fond. These tiny morsels are flavor powerhouses! As the butter begins to foam and bubble, throw in the minced garlic. Trust me when I say that there’s nothing quite like the aroma of garlic dancing in melted butter; it’s a scent that promises warmth and comfort.
Cook that garlic for only about 30 seconds until it becomes fragrant—be careful not to let it burn! Burnt garlic can turn bitter and ruin your sauce. At this point, you’ll want to deglaze the pan with half a cup of white grape juice (or chicken broth if you prefer). You might be wondering why we’re adding liquid here; deglazing helps lift those flavorful bits off the bottom of the pan and infuses them back into your sauce. Scrape gently with a wooden spoon as you pour in the juice, allowing everything to mingle beautifully. After this, add in one cup of chicken broth along with the juice of one fresh lemon. The acidity from the lemon is absolutely paramount; it brightens up flavors, cuts through richness, and balances everything perfectly. Let this mixture simmer for about 3-5 minutes until it reduces slightly—a process that concentrates all those incredible flavors into a rich, tangy sauce.
Step 6: Bringing It All Together
As your sauce simmers away, it’s time to reintroduce that beautiful chicken back into the skillet. Gently nestle each piece into the bubbling concoction, ensuring they’re coated in that luscious lemon-butter goodness. This step is vital because you want those succulent chicken breasts to absorb all that flavor while finishing their cooking journey. Allow them to simmer in the sauce for another 3-5 minutes on low heat—this gentle cooking ensures they stay juicy and tender while soaking up every bit of flavor present in that pan.
Incorporating capers at this stage is optional but highly recommended if you’re feeling adventurous! Just a tablespoon can elevate your dish with its briny punch—adding depth and complexity to every bite. Stir them into the sauce before returning your chicken to make sure they distribute evenly throughout; after all, we want every forkful of our Chicken Scallopini to be an experience unto itself! Keep an eye on your sauce as it thickens a bit during this time; we’re aiming for a silky consistency that clings lovingly to each piece of chicken rather than a watery mess.
Step 7: The Finishing Touches
Once you’ve allowed everything to simmer together beautifully, it’s time for one final flourish before serving: adding another tablespoon of butter right at the end. Yes, I know what you’re thinking—more butter?! But trust me on this one! Adding cold butter at the end of cooking is known as monter au beurre, which creates a glossy finish and enriches your sauce without making it greasy. Watch how it melts into your sauce like liquid gold, transforming it into something utterly intoxicating!
At this point, taste your sauce for seasoning—don’t forget to adjust with salt and pepper as needed! This final check is non-negotiable because every palate has its preferences; what might be perfect for me could need just a pinch more salt or an extra squeeze of lemon for brightness on your end! Once satisfied with your seasoning, sprinkle some fresh parsley over everything for an inviting pop of color and freshness just before plating.
Step 8: Plating Like A Pro
Now comes one of my favorite parts—the plating! How you present The Best Chicken Scallopini Recipe can elevate your dish from great home-cooked meal to truly impressive culinary masterpiece! Start by placing each piece of chicken on plates or a large serving platter. Use a ladle or spoon to drizzle some of that gorgeous lemon-butter sauce generously over each piece; don’t skimp here—the more sauce, the better!
To make it visually stunning, consider garnishing with additional fresh parsley or even slices of lemon on top for an added burst of color and brightness that beckons diners closer. If you’re feeling extra fancy (and I hope you are), serve it alongside some simple roasted vegetables or creamy mashed potatoes which will soak up any extra sauce beautifully—a perfect pairing indeed! As you take a step back to admire your work, feel free to pat yourself on the back—you’ve created something profoundly satisfying.
Final Touches Before Serving Your Masterpiece
As you prepare to serve this delectable dish, let’s take a moment to reflect on all those wonderful layers we’ve built together throughout The Best Chicken Scallopini Recipe process. From tenderizing those chicken breasts just right so they remain juicy and flavorful during cooking to crafting that impeccable lemon-butter sauce filled with depth—it’s all part of creating something special that warms both bellies and hearts alike.
When serving up these delightful morsels, think about pairing them with sides that complement yet don’t overshadow their delicate flavors—perhaps some light pasta tossed lightly in olive oil or even crusty bread perfect for sopping up any remaining juices left behind on plates. Trust me when I say every bite will be met with pure delight from everyone fortunate enough to share in this meal with you!
So there you have it—the complete guide for making The Best Chicken Scallopini Recipe right from my kitchen to yours! Whether it’s date night or simply treating yourself after a long day at work, I promise you this dish will never disappoint—it’s bound to become one of those recipes you’ll cherish forever! Enjoy every moment spent cooking—and even more so when sharing this masterpiece with loved ones around your table!
Storage and Enjoyment Tips for Your The Best Chicken Scallopini Recipe
Now that you’ve created a dish that’s not just a meal but an experience, it’s time to dig in and enjoy every bite of your delicious Chicken Scallopini! But wait—let’s talk about how to savor this culinary delight beyond the dinner table. Whether you’re planning to enjoy leftovers or want to save some for later, I’ve got you covered with tips that ensure each bite is as delightful as the first.
Storing Leftover The Best Chicken Scallopini Recipe
When it comes to storing your leftover Chicken Scallopini, using an airtight container is absolutely paramount. This keeps the flavors locked in and prevents any unwanted drying out. Simply place your cooled chicken and sauce into the container, giving it a gentle shake to mix everything nicely before sealing it up. You can keep it in the refrigerator for up to three days, which is ideal for those busy weeknights when you need something quick but still want that homemade goodness. Trust me on this: if you want to maintain its succulent texture, consider slipping a slice of bread into the container with the chicken—it acts like a sponge, absorbing excess moisture while keeping your dish perfectly juicy. When you’re ready to enjoy it again, simply reheat it gently on the stovetop over low heat or in the microwave until warmed through. I promise you, the tangy lemon-butter sauce will still be utterly intoxicating!
Freezing Chicken Scallopini for Later
If you’re looking ahead and want to prepare a batch of this Chicken Scallopini for future meals, freezing is an incredible option! To freeze properly, let your chicken cool completely before transferring it into a freezer-safe container or heavy-duty zip-top bag—make sure to remove as much air as possible to prevent freezer burn. This dish can be frozen for up to three months without losing its delightful charm. When you’re ready to indulge again, simply transfer it from the freezer to the refrigerator and let it thaw overnight; then reheat it gently on the stovetop or microwave as I mentioned earlier. This makes weeknight dinners a breeze—just imagine how convenient it would be to pull out a homemade meal ready in minutes! The joy of knowing that you have such an exquisite dish waiting for you really adds a special touch to those hectic days.
The Best Chicken Scallopini Recipe

Discover The Best Chicken Scallopini Recipe—a quick Italian-American delight that’s bursting with flavor! Make it tonight and enjoy every bite!
- Prep Time: 10 minutes
- Cook Time: 20 minutes
- Total Time: 30 minutes
- Yield: Serves 4
- Category: Main
- Method: Frying
- Cuisine: Italian
Ingredients
- 4 boneless, skinless chicken breasts
- Salt and pepper to taste
- ½ cup all-purpose flour (or gluten-free flour)
- 2 tablespoons olive oil
- 4 tablespoons butter (divided)
- 2 garlic cloves (minced)
- ½ cup white grape juice (or chicken broth)
- 1 cup chicken broth
- Juice of 1 lemon
- 1 tablespoon capers (optional)
- Fresh parsley for garnish
Instructions
- Flatten chicken breasts to about half an inch thick using a meat mallet; season both sides with salt and pepper.
- Dredge the seasoned chicken in flour until fully coated.
- Heat olive oil and half the butter in a large skillet over medium-high heat. Sauté the chicken until golden brown on both sides; remove from skillet.
- In the same skillet, add remaining butter and sauté garlic until fragrant. Deglaze with white grape juice or chicken broth, scraping up any browned bits.
- Add chicken broth and lemon juice; simmer for 3–5 minutes until slightly reduced.
- Return the chicken to the skillet; let it simmer in the sauce for another 3–5 minutes.
- If using, stir in capers before serving. Garnish with fresh parsley.
Nutrition
- Serving Size: 1 piece of chicken with sauce (approximately 150g)
- Calories: 310
- Sugar: 2g
- Sodium: 580mg
- Fat: 15g
- Saturated Fat: 7g
- Unsaturated Fat: 7g
- Trans Fat: 0g
- Carbohydrates: 18g
- Fiber: 1g
- Protein: 29g
- Cholesterol: 110mg