Spring Chicken Pot Pie
There’s something profoundly satisfying about a warm, golden-brown Spring Chicken Pot Pie; it’s not just food, but a culinary embrace that envelops you in comfort and warmth. Imagine the first slice being made, the flaky crust giving way to reveal a bubbling symphony of tender chicken and vibrant vegetables. The aroma wafts through the kitchen, mingling with the fresh scent of lemon and herbs, transporting you to a sun-dappled spring day. This is what I strive for with my Spring Chicken Pot Pie—an experience that transcends mere sustenance, creating cherished memories around the dinner table. Every bite is a celebration of seasonal ingredients and heartfelt cooking, reminding us of the beauty of simplicity and the joy of sharing delicious food with those we love.
In this recipe, I invite you to join me on a culinary journey where each step is infused with care and passion. The Spring Chicken Pot Pie represents a delightful fusion of traditional comfort food with the bright flavors of springtime produce. It’s perfect for gatherings with friends or family celebrations—any occasion that calls for something special yet comforting. When I make this dish, I’m not just cooking; I’m honoring family traditions while embracing modern twists. Let’s dive into this delicious adventure together!
Spring Chicken Pot Pie: A Cozy Culinary Hug
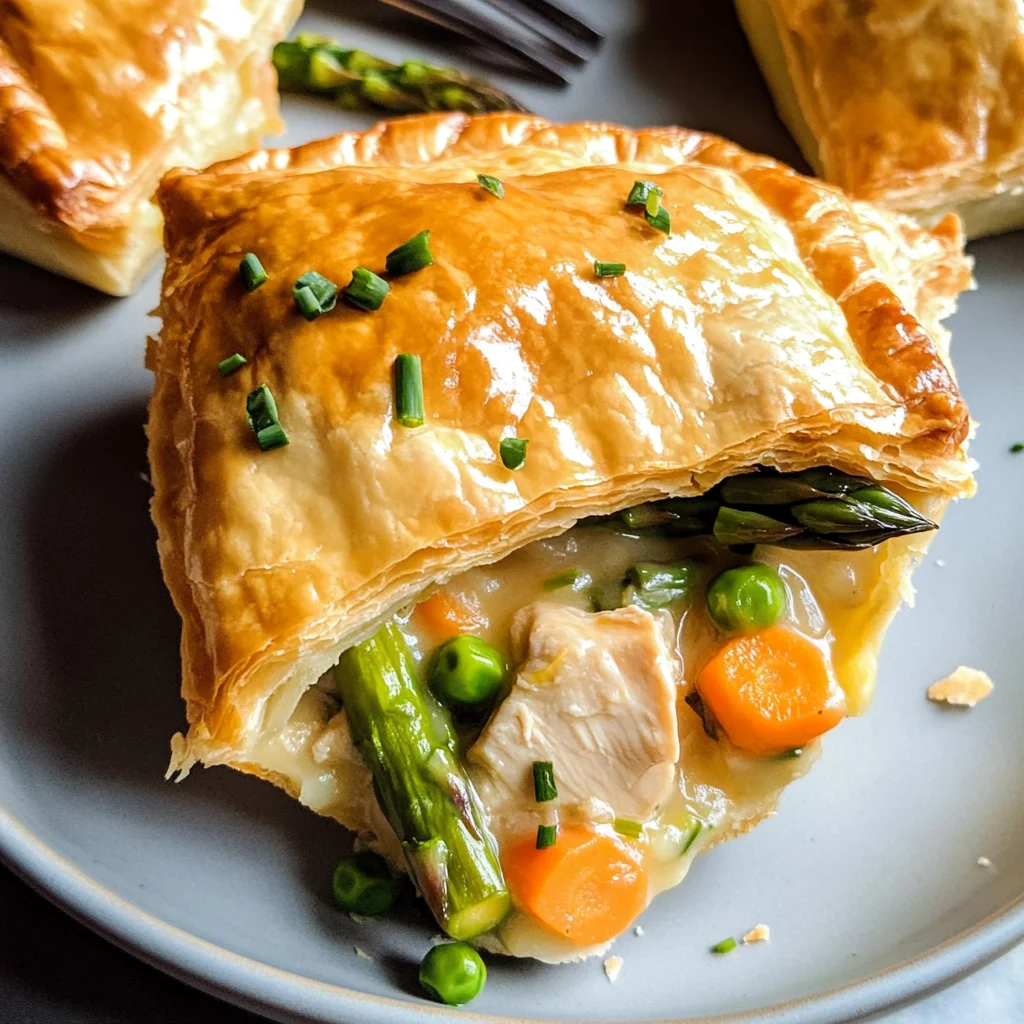
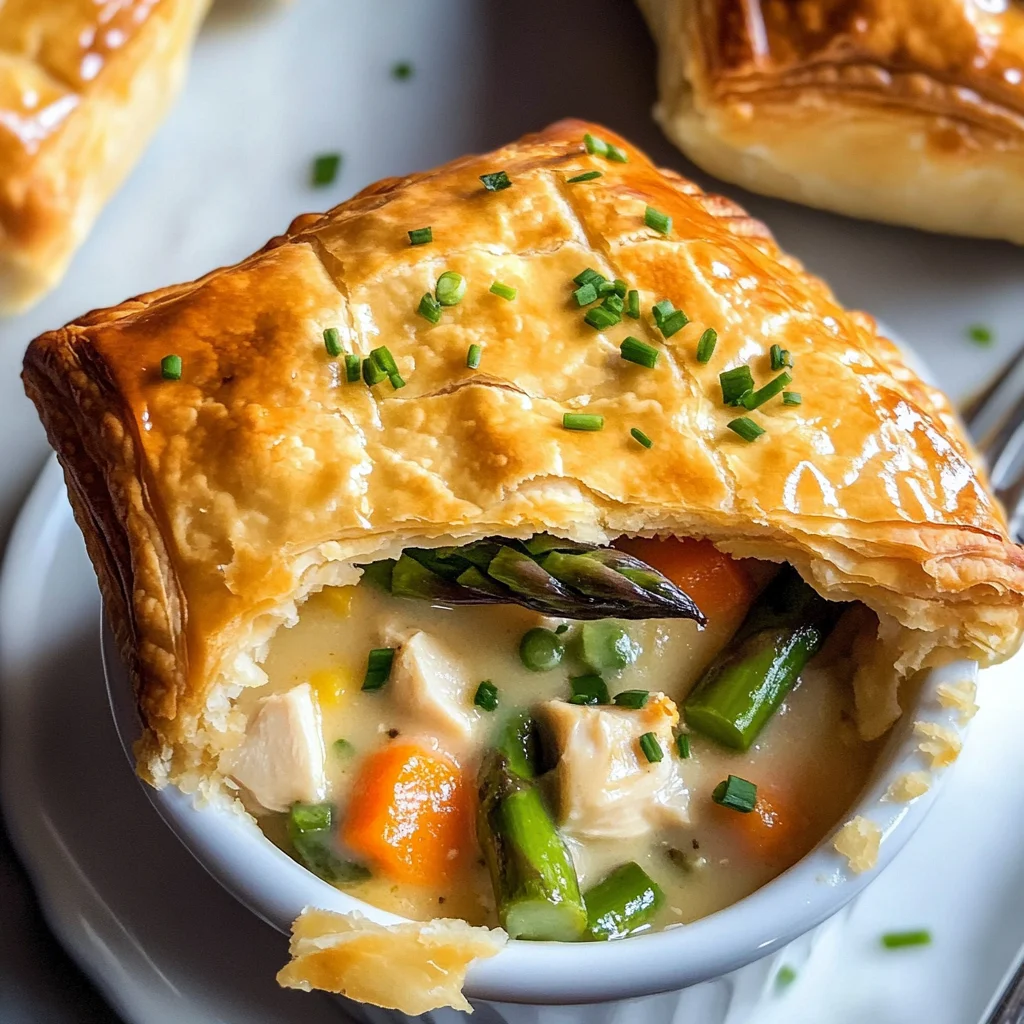
There’s nothing quite like the feeling you get when you pull a freshly baked pot pie from the oven, its crust golden and crisp, waiting to be devoured. This Spring Chicken Pot Pie is exactly that—each slice holds tender chunks of chicken nestled among seasonal vegetables enveloped in a rich lemony cream sauce. It’s hearty yet light enough to celebrate everything spring has to offer. Plus, it comes together quickly enough that even on busy weeknights, you can create something utterly intoxicating without feeling overwhelmed.
Ingredients:
As we embark on this culinary journey together, let’s take a moment to appreciate each ingredient’s role in crafting our Spring Chicken Pot Pie. Each component contributes its own unique flavor and character to this comforting dish.
- 2 tablespoons butter – Butter is more than just fat; it’s an essential building block for flavor in our pot pie filling. Using unsalted butter allows you to control salt levels throughout the dish, enhancing flavors without overpowering them. In this recipe, it serves as the base for sautéing our leeks and other vegetables, providing richness and depth that elevates every bite.
- 1 large leek (white and light green parts diced, about 1 cup) – Leeks are often underrated but bring an incredible mild sweetness to dishes when cooked down slowly. They provide a lovely aromatic foundation for your pot pie filling—much like onions but with a gentler touch. When selecting leeks, look for firm stalks without blemishes; they should feel heavy for their size. If leeks aren’t available, shallots can be used as an alternative.
- 1 ½ cups carrots (diced) – Carrots add color and natural sweetness that balances perfectly with savory notes in your chicken pot pie. They also offer crunch before they become tender during cooking—a delightful contrast! Choose vibrant orange carrots that feel firm; avoid any that are soft or shriveled.
- 1 cup radishes (diced) – These little gems might seem unconventional in a pot pie but trust me—they bring an unexpected peppery bite! When cooked, radishes soften beautifully and lose some heat while adding complexity to the dish’s flavor profile. Look for small radishes that are smooth and brightly colored; larger ones can be overly spicy.
- 1 cup asparagus (diced) – Asparagus is synonymous with spring! Their bright green color not only visually enhances your pie but also adds a fresh earthiness that’s simply delightful. Choose firm stalks with closed tips; avoid those that appear wilted or limp as they won’t deliver the crisp texture we’re aiming for.
- 3 tablespoons flour – This is crucial for thickening our creamy filling without compromising its lusciousness. Flour absorbs moisture from the sautéed vegetables while promoting that perfect sauce consistency we all crave in pot pies! For gluten-free versions, consider using cornstarch mixed with water as an alternative thickener.
- 1 cup homemade or low sodium chicken stock – Stock infuses deep flavor into our filling while keeping things moist—homemade stock offers unparalleled richness! If you’re using store-bought stock, opt for low sodium varieties so you can adjust seasoning according to taste later on.
- 2 teaspoons salt (plus more to taste) – Salt enhances every flavor present in our dish; it’s absolutely paramount for bringing out the natural sweetness of veggies and richness of chicken! Remember always to taste as you go; adjusting seasoning at different stages ensures balanced flavors throughout.
- Freshly cracked black pepper (to taste) – Just as salt amplifies flavor, so does freshly cracked black pepper add warmth and depth! Grinding your peppercorns just before use releases essential oils that dramatically enhance aroma—a simple step worth taking!
- 8 ounces mascarpone cheese – Mascarpone provides an incredibly creamy texture—think liquid gold—making our sauce rich without being heavy! You can substitute cream cheese if necessary but ensure it’s softened before adding so it blends smoothly into your mixture.
- 2 cups diced or shredded chicken – The star of our pot pie! Use leftover roast chicken or poach some freshly cooked breast meat—it’s all about convenience here! Dicing ensures even distribution throughout your filling for every forkful bursting with tender chicken goodness.
- ¾ cup frozen peas – Peas add pops of sweetness along with vibrant green color—plus they require no prep work since they’re already prepped! Feel free to swap them out for edamame if you’re looking for variety!
- 2 teaspoons lemon zest & 2 teaspoons lemon juice – These two ingredients brighten up our dish spectacularly! They cut through richness while enhancing flavors remarkably well—the zest offers aromatic oils while juice adds acidity—both absolutely non-negotiable!
- 2 tablespoons minced chives – Fresh herbs elevate any dish! Chives add subtle onion-y notes without overwhelming other flavors—a great finishing touch mixed into your filling just before baking!
- 1 sheet all-butter puff pastry (such as Darfour) – This flaky pastry layer is what dreams are made of—it creates such an indulgent crust over top! Always keep puff pastry chilled until you’re ready so it puffs beautifully when baked—I promise you’ll savor every crunchy bite!
- Flour (for rolling) – A little dusting keeps things manageable when rolling out pastry—it ensures ease without sticking which makes assembly smoother!
- 1 egg (whisked together with 1 teaspoon water) – This egg wash gives our crust its golden sheen upon baking—it’s all about aesthetics here folks!
Equipment You’ll Need:
Now let’s talk tools because having the right equipment makes all the difference in delivering perfection from your kitchen to your dining table. While these might not be ingredients, they are essential partners in creating something wonderful—even magic—in your oven!
- Large skillet or sauté pan – A sturdy skillet allows ample space for sautéing vegetables evenly over medium heat without crowding them together which can lead to steaming rather than browning—a crucial step in developing deep flavors!
- Cutting board & sharp knife – Investing time into quality knives pays off tremendously when prepping ingredients efficiently—you’ll save time chopping those leeks or dicing carrots while ensuring clean cuts that maintain uniformity across all sizes resulting in even cooking!
- Measuring cups & spoons – Accurate measurements yield consistent results every time—trust me when I say nothing ruins dinner more than miscalculating salt quantities or flour amounts leading to unexpected textures!
- Rolling pin – Essential when working with dough—it helps achieve uniform thickness across your puff pastry ensuring it bakes beautifully without uneven spots causing issues during assembly later on!
Step 1: Preheat Your Oven
To start off our Spring Chicken Pot Pie adventure, we need to preheat our oven to 375°F (190°C). Why is this important? Preheating ensures that once we place our lovingly prepared pie inside, it bakes evenly right from the get-go instead of spending precious minutes slowly warming up—which would compromise texture and cook times dramatically! Take this moment as an opportunity—to breathe deeply—and visualize how incredible dinner will soon be…
Step 2: Sautéing Vegetables
Now onto one of my favorite steps: sautéing those vibrant vegetables! In your trusty skillet over medium heat, melt those two tablespoons of butter until bubbly and fragrant—this process known as sweating brings out natural sugars hidden within each vegetable releasing aromas that’ll make mouths water already before any bites have been taken! Add in your diced leeks first since they take slightly longer than others—they’ll soften beautifully within minutes developing sweet caramelized edges which will infuse further layers of flavor throughout our filling mixture once combined later on… Trust me on this part—it’s absolutely paramount!
Once leeks become translucent after about five minutes’ worth stirring occasionally begins introducing diced carrots followed closely by radishes too—they both love hanging out together simmering away mingling their essence until fully tenderized roughly another ten minutes passing by… Keep stirring gently so nothing sticks at bottom allowing slight browning occur creating depth enhancing overall satisfaction once served atop crispy layers below…
Step 3: Creating The Creamy Base
After those lovely veggies have softened sufficiently now it’s time introduce flour into mix stirring constantly about two minutes helping create roux—this technique encourages binding liquids preventing separation during baking later allowing ultimately thicker sauce development inside every single slice taken once plated up too… Gradually pour homemade/low sodium chicken stock whisking vigorously preventing clumps forming ensuring silky smooth consistency remaining intact whilst incorporating mascarpone cheese mixing until melted completely creating heavenly creamy coating enveloping everything nicely…
Step 4: Bringing It All Together
Next comes joyously tossing shredded/diced chicken alongside peas chives lemon juice zests sprinkling generously throughout making sure nothing goes untouched by flavorful goodness present within mix itself… Taste testing now becomes non-negotiable principle here adjusting seasonings accordingly before transferring entire mixture into prepared baking dish lined beneath awaiting golden layer puff pastry placed atop keeping warm inside oven till reaching desired crispness around thirty minutes’ mark ahead…
As we move forward through these steps remember patience proves vital each stage enhancing final outcome immensely rewarding experience awaits once completed—we’re almost there friends let excitement build as anticipation mounts further still ahead…
Step 5: Sautéing the Treasures of Spring
Now, let’s immerse ourselves in the heart of our Spring Chicken Pot Pie by creating that luscious filling. Begin by melting the butter in a large skillet over medium heat, that liquid gold will serve as a rich base for our vegetables. Once the butter has melted and is bubbling gently, it’s time to introduce the diced leeks. Those tender green-white beauties are a treasure trove of flavor, adding a mild sweetness that will elevate our pie to extraordinary heights. Sauté them for about 3-4 minutes until they become soft and aromatic; you want them to be translucent and fragrant, releasing their essence into the air. This step is crucial because it lays the foundation for all those vibrant flavors to meld together beautifully.
Once your leeks are ready, toss in the diced carrots and radishes. The carrots will impart a natural sweetness while the radishes add a delightful peppery crunch that gives texture to our filling. Stir everything together and let it cook for another 5 minutes—this gentle sautéing not only enhances their flavors but also begins to soften them just enough so they’ll be tender when baked but still have that satisfying bite. After this, we’ll add in the asparagus; its fresh, grassy notes are what spring is all about! Cook everything together until those bright green spears are just tender—about 2-3 minutes should do it. Don’t rush this step! The deeper those flavors develop now, the more satisfying your pot pie will be later on.
Step 6: Creating That Creamy Harmony
Once your vegetables are perfectly sautéed and smelling utterly intoxicating, it’s time to introduce some depth with flour. Sprinkle in 3 tablespoons of flour over your veggies, stirring constantly so each piece gets coated evenly. This technique is known as making a roux—it’s essential for thickening our filling and giving it that creamy texture you crave in a pot pie. Let this mixture cook for about 1-2 minutes; you’re looking for a subtle change in color; it should turn slightly golden and start to smell nutty—this tells you that the raw flour taste has cooked out.
Next comes the magic moment where we pour in your homemade or low-sodium chicken stock. I can already hear that wonderful sound as it hits the pan! As you pour, whisk vigorously; this action breaks up any clumps of flour, creating a smooth sauce that’s going to envelop all those lovely vegetables and chicken beautifully. Continue stirring until everything comes together into a creamy consistency—it should bubble gently and look wonderfully cohesive within about 5-7 minutes of simmering. This step is absolutely paramount because it transforms those simple ingredients into a velvety sauce that binds everything together like an embrace.
Step 7: Infusing Flavor with Zest
Now, let’s add layers upon layers of flavor that make this dish sing! Remove your skillet from heat and stir in 8 ounces of mascarpone cheese—this is where things get really exciting! The mascarpone will melt into your sauce and create an ultra-creamy consistency that’s simply divine. Make sure you mix it thoroughly until no white streaks remain; you’ll want every bite to carry that luxurious creaminess throughout. Next, fold in your shredded chicken along with those vibrant frozen peas—those little bursts of sweetness counterbalance the richness beautifully.
But wait! We need to brighten things up before we finish off our filling completely. Zest two teaspoons of lemon directly into your mixture for an uplifting freshness—you should see how it brings everything to life! The citrusy aroma mingling with the creamy filling is nothing short of magical. Then squeeze in two teaspoons of fresh lemon juice; this sharpness cuts through the richness and adds depth that elevates this pot pie beyond any ordinary comfort food experience. Lastly, sprinkle two tablespoons of minced chives over the top—a gentle whisper of onion-like flavor that resonates throughout our dish.
Step 8: Preparing Your Puff Pastry Masterpiece
While your filling cools slightly (trust me—chilling helps all those flavors meld beautifully), let’s turn our attention to that glorious puff pastry crust! Roll out your sheet of all-butter puff pastry on a floured surface until it’s about ¼ inch thick—this step is so important for ensuring it bakes up flaky and golden brown rather than dense and chewy. You want to keep it cool during this process because warm dough can lose its amazing layers during baking; if at any point it feels too soft or sticky, pop it back in the fridge for just a few minutes.
Once rolled out, cut your pastry into circles or squares depending on how you’re planning to assemble your pies—you should aim for pieces large enough to cover each individual serving dish comfortably with some overhang as well (think generous!). If you’re feeling creative—and I promise you it’s worth taking this extra step—consider creating decorative edges by trimming or crimping with a fork after placing them atop your filled dishes. This not only looks stunning but also gives you additional flaky bits around each serving!
Now here’s where patience plays its part again: brush the edges with your whisked egg wash (the combo of egg and water) which will give you that gorgeous golden color post-baking! This last touch ensures every bite looks as good as it tastes—and trust me when I say no one can resist such an inviting appearance!
Baking Your Perfect Spring Chicken Pot Pie
With everything assembled beautifully, it’s time to send these lovelies into the oven where they’ll transform into pure comfort food magic.
Step 9: The Final Touch – Baking Perfection
Preheat your oven to 375°F (190°C) if you haven’t done so already—this temperature is ideal for achieving perfectly puffed pastry while allowing our creamy filling inside to heat through without burning or drying out. Place each prepared pot pie on a baking sheet lined with parchment paper; this not only makes cleanup easier but also catches any drips from bubbling over—a common occurrence with such decadent fillings!
Bake them in that preheated oven for about 25-30 minutes or until they reach a gorgeous deep golden brown—the visual cue you’re looking for here is not just color but also how high and puffy they appear! Once they start rising like fluffy clouds right before your eyes, you know they’re nearing perfection! You might even catch a whiff of savory aromas wafting through your kitchen at this point—it’s utterly intoxicating!
When they emerge from their oven haven, allow them to rest for about five minutes before diving in—the steam trapped inside needs just a moment longer to settle down so you won’t burn yourself on molten hot filling (trust me on this!). As you cut into these beauties, watch how they release steam like an artist revealing their masterpiece—it’s such an exhilarating moment!
Conclusion:
As we wrap up our journey through crafting this incredible Spring Chicken Pot Pie together, I hope you feel inspired by every step we took! Isn’t it amazing how simple ingredients transform into something so profoundly satisfying? The tender chunks of chicken meld beautifully with crisp seasonal veggies like asparagus and radishes, all drenched in that creamy lemony sauce that sings springtime with every bite. And let’s not forget the flaky puff pastry; it’s like a warm hug wrapped around all those vibrant flavors! This dish isn’t just food; it’s a celebration of seasonal bounty and culinary creativity.
You simply must try making this pot pie—not only because of its delightful taste but also for the joy of creating it with loved ones. Picture yourself rolling out that buttery pastry while laughter fills your kitchen; imagine pulling a bubbling pot pie from the oven and being greeted by a chorus of wow! from everyone gathered around the table. This recipe shines during special occasions like family gatherings or even cozy weeknight dinners when you deserve something extraordinary without too much fuss.
For serving suggestions, imagine savoring one slice alongside a crisp mixed greens salad dressed lightly with lemon vinaigrette—this freshness balances out the rich goodness of the pie perfectly. Or perhaps pair it with roasted baby potatoes tossed with rosemary and garlic for an utterly intoxicating experience that feels both indulgent and wholesome. And don’t overlook dessert; after such a hearty meal, why not treat yourself to something light yet refreshing? A delicate fruit sorbet would round off your culinary masterpiece beautifully!
Feeling adventurous? This recipe is wonderfully adaptable; switch out vegetables based on what’s in season or what you have on hand—zucchini or bell peppers could add new dimensions! Want to elevate it further? Consider adding herbs like thyme or tarragon for an aromatic twist that dances alongside those familiar flavors. I encourage you to dive into this recipe and make it your own—share your creations with friends and family, and let’s keep this beautiful connection through cooking alive!
Spring Chicken Pot Pie

Discover how to make a delightful Spring Chicken Pot Pie bursting with seasonal flavors! Get ready to impress everyone at dinner tonight!
- Prep Time: 20 minutes
- Cook Time: 30 minutes
- Total Time: 50 minutes
- Yield: Serves 6
- Category: Main
- Method: Baking
- Cuisine: American
Ingredients
- 2 tablespoons butter
- 1 large leek (diced)
- 1 ½ cups carrots (diced)
- 1 cup radishes (diced)
- 1 cup asparagus (diced)
- 3 tablespoons flour
- 1 cup low-sodium chicken stock
- 8 ounces mascarpone cheese
- 2 cups diced or shredded chicken
- ¾ cup frozen peas
- 2 teaspoons lemon zest and juice
- 2 tablespoons minced chives
- 1 sheet all-butter puff pastry
Instructions
- Preheat oven to 375°F (190°C).
- In a large skillet, melt butter over medium heat. Sauté leeks for about 3 minutes until translucent.
- Add diced carrots and radishes; cook for an additional 5 minutes until tender.
- Stir in asparagus and sauté for another 2-3 minutes.
- Sprinkle flour over the vegetables, stirring for about 2 minutes to form a roux.
- Gradually whisk in chicken stock, cooking until the mixture thickens (5–7 minutes).
- Remove from heat, then stir in mascarpone cheese until smooth.
- Fold in shredded chicken, peas, lemon zest, juice, and chives; season with salt and pepper.
- Transfer filling to a baking dish and cover with rolled-out puff pastry.
- Brush pastry edges with egg wash and bake for 25–30 minutes until golden brown.
Nutrition
- Serving Size: 1 slice (200g)
- Calories: 420
- Sugar: 4g
- Sodium: 550mg
- Fat: 26g
- Saturated Fat: 13g
- Unsaturated Fat: 12g
- Trans Fat: 0g
- Carbohydrates: 34g
- Fiber: 4g
- Protein: 16g
- Cholesterol: 80mg