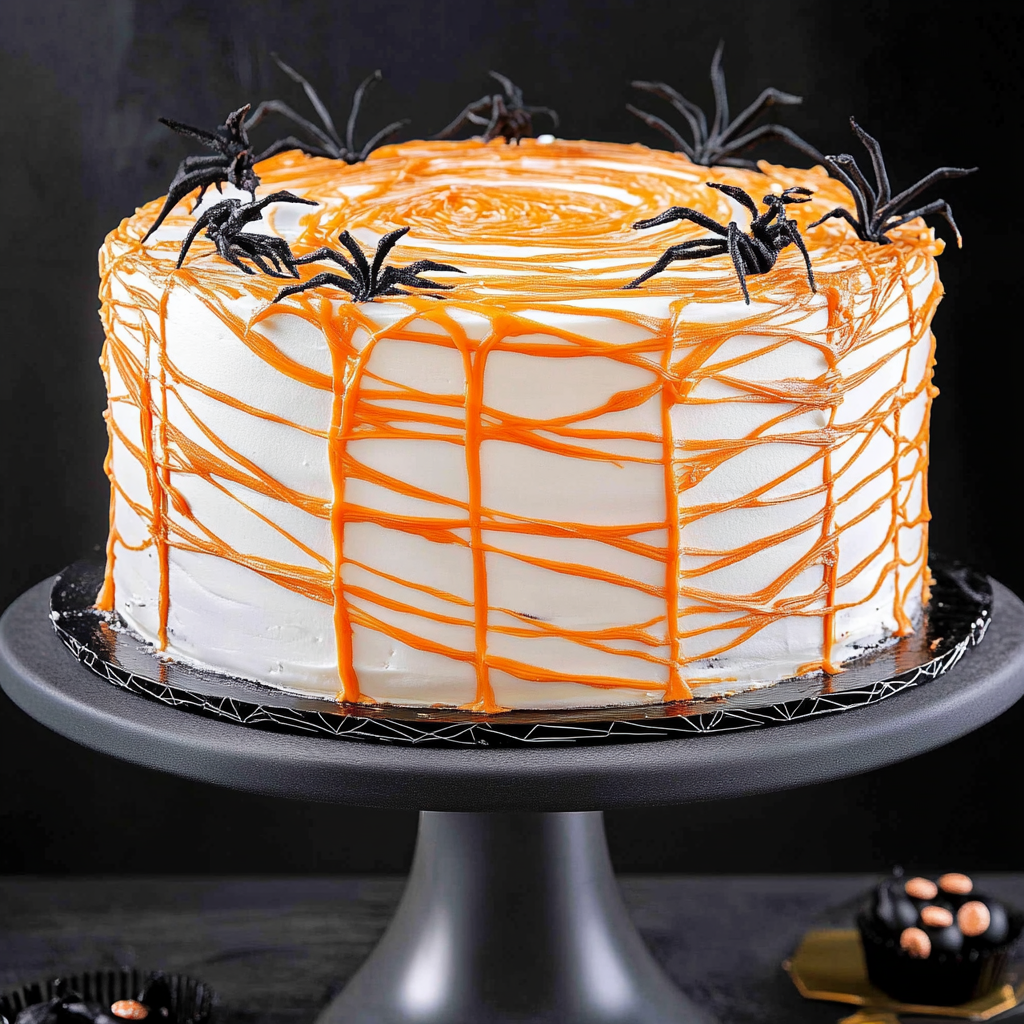
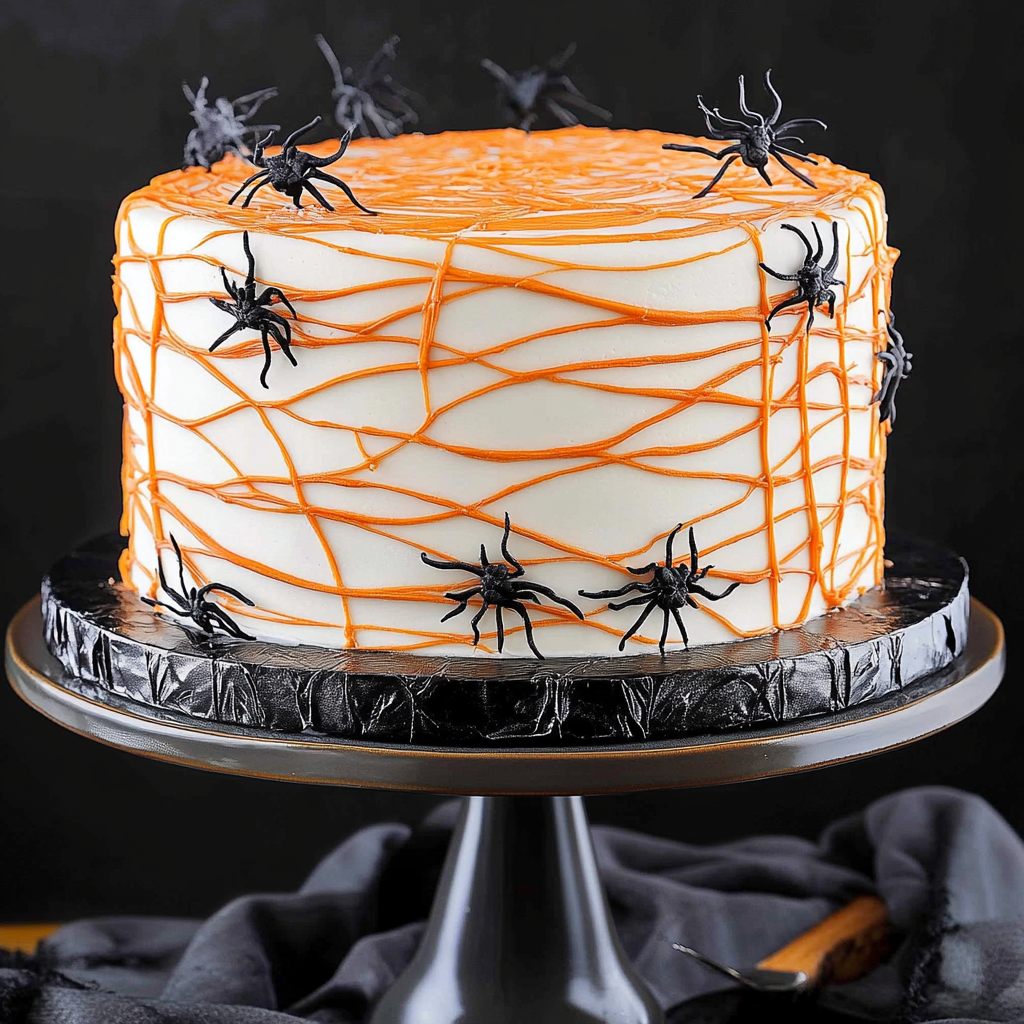
Spiderweb Cake
If you’re looking for a show-stopping dessert that’s perfect for Halloween or any spooky gathering, look no further than this delightful Spiderweb Cake! This rich chocolate cake with cream cheese frosting is not only delicious but also fun to make. The eerie vegan marshmallow web adds a playful touch that will impress your friends and family. It’s a fantastic way to bring a little creativity into your baking, whether it’s for a festive celebration or just a cozy evening at home.
This Spiderweb Cake is more than just a treat; it’s an experience. Picture gathering around the table, sharing slices of this decadent cake, and watching the little ones marvel at the spiderweb design. It’s perfect for busy weeknights when you want something special without spending all day in the kitchen!
Why You’ll Love This Recipe
- Easy to Make: With simple steps and readily available ingredients, you can whip this up even on a busy day.
- Family-Friendly Fun: Everyone loves chocolate, and the spiderweb design makes it exciting for kids and adults alike!
- Versatile Ingredients: You can use all-purpose, whole wheat, or gluten-free flour, making it adaptable to various diets.
- Make-Ahead Option: Bake ahead of time and frost later; it keeps well in the fridge for several days.
- Impressive Presentation: The creative marshmallow web design makes this cake a real showstopper at any event!
Ingredients You’ll Need
Let’s gather our wholesome ingredients to create this delightful Spiderweb Cake! Most of these items are pantry staples, making it easy to get started without any last-minute grocery runs.
For the Cake
- 3 cups granulated sugar
- 2 1/2 cups + 2 tablespoons flour (see notes)
- 3/4 cup + 2 tbsp Dutch-process cocoa powder
- 1/4 cup black cocoa powder (or more Dutch-process cocoa)
- 1 1/2 teaspoons baking powder
- 1 1/2 teaspoons baking soda
- 1 1/2 teaspoons salt
- 3 large eggs (each 50 grams out of shell, room temp – or use chia eggs)
- 1 1/2 cups milk (see notes)
- 3/4 cup olive oil (or canola/vegetable oil)
- 1 tablespoon vanilla extract
- 1 cup + 2 tablespoons boiling water
For the Frosting
- 24 ounces full-fat cream cheese (room temperature)
- 1 cup + 2 tablespoons unsalted butter
- 3 3/4 cups powdered sugar (or more if you like)
- 1 1/2 teaspoons vanilla extract
- pinch of salt
- orange gel food coloring (see notes)
- 2 cups mini vegan marshmallows (see notes)
For Decoration
- Plastic spiders
Variations
One of the best parts about baking is how flexible recipes can be! Feel free to experiment with these fun variations to suit your taste or dietary needs.
- Use Different Flours: Swap all-purpose flour for whole wheat or gluten-free flour to cater to different dietary preferences.
- Try Different Frosting Flavors: Mix in some citrus zest or swap vanilla extract for almond extract in the frosting for a unique twist.
- Experiment with Colors: Use different gel food coloring shades to create vibrant webs—think green or purple for a spooky vibe!
- Add Some Crunch: Fold in some chopped nuts or crushed cookies into the batter for added texture.
How to Make Spiderweb Cake
Step 1: Preheat Your Oven
Before diving into mixing your ingredients, preheat your oven to 350°F (175°C). This ensures that your cake bakes evenly and rises beautifully.
Step 2: Prepare Your Cake Batter
In a large mixing bowl, combine your dry ingredients: granulated sugar, flour, cocoa powders, baking powder, baking soda, and salt. Whisk them together until well mixed. In another bowl, beat together your eggs and then add in milk, olive oil, and vanilla extract. Combine both mixtures slowly while adding boiling water last; this helps create that moist texture we all love!
Step 3: Bake Your Cakes
Divide your batter evenly between prepared cake pans. Bake in your preheated oven for about 24 minutes or until a toothpick inserted comes out clean. This step is crucial as it creates those rich layers that will hold up under the creamy frosting!
Step 4: Make The Frosting
While your cakes cool down, let’s make that luscious cream cheese frosting! Beat together softened cream cheese and butter until smooth. Gradually add powdered sugar while mixing; this makes sure there are no lumps. Finally, mix in vanilla extract and a pinch of salt. If desired, add orange gel food coloring until you achieve the perfect shade.
Step 5: Assemble Your Cake
Once cooled completely, place one cake layer on your serving plate. Spread a generous amount of frosting on top before placing the second layer on top. Now frost the entire cake smoothly with remaining frosting; don’t worry about perfection—it adds character!
Step 6: Create The Spiderweb Design
To make the spiderweb design on top of your cake using mini vegan marshmallows: Start by melting them slightly so they’re pliable but not runny. Use them to create lines across the surface of the cake mimicking threads of a web. Add plastic spiders as finishing touches for that ultimate spooky charm!
And there you have it—a stunning Spiderweb Cake ready to wow everyone! Enjoy every slice with laughter and joy!
Pro Tips for Making Spiderweb Cake
Creating the perfect Spiderweb Cake is a fun and rewarding experience, especially with these handy tips!
- Measure Ingredients Accurately: Using a kitchen scale or measuring cups ensures that your cake layers bake evenly. Accurate measurements lead to a balanced flavor and texture in your cake.
- Room Temperature Ingredients: Make sure your eggs, cream cheese, and butter are at room temperature. This helps them blend together smoothly, resulting in a creamy frosting and moist cake.
- Don’t Overmix: When combining the wet and dry ingredients, mix just until incorporated. Overmixing can lead to a tough cake, so be gentle for a light and fluffy result!
- Use Boiling Water: Adding boiling water to the batter enhances the chocolate flavor and creates a moist crumb. This step is crucial for achieving that rich chocolatey goodness.
- Chill the Frosting: If your cream cheese frosting seems too soft to spread, chill it for about 15-30 minutes. This will help it firm up, making it easier to create those beautiful spiderweb designs.
How to Serve Spiderweb Cake
Serving your Spiderweb Cake can be as creative as you are! Whether for a spooky Halloween gathering or just an exciting dessert experience, here are some ideas to make it visually appealing.
Garnishes
- Fresh Berries: A handful of raspberries or blackberries adds a pop of color and a tart contrast to the sweet cake.
- Chocolate Shavings: Sprinkle some dark chocolate shavings on top for an elegant touch that complements the rich chocolate flavors.
- Mint Leaves: A few fresh mint leaves can brighten up the presentation and add a refreshing note to each bite.
Side Dishes
- Vanilla Ice Cream: A scoop of creamy vanilla ice cream pairs perfectly with the rich chocolate layers, providing a delightful cold contrast.
- Fruit Salad: A light fruit salad offers freshness and balances out the sweetness of the cake. Opt for seasonal fruits like apples, pears, or citrus.
- Chocolate Pudding: For true chocolate lovers, serving some silky chocolate pudding alongside enhances the indulgence of your dessert spread.
- Coffee or Herbal Tea: A warm beverage complements dessert beautifully. Choose a rich coffee or soothing herbal tea that matches your guests’ tastes.
With these tips and serving suggestions, you’ll have everything you need to create a memorable Spiderweb Cake experience that’s sure to impress! Enjoy baking and decorating this delightful treat!
Make Ahead and Storage
This Spiderweb Cake is perfect for meal prep and special occasions, allowing you to enjoy delicious chocolate layers without the last-minute rush. Here’s how to keep your cake fresh and tasty!
Storing Leftovers
- Store leftover cake slices in an airtight container at room temperature for up to 3 days.
- If you prefer, refrigerate the cake for up to a week; just ensure it’s well covered to prevent drying out.
Freezing
- Wrap individual slices or the whole cake tightly in plastic wrap, then place it in a freezer-safe bag or container.
- Freeze for up to 3 months. When ready to enjoy, thaw overnight in the refrigerator.
Reheating
- To reheat slices, simply microwave for about 10-15 seconds on low power.
- For larger portions, preheat your oven to 350°F (175°C) and warm the cake on a baking sheet for around 10-15 minutes.
FAQs
Here are some common questions you might have while making this delightful Spiderweb Cake:
Can I make a gluten-free Spiderweb Cake?
Absolutely! You can substitute all-purpose flour with a gluten-free blend. Just make sure your baking powder is also gluten-free.
How do I create the spiderweb design on my Spiderweb Cake?
To achieve the spooky spiderweb look, use melted vegan marshmallows drizzled in a circular pattern over the top layer of frosting. Then use a toothpick or knife to drag lines from the center outward!
What can I use instead of eggs in my Spiderweb Cake?
Chia eggs are a fantastic substitute! Mix 1 tablespoon of chia seeds with 2.5 tablespoons of water for each egg needed. Let it sit until it thickens before adding it to your batter.
How should I store my Spiderweb Cake?
Store any leftovers in an airtight container at room temperature for up to three days or refrigerate them for up to a week.
Final Thoughts
I hope you’re as excited about this Spiderweb Cake as I am! It’s not only visually stunning but also deliciously rich with chocolate flavors and creamy frosting that will impress everyone at your gathering. Enjoy making it and don’t forget to share your spooky creations with friends and family—you might just inspire someone else to dive into baking too! Happy Halloween baking!
Spiderweb Cake
Indulge in the festive spirit with this delightful Spiderweb Cake, perfect for Halloween or any spooky gathering. This rich chocolate layer cake is topped with creamy cream cheese frosting and adorned with a playful spiderweb design made from mini vegan marshmallows. It’s not just a treat; it’s an experience that brings family and friends together around the table. With its moist layers and striking appearance, this cake will impress kids and adults alike. Plus, it’s easy to make, versatile for various dietary needs, and can be prepared ahead of time. Whether you’re celebrating a special occasion or enjoying a cozy evening at home, this Spiderweb Cake promises to be the centerpiece of joy and creativity.
- Prep Time: 30 minutes
- Cook Time: 24 minutes
- Total Time: 54 minutes
- Yield: Approximately 12 servings 1x
- Category: Dessert
- Method: Baking
- Cuisine: American
Ingredients
- 3 cups granulated sugar
- 2 ½ cups all-purpose flour (or gluten-free)
- ¾ cup Dutch-process cocoa powder
- 1 ½ teaspoons baking powder
- 1 ½ teaspoons baking soda
- 3 large eggs (or chia eggs)
- 1 ½ cups milk (or plant-based alternative)
- ¾ cup olive oil (or canola/vegetable oil)
- 1 tablespoon vanilla extract
- 1 cup + 2 tablespoons boiling water
- 24 ounces cream cheese (room temperature)
- 2 cups mini vegan marshmallows
- 1 cup + 2 tablespoons unsalted butter
- 3 ¾ cups powdered sugar
- 1 ½ teaspoons vanilla extract
- pinch of salt
- orange gel food coloring (see notes)
Instructions
- Preheat oven to 350°F (175°C).
- In one bowl, mix dry ingredients: sugar, flour, cocoa powders, baking powder, baking soda, and salt.
- In another bowl, beat eggs (or chia eggs) with milk, oil, and vanilla. Combine both mixtures while slowly adding boiling water.
- Divide batter into prepared pans and bake for about 24 minutes until a toothpick comes out clean.
- For frosting, beat cream cheese and butter until smooth, then gradually add powdered sugar and vanilla.
- Once cooled, frost the layers generously and create a spiderweb design using melted mini vegan marshmallows.
Nutrition
- Serving Size: 1 serving
- Calories: 425
- Sugar: 56g
- Sodium: 300mg
- Fat: 22g
- Saturated Fat: 10g
- Unsaturated Fat: 10g
- Trans Fat: 0g
- Carbohydrates: 58g
- Fiber: 2g
- Protein: 5g
- Cholesterol: 60mg