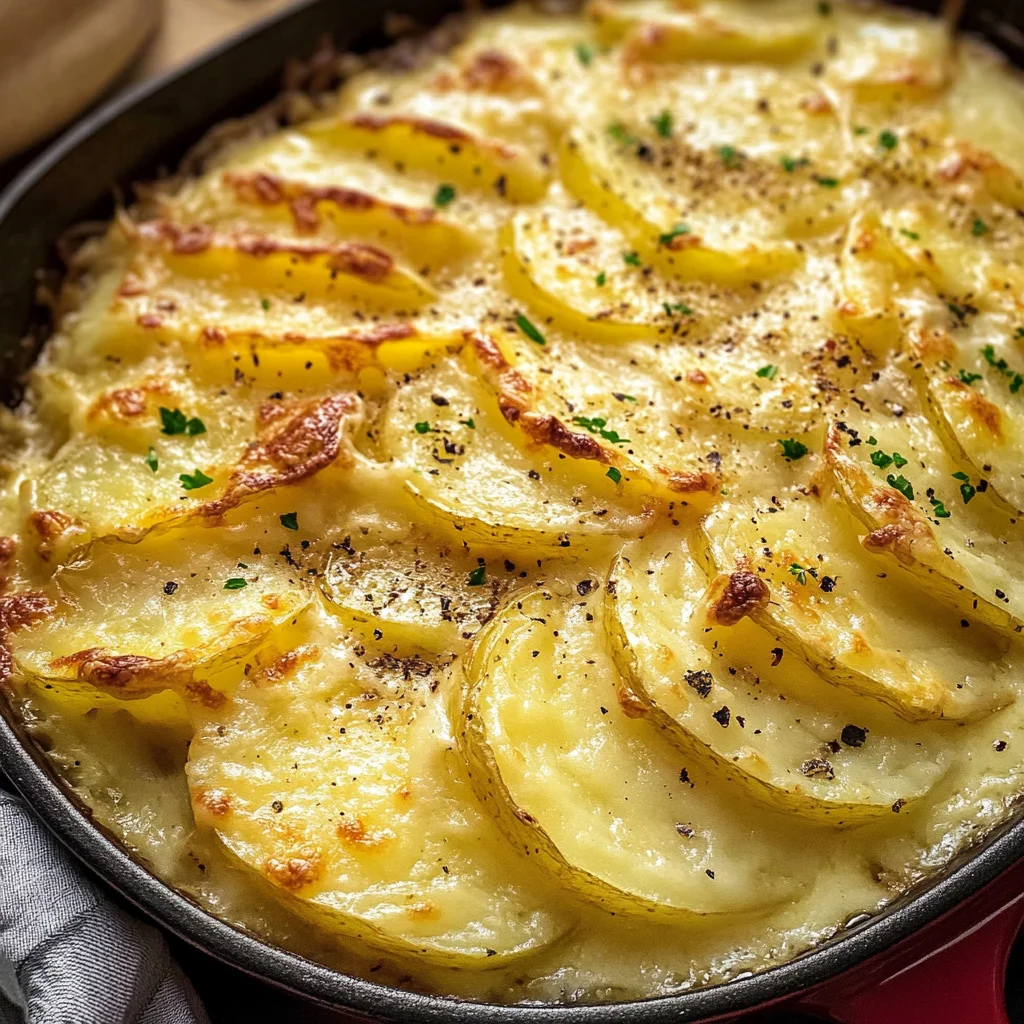
Scalloped Potatoes
Indulge in the ultimate comfort food with these Scalloped Potatoes, featuring tender layers of potato smothered in a rich, creamy cheese sauce that will leave you longing for seconds. This dish isn’t just about feeding the body; it’s about nourishing the soul. Picture this: a cozy evening, the aroma of buttery potatoes wafting through your home, and as you take that first bite, the silky cheese envelops your senses, making every worry fade away. I promise you, there’s something truly magical about the way scalloped potatoes bring people together around the dinner table. They hold a special place in my heart, just like an old friend who always knows how to make things better.
I’ve always been captivated by how this dish bridges generations; each family has its own version, often passed down through the years like a cherished heirloom. The beauty of scalloped potatoes lies not only in their comforting flavors but also in their versatility. Whether served at a holiday gathering or a simple weeknight dinner, they elevate any meal into something extraordinary. The creamy cheese sauce combined with perfectly cooked potatoes creates a symphony of flavors and textures that simply can’t be beaten. It’s no wonder that when I think of homemade goodness, scalloped potatoes spring to mind as a must-have on my table.
Scalloped Potatoes: A Heartwarming Classic
Now that we’ve set the stage for this culinary adventure, let’s dive into making these unforgettable scalloped potatoes together! Trust me when I say that once you master this recipe, you’ll find yourself craving it more often than you’d expect. The process is straightforward yet rewarding; each step brings us closer to that gooey, cheesy goodness we all adore.
Ingredients:
As we embark on this delicious journey to create our Scalloped Potatoes, let’s talk about each ingredient that plays an essential role in bringing this dish to life.
- 4 lb Potatoes: Choosing the right type of potato is absolutely paramount in creating the perfect scalloped dish. I recommend using Yukon Gold or Russet potatoes because they have a wonderful balance of starchiness and waxiness that helps them hold their shape while still becoming tender and creamy during baking. When selecting your potatoes, look for ones with smooth skin and firm flesh – avoid any with blemishes or soft spots, as they may affect the final texture of your dish.
- 1/4 cup Butter: This golden delight is what adds richness and depth to our cheese sauce. By melting butter at medium heat before incorporating it into our roux (a mixture of fat and flour), we’re setting up a flavorful base that will coat our potatoes beautifully. Using unsalted butter allows us to control the saltiness throughout the dish – trust me on this one; it makes all the difference!
- 1/4 cup Flour: Flour serves as our thickening agent in this recipe, creating a luscious sauce that clings to every slice of potato. When whisked together with melted butter, it forms what is known as a roux—a technique crucial for achieving that velvety texture we crave in scalloped potatoes. Be sure to cook your roux for just 1-2 minutes; this step is non-negotiable! Cooking out the raw flavor of the flour ensures our sauce tastes rich and delightful rather than gritty.
- 2 cups Milk: The liquid gold that binds everything together! Milk not only adds creaminess but also brings warmth and comfort to our dish. I recommend using whole milk for its rich taste; however, if you’re looking for a lighter option or are dairy-free, unsweetened almond milk works surprisingly well too! Just remember to warm it slightly before adding—this helps prevent lumps from forming when mixing with your roux.
- 2 cups Cheddar Cheese: Here comes the star of our show—the cheese! A sharp cheddar is my go-to choice because it provides an irresistible flavor punch that stands up beautifully against our creamy sauce. When shopping for cheese, opt for block cheddar instead of pre-grated varieties; freshly grating it yourself ensures better melting quality and flavor infusion throughout your dish.
- 1 tsp Salt: This humble seasoning enhances every component of our recipe while balancing out flavors beautifully. It’s important to season layers as you go along—don’t underestimate how vital salt is for elevating your dish from good to extraordinary!
- 1/4 tsp Cayenne Pepper: Adding just a hint of cayenne pepper introduces an exciting kick without overpowering our other flavors. It gives depth and complexity while complementing the creaminess perfectly—trust me on this little secret weapon!
- 1/2 tsp Paprika: Not only does paprika add color to our cheesy creation, but its mild sweetness also rounds out all those rich flavors beautifully. I love how it lifts dishes without requiring much effort—it’s like magic sprinkled from a jar!
Equipment You’ll Need:
Having the right tools makes your cooking experience smoother and more enjoyable—like having loyal companions by your side on this culinary journey! While these items might not be ingredients themselves, they are essential partners in crafting something wonderful.
- Mandoline Slicer: If there’s one tool I highly recommend investing in for this recipe (and many others!), it’s a mandoline slicer! This handy gadget allows you to achieve uniform potato slices effortlessly while ensuring even cooking throughout—no more guesswork here! Just be cautious with those blades; they are extremely sharp!
- Saucepan: A sturdy saucepan is key for making your roux and cheese sauce seamlessly. Opt for one with a heavy bottom to prevent scorching—after all, we want every drop of goodness accounted for!
- Whisk: A good whisk helps bring everything together smoothly when making sauces or combining dry ingredients—this tool will be your best friend as you work toward achieving that luscious consistency we crave!
- Baking Dish: Choose a medium-sized baking dish (about 9×13 inches) – glass or ceramic works best here so you can admire those gorgeous layers as they bake away! Make sure it’s greased well so nothing sticks during baking (we want every last bite!).
Now that we have gathered all our ingredients and equipment let’s start preparing those mouthwatering scalloped potatoes!
Preparing the Scalloped Potatoes
Step 1: Preheat Your Oven
First things first—let’s get our oven preheating at 350°F (175°C). This step is crucial because having an adequately heated oven ensures even cooking right from the moment those delightful layers go in. While it’s warming up, take some time to gather everything else you’ll need; trust me when I say preparation makes all subsequent steps smoother!
Step 2: Slice Those Potatoes
Next up is slicing those beautiful potatoes into elegant rounds using your trusty mandoline slicer! Aim for about 1/8 inch thickness—this will help ensure even cooking throughout. Don’t rush through this step; each slice should be uniform so they cook at the same rate and absorb all that glorious cheese sauce evenly! As you slice away, enjoy observing how these humble tubers transform into delicate layers waiting eagerly to soak up flavor.
Step 3: Make Your Roux
Now onto one of my favorite parts—the roux! In your saucepan over medium heat, melt down your butter until it’s bubbly but not browned (we don’t want burnt notes here). Once melted, whisk in flour until fully incorporated—what you’re creating now is going to act as both thickener and flavor enhancer later on! Cook it gently for about 1-2 minutes until slightly golden—it should smell heavenly by now!
Step 4: Create That Creamy Sauce
With your roux ready, gradually pour in warmed milk while continuously whisking until everything melds together beautifully without lumps forming (we want smooth sailing!). Keep whisking until it begins thickening—this process can take around 5-7 minutes total depending upon heat levels used earlier on). Once thickened properly (think custard-like), stir in shredded cheddar along with salt & spices mentioned previously until completely melted through—oh boy does it smell incredible already!
I can already feel my excitement building as we prepare those luscious layers next…stay tuned!
The Creamy Transformation of Your Scalloped Potatoes
Step 5: Creating the Velvety Cheese Sauce
Now comes the moment when your kitchen transforms into a haven of warmth and rich aromas—the creation of that utterly intoxicating cheese sauce! Begin by melting a generous 1/4 cup of butter in a medium saucepan over medium heat, allowing it to bubble just enough to coax out its nutty flavors. This process is not just about melting; it’s about creating a foundation for our sauce, known as a roux. Once the butter is melted, whisk in an equal amount—1/4 cup—of flour. This step is crucial; you’re essentially creating a thickening agent that will give your sauce that luxurious, creamy texture. Cook this mixture for about 1-2 minutes, stirring constantly until it turns a lovely light golden color. Why this matters? Cooking the flour helps eliminate that raw taste and brings out its nutty essence, enriching the overall flavor profile of your dish.
Now, gradually add in 2 cups of milk while whisking continuously—this is where the magic begins! You’ll want to pour in the milk slowly at first to avoid any lumps forming. As you whisk, you’ll notice how the mixture begins to thicken beautifully, transforming from a liquid into something that resembles liquid gold. This gradual incorporation allows for even cooking and ensures that you achieve that silky-smooth consistency we all crave in scalloped potatoes. Keep whisking until the sauce bubbles gently and coats the back of a spoon—trust me on this; patience pays off! Once you have achieved that luscious thickness, stir in 2 cups of cheddar cheese along with 1 teaspoon of salt, 1/4 teaspoon of cayenne pepper, and 1/2 teaspoon of paprika. The cheese should melt seamlessly into the sauce, creating a rich and flavorful embrace for our potatoes.
Step 6: Layering with Love
With your glorious cheese sauce ready to go, it’s time to layer those perfectly sliced potatoes! Grab your greased baking dish—this step is non-negotiable because ensuring your dish is well-greased prevents any sticking and allows for easy serving later on. Start by placing a single layer of potato slices at the bottom of your dish; it’s like laying down the first notes of a beautiful melody. Pour some of that velvety cheese sauce over this first layer until they are lovingly coated but not drowning—just enough to keep them moist and flavorful as they bake.
Continue layering your potato slices and cheese sauce until all ingredients are used up. I recommend about three layers for an ideal balance between potatoes and sauce—the key here is to make sure each layer gets its fair share of that creamy goodness. Don’t rush this step; take your time to ensure each slice is nestled perfectly within its cheesy blanket. What makes these scalloped potatoes so special is precisely this layering technique—it allows each slice to cook evenly while absorbing all those delightful flavors from the cheese sauce.
Step 7: The Foil Cover
Once you’ve layered up your masterpiece, it’s time to prepare for baking! Cover your dish tightly with aluminum foil; this might seem simple, but it’s absolutely paramount for achieving perfectly cooked scalloped potatoes. The foil acts as a protective shield during the initial phase of baking—it traps steam inside, preventing the top from browning too quickly while ensuring that those beautiful layers cook through evenly.
Pop your covered dish into the preheated oven set at 350°F (175°C) and let it bake for about 30 minutes. During this time, what you should watch for is gentle bubbling around the edges—this tells you that everything is progressing beautifully within! It’s also important not to skip this step because if you uncover too soon, you risk those top layers drying out before they can become tender and infused with flavor. Trust me on this one; patience truly makes all the difference.
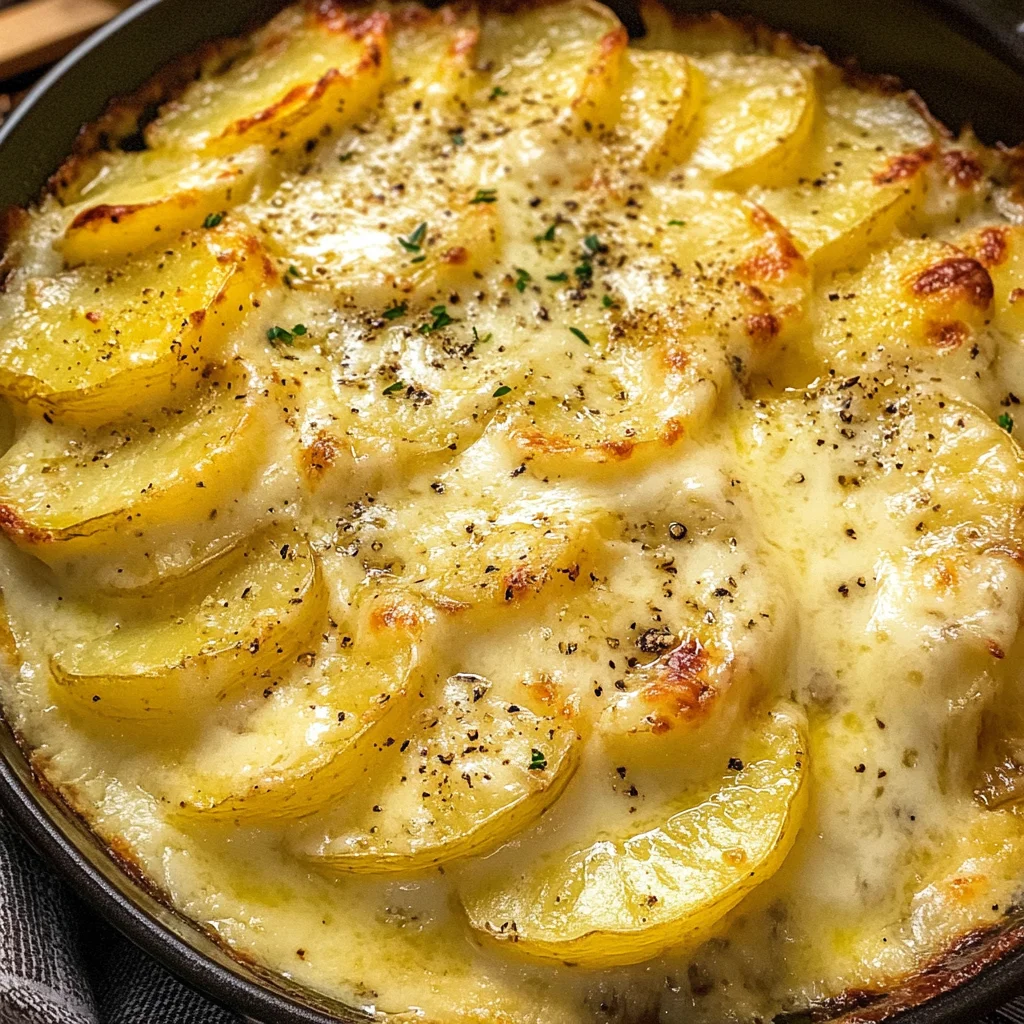
Step 8: Unveiling Your Creation
After half an hour has passed—a time filled with delicious anticipation—you can finally remove that foil cover! Be careful here; steam will escape like an excited sigh from your dish. At this point, you’ll want to admire how beautifully cooked everything looks beneath that protective layer. Now comes another essential moment: increase the oven temperature slightly or leave it as-is if you’re feeling cautious (you know your oven best). Bake uncovered for an additional 15 minutes until those edges start turning golden brown and bubbly.
This final bake performs some extraordinary alchemy; as moisture escapes from the top layer, it encourages browning—a visual cue indicating flavor deepening as sugars caramelize beautifully on the surface. It’s also when those delectable bits around the edges develop an irresistible crunch! So keep an eye on it as it bakes during these last minutes because every oven behaves differently; you want a gorgeous golden hue without burning any part away.
Final Touches: The Grand Reveal
Step 9: Letting It Rest
Once your scalloped potatoes emerge from their oven sanctuary looking utterly divine—bubbling cheese glistening under a crisp golden crust—resist the temptation to dig right in! I know it’s hard; I’ve been there too! But allowing them to rest for about 10-15 minutes creates magic; it lets everything settle down after such vigorous baking which helps achieve perfect sliceability when serving later on.
During this resting period, flavors meld together beautifully while excess moisture evaporates—resulting in less soupy servings when you finally cut into them. Just imagine slicing through those tender layers only to reveal their perfection on each plate—a sight guaranteed to make hearts flutter!
As you serve these scalloped potatoes at your table tonight or at any gathering where comfort food reigns supreme—it will undoubtedly elicit oohs and ahhs from everyone lucky enough to enjoy them alongside you. They’re not just side dishes but heartfelt memories crafted in every bite—a reminder that love indeed resides within every delicious layer of food shared among friends and family alike.
Enjoy every mouthful knowing you’ve created something truly extraordinary—and remember: great food deserves great company! Happy cooking!
Storage and Enjoyment Tips for Your Scalloped Potatoes
Now that your kitchen is filled with the intoxicating aroma of freshly baked Scalloped Potatoes, it’s time to dig in and revel in the cozy comfort they bring! But what if you find yourself with leftovers? Fear not, my friends; these delightful layers of creamy goodness can be preserved so you can enjoy them again. Let’s dive into how to store and savor your Scalloped Potatoes long after they’ve graced your table.
Storing Leftover Scalloped Potatoes
To keep your Scalloped Potatoes as delicious as the moment they came out of the oven, it’s essential to store them properly. First things first: let them cool down completely before transferring them to an airtight container. This helps prevent condensation from ruining that creamy texture we adore. You can keep them in the refrigerator for about 3-5 days, but I promise you, they’ll be gone long before then! For an extra touch of freshness, consider placing a slice of bread in the container; it absorbs excess moisture and helps maintain that perfect creaminess. When you’re ready to relive that flavor explosion, simply reheat in the oven or microwave until warmed through. Trust me—these potatoes become even more flavorful after a night in the fridge, allowing all those wonderful spices and cheese to meld together beautifully!
Freezing Scalloped Potatoes for Later
If you want to take your meal prep game up a notch, freezing your Scalloped Potatoes is an excellent option! Start by allowing them to cool completely, just like before, then portion them into freezer-safe containers or heavy-duty freezer bags. Make sure to remove as much air as possible—this will help prevent freezer burn and keep those flavors locked in. They can last up to 2-3 months frozen but will likely call your name long before then! When you’re ready to enjoy this comforting dish again, simply thaw it overnight in the fridge and reheat in the oven until bubbly and golden. The convenience factor here is absolutely paramount; imagine pulling a hearty casserole from your freezer on a chilly weeknight, filling your home with warmth and nostalgia!
Scalloped Potatoes

Indulge in the heartwarming comfort of Scalloped Potatoes, a classic dish that elevates any meal with its creamy layers of perfectly cooked potatoes enveloped in a rich cheese sauce. This delightful casserole is not just food; it’s a celebration of flavors and memories shared around the dinner table. Picture gathering with loved ones, savoring every cheesy bite as laughter fills the air. Whether served at holiday gatherings or cozy weeknight dinners, these scalloped potatoes promise to be the star of the show, bringing warmth and joy to all who partake.
- Prep Time: 20 minutes
- Cook Time: 45 minutes
- Total Time: 1 hour 5 minutes
- Yield: Serves approximately 8 people 1x
- Category: Side Dish
- Method: Baking
- Cuisine: American
Ingredients
- 4 lb Yukon Gold or Russet Potatoes
- 1/4 cup Butter
- 1/4 cup Flour
- 2 cups Milk (whole or unsweetened almond)
- 2 cups Sharp Cheddar Cheese
- 1 tsp Salt
- 1/4 tsp Cayenne Pepper
- 1/2 tsp Paprika
Instructions
- Preheat your oven to 350°F (175°C).
- Slice the potatoes into even rounds using a mandoline slicer.
- In a saucepan, melt butter over medium heat, then whisk in flour to create a roux, cooking for 1-2 minutes.
- Gradually add warmed milk while whisking until thickened; stir in shredded cheese, salt, cayenne pepper, and paprika until melted.
- Layer sliced potatoes in a greased baking dish, pouring cheese sauce over each layer until all ingredients are used.
- Cover with aluminum foil and bake for 30 minutes; remove foil and bake for an additional 15 minutes until golden brown.
- Let rest for 10-15 minutes before serving.
Nutrition
- Serving Size: 1 cup (240g)
- Calories: 350
- Sugar: 3g
- Sodium: 600mg
- Fat: 18g
- Saturated Fat: 10g
- Unsaturated Fat: 7g
- Trans Fat: 0g
- Carbohydrates: 36g
- Fiber: 4g
- Protein: 10g
- Cholesterol: 40mg