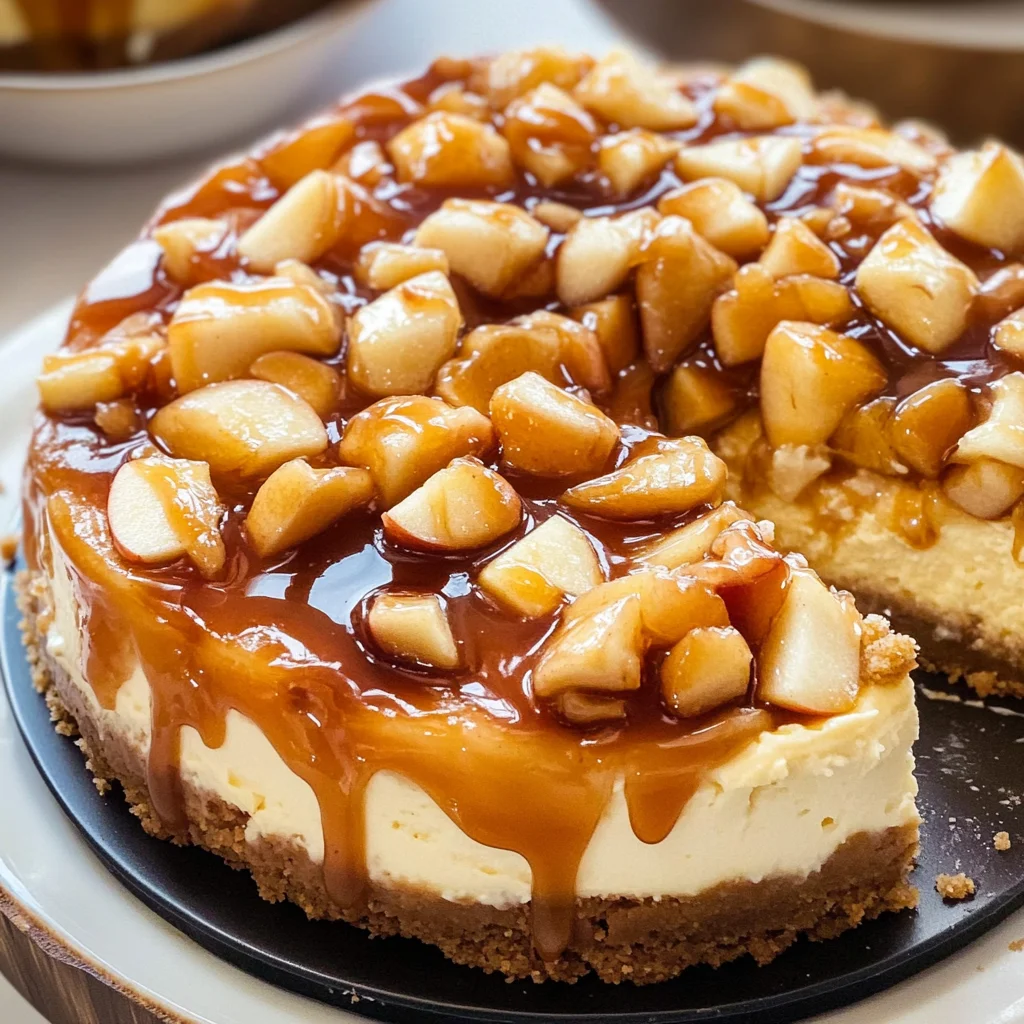
Salted Caramel Apple Pie Cheesecake
If you’re looking for a show-stopping dessert that combines the comforting flavors of apple pie with the creamy richness of cheesecake, then you’ve stumbled upon the perfect recipe! This Salted Caramel Apple Pie Cheesecake is not only delicious but also a delightful treat for any occasion. Whether it’s a busy weeknight or a family gathering, this dessert will surely impress your loved ones and satisfy your sweet tooth.
What makes this cheesecake so special is that it’s packed with warm spices, luscious layers, and topped off with homemade salted caramel. It’s the kind of dessert that will have everyone coming back for seconds (and maybe even thirds!). Plus, it’s easier to make than you might think!
Why You’ll Love This Recipe
- Decadent flavor: The combination of salted caramel and apple pie is a match made in heaven.
- Crowd-pleaser: This cheesecake is sure to be a hit at any gathering or celebration.
- Make-ahead option: You can prepare it in advance and let it chill overnight, making entertaining stress-free.
- Simple ingredients: All you need are wholesome ingredients that you may already have in your pantry.
- Comfort food vibes: This dessert wraps you in warmth and nostalgia, perfect for cozy evenings at home.
Ingredients You’ll Need
To create this incredibly tasty Salted Caramel Apple Pie Cheesecake, you’ll need some simple and wholesome ingredients. Don’t worry; there’s nothing fancy here—just good old-fashioned staples that come together beautifully.
For the Crust
- 1 1/2 cups graham cracker crumbs
- 1/4 cup granulated sugar
- 1/2 cup unsalted butter (melted)
For the Apple Layer
- 3 cups peeled and sliced apples
- 1/4 cup brown sugar
- 1 tsp ground cinnamon
- 2 tbsp all-purpose flour
For the Cheesecake Filling
- 24 oz cream cheese (softened)
- 1 cup granulated sugar
- 3 large eggs
- 1 tsp vanilla extract
- 1/2 cup sour cream
For the Salted Caramel Sauce
- 1 cup granulated sugar
- 6 tbsp unsalted butter
- 1/2 cup heavy cream
- 1 tsp sea salt
Variations
One of the great things about this recipe is its flexibility! You can easily customize it to suit your taste or what you have on hand.
- Change up the fruit: Try using pears or peaches instead of apples for a different flavor profile.
- Add nuts: Tossing in some chopped pecans or walnuts can add a delightful crunch to your cheesecake.
- Experiment with spices: If you’re feeling adventurous, add a pinch of nutmeg or ginger to spice things up!
- Gluten-free option: Swap out graham cracker crumbs for gluten-free alternatives to accommodate dietary needs.
How to Make Salted Caramel Apple Pie Cheesecake
Step 1: Prepare the Crust
Start by preheating your oven to 325°F (163°C). In a mixing bowl, combine the graham cracker crumbs, sugar, and melted butter until well mixed. Press this mixture firmly into the bottom of a 9-inch springform pan. Baking it helps set the crust and gives it that lovely golden color!
Step 2: Bake the Crust
Bake the crust for about 10 minutes, then take it out and let it cool completely. Cooling is essential as it prevents the cheesecake filling from melting into the crust when you pour it on top.
Step 3: Make the Apple Layer
In another large bowl, mix together sliced apples with brown sugar, cinnamon, and flour until they’re well-coated. Distributing these juicy apple slices evenly over your cooled crust will create a delicious base for your creamy filling.
Step 4: Prepare the Cheesecake Filling
In a large mixing bowl, beat softened cream cheese with granulated sugar until smooth. Adding eggs one at a time ensures they mix uniformly without lumps. Then stir in vanilla extract and sour cream until everything is perfectly combined. This filling will be rich and creamy!
Step 5: Assemble
Pour your cheesecake mixture over the apple layer in the pan. It should cover them nicely! Bake this beauty for about 60-70 minutes until just set in the center. Remember to keep an eye on it; we want that perfect texture!
Step 6: Chill Out
Once baked, let your cheesecake cool completely before transferring it to the fridge for at least four hours (or overnight if you can wait!). Chilling helps firm up our cheesecake and melds those flavors beautifully.
Step 7: Make Salted Caramel Sauce
While waiting, let’s whip up some salted caramel sauce! In a saucepan over medium heat, melt granulated sugar until it’s amber-colored—this takes patience! Once melted, whisk in butter until smooth. Carefully pour in heavy cream while stirring continuously; this transformation will be magical! Finally, stir in sea salt for that classic salted caramel flavor.
Step 8: Serve
Drizzle your homemade salted caramel sauce generously over each slice of chilled cheesecake before serving. Enjoy every bite as you savor this incredible blend of flavors!
Now you’re ready to dig into one of my favorite desserts—Salted Caramel Apple Pie Cheesecake! I can’t wait for you to try it!
Pro Tips for Making Salted Caramel Apple Pie Cheesecake
Creating the perfect salted caramel apple pie cheesecake can be a rewarding experience, and with a few extra tips, you’ll ensure it turns out absolutely delicious!
- Use Room Temperature Ingredients: Starting with softened cream cheese and room temperature eggs helps achieve a smooth batter without lumps. This is key for that delightful creamy texture you want in a cheesecake.
- Don’t Overmix: Once you add the eggs to the cream cheese mixture, mix just until combined. Overmixing can introduce air into the batter, which may lead to cracks while baking.
- Cool Gradually: After baking, let your cheesecake cool slowly at room temperature before refrigerating. This prevents sudden temperature changes that could cause cracks.
- Check for Doneness: The cheesecake should be set around the edges but still slightly jiggly in the center when you remove it from the oven. It will continue to firm up as it cools.
- Make the Caramel Ahead of Time: Preparing your salted caramel sauce in advance not only saves time but also allows it to cool properly for easy drizzling over your cheesecake when serving.
How to Serve Salted Caramel Apple Pie Cheesecake
Serving your salted caramel apple pie cheesecake beautifully can make all the difference! Here are some fun ideas to elevate your presentation.
Garnishes
- Whipped Coconut Cream: A dollop of whipped coconut cream adds a light and fluffy touch that complements the richness of the cheesecake.
- Chopped Nuts: Sprinkle some finely chopped pecans or walnuts on top for added texture and a hint of nuttiness.
- Fresh Apple Slices: Thin slices of fresh apples arranged decoratively on top give a refreshing contrast and enhance visual appeal.
Side Dishes
- Vanilla Ice Cream: A scoop of dairy-free vanilla ice cream creates a delicious temperature contrast against the chilled cheesecake.
- Caramel Drizzled Popcorn: Sweet and salty popcorn makes an enticing side snack that echoes the flavors of your dessert.
- Fruit Salad: A light fruit salad with seasonal fruits offers a refreshing balance to the rich cheesecake, making it a perfect pairing.
- Coffee or Herbal Tea: Serving with a warm cup of coffee or herbal tea enhances the dessert experience, providing warmth and ease after a sweet indulgence.
Enjoy crafting this delightful dessert, and remember, sharing is just as sweet as savoring it yourself!

Make Ahead and Storage
This Salted Caramel Apple Pie Cheesecake is perfect for meal prep! Not only can you make it ahead of time, but it also stores beautifully, allowing the flavors to meld together even more. Here’s how to keep it fresh and delicious.
Storing Leftovers
- Store leftovers in an airtight container in the refrigerator for up to 5 days.
- If possible, cover the top with plastic wrap to prevent drying out.
- Keep any leftover salted caramel sauce in a separate container in the fridge.
Freezing
- Wrap slices or the whole cheesecake tightly in plastic wrap, then foil.
- Freeze for up to 2 months for the best quality.
- Thaw overnight in the refrigerator before serving.
Reheating
- Enjoy your cheesecake cold or at room temperature for the best texture and flavor.
- If you prefer it warm, reheat individual slices in the microwave for about 15-20 seconds.
FAQs
If you have questions about this delightful dessert, you’re not alone! Here are some common inquiries regarding the Salted Caramel Apple Pie Cheesecake.
Can I use other fruits instead of apples in this cheesecake?
Absolutely! Pears or peaches would work wonderfully. Just ensure they are sliced thinly and adjust any sugar as needed based on their sweetness.
How do I make Salted Caramel Apple Pie Cheesecake gluten-free?
You can easily make this recipe gluten-free by using gluten-free graham cracker crumbs for the crust. The rest of the ingredients are naturally gluten-free!
What can I substitute for sour cream?
Greek yogurt is an excellent alternative to sour cream in this cheesecake recipe. It will maintain that creamy texture without compromising flavor.
Can I prepare Salted Caramel Apple Pie Cheesecake a day in advance?
Yes! In fact, preparing it a day ahead enhances its flavor as it allows time for all the elements to meld together beautifully.
Final Thoughts
I hope you enjoy making this Salted Caramel Apple Pie Cheesecake as much as I do! It’s truly a special dessert that combines comforting flavors into one delightful treat. Whether it’s for a gathering or just a sweet indulgence at home, this cheesecake is sure to impress. Happy baking, and may your kitchen be filled with warmth and delicious aromas!
Salted Caramel Apple Pie Cheesecake
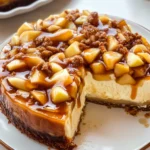
Indulge in a slice of Salted Caramel Apple Pie Cheesecake, a decadent dessert that beautifully marries the comforting flavors of classic apple pie with the rich creaminess of cheesecake. This show-stopping treat features layers of spiced apples nestled beneath a smooth and creamy cheesecake filling, all topped with a luscious homemade salted caramel sauce. Perfect for gatherings or cozy nights at home, this cheesecake will leave your loved ones craving more. With easy-to-find ingredients and straightforward steps, you’ll have a delightful dessert that impresses without the stress.
- Prep Time: 30 minutes
- Cook Time: 70 minutes
- Total Time: 1 hour 40 minutes
- Yield: Serves approximately 12 slices 1x
- Category: Dessert
- Method: Baking
- Cuisine: American
Ingredients
- 1 1/2 cups graham cracker crumbs
- 1/4 cup granulated sugar
- 1/2 cup unsalted butter (melted)
- 3 cups peeled and sliced apples
- 1/4 cup brown sugar
- 1 tsp ground cinnamon
- 2 tbsp all-purpose flour
- 24 oz cream cheese (softened)
- 1 cup granulated sugar
- 3 large eggs
- 1 tsp vanilla extract
- 1/2 cup sour cream
- 1 cup granulated sugar (for caramel sauce)
- 6 tbsp unsalted butter (for caramel sauce)
- 1/2 cup heavy cream (for caramel sauce)
- 1 tsp sea salt (for caramel sauce)
Instructions
- Preheat oven to 325°F (163°C). Combine graham cracker crumbs, sugar, and melted butter in a bowl and press into the bottom of a springform pan. Bake for 10 minutes and let cool.
- Mix sliced apples with brown sugar, cinnamon, and flour; evenly distribute over the cooled crust.
- Beat cream cheese with granulated sugar until smooth, then add eggs one at a time, followed by vanilla extract. Mix in sour cream until combined.
- Pour cheesecake mixture over apple layer and bake for 60-70 minutes until set but slightly jiggly in the center. Let cool before refrigerating for at least four hours.
- For the salted caramel sauce, melt sugar over medium heat until amber-colored, then whisk in butter and heavy cream followed by sea salt.
- Drizzle caramel sauce over chilled cheesecake before serving.
Nutrition
- Serving Size: 1 slice (100g)
- Calories: 350
- Sugar: 30g
- Sodium: 210mg
- Fat: 22g
- Saturated Fat: 12g
- Unsaturated Fat: 8g
- Trans Fat: 0g
- Carbohydrates: 36g
- Fiber: 2g
- Protein: 5g
- Cholesterol: 70mg