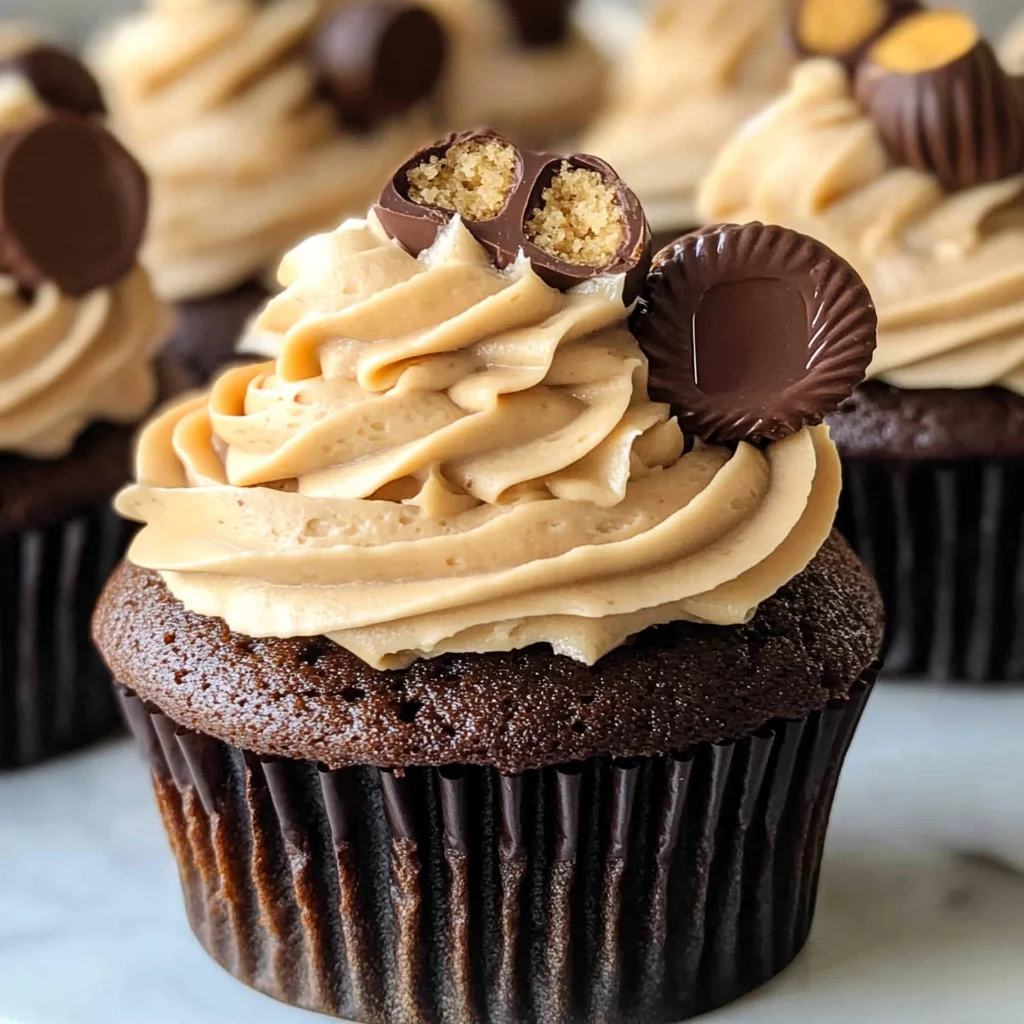
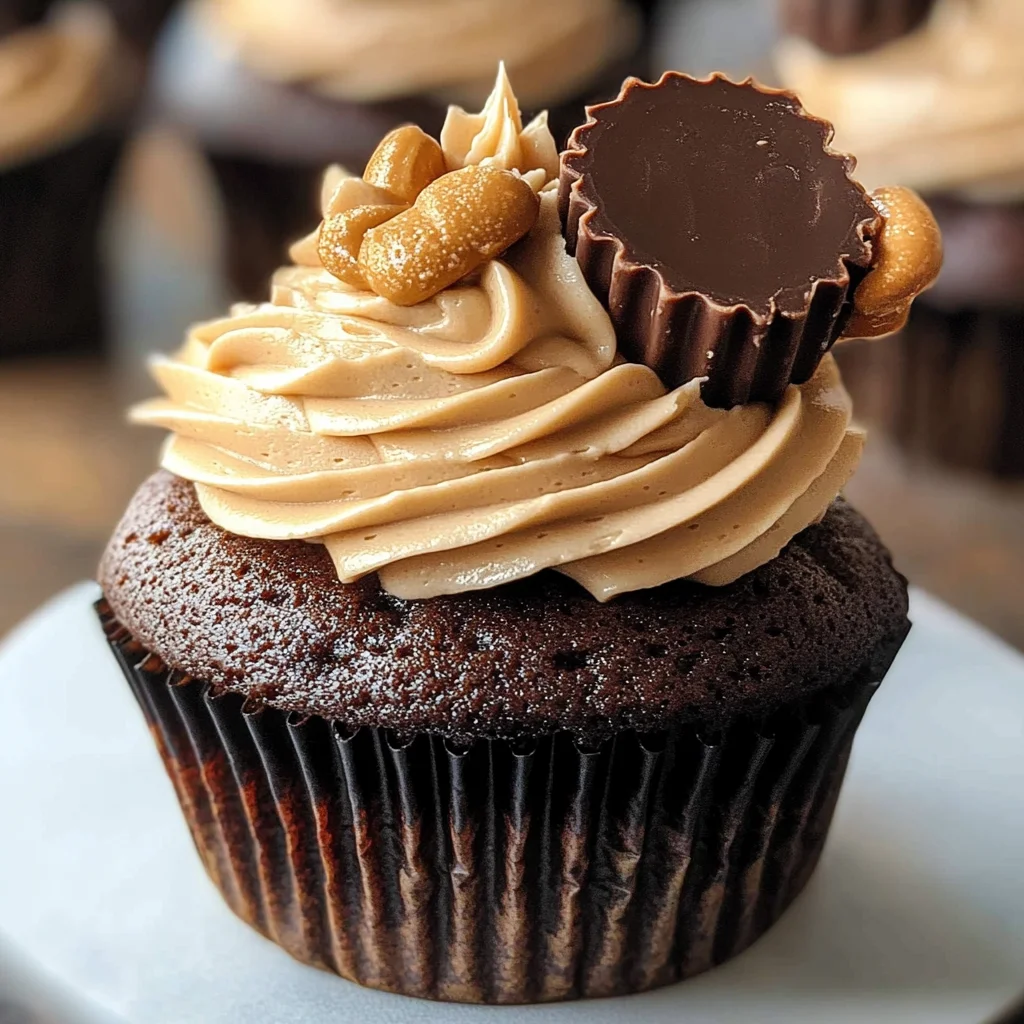
Reese’s Cupcakes
There’s something utterly magical about baking, isn’t there? The way the kitchen fills with warm aromas that seduce your senses, the anticipation that builds as you wait for those little cakes to rise and transform into glorious treats—it’s an experience that goes beyond just making food. Today, I’m thrilled to share with you one of my all-time favorite recipes: Reese’s Cupcakes! These delightful creations are a symphony of chocolate and peanut butter, blending two beloved flavors into a single, indulgent bite. Each cupcake is not just a dessert; it’s a celebration of comfort, joy, and the simple pleasures in life. Trust me when I say that once you try these, you’ll be left craving more.
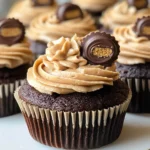
I’ve always been captivated by the harmonious dance between sweet and salty—it’s like a love story on your palate! Imagine sinking your teeth into a rich, moist chocolate cupcake topped with creamy peanut butter frosting and sprinkled with bits of Reese’s Miniature Cups. This recipe embodies that perfect contrast that makes every single mouthful profoundly satisfying. Whether you’re celebrating a special occasion or simply indulging your sweet tooth after a long day, these Reese’s Cupcakes will surely make your heart flutter and your taste buds sing. So gather your ingredients and let’s embark on this delightful culinary adventure together!
Reese’s Cupcakes: A Delightful Chocolate-Peanut Butter Harmony
These Reese’s Cupcakes are as easy to make as they are delicious! With just six simple ingredients, you’ll be surprised at how quickly you can whip up this crowd-pleaser. Perfect for sharing at parties or enjoying on a cozy evening at home, these cupcakes will impress anyone who takes a bite. Let’s dive in!
Ingredients:
As we embark on this delightful culinary journey, let’s take a moment to appreciate the star players in our recipe. Each ingredient contributes uniquely to our cupcakes’ luscious texture and flavor profile.
- 1 box chocolate cake mix (plus ingredients called for on the box). This is the foundation of our Reese’s Cupcakes! Using a boxed cake mix not only saves time but also guarantees consistent results. Look for a high-quality brand for maximum flavor; some mixes even offer rich cocoa content that enhances the chocolate intensity. You’ll typically need eggs, water, and oil as per the box instructions—these additional ingredients will activate the leavening agents in the mix, creating those beautifully fluffy cupcakes we all adore.
- 10.5 ounces Reese’s Miniature Cups (1 “share pack” size package). Ahh, this is where the magic truly begins! These mini cups add layers of creamy peanut butter encased in smooth milk chocolate right into each cupcake. As they melt during baking, they create gooey pockets of deliciousness that elevate each bite to new heights. If you can’t find mini cups or wish to use an alternative, feel free to chop up regular-sized Reese’s or even use another brand of chocolate-peanut butter candy.
- ½ cup unsalted butter (softened). This ingredient is absolutely paramount for achieving that light and tender crumb we desire in our cupcakes. Softened butter creams beautifully with sugar (even though we don’t directly add sugar here since we’re using cake mix), leading to airy cupcakes that practically melt in your mouth! Make sure it’s softened properly—if it’s too cold or melted, it won’t blend well; aim for that lovely creamy texture where it holds its shape without being runny.
- 1 cup peanut butter. This liquid gold plays double duty in both flavor and texture! Creamy peanut butter adds richness while enhancing the iconic combination with chocolate found in Reese’s Cups. It’s essential to use good-quality peanut butter here; avoid natural ones with excessive oils separating from solids unless you’re willing to stir them together first! The creaminess helps make our frosting dreamy and spreadable without being too stiff.
- 2 cups confectioners’ sugar. This is what transforms our peanut butter into an utterly intoxicating frosting! Confectioners’ sugar dissolves beautifully when mixed, creating that smooth consistency we crave in frosting—no one likes gritty bites here! It also adds just enough sweetness without overwhelming the balance we achieve with chocolate and peanut butter.
- 3 tablespoons milk (as needed to thin the frosting). Milk is crucial for achieving the perfect frosting consistency: not too thick but not too runny either! Depending on how creamy you want your frosting to be—or how humid it is—you may need more or less than three tablespoons; start small and add gradually until it reaches your desired thickness.
Equipment You’ll Need:
Having the right tools at hand can truly elevate your baking experience from enjoyable to downright delightful! While these items aren’t ingredients per se, they are essential partners in crafting those beautiful Reese’s Cupcakes.
- Mixing bowls – A sturdy set of mixing bowls is non-negotiable when it comes to baking; they’ll help keep everything organized while preventing any messy spills along the way! I recommend having both large and medium sizes on hand so you can seamlessly transition between mixing batter and preparing frosting.
- Electric mixer – An electric mixer will save your arms from fatigue when creaming butter with peanut butter or mixing up cupcake batter—trust me on this one! If you don’t have one handy, a whisk will work too; just be prepared for an arm workout!
- Cupcake pan – A standard 12-cup cupcake pan will ensure uniformity in size while baking; we want all cupcakes rising evenly so they look as stunning as they taste! If you’re feeling adventurous or have larger appetites at home, consider using jumbo cupcake liners instead.
- Cupcake liners – These lovely little paper liners not only keep cleanup easy but also add an extra touch of charm to each cupcake presentation! Choose fun colors or patterns that match your occasion—after all, we eat with our eyes first!
Now that we’ve gathered everything we need let’s dive into preparing these irresistible Reese’s Cupcakes!
Step 1: Mix Your Chocolate Cake Base
Start by preheating your oven according to package instructions—typically around 350°F (175°C). In a large mixing bowl, combine the chocolate cake mix with eggs (usually around three), water (or milk if specified), and vegetable oil as outlined on the box directions. This process is known as combining dry and wet ingredients—a crucial step because it creates those air pockets necessary for rising while activating gluten strands within flour. Mix until just combined; overmixing can lead to dense cupcakes which nobody wants!
Step 2: Add Delightful Surprise Inclusions
Once blended smoothly together without lumps remaining—oh how heavenly it smells already—you’ll want to fold in half of those chopped-up mini Reese’s Cups delicately into the batter using a spatula or wooden spoon instead of continuing with electric beaters here; this ensures they remain intact rather than breaking apart into tiny pieces during mixing—their gooeyness is part of their charm!
Step 3: Fill Your Liners
Carefully distribute batter evenly across each liner filling them about two-thirds full; this allows room for expansion during baking without overflowing—which would create quite a mess inside your oven if not watched! You might even get creative here by topping off each filled liner with additional mini cups before placing them into their awaiting hot environment—it adds visual appeal while providing more melty goodness throughout!
Step 4: Bake To Perfection
Now comes one of my favorite parts—the waiting game! Slide those enticingly filled cupcake pans onto middle racks inside preheated ovens allowing them roughly 16 minutes—or until their edges start pulling away slightly from sides showing golden browning tops forming around edges signaling readiness emerging aromas wafting through kitchen air beckoning family members closer towards curiosity… Your nose knows when they’re ready!
Stay tuned because soon we’ll whip up that luscious peanut butter frosting that’ll crown these beauties perfectly!
Step 5: Combining the Chocolate Cake Mix with Love
Now that your cupcake liners are ready and waiting, it’s time to turn our attention to the chocolate cake mix. You’ll want to grab that box of chocolate cake mix you have on hand, and trust me when I say this is going to be the foundation of your delightful Reese’s Cupcakes. Follow the instructions on the box for the wet ingredients—usually eggs, water, and oil—but don’t forget to take a moment to appreciate the magic that’s about to unfold. As you whisk together these ingredients in a large mixing bowl, you’re not just creating batter; you’re blending a symphony of flavors that will soon dance on your taste buds.
The reason we follow these instructions carefully is that they ensure your cupcakes rise perfectly and achieve that light, fluffy texture we all adore. You might notice that as you mix, a rich chocolate aroma begins to fill your kitchen—this is your cue that deliciousness is on its way! Once everything is well combined, it’s time to fold in those miniature Reese’s Cups. I like to chop them into smaller pieces so they distribute evenly through the batter, creating delightful pockets of peanut butter goodness in each bite. Pour the batter into each cupcake liner until they’re about two-thirds full, giving them room to rise without overflowing—trust me, no one wants a cupcake volcano!
Step 6: Baking Your Perfect Cups of Joy
With your cupcake batter nestled comfortably in their liners, it’s time for the moment of truth: placing them in the oven. Preheat your oven according to the instructions on the cake mix box—this step is absolutely crucial because starting with an appropriately heated oven ensures even baking. As you slide the tray into the oven, set a timer for about 16 minutes but remember: every oven behaves differently! I always suggest checking for doneness a few minutes earlier if you’ve got a particularly snappy oven or if it’s running hotter than normal.
When it’s almost time, keep an eye out for those telltale signs of doneness: the tops should look springy and firm when gently pressed with a fingertip and slightly domed—the perfect visual cue that your cupcakes are ready to shine! Another great test is inserting a toothpick into the center; if it comes out clean or with just a few moist crumbs clinging to it, you’ve hit jackpot! Remember, overbaking can lead to dry cupcakes which nobody wants; so trust me when I say this part requires some patience and vigilance.
Step 7: Cooling Down – The Sweet Anticipation
Once your cupcakes are beautifully baked and golden brown, resist the urge to dive in right away! This is where good things come to those who wait—allowing them to cool completely is essential before we crown them with our luscious peanut butter frosting. Transfer them gently from the hot pan onto a wire rack; leaving them in the pan can create steam which may cause sogginess—a fate we must avoid at all costs!
As they cool down, take this time for yourself; maybe sip on some tea or coffee while daydreaming about how incredible these treats will be once adorned with frosting. This cooling period takes about 10-15 minutes but can feel like an eternity when you’re excited! Once they have reached room temperature (you’ll know they’re cool enough when you can comfortably touch them), it’s finally time for frosting!
Step 8: Whipping Up That Irresistible Peanut Butter Frosting
Now let’s talk frosting—the pièce de résistance of these Reese’s Cupcakes! In a mixing bowl, combine ½ cup of softened unsalted butter and 1 cup of creamy peanut butter. Using an electric mixer or stand mixer (if you have one—it makes life easier!), blend these two together until smooth and utterly intoxicatingly creamy. The key here is ensuring your butter is soft enough; if it’s too hard straight from the fridge, it won’t blend properly with the peanut butter and could leave you with lumps—a non-negotiable situation we want to avoid!
Gradually add 2 cups of confectioners’ sugar while mixing on low speed. This step ensures that sugar doesn’t cloud up your kitchen! As you incorporate sugar into this creamy mixture, watch as it transforms into what feels like pure liquid gold—a thick frosting that can only be described as heavenly. Depending on how thick or thin you’d like your frosting (and I personally love mine spreadable yet sturdy), add in those tablespoons of milk one at a time until you reach your desired consistency. Don’t rush this step; achieving that perfect balance between creaminess and stability for frosting piped onto cupcakes requires patience and careful adjustments.
There you have it—your very own batch of Reese’s Cupcakes made from scratch! Each bite promises an explosion of chocolatey richness coupled with creamy peanut butter bliss that will leave everyone asking for seconds—and maybe even thirds! These cupcakes are not just desserts; they’re expressions of love crafted by your hands in celebration of flavor and joy shared around tables filled with laughter. So go forth my friend—share these delightful treats with friends and family (or keep them all for yourself—I won’t tell!). Enjoy every last crumb because you deserve it!
Storage and Enjoyment Tips for Your Reese’s Cupcakes
Now that you’ve created these delightful Reese’s Cupcakes, it’s time to savor every bite! However, if you find yourself with a few leftovers (though I highly doubt it!), knowing how to store them properly will ensure they remain just as scrumptious. These cupcakes deserve to be enjoyed at their finest, so let’s talk about how to preserve that irresistible flavor and soft texture.
Storing Leftover Reese’s Cupcakes
To keep your leftover Reese’s Cupcakes fresh and delectable, the best approach is to place them in an airtight container. This is crucial because exposure to air can dry them out, robbing you of that moist, fudge-like quality we all adore. You can keep your cupcakes at room temperature for up to three days; however, if you want them to last even longer, pop them in the refrigerator where they can stay fresh for about a week. For an added tip: placing a slice of bread inside the container can work wonders! The bread helps maintain moisture, ensuring your cupcakes remain as luscious as the day they were made. And trust me on this—when you take one out after a day or two, it still tastes like a little piece of heaven. If you prefer serving them warm, just give them a quick zap in the microwave for about 10-15 seconds; it brings back that freshly baked sensation!
Freezing Reese’s Cupcakes for Later
If you’re looking to enjoy these cupcakes down the line—say for a special occasion or just when you’re craving something sweet—freezing is your best friend! To freeze your Reese’s Cupcakes properly, let them cool completely before wrapping each one tightly in plastic wrap or aluminum foil. This step is absolutely paramount because it prevents freezer burn from ruining their delightful taste and texture. Once wrapped, place them in a freezer-safe bag or container and they will keep well for up to three months. When you’re ready to indulge again, simply take them out of the freezer and let them thaw at room temperature; no need for any complicated steps here! How convenient is that? Having these little gems on hand means you can whip up dessert magic anytime the craving strikes!
Reese’s Cupcakes
Indulge in these easy-to-make Reese’s Cupcakes that blend chocolatey goodness with creamy peanut butter—perfect for any occasion!
- Prep Time: 15 minutes
- Cook Time: 16 minutes
- Total Time: 31 minutes
- Yield: Approximately 12 servings 1x
- Category: Dessert
- Method: Baking
- Cuisine: American
Ingredients
- 1 box chocolate cake mix (plus ingredients called for on the box)
- 10.5 ounces Reese's Miniature Cups
- ½ cup unsalted butter (softened)
- 1 cup peanut butter
- 2 cups confectioners’ sugar
- 3 tablespoons milk (as needed)
Instructions
- Preheat your oven according to package instructions (typically 350°F).
- In a large mixing bowl, combine the chocolate cake mix with eggs, water, and oil as per the box directions.
- Fold in half of the chopped Reese's Miniature Cups into the batter.
- Fill cupcake liners two-thirds full with batter and top with additional mini cups if desired.
- Bake for approximately 16 minutes or until tops spring back when pressed.
- Let cupcakes cool completely before frosting.
Nutrition
- Serving Size: 1 cupcake (75g)
- Calories: 330
- Sugar: 26g
- Sodium: 220mg
- Fat: 15g
- Saturated Fat: 6g
- Unsaturated Fat: 9g
- Trans Fat: 0g
- Carbohydrates: 45g
- Fiber: 2g
- Protein: 5g
- Cholesterol: 35mg