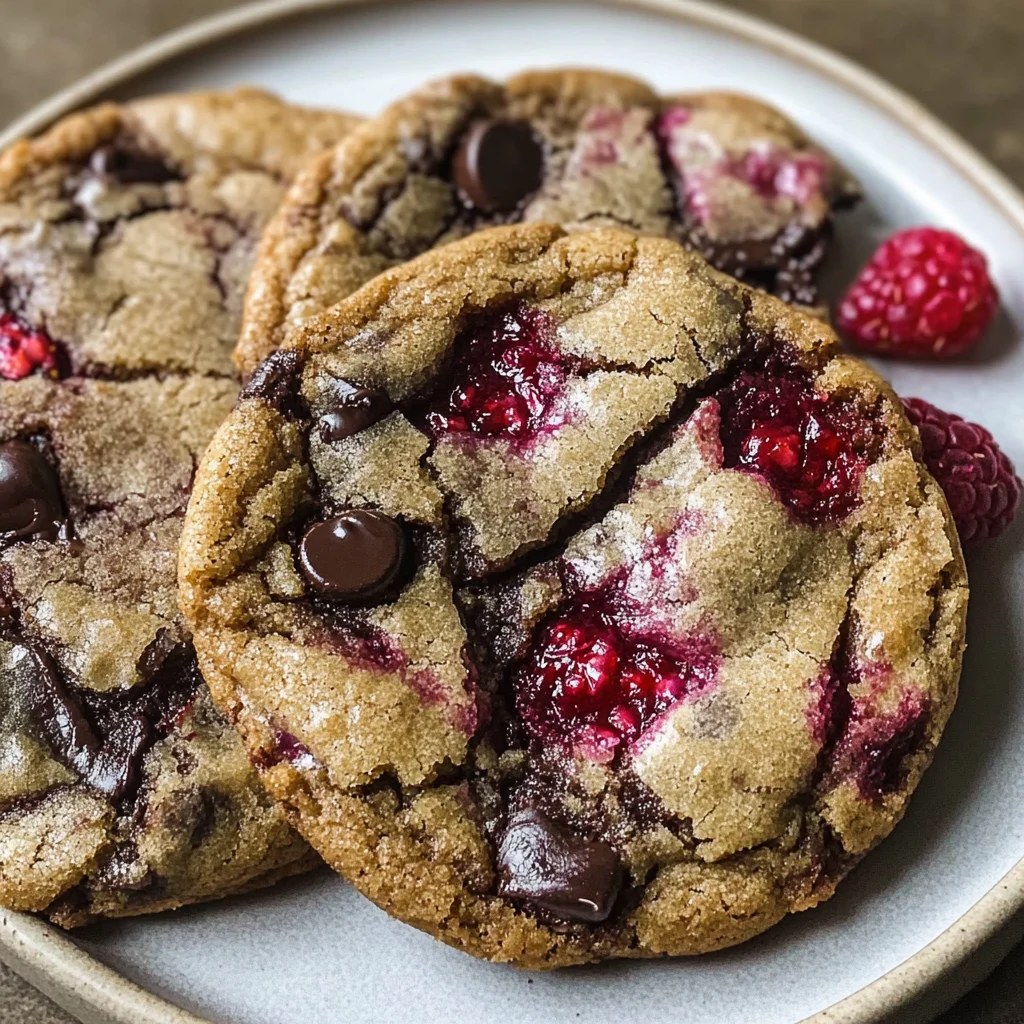
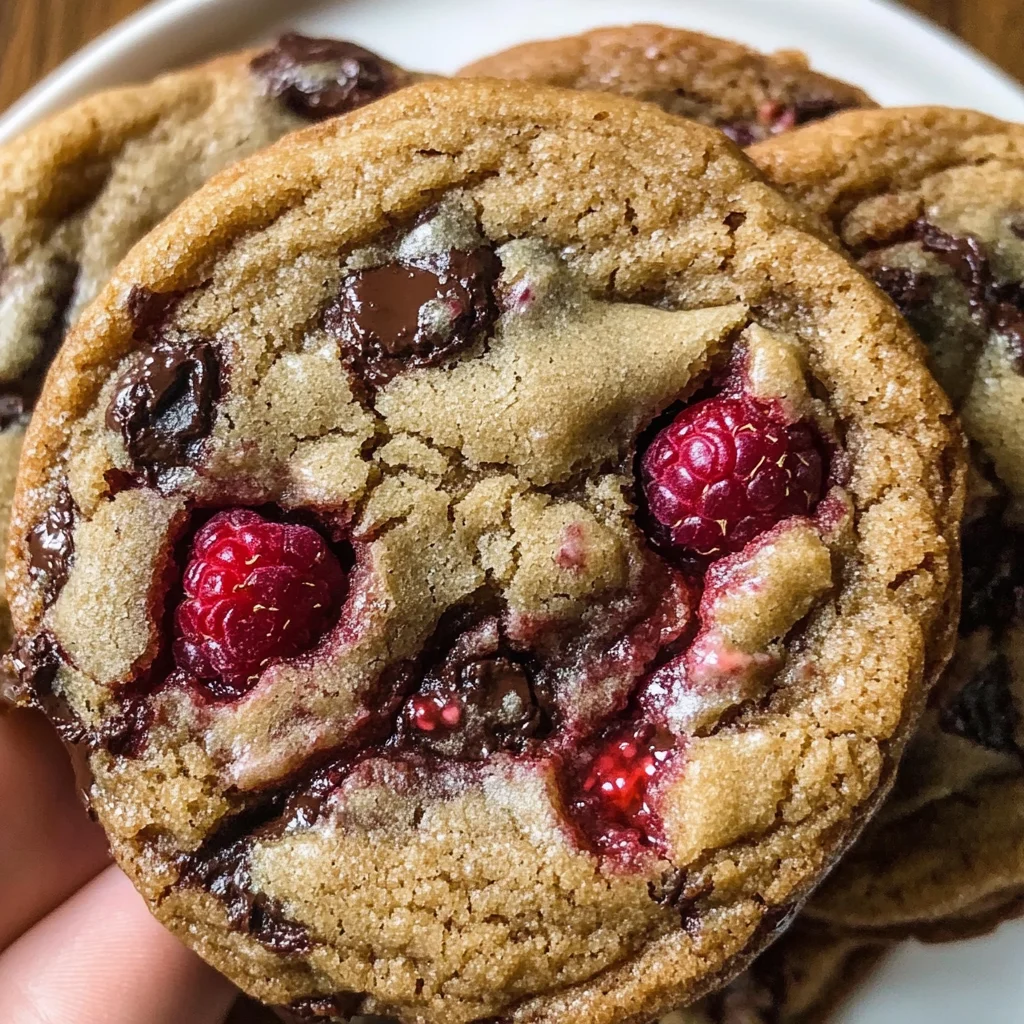
Raspberry Chocolate Chip Cookies
There’s something undeniably magical about the scent of freshly baked cookies wafting through your home. It’s more than just an aroma; it’s a warm embrace, a nostalgic whisper of childhood memories wrapped up in the comfort of family traditions. The moment you take that first bite, with the rich dark chocolate melting in your mouth and the sweet-tart burst of raspberries mingling together, it’s like a symphony of flavors performing a delightful dance on your palate. These Raspberry Chocolate Chip Cookies aren’t just a treat; they’re an experience—an exploration of taste that bridges the gap between the comforting familiarity of classic cookies and the bold brightness of fresh fruit. I promise you, once you indulge in these soft and chewy wonders, you’ll be hooked!
What makes these cookies stand out even more is their effortless nature. You don’t have to wait hours for your dough to chill; instead, you can dive right into baking without any delays. This no-chill recipe is perfect for those spontaneous cravings or when unexpected guests show up at your door. It’s all about embracing simplicity while still delivering that profoundly satisfying experience we all crave from a homemade cookie. Trust me on this: everyone will be begging you for the secret behind these delightful treats!
Raspberry Chocolate Chip Cookies: A Sweet Symphony of Flavor
Welcome to the world of Raspberry Chocolate Chip Cookies! Prepare to embark on a delightful culinary journey filled with warmth and joy as we create these delectable treats together.
Ingredients:
As we gather our ingredients for these irresistible cookies, think of each component as a vital note in our flavor symphony. With every element playing its part, we’ll create something truly extraordinary.
- 1/2 cup unsalted butter (melted and cooled). Butter is the backbone of any cookie recipe; it brings richness and moisture to our dough. Using unsalted butter allows us to control the saltiness, ensuring that sweetness shines through beautifully. When melting the butter, let it cool slightly before adding it to avoid scrambling the egg later on—a step that’s absolutely paramount for achieving that perfect texture.
- 1/4 cup white granulated sugar. This sugar acts as a sweetener but also contributes to creating a lovely crisp edge around our cookies. The fine granules dissolve quickly during mixing, ensuring an even distribution throughout our dough. If you’re looking for alternatives, coconut sugar can work too—it’ll add a hint of caramel flavor!
- 3/4 cup light brown sugar. The molasses in brown sugar adds depth and moisture, creating those soft centers we all adore in cookies. For this recipe, light brown sugar is ideal since it provides just enough sweetness without overwhelming the delicate balance with raspberries.
- 1 large egg (room temperature). Eggs are essential for binding our ingredients together and providing structure to our cookies. Using room temperature eggs ensures they incorporate smoothly into the mixture—this helps achieve that lush texture we’re aiming for.
- 1 tsp vanilla bean paste. Ah, vanilla! This ingredient is like magic dust that enhances all other flavors in our cookies. Vanilla bean paste gives us those beautiful specks of real vanilla beans, plus its flavor profile is richer compared to extract. If you don’t have it on hand, pure vanilla extract will do just fine in a pinch.
- 1 1/2 cups all-purpose flour (spooned and leveled). Flour is what gives our cookies body; it provides structure while allowing them to rise beautifully in the oven. Spoon and level your flour rather than scooping directly from the bag—this prevents packing too much flour into your measuring cup which could lead to dry cookies.
- 1/2 tsp baking soda and 1/2 tsp baking powder: These two leavening agents work together to provide lift and fluffiness! Baking soda reacts with acidic ingredients (like our raspberries), while baking powder creates additional rise when combined with moisture and heat.
- 1/2 tsp kosher salt. Salt may seem small but trust me—it elevates flavors like nothing else can! It balances sweetness and enhances all those delightful notes from chocolate and berries.
- 1 cup dark chocolate chunks. The star of our show! Dark chocolate not only adds rich flavor but also contributes to those melty pockets we crave in every bite. Look for high-quality dark chocolate with at least 60% cocoa content for deep intensity—it’s truly worth it!
- 1/2 cup frozen raspberries: These little beauties are bursting with tartness that contrasts beautifully against rich chocolate. Using frozen raspberries ensures they hold their shape better during baking compared to fresh ones—no mushy surprises here!
Equipment You’ll Need:
Having the right tools at your disposal makes all the difference when embarking on this cookie-making adventure! While they might not be ingredients themselves, these essential pieces will help us navigate through each step smoothly.
- Mixing bowls – A set of various-sized mixing bowls will allow you to easily combine wet and dry ingredients separately before merging them into one glorious dough.
- Whisk – A good whisk is crucial for achieving that smooth consistency when blending sugars with melted butter or incorporating eggs into your mixture.
- Rubber spatula – This handy tool is perfect for folding in delicate ingredients like raspberries and chocolate chunks without overmixing—keeping those lovely bursts intact!
- Baking sheet – Opt for heavy-duty baking sheets; they prevent warping under high heat which can affect even cooking.
- Parchment paper or silicone baking mat – Line your baking sheet with parchment paper or use reusable silicone mats for easy cleanup and perfectly baked cookies without sticking.
As we prepare to dive into making these Raspberry Chocolate Chip Cookies together, remember: this process is as much about enjoying yourself as it is about creating something delicious!
Step 1: Melt Your Butter With Care
First things first: melt that unsalted butter until it’s a liquid gold! You can choose between microwave or stovetop methods—both work wonderfully—as long as you keep an eye on it so it doesn’t bubble over or scorch! Once melted, let it cool slightly—at least 20 minutes—to prevent cooking your egg when mixed later on; trust me, this step will ensure those beautiful soft centers we love so much!
Step 2: Create Your Sugar Mixture
In a large mixing bowl, combine your cooled melted butter with both white granulated sugar and light brown sugar using a whisk—this process transforms them into a smooth paste-like consistency that’s utterly intoxicating! Whisk vigorously for about two minutes until everything comes together perfectly; you’ll notice how well-integrated everything feels at this stage—it’s so important because this ensures even sweetness throughout each cookie!
Step 3: Introduce Your Egg & Vanilla
Now it’s time to add in that room temperature egg along with your luscious vanilla bean paste! Stir gently but thoroughly until fully incorporated—this combination will add richness while promoting lift as our cookies bake away happily in their oven sanctuary! Just imagine how incredible they’re going to smell—the anticipation builds!
Step 4: Whisk Together Dry Ingredients
In another bowl (yes, I know more dishes!), whisk together all-purpose flour along with baking powder, baking soda, and salt until evenly combined—this step helps ensure there are no lumps or clumps hiding away waiting to surprise us during baking! Gradually fold this mixture into your wet ingredients using a rubber spatula until just combined—the goal here is not overmixing but simply combining until no dry streaks remain visible—that’s where perfection lies!
Stay tuned as we continue crafting these delightful Raspberry Chocolate Chip Cookies together; I can’t wait for you to experience how incredible they’ll taste fresh out of the oven!
Step 5: Sculpting Your Cookie Dough
Now it’s time to bring your cookie dough to life! Using a 2 oz ice cream scoop, gently portion out the dough onto a parchment-lined baking sheet. This step is crucial because the size of your dough balls will directly influence how these cookies bake up. You want them to be uniform in size for even cooking and that delightful chewiness we all crave. Place about six cookie dough balls on each baking sheet, leaving ample space between them—about two inches apart. This allows the cookies to spread as they bake, transforming into those luscious rounds we adore. If you find that your dough feels a bit sticky or too soft, don’t worry! The warmth from your hands should help shape it without compromising the texture. Just remember, don’t press down on these balls; we want them to maintain their round shape for that perfect gourmet look.
Step 6: Prepping for Baking – The Oven Dance
With your cookies prepped and ready to go, it’s time to crank up that oven! Preheat it to 350℉ (175℃), which is the ideal temperature for baking these beauties. Preheating is absolutely paramount because it ensures that the cookies start baking immediately when placed inside. This initial blast of heat seals in moisture and helps create those irresistible golden edges while keeping the centers delightfully soft and chewy. Trust me on this; if you skip this step, you might end up with flat, sad cookies instead of the fluffy morsels bursting with flavor that you deserve! While the oven warms up, take a moment to admire your cookie dough—this is what dreams are made of!
Step 7: Baking Bliss – The Aroma That Fills Your Kitchen
Once your oven reaches that perfect temperature, slide the cookie sheet in and let the magic unfold! Bake these glorious Raspberry Chocolate Chip Cookies for approximately 12-13 minutes, but keep an eye on them—every oven behaves a little differently. You’re looking for golden brown edges with slightly soft centers; this contrast is what makes each bite so profoundly satisfying. Halfway through baking, I recommend rotating the pan—this helps achieve an even bake throughout and avoids any dreaded hot spots in your oven. As they bake, you’ll be enveloped by the utterly intoxicating aroma of melting chocolate and fresh raspberries wafting through your kitchen; it’s like a warm hug from all those cherished memories of baking with loved ones.
Step 8: Shaping Perfection – A Secret Trick
As soon as those cookies are out of the oven and still warm, here comes a little secret that will elevate their appearance dramatically! Grab a round cookie cutter that’s slightly larger than your cookies and gently place it over one right after they come out of the oven. With a delicate swirling motion, reshape each cookie into a perfect circle. This technique isn’t just for aesthetics; it ensures that every bite is consistent in texture and structure. I promise you—it’s worth taking those extra few seconds! Now let them rest on the baking sheet for about 5 minutes before transferring them to a wire rack. This resting period is essential; it allows them to firm up just enough so they don’t crumble apart when moved but still remain perfectly tender within.
Final Touches – Letting Your Cookies Shine
After allowing your cookies to cool slightly on the wire rack, here’s where you can really showcase your beautiful creations! These Raspberry Chocolate Chip Cookies are best enjoyed warm or at room temperature—each bite revealing pools of melted chocolate amidst bursts of tangy raspberry flavor that dance across your palate like an exquisite symphony of flavors. What makes these cookies truly special is not just their mouthwatering taste but also their delightful texture—the balance between soft chewy centers and crisp edges creates an experience that is simply extraordinary.
If you’re feeling particularly indulgent (and who wouldn’t?), consider drizzling some melted dark chocolate over cooled cookies or sprinkling a touch of sea salt on top right before serving—a little contrast that heightens all those flavors beautifully! Remember, sharing isn’t mandatory but highly encouraged; watching friends and family light up with joy as they savor your creation is one of life’s simplest pleasures.
So there you have it—the ultimate recipe for Raspberry Chocolate Chip Cookies that are sure to become a staple in your home or at gatherings with loved ones. Bake them with love, share them generously, and watch as they disappear—because trust me when I say no one can resist these little bites of heaven! Enjoy every moment spent in creating these delightful treats; cooking is not just about food—it’s about connection, joy, and sweet memories that linger long after the last crumb has vanished.
Storage and Enjoyment Tips for Your Raspberry Chocolate Chip Cookies
Now that you’ve baked a batch of these heavenly Raspberry Chocolate Chip Cookies, it’s time to relish in the sweet rewards of your labor! Trust me, the symphony of flavors combined with the delightful textures will have you grinning from ear to ear. But what if you find yourself with a few extras? Fear not, my friend! I’m here to guide you through the best ways to store and enjoy every last crumb of these scrumptious cookies.
Storing Leftover Raspberry Chocolate Chip Cookies
To keep your Raspberry Chocolate Chip Cookies fresh and utterly delicious, it’s all about using the right container. I recommend placing them in an airtight container at room temperature; this helps maintain their soft and chewy texture while preventing any unwanted moisture from seeping in. Ideally, they’ll stay fresh for about 3 to 5 days. If you want to take it up a notch, consider adding a slice of bread into the container. This little trick works wonders by drawing moisture away from the cookies, ensuring they remain soft and scrumptious for even longer! After storage, when you come back to enjoy one (or two!), you’ll notice how those rich pools of chocolate meld beautifully with the tart bursts of raspberry—it’s like a little piece of heaven each time. If you’re feeling like indulging again after a few days, simply warm them up in the microwave for about 10 seconds; this will rejuvenate that melty chocolate goodness that makes these cookies so special.
Freezing Raspberry Chocolate Chip Cookies for Later
But wait—what if your cookie cravings hit unexpectedly? That’s where freezing comes in handy! To freeze your delightful creations, simply place them in a single layer on a baking sheet until they are solid. Then, transfer them into an airtight freezer bag or container and label it with the date. They can be stored frozen for up to three months without losing their charm! When you’re ready to indulge again, just pop them directly from the freezer into a preheated oven at 350°F for about 10-12 minutes. This not only brings them back to life but also fills your kitchen with that intoxicating aroma that’ll soon have everyone wandering into the room, wondering what deliciousness is underway. The convenience factor here is absolutely paramount; having homemade cookies ready at a moment’s notice? Now that’s something worth celebrating!
Raspberry Chocolate Chip Cookies
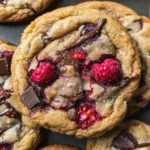
Indulge in the delightful experience of baking these Raspberry Chocolate Chip Cookies, where rich dark chocolate meets the vibrant tartness of fresh raspberries. This easy no-chill recipe allows you to whip up a batch of soft and chewy cookies in no time, making them perfect for spontaneous cravings or unexpected guests. Each bite reveals a harmonious blend of flavors and textures, with melty chocolate chunks and juicy berry bursts creating a symphony of taste that will leave everyone wanting more. Whether enjoyed warm from the oven or at room temperature, these cookies are sure to become a beloved treat in your home.
- Prep Time: 15 minutes
- Cook Time: 13 minutes
- Total Time: 28 minutes
- Yield: Approximately 24 cookies 1x
- Category: Dessert
- Method: Baking
- Cuisine: American
Ingredients
- 1/2 cup unsalted butter (melted and cooled)
- 1/4 cup white granulated sugar
- 3/4 cup light brown sugar
- 1 large egg (room temperature)
- 1 tsp vanilla bean paste
- 1 1/2 cups all-purpose flour
- 1/2 tsp baking soda
- 1/2 tsp baking powder
- 1/2 tsp kosher salt
- 1 cup dark chocolate chunks
- 1/2 cup frozen raspberries
Instructions
- Preheat your oven to 350°F (175°C).
- In a mixing bowl, combine melted butter, white sugar, and brown sugar until smooth.
- Add in the egg and vanilla bean paste; stir until well combined.
- In another bowl, whisk together flour, baking soda, baking powder, and salt.
- Gradually fold the dry ingredients into the wet mixture until just combined.
- Gently stir in the dark chocolate chunks and frozen raspberries.
- Using an ice cream scoop, portion out dough onto a parchment-lined baking sheet, spacing them about two inches apart.
- Bake for 12-13 minutes or until edges are golden brown and centers are soft.
- Let cool on the baking sheet for five minutes before transferring to a wire rack to cool completely.
Nutrition
- Serving Size: 1 cookie (30g)
- Calories: 150
- Sugar: 10g
- Sodium: 80mg
- Fat: 7g
- Saturated Fat: 4g
- Unsaturated Fat: 3g
- Trans Fat: 0g
- Carbohydrates: 20g
- Fiber: 1g
- Protein: 2g
- Cholesterol: 15mg