quick & easy deli-style rye bread
There’s something truly magical about bread, isn’t there? The way the scent of warm dough wafts through the kitchen, inviting everyone to gather around, is an experience that transcends mere sustenance. When you take a bite of freshly baked bread, it’s not just about flavor; it’s about the stories woven into each loaf and the joy shared over a meal. This quick & easy deli-style rye bread is not just a recipe for me; it’s a heartfelt homage to tradition and comfort, a bridge connecting generations of home bakers with modern convenience. Imagine slicing through a crusty exterior to reveal a tender, aromatic interior, speckled with those delightful caraway seeds that dance like little bursts of flavor on your palate. I promise you, this bread will elevate any meal from ordinary to extraordinary.
This recipe comes from The New Artisan Bread in Five Minutes a Day, which I absolutely adore for its simplicity and effectiveness. The beauty lies in its accessibility – you don’t need to be a seasoned baker to whip up this delicious rye bread in no time! Whether you’re planning an elaborate dinner party or simply craving something comforting on a weeknight, this quick & easy deli-style rye bread fits perfectly into any occasion. Picture yourself serving it alongside hearty soups or slathering it with your favorite spreads; it’s versatile enough to complement both savory and sweet dishes alike. Trust me, once you experience the satisfaction of creating your own artisan bread at home, you’ll find yourself revisiting this recipe time and again.
quick & easy deli-style rye bread: A Warm Embrace of Flavor
Let’s dive into this delightful culinary adventure together! Making homemade bread might seem daunting at first glance, but I assure you that with just a few simple ingredients and some love, you’ll be rewarded with something truly special. There’s an undeniable joy in getting your hands floury and watching the dough transform under your fingers. So grab your apron and let’s get started on crafting this quick & easy deli-style rye bread that will fill your home with warmth and goodness!
Ingredients:
As we embark on this journey of baking our quick & easy deli-style rye bread, let’s take a moment to appreciate each ingredient that contributes to its unique charm. Each component plays an essential role in crafting that perfect loaf.
- 3 cups lukewarm water (around 100°F) (680 grams): Water is the lifeblood of bread-making; it activates the yeast and hydrates the flour. Using lukewarm water is crucial because it helps bring the yeast to life without shocking it—too hot can kill those little organisms while too cold can slow them down significantly. Aim for that cozy temperature around 100°F; if you have a kitchen thermometer handy, use it! But if not, just trust your instincts—think of how warm bathwater feels.
- 1 tablespoon granulated yeast (10 grams): Yeast is our magical agent here! It ferments the sugars in the dough and produces carbon dioxide bubbles that give our rye bread its airy texture. Opt for high-quality active dry yeast for best results—it should smell fresh with no signs of clumping or discoloration. If you’re ever uncertain about its potency, sprinkle some yeast into warm water with a pinch of sugar; if it foams up within minutes, it’s ready to work its magic in your dough!
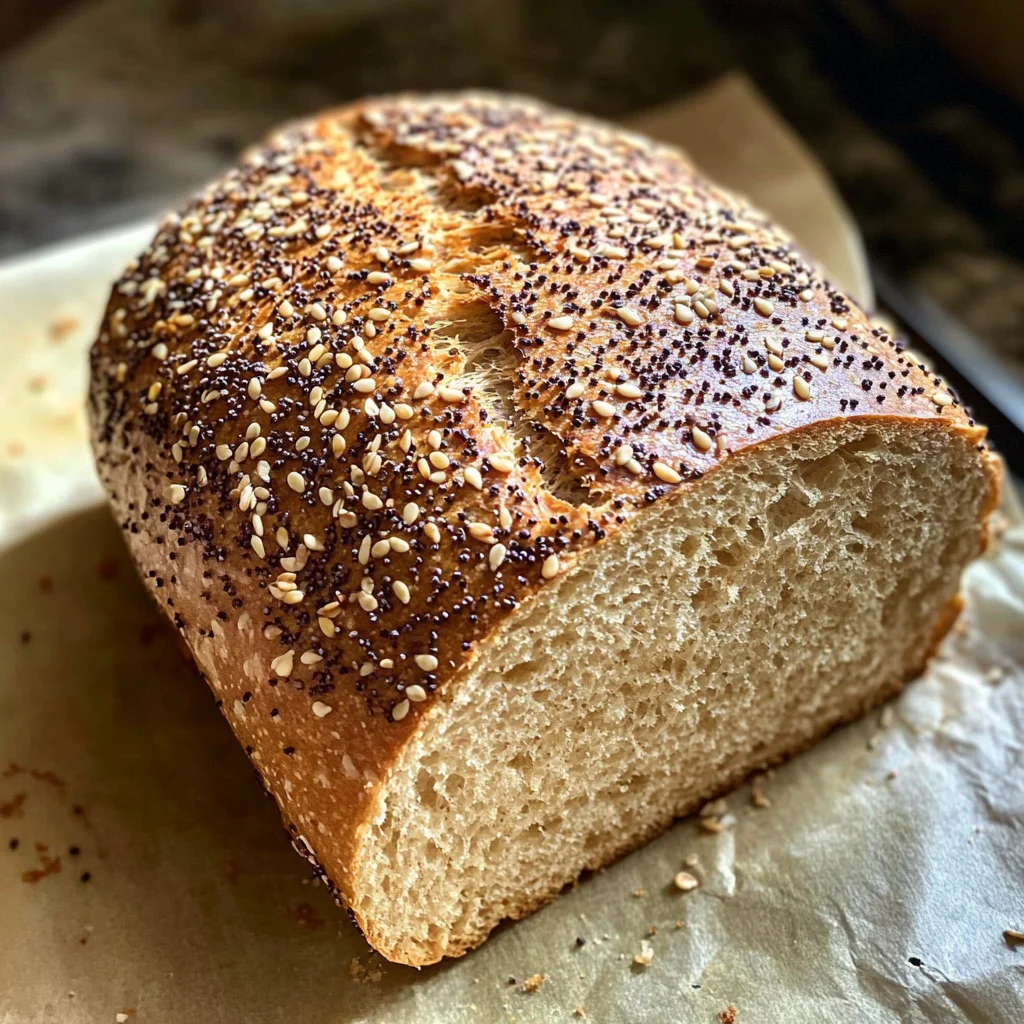
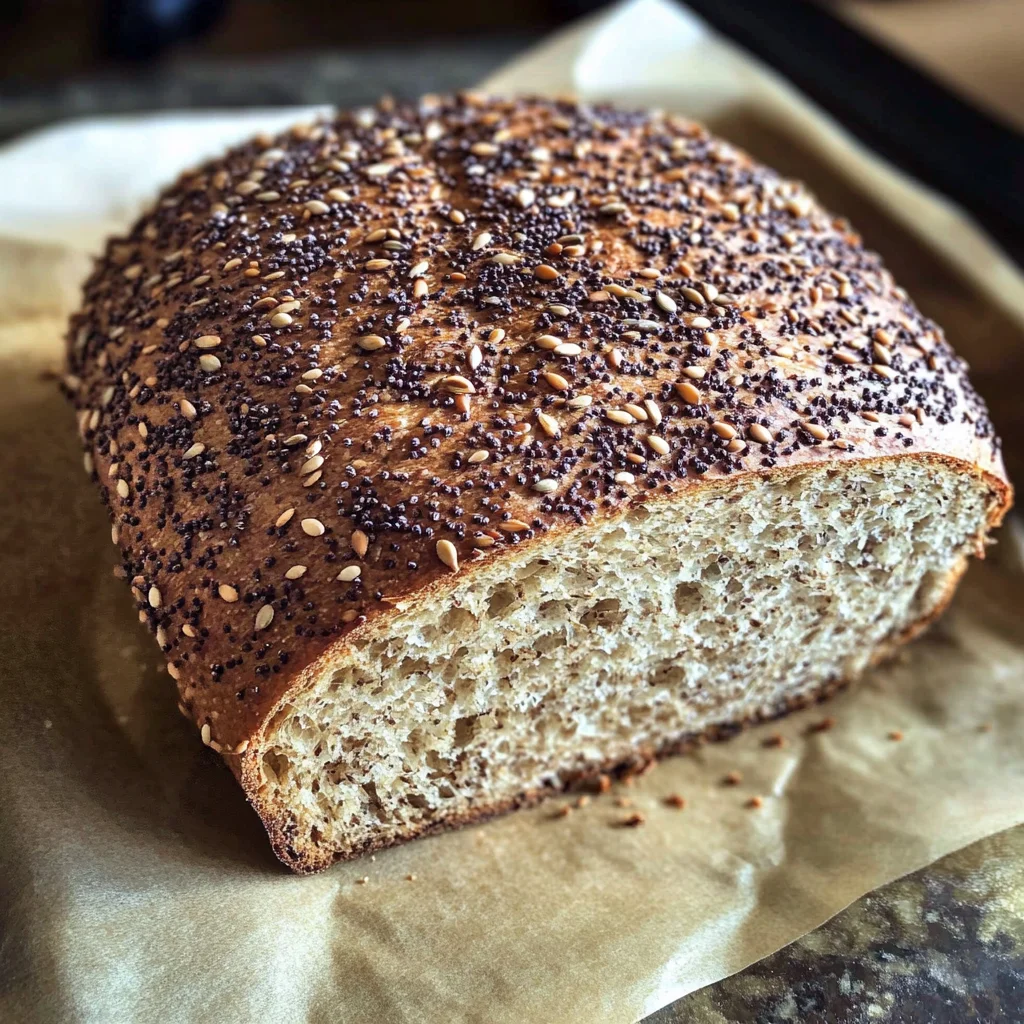
- 1 1/2 tablespoons caraway seeds plus more for sprinkling on top (or 1 tablespoon ground caraway plus seeds for sprinkling): Caraway seeds are what truly set this rye bread apart! Their slightly sweet yet peppery flavor adds depth and character to every slice. You can use whole seeds for added crunch or ground caraway if that’s what you have on hand—just remember that freshly ground will have more intense flavor. And don’t forget to sprinkle some extra seeds on top before baking; they add an enticing visual appeal!
- 1 tablespoon kosher salt (17 grams): Salt isn’t just for seasoning; it’s essential for controlling fermentation and enhancing flavors within our dough. Kosher salt is preferable due to its larger grains which dissolve easily without overpowering other flavors. As you mix it into your dough, imagine how it will elevate every bite into something utterly intoxicating.
- 1 cup rye flour (120 grams): Rye flour gives our quick & easy deli-style rye bread that signature dense texture and unmistakable flavor profile—the heartiness we crave! Look for medium or dark rye flour as they contain more bran and germ than light versions, offering more nutrients and flavor complexity.
- 5 1/2 cups all-purpose flour (780 grams): This versatile flour provides structure while allowing our quick & easy deli-style rye bread to rise beautifully. When selecting all-purpose flour, choose unbleached varieties as they retain more natural nutrients compared to bleached options. The balance of rye flour with all-purpose creates perfect harmony in texture!
- Parchment paper: Although not an ingredient per se, parchment paper is one of my secret weapons when baking! It provides a non-stick surface which helps achieve that lovely golden crust without sticking woes during transfer—trust me; you’ll be grateful for this simple addition!
Equipment You’ll Need:
Before we dive into the magic of kneading and shaping our dough, let’s talk equipment! Having the right tools makes all the difference in ensuring everything goes smoothly as we create our quick & easy deli-style rye bread.
- Large mixing bowl: A sturdy mixing bowl is essential for combining all those wonderful ingredients together without any risk of spills! It should be spacious enough to allow for mixing by hand without feeling cramped—trust me when I say you’ll want room as we stir up that lovely sticky dough.
- Wooden spoon or spatula: Your trusty wooden spoon or silicone spatula will become your best friend throughout this process! They’re perfect for folding ingredients together without damaging delicate structures—and let’s face it; there’s something wonderfully rustic about stirring dough by hand.
- Measuring cups & spoons: Precision matters when baking; having accurate measuring cups and spoons ensures consistency in every loaf you create. I recommend using dry measuring cups specifically designed for dry ingredients like flour—these tend to yield better results than liquid measuring cups.
- Kitchen scale (optional but recommended): If you’re someone who loves precision baking like I do, consider investing in a kitchen scale! Weighing ingredients leads to consistent results every time—especially beneficial when working with flours since their density can vary widely between brands.
- Baking sheet or Dutch oven: Depending on how you’d like to bake your loaves—on a sheet pan or inside a Dutch oven—you’ll need one of these trusty vessels ready at hand! A Dutch oven creates steam while baking which can enhance crust development but feel free to use whatever suits you best!
Preparing the quick & easy deli-style rye bread
Step 1: Activate Your Yeast
First things first—we need to awaken our sleepy yeast friends! In your large mixing bowl (or even directly in a stand mixer if you’re using one), combine those three cups of lukewarm water with one tablespoon of granulated yeast. Stir gently until everything is well combined then let it sit undisturbed for about five minutes; during this time you’ll witness magic unfold as tiny bubbles form on top—a clear sign that fermentation has begun! This step is absolutely paramount because activating your yeast ensures robust rising power later on.
Step 2: Add Flour and Mix
Once those bubbles appear like little jewels atop liquid gold, it’s time to introduce our flours into the fold! Sprinkle one cup of rye flour along with five-and-a-half cups of all-purpose flour straight into the bowl along with one tablespoon kosher salt and one-and-a-half tablespoons caraway seeds—this combination creates an irresistible contrast between textures while elevating flavors further still! Using either your wooden spoon or spatula mix everything together until no dry bits remain visible—the dough should appear shaggy yet cohesive at this point.
Step 3: Knead Until Smooth
Now comes perhaps my favorite part—the kneading process where all those lovely ingredients come together harmoniously! If using hands rather than mixers remember not rush this step; patience yields rewards here since thorough kneading develops gluten structure which gives our final loaf strength needed during rising stages ahead—about eight minutes should suffice when done manually (or set mixer speed low until smooth). During kneading observe how soft sticky bits gradually transform into smoother elastic consistency—it’s fascinating!
Step 4: Resting Period
After kneading away any worries (and trust me—you’ll feel great after doing so!), cover your bowl tightly using plastic wrap or clean kitchen towel then place somewhere warm—a cozy spot away from drafts works wonders—for approximately two hours until doubled in size occurs effortlessly thanks again due diligence earlier activating yeast properly! This gentle resting period allows gluten strands time relax allowing gases expand fully creating fluffy interiors crucial achieving delightful texture desired upon final bake-off results!
Stay tuned as we continue exploring additional steps towards completing our beloved quick & easy deli-style rye bread adventure…
Step 5: Mixing Your Dough to Perfection
Now that we have our ingredients all lined up like eager participants at a dinner party, it’s time to bring them together into a cohesive dough. In a large mixing bowl, start by pouring in the lukewarm water—this is crucial because we want to activate the yeast without shocking it. You can think of this as giving the yeast a warm hug; after all, yeast is a living organism and thrives in conditions that feel comfortable. Add in the granulated yeast and give it a gentle stir with a whisk or wooden spoon until it dissolves completely. You should see tiny bubbles forming on the surface, hinting at the magic that’s about to happen.
Next, sprinkle in your caraway seeds. These tiny little gems are what elevate this quick & easy deli-style rye bread from simple to extraordinary. Their unique, slightly sweet flavor and aromatic profile will infuse the dough with an intoxicating scent that harkens back to traditional delis. After the caraway seeds, add the kosher salt—this helps control yeast activity and enhances the overall flavor of your bread. Make sure you don’t skip this step! The balance of salt is absolutely paramount for not just taste but also for texture. If you were to mix everything without salt, you would end up with a bland loaf that lacks character.
Once these ingredients are combined, it’s time to incorporate your flours. Start with the rye flour; its earthy tones will blend seamlessly into our mixture, adding depth and complexity. Mix it in using your hands or a spatula until it’s fully absorbed before moving onto the all-purpose flour. Gradually add in about four cups of all-purpose flour while stirring continuously until the dough becomes too thick to mix with a spoon. At this point, switch to using your hands—don’t be afraid to get messy! Kneading isn’t required for this recipe; instead, we want to create a shaggy dough that holds together but remains slightly sticky. This is where intuition comes into play: if you find the dough too wet, sprinkle in more flour slowly until it reaches a manageable consistency.
Step 6: The Art of Resting Your Dough
Now comes one of my favorite parts—the resting phase! Once your dough has come together nicely, cover the bowl tightly with plastic wrap or a clean kitchen towel to prevent any drafts from sneaking in. Let it sit at room temperature for about two hours or until it has doubled in size. Why rest? This step is essential because it allows gluten strands to develop naturally through fermentation without any heavy kneading involved. As those gluten strands form, they create an intricate network that will give your bread structure and chewiness.
During this resting period, don’t rush things! Take this time to soak in the delightful aroma wafting from your kitchen—it’s truly transformative! You’ll notice that your dough begins to bubble and expand as yeast feasts on sugars present in the flour. This slow fermentation process not only enhances flavor but also results in a beautifully airy crumb structure once baked. Keep an eye on your dough; if you’re unsure whether it’s ready, poke it gently with your finger—a well-proofed dough should spring back slowly but leave an indention behind.
Step 7: Shaping Your Loaves
Once you’ve achieved that perfect puffiness, it’s time for one of my favorite moments: shaping those lovely loaves! Lightly dust your countertop or work surface with flour before turning out your risen dough—this helps prevent sticking while providing just enough surface tension for shaping later on. Divide your dough into four equal portions; I usually weigh them out for accuracy, ideally around 450 grams each if you’re looking for precision.
To shape each loaf into its final form, begin by flattening each portion gently into a rectangle about 1-inch thick—this doesn’t need to be perfect! Fold over one-third of the rectangle towards the center followed by folding over another third on top (like folding a letter). Pinch the seams well so they hold together during baking; trust me when I say this little pinch will pay dividends when you slice into that finished loaf later on! Once shaped into loaves, place them seam-side down onto parchment paper-lined baking sheets.
Before we get too excited about baking—and I know how tempting that can be—let’s give our loaves another chance to rise for about 30-45 minutes while covered loosely with a damp towel or plastic wrap. This final proofing step allows us to achieve that delightful oven spring we all crave—an airy interior surrounded by golden crust!
Step 8: Prepping for Baking Brilliance
While those beautiful loaves are rising again, let’s turn our attention toward preheating our oven—a vital step often overlooked but one I promise you won’t want to skip! Set your oven temperature at 450°F (232°C) and place an empty baking dish on the bottom rack while it heats up. Why an empty dish? Well, friends, this simple act will create steam once filled with hot water during baking—a technique used by professional bakers everywhere to achieve that perfectly crispy crust!
As soon as you’ve allowed those loaves their final rise and your oven is preheated like an inviting hug waiting for us, it’s time for some finishing touches! Sprinkle additional caraway seeds generously over each loaf’s surface; they not only enhance visual appeal but also provide little bursts of flavor with every bite—that added texture is simply divine! Use a sharp knife or lame (a baker’s tool) to make several shallow slashes across each loaf; this isn’t just decorative—these cuts allow steam to escape during baking while helping guide where they expand.
Now comes the moment we’ve been preparing for: placing our loaves onto their respective racks in the oven along with carefully pouring boiling water into that preheated baking dish below—which will transform our kitchen into an aromatic haven! You’ll want these beauties baking away for about 30-35 minutes until they reach a rich golden-brown hue and sound hollow when tapped on their bottoms—a perfect auditory cue signaling deliciousness awaits!
Final Touches: Cooling Down and Slicing Up
Step 9: The Sweet Reward of Patience
Once those heavenly loaves have reached their peak perfection in color and soundness, remove them from the oven and allow them some much-needed cooling time on wire racks—if you can resist taking bites immediately (and I promise it’s hard!). This cooling phase is absolutely non-negotiable; slicing too early can result in gummy interiors since steam needs time to redistribute throughout each loaf.
After about 30 minutes of cooling—and trust me when I say those minutes feel like hours—you can finally slice into one of these incredible quick & easy deli-style rye breads! Grab yourself a serrated knife and behold as you cut through crusty exteriors revealing beautiful swirls of rich color inside—each slice showcasing those wonderful caraway seeds speckled throughout like tiny treasures waiting to be discovered!
And there you have it—a labor of love transformed into slices bursting with flavor ready for sandwiches or simply enjoyed warm with butter melting atop its surface like liquid gold! Don’t forget—the best part is sharing these delights with friends or family; after all, nothing warms hearts quite like freshly baked bread straight from your own kitchen!
So go ahead and dive into this journey—I promise you’ll find every moment spent crafting these loaves profoundly satisfying and utterly worth every second spent waiting… because good things really do come to those who bake patiently!
Storage and Enjoyment Tips for Your quick & easy deli-style rye bread
Now that you’ve lovingly crafted your quick & easy deli-style rye bread, let’s talk about how to savor and preserve this delightful creation! The aroma that wafts through your kitchen is an irresistible invitation, and I can almost hear you saying, “I can’t wait to dive in!” But before you do, let’s ensure you have the best storage tips at your fingertips so that each slice remains as enchanting as the first. After all, there’s something profoundly satisfying about knowing you can enjoy this liquid gold not just today, but also in the days to come.
Storing Leftover quick & easy deli-style rye bread
When it comes to storing your leftover quick & easy deli-style rye bread, simplicity is key! First things first: allow your bread to cool completely on a wire rack; this prevents moisture from building up and making it soggy. Once cooled, wrap the loaves tightly in plastic wrap or place them in an airtight container – a glass or ceramic one works wonders here! If stored correctly at room temperature, your bread will stay fresh for about 3-4 days. To maintain that delightful crustiness, consider placing a slice of apple or a celery stalk inside the container; these little tricks keep the moisture levels just right. Trust me on this: you’ll be amazed at how it retains its flavor even after a couple of days, bringing back memories of that warm, aromatic loaf you pulled from the oven. If you’re ready for a bite after storage, simply pop slices in the toaster or warm them gently in the oven for a few minutes – it revitalizes that lovely crust while keeping the inside perfectly soft.
Freezing quick & easy deli-style rye bread for Later
If you find yourself with more delicious rye bread than you can devour right away (which is often my happy dilemma), freezing is an excellent option! To do this properly, slice your loaves into individual portions before wrapping them tightly in plastic wrap and then placing them in a freezer-safe bag. This way, whenever you’re craving a taste of that homemade goodness, you can grab just what you need without defrosting the entire loaf. Your quick & easy deli-style rye bread will stay fresh frozen for up to three months! Imagine pulling out a slice on a busy morning and quickly toasting it for breakfast or whipping up some sandwiches for lunch—it’s convenience at its finest! Plus, there’s something incredibly satisfying about knowing that you’ve got a stash of homemade goodness tucked away for those moments when time is tight.
quick & easy deli-style rye bread
Experience the joy of baking with this quick & easy deli-style rye bread, a deliciously simple recipe that captures the essence of homemade goodness. The delightful aroma of warm dough fills your kitchen as you create a loaf that’s perfect for any occasion. With its crusty exterior and tender interior, speckled with aromatic caraway seeds, this bread brings comfort and flavor to every meal. Whether you’re serving it alongside hearty soups or crafting the ultimate sandwich, this versatile rye bread will elevate your dining experience.
- Prep Time: 15 minutes
- Cook Time: 35 minutes
- Total Time: 50 minutes
- Yield: Approximately 12 servings 1x
- Category: Bread
- Method: Baking
- Cuisine: American
Ingredients
- 3 cups lukewarm water (680 grams)
- 1 tablespoon granulated yeast (10 grams)
- 1 ½ tablespoons caraway seeds (plus more for topping)
- 1 tablespoon kosher salt (17 grams)
- 1 cup rye flour (120 grams)
- 5 ½ cups all-purpose flour (780 grams)
Instructions
- In a large mixing bowl, combine lukewarm water and yeast; stir gently and let sit for five minutes until bubbly.
- Add rye flour, all-purpose flour, salt, and caraway seeds; mix until no dry bits remain.
- Knead briefly until smooth, then cover with plastic wrap and let rise in a warm place for about two hours or until doubled in size.
- Divide the dough into portions, shape into loaves, and place on parchment-lined baking sheets.
- Allow to rise again for 30-45 minutes while preheating the oven to 450°F (232°C).
- Sprinkle extra caraway seeds on top and make shallow slashes in each loaf before baking for 30-35 minutes until golden brown.
Nutrition
- Serving Size: 1 serving
- Calories: 120
- Sugar: 0g
- Sodium: 150mg
- Fat: 1g
- Saturated Fat: 0g
- Unsaturated Fat: 0g
- Trans Fat: 0g
- Carbohydrates: 24g
- Fiber: 2g
- Protein: 4g
- Cholesterol: 0mg