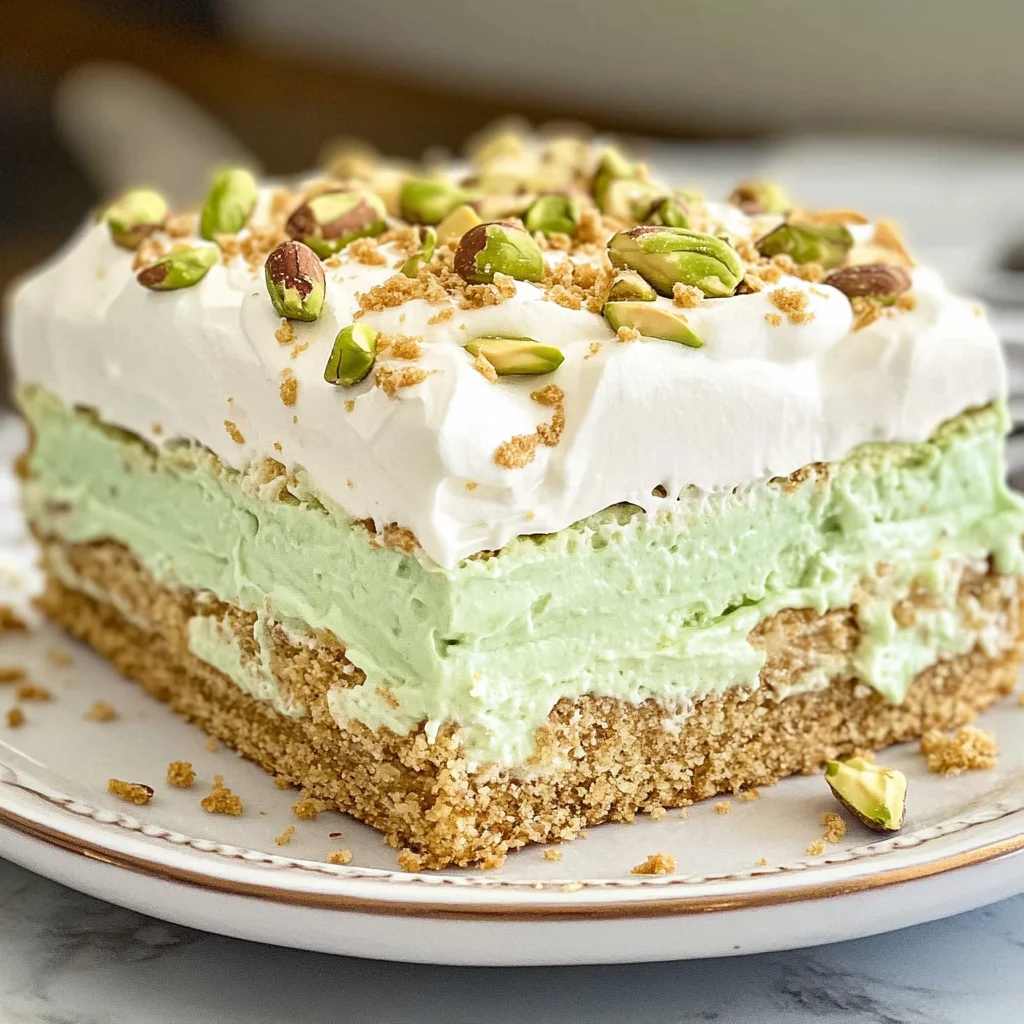
Pistachio Icebox Cake
There’s something undeniably magical about creating desserts that evoke fond memories and happy gatherings. When I think of warm summer days filled with laughter, the gentle hum of conversation, and the tantalizing aroma of sweet treats wafting through the air, my mind immediately drifts to my all-time favorite, the Pistachio Icebox Cake. This dessert isn’t just a recipe; it’s an experience—a harmonious blend of textures and flavors that sing together in every bite. The creamy pistachio pudding, nestled between layers of soft graham crackers and fluffy whipped topping, creates a symphony of sensations that dance on your palate. And let me tell you, there’s nothing quite like the joy of sharing this delightful creation with friends and family, as its lusciousness draws everyone in like moths to a flame.
As I prepare to share this beloved recipe with you, I want you to know that it holds a special place in my heart. It’s not just about whipping up a quick dessert; it’s about embracing the moments we share around the table. The beauty of this Pistachio Icebox Cake lies in its simplicity—no baking required! Just imagine layering those crunchy graham crackers with that velvety pistachio mixture—the anticipation builds as you wait for it to chill, transforming into an utterly intoxicating treat. So grab your apron, and let’s embark on this delicious journey together!
Ingredients:
Before we dive into crafting this dreamy Pistachio Icebox Cake, let’s take a moment to appreciate each ingredient that makes it so incredibly special. Each element plays a vital role in creating that perfect balance of flavor and texture.
- 6.8 ounces instant pistachio pudding mix. This magical powder is what transforms our cake into a green-hued delight bursting with nutty sweetness. It’s important to choose an instant mix rather than a cook-and-serve variety because we want that creamy consistency without any fuss. Instant pudding dissolves beautifully when whisked with milk, creating that luxurious pudding layer we crave. Plus, the vibrant color is simply irresistible!
- 2 ¾ cups milk. Milk acts as the liquid gold in this recipe—it hydrates our pudding mix and allows it to reach its full potential. I recommend using whole milk for a richer texture; however, if you’re looking for lighter options, almond or oat milk can work wonderfully too! Keep in mind that the creaminess of your final product will be affected by your choice here; so choose wisely!
- 16 ounces whipped topping (thawed and divided). Whipped topping is your secret weapon for achieving lightness in this dessert. By folding half into our pudding mixture, we introduce airiness that contrasts beautifully with the denser layers beneath. Make sure it’s completely thawed—if it’s still icy, you’ll struggle to achieve that smooth blend we’re after! If you prefer a more natural option, homemade whipped cream is a fabulous substitute.
- 14.4 ounces graham crackers (1 box). These versatile little squares are what gives our cake structure while adding an irresistible crunch! They soak up just enough moisture from the pudding without becoming overly soggy—this is absolutely paramount for maintaining those lush layers! When selecting your graham crackers, look for ones made with whole grains for added depth of flavor.
- Chopped pistachios (optional topping). A sprinkle of chopped pistachios isn’t just for show; it adds an extra layer of texture and enhances the nuttiness of our cake beautifully! If you have some extra pistachios lying around from another project or just love their flavor as much as I do, definitely toss them on top before serving—trust me on this one!
Equipment You’ll Need:
Now that we’ve gathered our ingredients, let’s talk tools! Having the right equipment makes all the difference when creating something truly wonderful in the kitchen. These tools will be your trusty companions throughout this culinary adventure.
- Large mixing bowl – A spacious bowl is essential for combining all those delightful ingredients without making a mess! Opting for one with high sides will help keep everything contained while you’re whisking away.
- Whisk – This tool will become your best friend during our first step! A good whisk helps incorporate air into our pudding mix smoothly—creating that light texture we love so much.
- 9 x 13 baking dish – This size is perfect for layering all those delicious components without overcrowding them! A glass dish works great since it allows you to see those beautiful layers come together.
- Spatula – You’ll need a sturdy spatula for folding in our whipped topping gently without losing all that precious air you’ve incorporated. A silicone spatula can be particularly helpful here because it scrapes every last bit from the bowl effortlessly!
Now that we have everything ready let’s dive into preparing this heavenly Pistachio Icebox Cake!
Step 1: Whipping Up That Creamy Pudding Mixture
Let’s get started by whisking together our instant pistachio pudding mix and milk in a large mixing bowl—this is where all the magic begins! Pour those two components together and take your time as you whisk vigorously for about two minutes until fully combined; you’ll know it’s ready when it thickens slightly and resembles liquid gold. This step is crucial because it activates the pudding mix’s thickening agents; skipping or rushing could leave you with an overly runny filling later on—definitely not ideal! Once blended perfectly, gently fold in half of your thawed whipped topping until no streaks remain visible—this will create that gorgeous creamy layer we’re after!
Step 2: Layering Like a Pro
Now comes one of my favorite parts: assembling our cake! Start by covering the bottom of your 9 x 13 baking dish with an even layer of whole graham crackers—just enough to form a solid base without any gaps peeking through should do the trick. With a spatula at hand, carefully spread half of your pudding mixture over these crackers; don’t rush this step because ensuring even coverage allows each bite to be rich and satisfying! Follow up with another layer of graham crackers before repeating the process with your remaining pudding mixture—oh yes, we’re building flavor upon flavor here!
Step 3: Finishing Touches
Once you’ve layered everything beautifully like a pro pastry chef (I believe in you!), wrap up this masterpiece with one final layer of graham crackers atop your second puddle—a beautiful canvas awaiting its crowning touch! Use whatever remains of your whipped topping to cover everything generously—it creates such an inviting finish while also sealing everything inside nicely during chilling time ahead.
Step 4: Chill Out!
Finally, cover your baking dish tightly with plastic wrap or foil—this part is non-negotiable as it prevents any unwanted odors from invading our delightful creation while chilling overnight (or at least four hours if you’re short on time). Trust me when I say patience pays off here; allowing flavors to meld contributes significantly to making each slice taste utterly extraordinary!
And there you have it—the first steps toward crafting an unforgettable Pistachio Icebox Cake await you! Let’s continue this journey together as we explore how easy it is to create something truly remarkable—all while sharing stories along the way!
Step 5: Layering the Magic
Now that you’ve whisked together that vibrant pistachio pudding and folded in the light, airy whipped topping, it’s time to create the first layer of your Pistachio Icebox Cake. Grab your trusty 9 x 13 baking dish and lay down a single layer of graham crackers. This is where the magic begins! Why graham crackers? They provide that essential structure and a delightful crunch, which contrasts beautifully with the creamy pudding. You want to ensure every nook and cranny of your baking dish is covered; each graham cracker will soak up the flavors and moisture as it chills, transforming into an utterly intoxicating layer that melds perfectly with the pudding.
Once you’ve laid down those graham crackers, gently spread half of your luscious pistachio pudding mixture over them. Use a spatula to ensure an even layer—this step is crucial because it allows every bite to be perfectly balanced with both creaminess and that distinct pistachio flavor. Take a moment to admire the beautiful green hue of your pudding; I promise you, it’s a sight that will make your heart sing! Repeat the process by layering another set of graham crackers followed by the remaining pudding mixture. Then, finish off with one last layer of graham crackers on top. This layering technique not only creates a stunning visual but also ensures that each slice will offer a delightful balance of textures when you dig in later. Don’t rush through this part; take pride in crafting these layers!
Step 6: The Final Whipped Topping Layer
Now for one of my favorite parts—the crowning glory! After layering those beautiful components, you’re going to take the remaining whipped topping and spread it generously over the last layer of graham crackers. This step adds a fluffy finish that elevates our Pistachio Icebox Cake from delicious to truly extraordinary. When you’re spreading the whipped topping, try to cover every inch; this not only provides visual appeal but also seals in all those wonderful flavors beneath it.
Why is this step so important? The whipped topping acts like a soft blanket for our cake, ensuring that moisture stays locked in as it chills. This means when you finally cut into your cake, each slice will be decadently creamy without any dry edges—a non-negotiable for any dessert! As you spread it evenly, don’t hesitate to dollop on extra for those who appreciate an indulgent treat (which I wholeheartedly encourage!). Trust me on this: the more fluffy topping you can manage on there without tipping overboard, the better!
Step 7: Patience is Key – Chill Time!
With your cake thoroughly assembled and topped off with its fluffy blanket, we now enter perhaps one of the most crucial phases—chilling! Cover your masterpiece snugly with plastic wrap or aluminum foil before placing it in the refrigerator. Now here’s where patience becomes paramount; allow this beauty to chill for at least four hours, although overnight is ideal if you can stand waiting! During this time, something magical happens: all those layers meld together into a symphony of flavors and textures.
But why wait? What makes chilling so special? It allows the graham crackers to absorb moisture from the pudding and whipped topping while simultaneously setting everything into one cohesive dessert experience. You’ll notice how they transform from crunchy squares into something creamy yet still holding their shape beautifully! If you’re tempted to skip this step or dig in before then, just remember how profoundly satisfying it will be after resting—your taste buds will thank you! If you’re anything like me, checking on it periodically just might build up your excitement too.
Step 8: Garnishing Your Dream Dessert
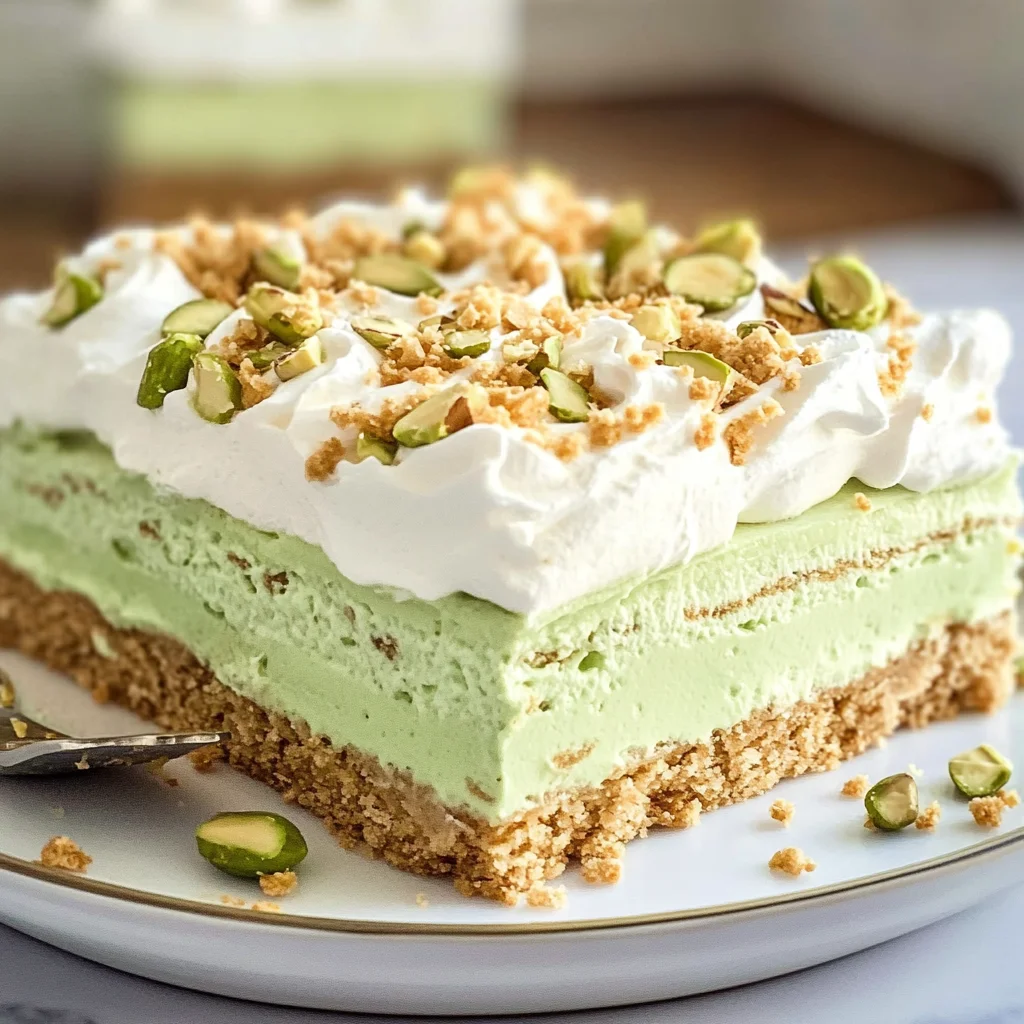
Finally, after what might feel like an eternity (but trust me—it’s worth every second!), it’s time for some finishing touches before serving up slices of pure bliss. Once your Pistachio Icebox Cake has had its time in the fridge and is beautifully set, pull it out and take a moment to revel in its beauty. The layers should look cohesive and inviting—smooth from that whipped topping yet slightly domed where they peek through when cut.
For an optional yet highly encouraged garnish, sprinkle some chopped pistachios over the top right before slicing—this adds not only a pop of color but also an additional layer of crunch that heightens each bite’s texture. When you serve this cake at gatherings or simply enjoy it at home with loved ones, I promise you’ll be showered with compliments about how divine this dessert is! And when they ask for seconds (which they undoubtedly will), you’ll know you’ve created something truly special—a recipe passed down with love that’s now part of your culinary repertoire.
Conclusion:
As we come full circle through this delightful journey of creating your very own Pistachio Icebox Cake, I hope you’re feeling just as excited as I do every time I make this recipe. It’s more than just a dessert—it’s a symphony of flavors and textures that beckons gatherings around the table and turns ordinary moments into extraordinary ones. The creamy pistachio pudding layered with soft graham crackers creates an experience that’s truly unforgettable. Each bite transports you into a world of blissful sweetness where every ingredient plays its part magnificently.
This recipe is an absolute must-try for any occasion—from summer barbecues to cozy family dinners or even just because you deserve something special! The sheer joy of assembling this no-bake masterpiece is an experience in itself; you’ll find yourself smiling at how simple yet rewarding it is. Imagine pulling it from the fridge after it’s chilled perfectly overnight—the anticipation alone is worth every second spent waiting! And when you finally dig in? That moment of indulgence will leave you yearning for more.
Serving suggestions are endless when it comes to pairing with your Pistachio Icebox Cake. Imagine savoring one alongside freshly brewed coffee for an afternoon pick-me-up or serving with a scoop of homemade vanilla ice cream for an indulgent treat that elevates everything to new heights. For those moments when you wish to impress guests at gatherings, consider drizzling some rich chocolate sauce over each slice or presenting them with fresh berries on the side—the contrast between flavors will dance delightfully on their palates!
Feeling adventurous? This recipe is wonderfully adaptable! You could swap out the pistachio pudding mix for other flavors like almond or matcha if you’re craving something different—each variation brings its own unique twist while maintaining that satisfying creaminess we love so much. Or perhaps add layers of crushed cookies or fruits like banana slices for added texture—the possibilities are truly endless! I wholeheartedly invite you to try this recipe, share your experiences with loved ones, and connect through this beautiful act of making something delicious together. Let’s spread joy one slice at a time!
Pistachio Icebox Cake
Pistachio Icebox Cake is a delightful no-bake dessert that combines creamy pistachio pudding with layers of graham crackers, creating an irresistible treat perfect for any occasion. This easy-to-make dessert features a luscious texture and nutty flavor, making it a crowd-pleaser at summer gatherings or cozy family dinners. With just a few simple ingredients and no baking required, you can whip up this refreshing cake in no time. As the layers chill together, they meld into a symphony of flavors that will have everyone coming back for seconds. Enjoy the simplicity and joy of crafting this dreamy Pistachio Icebox Cake—a dessert experience that brings smiles to every table.
- Prep Time: 15 minutes
- Cook Time: None
- Total Time: 0 hours
- Yield: 12 servings 1x
- Category: Dessert
- Method: No-bake
- Cuisine: American
Ingredients
- 6.8 ounces instant pistachio pudding mix
- 2 ¾ cups milk (whole, almond, or oat)
- 16 ounces whipped topping (thawed)
- 14.4 ounces graham crackers (1 box)
- Chopped pistachios (optional topping)
Instructions
- In a large mixing bowl, whisk together the instant pistachio pudding mix and milk for about two minutes until it thickens.
- Gently fold half of the thawed whipped topping into the pudding mixture until combined.
- Layer the bottom of a 9 x 13 baking dish with graham crackers. Spread half of the pudding mixture over the crackers.
- Add another layer of graham crackers followed by the remaining pudding mixture, then top with a final layer of graham crackers.
- Spread the remaining whipped topping over the top layer and smooth it out evenly.
- Cover tightly with plastic wrap or foil and refrigerate for at least four hours or overnight to allow flavors to meld.
- Before serving, garnish with chopped pistachios if desired.
Nutrition
- Serving Size: 1 slice
- Calories: 280
- Sugar: 24g
- Sodium: 120mg
- Fat: 12g
- Saturated Fat: 5g
- Unsaturated Fat: 6g
- Trans Fat: 0g
- Carbohydrates: 38g
- Fiber: 1g
- Protein: 3g
- Cholesterol: 5mg