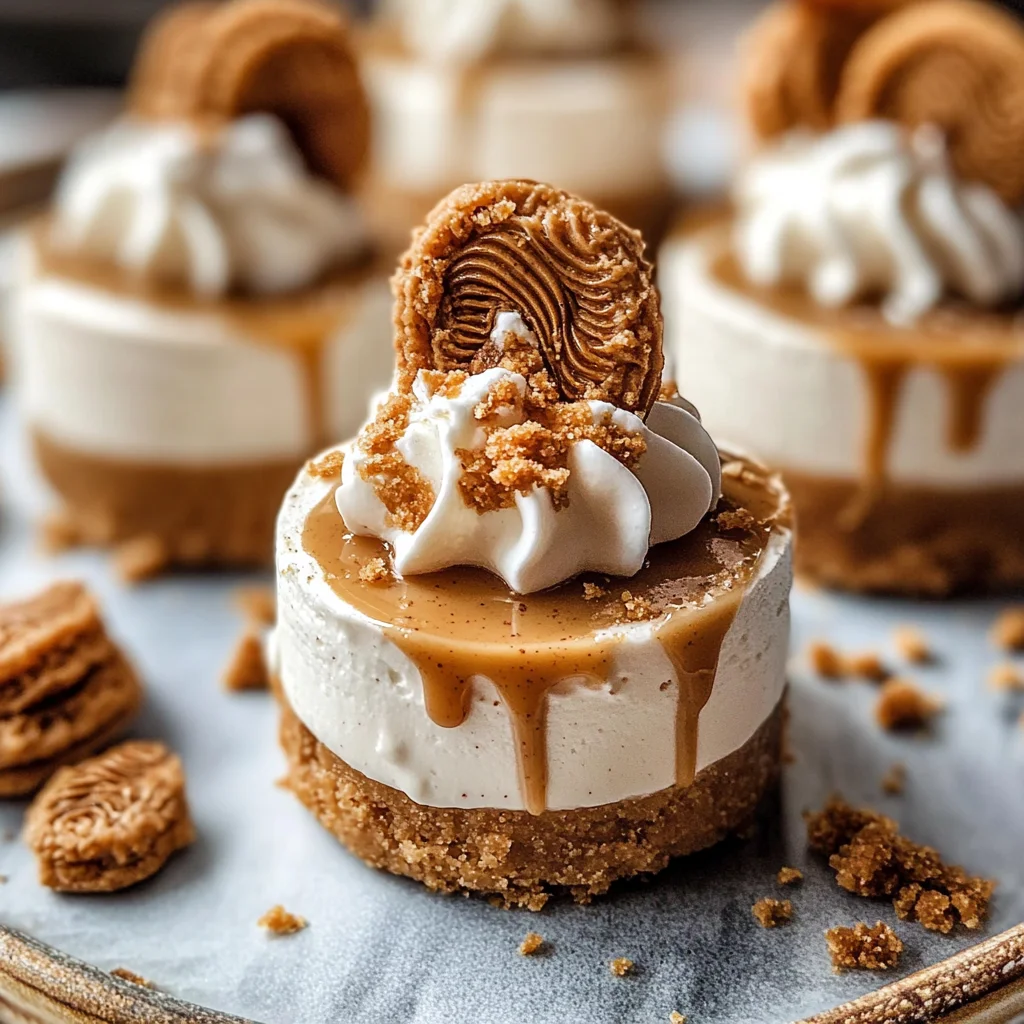
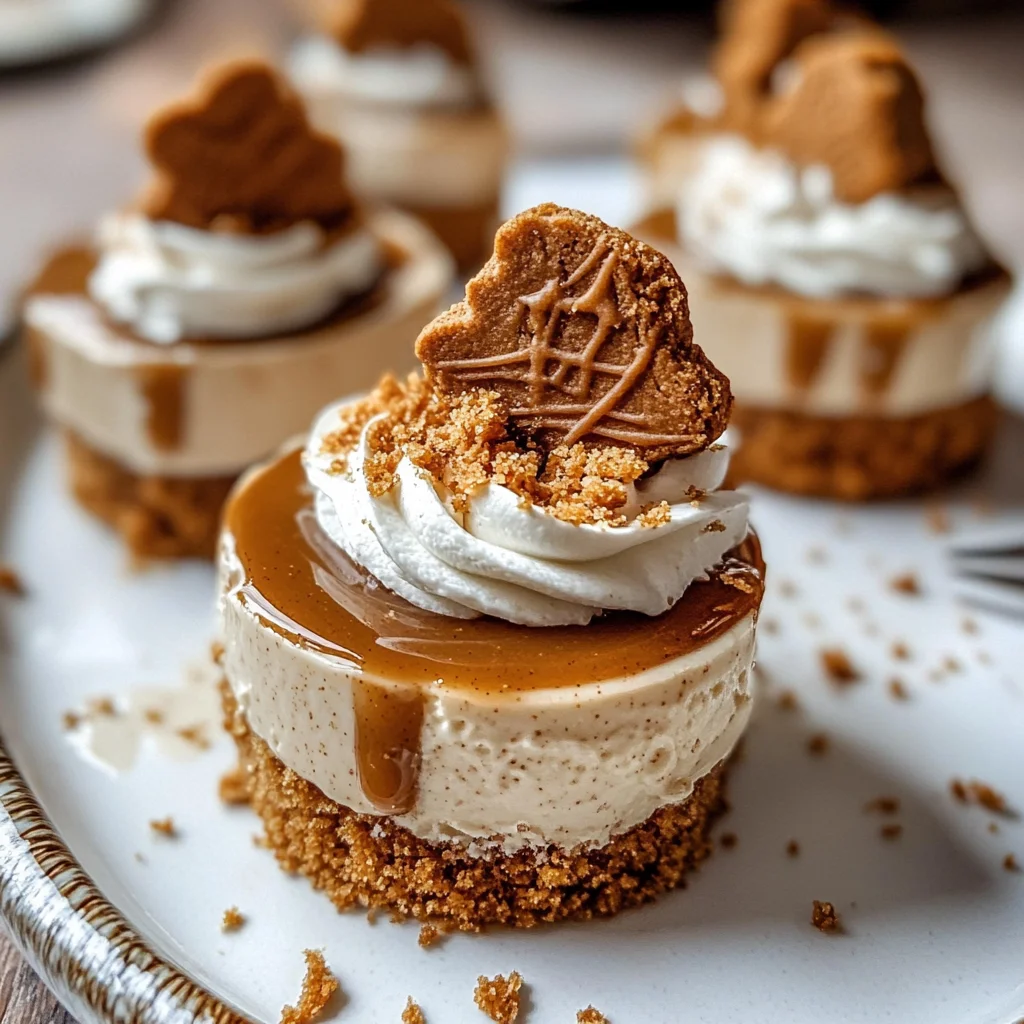
No Bake Mini Biscoff Cheesecakes
There’s something utterly magical about desserts that don’t require baking; they often feel like a gentle embrace at the end of a long day. Imagine sinking your spoon into a rich, creamy cheesecake, each bite melting away with the warm flavors of cinnamon and the comforting sweetness of caramelized cookies. This is what you can expect with my No Bake Mini Biscoff Cheesecakes—a delightful treat that transforms an ordinary moment into something extraordinary. The velvety smoothness of the Biscoff cheesecake filling paired with a crunchy cookie base creates a symphony of textures that dance harmoniously on your palate. And trust me, once you serve these little beauties, you’ll be met with oohs and aahs that will make your heart swell with pride.
As I take you through this recipe, I want to remind you that cooking is not just about following directions; it’s about creating an experience filled with love and passion. These mini cheesecakes are perfect for celebrations or casual gatherings—think of them as edible hugs! They hold within them stories waiting to be shared—of family dinners, laughter-filled parties, or just cozy nights in. So let’s embark on this culinary journey together and whip up some magic!
No Bake Mini Biscoff Cheesecakes: A Sweet Escape from Tradition
These No Bake Mini Biscoff Cheesecakes are not just easy to make; they’re also an indulgence that anyone can prepare without needing to turn on the oven. The heavenly layers of creamy Biscoff goodness combined with the buttery crunch of cookie crust create a dessert so divine, it feels like a little piece of heaven on a plate. Perfectly sized for sharing (or hoarding all to yourself!), these mini cheesecakes are sure to impress both friends and family alike.
Ingredients:
Gathering our ingredients is like assembling our dream team for this delightful culinary adventure. Each component plays an essential role in crafting these exquisite mini cheesecakes, so let’s dive into what makes each ingredient special.
- 1 (8.8 oz, 250g) package Biscoff cookies. These iconic cookies bring more than just flavor; their unique caramelized sugar notes paired with hints of spice create the foundational taste of our cheesecake crust. When crushed into fine crumbs, they become the perfect base—crunchy yet buttery—which sets the stage for our creamy filling. If you’re feeling adventurous, you could substitute them with speculoos or any similar spiced cookie, but I assure you there’s nothing quite like the classic Biscoff!
- 1/2 cup melted unsalted butter. This golden liquid gold is crucial for binding the crushed cookies into a crust that holds its shape while still offering that melt-in-your-mouth texture we crave. Unsalted butter allows us to control the saltiness in our dessert since we’re already adding other ingredients that may contain salt. Be sure it’s melted but not hot when mixing—it should be warm enough to combine without cooking the other ingredients.
- 1 cup heavy cream, cold. This is where things get dreamy! The heavy cream adds luxurious richness and stability to our cheesecake filling. When whipped to stiff peaks, it transforms into billowy clouds that lighten our mixture beautifully—making each bite feel airy yet indulgent. Chill your mixing bowl and beaters beforehand; this helps achieve those perfect peaks faster!
- 3 (8 oz.) blocks full-fat cream cheese, softened to room temperature. Cream cheese is key for achieving that classic cheesecake texture we’re all familiar with—smooth, creamy, and utterly satisfying! Ensure it’s softened properly (not melted!) as this allows for better blending with the other components, which creates a cohesive filling without any lumps.
- 1 cup powdered sugar. This sweet addition gives us not only sweetness but also contributes to a velvety mouthfeel in our cheesecake filling. Powdered sugar dissolves quickly compared to granulated sugar which means it integrates seamlessly into our mixture without leaving gritty bits behind—a non-negotiable for achieving creamy perfection!
- 1 cup creamy Biscoff cookie butter. Ah, now we get to the heart of flavor—the Biscoff cookie butter! It brings an added depth of sweetness along with those iconic spices we adore from the cookies themselves. You could even spread some extra on top if you’re feeling indulgent! If you can’t find this specific brand, look for any smooth cookie butter spread as an alternative; just ensure it complements rather than overpowers.
- 1/3 cup sour cream, room temperature. Sour cream adds tanginess which balances out all that sweetness while also keeping our cheesecake filling luxuriously creamy and moist! Make sure it’s at room temperature so it mixes easily without clumping.
- 2 tsp pure vanilla extract. Vanilla is like music in cooking—enhancing flavors harmoniously without stealing the spotlight! Always choose pure vanilla extract over imitation for a richer flavor profile; it’s worth every drop.
- Pinch of salt. Salt may seem insignificant but trust me—it amplifies all those sweet notes beautifully! It’s what separates an average dessert from an extraordinary one by enhancing depth in flavors.
- 1/2 cup creamy Biscoff cookie butter (for topping). Melting some additional cookie butter brings another layer of richness atop these cheesecakes—think of it like icing on a cake!
- Additional Biscoff cookies for garnish (whole or crushed). These little gems are perfect for adding visual appeal as well as texture when sprinkled on top or served alongside each cheesecake!
- Whipped cream, for serving if desired! A light dollop completes these mini masterpieces perfectly—rich and airy at once!
Equipment You’ll Need:
Now that we have gathered all our love-infused ingredients together, let’s talk tools—the unsung heroes behind every successful recipe! Having the right equipment makes this entire process smoother and more enjoyable.
- Food processor: This handy gadget is essential for transforming those crunchy cookies into fine crumbs effortlessly! If you don’t own one, placing cookies in a zip-top bag and smashing them with a rolling pin works too; just know it’ll take longer and require some elbow grease.
- Mixing bowls: You’ll need various sizes here—the larger ones will house your cream cheese mixtures while smaller ones can hold whipped cream until needed! Opt for glass or stainless steel as they hold temperature well during mixing processes.
- Hand mixer or stand mixer: Whipping heavy cream can be laborious by hand, so having either type of mixer makes life much easier—and who doesn’t love fluffy whipped cream?
- Piping bag fitted with round tip 1A: This isn’t absolutely necessary but makes piping your cheesecake filling onto the crust much neater and visually appealing! If you’re sans piping bags (no shame), simply spooning it in works too; just ensure even distribution across each crust.
- Mini cheesecake pans or muffin tins lined with cupcake liners: These will be your molds for shaping those adorable mini cheesecakes! Opting for silicone molds can help release them later without fussing over sticking issues.
Now that we have everything set up nicely, let’s dive into preparing these divine No Bake Mini Biscoff Cheesecakes!
Step 1: Creating That Irresistible Cookie Crust
First things first—we need to create our beautiful cookie crust which serves as the foundation of our no-bake cheesecake delight! Begin by blitzing those beloved Biscoff cookies in your food processor until they resemble fine crumbs—a process akin to creating sand at the beach; we want no large pieces here! As you watch them transform under the blade’s power, inhale deeply—the aroma wafting from freshly ground cookies is truly intoxicating!
Once you’ve achieved crumb perfection, stream in your melted unsalted butter gradually while continuing to pulse until everything combines evenly—a sandy consistency should form that’s moldable when pressed between fingers but not overly wet or greasy. Don’t rush this step; taking time here ensures structural integrity later on as it binds well together without crumbling apart during assembly.
Next comes one crucial part—prepping your pans! Spray two mini cheesecake pans lightly using non-stick spray—or use cupcake liners if you’re going down that route—instead giving yourself peace of mind against any potential sticking issues later on when releasing those delectable bites from their molds after chilling time passes by wonderfully slowly.
Using approximately one tablespoon per compartment (you can eyeball it), firmly press down each portion evenly across its base using fingers or small measuring cup until compacted nicely together—we want no air pockets lurking about ruining texture later after chilling occurs overnight!
Finally comes patience… Place these crust-filled pans either in freezer or refrigerator while preparing filling below so they solidify slightly before adding luscious toppings later—it’ll pay off immensely come serving time!
Step 2: Whipping Up Heavenly Cream
Now let’s talk about whipping heavy cream—a skill worth mastering because nothing beats freshly whipped clouds perched atop desserts like these little cheesecakes do beautifully! In order to achieve ideal stiffness without risking overbeating—which would lead us down sad paths yielding grainy results—we start by pouring cold heavy cream into either chilled medium-sized mixing bowl (or stand mixer fitted with whisk attachment).
Begin mixing slowly at first before increasing speed gradually—you want bubbles forming steadily but gently throughout this process rather than splattering everywhere around kitchen counters! After about two minutes (it may differ slightly depending on wattage), keep an eye out for soft peaks forming—that moment when peaks begin holding shape gracefully while still being soft around edges indicates readiness approaching stiff peak territory soon thereafter… Remember: don’t rush this step since patience yields better outcomes here!
Once you’ve reached desired peak stage (meaning creamed mixture holds shape firmly upon lifting whisk!), set aside onto refrigerator shelf temporarily while focusing next efforts entirely on crafting deliciously smooth filling components awaiting incorporation shortly thereafter… Trust me—it’ll bring balance between lightness from whipped element coupled harmoniously against richness provided by others blended below during next stages ahead!
Step 3: Blending All Things Cheesecake
Now comes perhaps my favorite part—the real magic happens when we combine everything together making up our luscious filling that’ll crown those crumbly bases beautifully soon after chilling transforms them fully into decadent delights worthy indeed celebrating among friends & family alike!
In another medium-large mixing bowl fitted snugly against countertop surfaces nearby ensuring proper stability during vigorous motion ahead—begin creaming softened full-fat cream cheese using electric mixer set upon medium speed initially until silky-smooth consistency reveals itself underneath blades’ rhythmic movements captivating senses entirely… Stay vigilant though avoiding lumps becoming interspersed throughout otherwise ruining overall texture significantly later down line ahead here too!
Gradually introduce powdered sugar followed closely thereafter by rich velvety goodness derived straight from jarred treasure known affectionately as ‘biscoff cookie butter’ along sour cream & pure vanilla extract additionally finishing touch sprinkle pinch salt added generously… Trust me—it sounds like heaven doesn’t it?
Continue blending thoroughly ensuring complete incorporation occurs before folding gently folded earlier whipped clouds back into this delightful concoction using rubber spatula allowing air retained therein remain intact whilst creating harmonious union among flavors present uniquely within final product anticipated eagerly ahead dear friends…Each gentle motion should feel restorative bringing forth unity amongst disparate elements culminating soon thereafter delicious satisfaction awaits delectably enticing experience ahead waiting eagerly served up simply chilled overnight patiently allowing flavors bloom effortlessly together harmoniously instead rushing toward conclusion prematurely…
Step 4: Assembling Our Cheesecake Dreams
At long last we’ve reached assembling phase where all efforts culminate beautifully showcasing artistry behind creation leading directly towards enjoyment awaiting patiently shortly ahead… Using piping bag fitted snugly rounded tip #1A carefully fill prepared crusts extravagantly layering generous amounts luscious biscoff-infused mixture atop expressive biscuit foundations below skillfully smoothing tops evenly across surfaces presenting aesthetically pleasing results promising great anticipation building within hearts eager souls gathered around tables shortly near…
Take care not overfill compartments beyond intended limits set forth early meanwhile reserving remaining spaces available invite additional toppings decorate adorning plates nicely alongside alongside each slice served afterward bringing joy utmost pleasure brought forth amidst gathering shared moments cherished forever cherished memories created lovingly shared over morsels crafted especially remembering fond times spent together laughing reminiscing enjoying simple pleasures indulging desserts made truly unforgettable experiences driven love warmth built relationships forged enduring warmth shared between families friends alike meeting expectations held high so let’s honor tradition new tales woven throughout history proudly reflected reflecting deep connection found within simple act nourishing souls feeding hearts through food shared lovingly prepared treasured recipes passed through generations inspiring future cooks alike crafting journey begun anew today…
Conclusion:
As we wrap up this delicious journey through making No Bake Mini Biscoff Cheesecakes together, I can’t help but feel giddy about what we’ve created! From the very first crunch of that buttery cookie base to the last heavenly spoonful of creamy filling adorned with an inviting drizzle of melted Biscoff spread—every element sings in harmony together like a beautiful symphony of flavors! Each bite offers an experience that’s not merely about taste; it’s about comfort, nostalgia, and perhaps even sharing a piece of our hearts with those we love.
Why should this recipe be on your must-try list? Well, beyond its captivating flavor profile—the combination of creamy cheesecake mingling with warm hints of cinnamon spice is truly extraordinary—it also brings joy during preparation. It’s incredibly accessible; anyone can whip these up quickly without turning on an oven or worrying about complicated techniques. Imagine pulling these beauties from your fridge at a gathering—the smiles on everyone’s faces as they take that first bite will be priceless! This dessert shines at celebrations or quiet evenings alike; it’s perfect for birthdays, casual get-togethers, or simply as an excuse to indulge yourself after a tough day.
As you prepare to serve these delightful cheesecakes, picture yourself enjoying one alongside your favorite cup of coffee or tea—what an exquisite pairing! Or perhaps envision offering them as part of an impressive dessert platter next time you host friends or family—a true showstopper indeed! For an afternoon pick-me-up that feels utterly indulgent yet remains light enough not to weigh you down, these mini cheesecakes are perfection incarnate.
Feeling adventurous? This recipe is wonderfully adaptable! You could swap out Biscoff cookie butter for another nut butter if you’d like a different flavor profile or sprinkle some crushed nuts on top for added texture and crunch. You could even experiment with flavored whipped cream—think vanilla bean or chocolate—to elevate this treat even further. I encourage you to get creative and make it your own; there are so many ways to enhance this already fabulous recipe! So grab those ingredients once more and dive into making these delightful cheesecakes again—I can’t wait for you to share your experiences and variations with me!
No Bake Mini Biscoff Cheesecakes
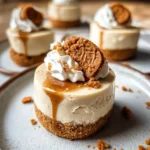
Indulge in the irresistible charm of No Bake Mini Biscoff Cheesecakes, where creamy cheesecake meets a crunchy cookie base for a delightful dessert experience. These easy-to-make treats are perfect for impressing guests at gatherings or enjoying a sweet moment all to yourself. The rich flavors of Biscoff cookie butter blend harmoniously with whipped cream and cream cheese, creating a velvety filling that melts in your mouth. Topped with a drizzle of melted Biscoff spread and garnished with crushed cookies, these mini cheesecakes are not only stunning but also incredibly satisfying. With no baking required, you can whip these up in no time and let them chill while you await the sweet reward. Each bite is a celebration of flavor and texture—truly an edible hug!
- Prep Time: 30 minutes
- Cook Time: None
- Total Time: 0 hours
- Yield: Makes approximately 12 mini cheesecakes 1x
- Category: Dessert
- Method: No baking required
- Cuisine: American
Ingredients
- 1 package (8.8 oz) Biscoff cookies
- 1/2 cup melted unsalted butter
- 1 cup heavy cream, cold
- 3 blocks (8 oz each) full-fat cream cheese, softened
- 1 cup powdered sugar
- 1 cup creamy Biscoff cookie butter
- 1/3 cup sour cream, room temperature
- 2 teaspoons pure vanilla extract
- Pinch of salt
- Additional Biscoff cookie butter for topping
Instructions
- Prepare the crust: Crush Biscoff cookies into fine crumbs using a food processor. Mix with melted butter until combined. Press mixture into mini cheesecake pans and chill.
- Make the filling: In a bowl, beat softened cream cheese and powdered sugar until smooth. Add Biscoff cookie butter, sour cream, vanilla extract, and salt; mix until well combined.
- Whip heavy cream to stiff peaks in another bowl; gently fold into the cheesecake mixture.
- Pipe or spoon filling over chilled crusts and smooth tops. Chill for at least 6 hours or overnight.
- Serve: Drizzle melted Biscoff spread on top before serving and garnish with crushed cookies.
Nutrition
- Serving Size: 1 cheesecake (70g)
- Calories: 290
- Sugar: 22g
- Sodium: 180mg
- Fat: 23g
- Saturated Fat: 13g
- Unsaturated Fat: 9g
- Trans Fat: 0g
- Carbohydrates: 21g
- Fiber: 0g
- Protein: 3g
- Cholesterol: 35mg