Milk Bar Hilly’s Pumpkin Caramel Pie Recipe
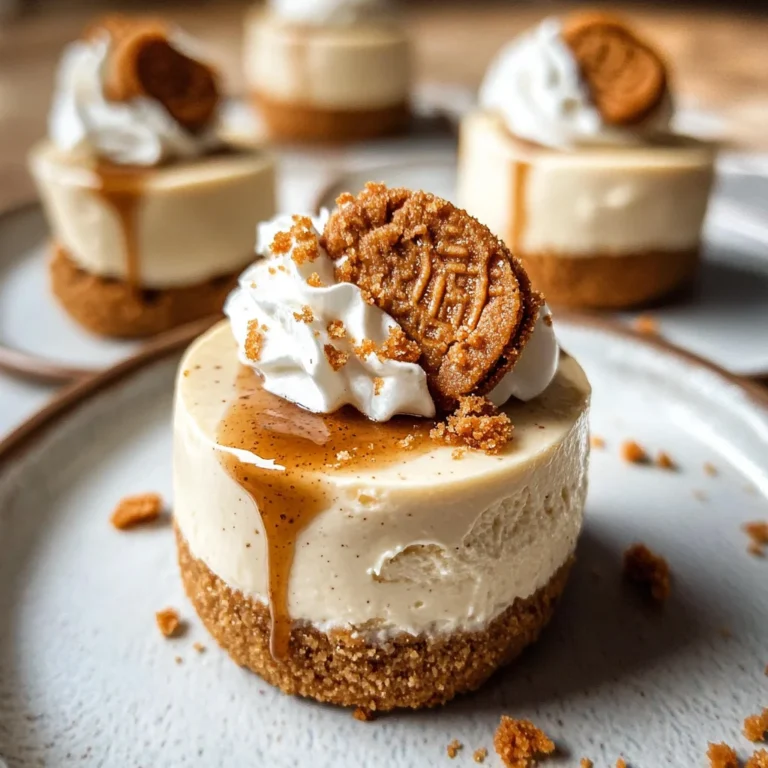
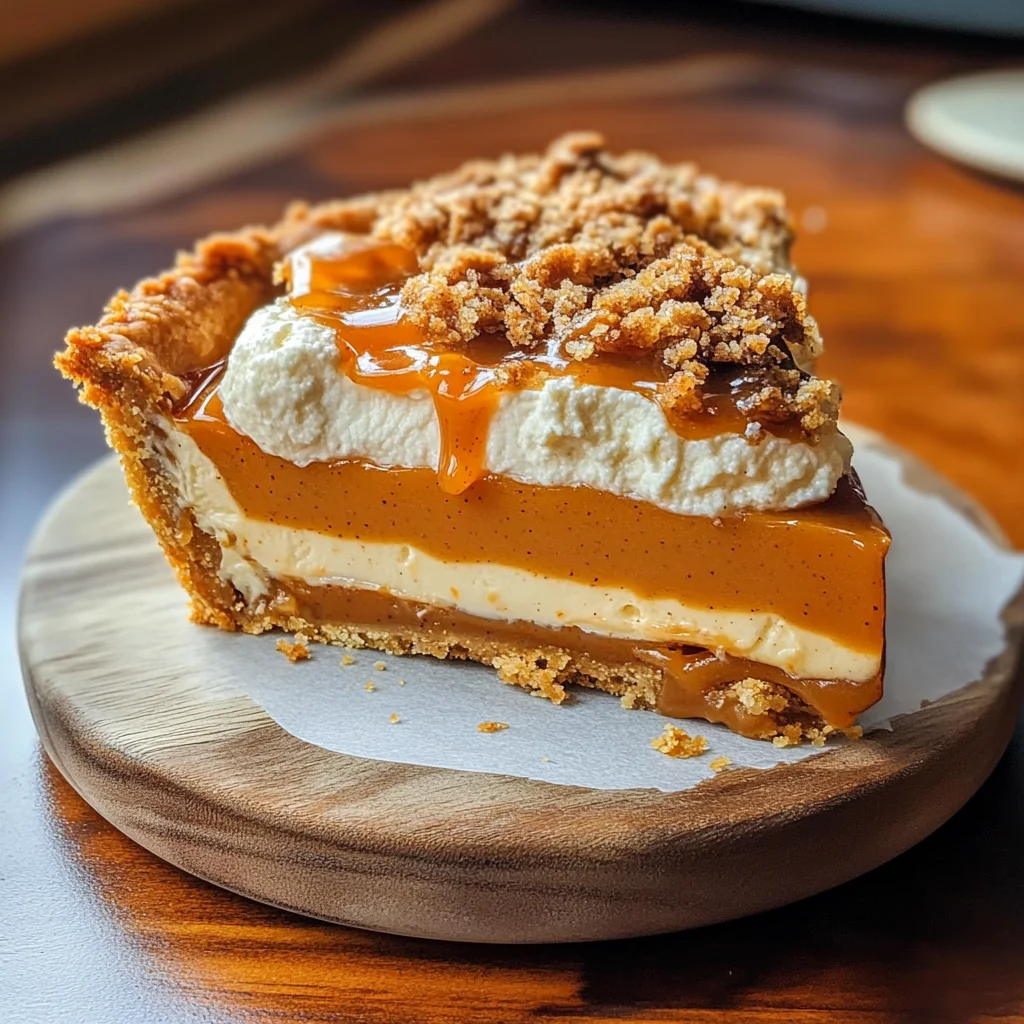
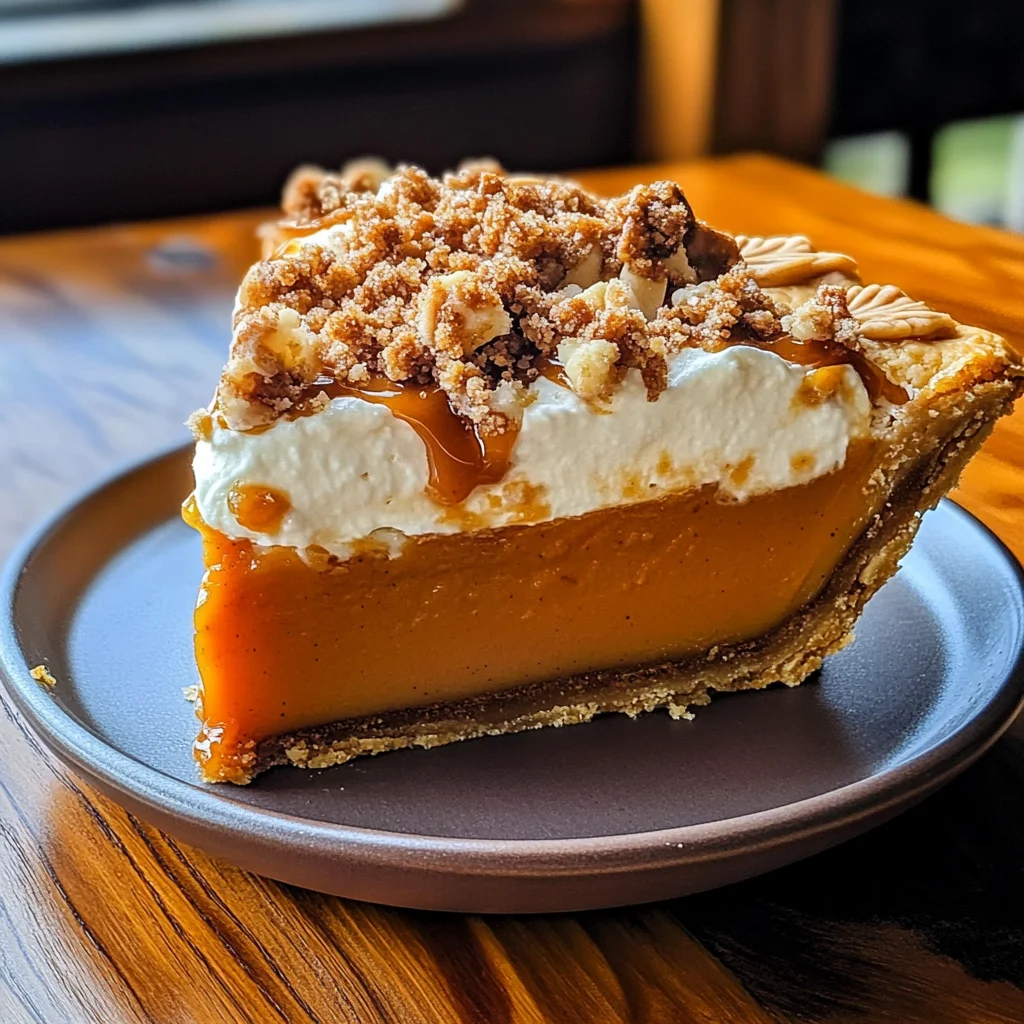
Oh, my dear friend, let me tell you about a dessert that has the power to transport you straight into the cozy embrace of autumn, no matter the season. The Milk Bar Hilly’s Pumpkin Caramel Pie is not just a pie; it’s a celebration of flavors, textures, and memories that dance together in perfect harmony. Imagine the buttery crunch of a homemade crust giving way to a luxuriously spiced pumpkin white chocolate ganache, topped with ribbons of salted caramel that glisten like liquid gold. And just when you think it can’t get any better, a dollop of fresh sweetened whipped cream and a delightful streusel topping complete this masterpiece. It’s truly extraordinary, my friends—a pie that brings warmth to your heart and joy to your table.
This recipe comes from the famed Milk Bar in New York City, known for its innovative take on classic desserts. What makes this pie so special is its ability to blend traditional fall flavors with modern flair, creating an experience that feels both nostalgic and refreshingly new. Whether you’re gathering around the table with family during the holidays or simply indulging on a cozy evening at home, this pie will undoubtedly become a cherished part of your baking repertoire. I promise you; every bite tells a story—of laughter shared, of rich flavors mingling like old friends, and of the comfort that comes from creating something beautiful with your own hands.
Milk Bar Hilly’s Pumpkin Caramel Pie Recipe: A Cozy Fall Experience
Let’s embark on this delicious journey together! As we navigate through each step of making this scrumptious pie, I want you to feel empowered and excited about every ingredient and technique we’ll be using. This isn’t just about following a recipe; it’s about understanding what we’re doing and why it matters. Get ready to create something that will make your kitchen smell divine and your taste buds sing!
Ingredients:
As we dive into our ingredient list for this beloved Pumpkin Caramel Pie, take a moment to appreciate how each component plays an essential role in creating this masterpiece. Every ingredient we use adds depth and character to our final dish.
- (2) 15-ounce cans pumpkin puree. It’s absolutely crucial to use pure pumpkin puree here—not pumpkin pie filling or mix! The difference lies in purity; real pumpkin puree provides that rich vegetable flavor without added spices or sugars muddling its essence. When selecting your cans, look for organic options if available—they tend to have a fresher flavor that elevates your pie to new heights.
- 1 1/4 cups heavy cream. Heavy cream is what gives our pumpkin filling its luscious texture—a velvety smoothness that wraps around your palate like a warm hug. When whipped into sweetened cream later on for topping, it becomes airy yet stable enough to hold its shape beautifully atop our pie. For the best results, chill your heavy cream before whipping; it whips up faster and achieves greater volume!
- 1/3 cup corn syrup (scant). This might seem like an unusual addition for some home bakers, but corn syrup plays a vital role in achieving that glossy finish on our salted caramel—it helps prevent crystallization while adding sweetness without being overly cloying. If you’re looking for alternatives due to dietary preferences, light molasses or golden syrup can work well too.
- 5 tablespoons unsalted butter. Butter is non-negotiable in baking; its rich flavor is paramount for both the crust and caramel components of our pie. Make sure it’s softened to room temperature so it blends seamlessly into other ingredients—this ensures optimal texture whether we’re making our crust or enriching the ganache.
- 12 to 16 ounces white chocolate (2 to 2 1/2 cups high-quality). You want good quality white chocolate here; think creamy and indulgent! This ingredient not only adds sweetness but also lends an elegant richness that perfectly complements the spiced pumpkin puree—creating an enchanting flavor profile that’s hard to resist.
- 3 teaspoons pumpkin pie spice. This magical blend captures all those warm spice notes we love about fall—cinnamon, nutmeg, ginger—all mixed together in one convenient package! While store-bought works perfectly fine, consider making your own mix at home for freshness and customization based on your taste preferences.
- 1/2 teaspoon salt. Salt might seem simple but trust me—it amplifies flavors in ways we often overlook! It balances out sweetness remarkably well while enhancing all the natural flavors present in our pumpkin mixture.
- 1 cup white sugar. Sugar doesn’t just sweeten; it also contributes texture and moisture! For this recipe specifically, granulated sugar helps caramelize beautifully later on when combined with butter and corn syrup—leading us towards that luscious salted caramel layer everyone will rave about!
- 1/3 cup heavy cream (for caramel). Another splash of heavy cream joins us for our caramel sauce—it ensures richness as well as giving us that silky-smooth consistency we crave when drizzling over slices of pie!
- 6 tablespoons unsalted butter (for caramel). Just like before—butter enriches everything with unparalleled flavor while providing necessary fat content required when simmering down our sugar mixture into liquid gold!
- 1/4 cup water (for caramel). Water acts as an essential companion during the initial stages when melting sugar—it helps dissolve granules evenly before they transform into something truly extraordinary!
- 2 tablespoons corn syrup (for caramel). We’re doubling down on corn syrup here because consistency matters! It prevents any unwanted crystallization during cooking so you can achieve perfect caramel sauce every time.
- 1 teaspoon salt (up to 2 teaspoons salt to taste) (for caramel). Salt enhances flavor profiles beautifully—and trust me—you may want more than just one teaspoon depending on personal preference!
- 2 teaspoons vanilla extract. Vanilla elevates desserts by adding subtle complexity—we’ll include it after cooking down our caramel sauce so its fragrance remains intact without being cooked away.
- 1 1/2 cups flour (for crust). All-purpose flour provides structure essential for holding everything together while still allowing room for flakiness within our crust—a delicate balance achieved through careful mixing techniques!
- 12 tablespoons unsalted butter (for crust). Just like before—softened unsalted butter transforms dry ingredients into heavenly dough through creaming; leading toward crispness upon baking without overly greasy results!
- 1/2 cup fine ground cornmeal (for crust). Cornmeal introduces lovely texture alongside flavor—that subtle nuttiness pairs wonderfully with rich fillings making each bite memorable beyond compare!
- 1 tablespoon white sugar (heaping) (for crust). A hint of sweetness enhances overall flavor while assisting browning during baking process resulting in delightful golden hue worth savoring later on!
- 1/2 teaspoon salt (for crust). Salt balances sweetness & enhances flavors within dough keeping things harmonious throughout preparation phases leading toward successful pies every time!
- 1/4 to 1/3 cup ice cold water (for crust). Chilled water is essential when forming pastry dough—it keeps fats solidified ensuring flaky layers remain intact instead turning gummy during mixing processes which would ruin desired textures altogether!
- 1 tablespoon apple cider vinegar (for crust). Adding acidity aids gluten development while also contributing tenderness needed within flaky pastries—so don’t skip out on this crucial little detail here folks!
- 1/2 cup flour (for streusel topping). We’ll use more flour again but now mixed with oats & sugars yielding crumbly topping worthy enough alone pairing perfectly atop dishes like ice cream sundae too if desired!
- 1/3 cup light brown sugar (for streusel topping). Brown sugar delivers moisture along with slight chewiness contrasting nicely against crunchy bits giving dimension whenever biting into these delightful pieces hiding beneath mounds whipped creams awaiting their turn showcasing artistry tasted beyond words alone!
- 1/3 cup rolled oats (for streusel topping). Oats bring wholesome goodness plus satisfying crunchiness elevating textures throughout experience leaving guests craving seconds even after indulging fully already—the perfect end note indeed to any occasion served proudly showcasing talents amongst culinary arena indeed!
- 6 tablespoons unsalted butter (melted—for streusel topping). Melted butter binds everything together ensuring proper clumping occurs effectively creating those irresistible nuggets everyone fights over whenever served up warm alongside pies freshly baked from ovens overflowing fragrant aromas wafting throughout spaces inviting us closer time after time again…
- 1 teaspoon cinnamon, and
– 1/2 teaspoon cardamom, and
– pinch of salt (for streusel topping) combined together enhances overall character enriching experiences shared amongst loved ones savoring these bites forging connections deeper than mere food alone can offer back warmly comforting hearts shared across tables adorned lovingly prepared meals alike spanning generations past down cherished recipes cultivated amidst warmth surrounding hearths glowing brightly filled laughter resounding echoes timelessly reminding us all why we cook passionately share such delights…
– Finally finally…
– 2 cups heavy cream + 3 tablespoons powdered sugar whipped together forms heavenly clouds billowing forth atop slices waiting patiently resting gently awaiting their turn gracing plates before reaching eager hands ready dive right into blissful experiences unfolding them feeling full hearts satisfied souls embraced warmly…
Now I know this seems like quite an array but trust me—each component plays its own vital role crafting something spectacular worth celebrating surrounded loved ones near & far alike sharing moments spent cozily reminiscing fondly enjoying every mouthful reveling delightfully exploring depths flavors experienced anew always returning back repeatedly drawn towards familiar comforts offered up generously through lovingly crafted treats crafted around tables filled laughter warmth enveloped brightly shining hope shining ever bright promising futures ahead brimming possibilities endless journeys awaiting discovery blossoming dreams realized alongside cherished friendships forged stronger than ever before bonding tightly woven threads connecting souls intertwined forevermore…
Equipment You’ll Need:
Having the right tools at hand makes all the difference in achieving success with this recipe—you wouldn’t want anything less than perfection as you create such an incredible dessert! Each piece of equipment plays its own unique role in helping us bring this vision of culinary delight into reality.
- Mixing bowls: A set of various sizes is essential; you’ll need larger bowls for mixing wet ingredients together while smaller ones come handy measuring precise amounts dry ingredients too ensuring everything incorporated thoroughly keeps things organized flowing smoothly throughout processes involved preparing dishes from start finish without hiccups along way either…
- Whisk: An indispensable tool when whipping cream or mixing together batter components ensuring uniform consistency achieved easily also great blending spices evenly distributing across mixtures making sure every bite tastes equally delicious not just few lucky ones enjoy bite experiencing best versions brought forth fully realizing potential hidden secrets waiting uncovered inside…
- Pie dish: A sturdy ceramic or glass pie dish retains heat beautifully allowing even cooking throughout resulting perfectly golden brown crusts completed properly baked pies destined impress anyone encountering them fortunate enough samples gifted lovingly crafted creations borne passion persistence dedication poured forth lovingly crafted efforts exerted nurturing spirits uplifting hearts soaring soaring high above clouds radiating joy everywhere spread wide open arms embracing entire world warmly welcoming many more travels discovering wonders awaiting exploration boundless horizons imagined dreams fulfilled ultimately realized…
Preparing the Milk Bar Hilly’s Pumpkin Caramel Pie Recipe
Step 1: Crafting Our Crust
First things first—let’s start by crafting our beautiful homemade pie crust! Begin by combining 1 ½ cups flour along with fine ground cornmeal which adds delightful texture then sprinkle heaping tablespoon white sugar pinch salt over mixture toss gently until thoroughly mixed ensuring everything evenly distributed before pouring melted six tablespoons unsalted butter directly onto top stirring briefly incorporating everything well until fully combined resembling moist crumbs resembling wet sand clumping together nicely forming cohesive ball manageable dough stage reached successfully attained thus far onward onward journey continued undeterred determined craft delicious treat deserving adoration attention received abundantly thereafter next step requires adding chilled water gradually until desired consistency achieved soft pliable sticky yet workable should feel cool touch fingertips knead lightly forming disc wrap tightly plastic wrap refrigerate minimum thirty minutes allowing relax firm up nicely ensuring flakiness retained baked thereafter…
Step 2: Prepping Our Filling
While we wait patiently for our dough chilling let’s prepare luscious filling awaiting patiently behind scenes beginning opening those glorious two cans pure pumpkin puree carefully transferring contents large mixing bowl whisk vigorously until smooth consistency formed bringing life vibrant hues forth inviting aromas wafting gently air tickling senses remind us autumnal flavors abound stirring three teaspoons aromatic pumpkin spice half teaspoon salt creamy blend sweetened generously one cup white sugar whisked smoothly then pour luscious heavy cream gently folding delicately incorporate evenly throughout mixture adding depth richness layered complexities enhanced further melted twelve ounces quality white chocolate folded softly inviting warmth seeping through heightening expectations heightened anticipation created eagerly excitement builds building steadily slowly unfolding gradually igniting passions hungry eager indulge seeking sweet satisfaction only attainable pie created lovingly crafted hand…
Step 3: Making That Irresistible Salted Caramel
Now let’s move onto creating our irresistible salted caramel sauce! In saucepan medium heat combine measured amounts six tablespoons unsalted butter one-third cup heavy cream quarter cup water stirring continuously dissolve fully bubbling gently releasing enticing fragrances enveloping kitchen completely mesmerizing mine senses completely capturing attention entirely lost momentarily blissfully indulgent aromas linger feeling warmth emanating longing desire reflectively gazing upon bubbling cauldron standing strong amidst swirling steam rising upward beckoning closer gentle embrace captivating magic brewing soon soon transformed liquid gold await eager taste buds primed poised devour sweet nectar dripping decadence flowing forth enhance experiences shared amongst loved ones gathered round tables adorned cherished memories exchanged effortlessly flowing freely between bites savored tenderly shared laughter ringing out resonantly fill air sounds joy echoing deeply felt hearts warmed surrounding festivities unfolding grand manner celebrating life love captured forever remained frozen time moments enjoyed once again reliving stories told countless retold over years passing reminding always heartwarming times spent cherished bonds forged along pathways traveled navigating life journeys discovering treasures discovered hidden treasures waiting explore…
Step 4: Crafting That Heavenly Whipped Cream
Before assembling everything beautifully let’s whip up some heavenly whipped cream grace final presentation adorning lovely slices awaiting reverently adorned effortlessly invitingly beckoning guests partake sumptuous delights presented artfully lovingly garnished whipped clouds floating lightly upon each slice dreamily evoking desires spiraling outward tempting thoughts dancing minds inspiring visions grandeur offered promise pleasures contained within each spoonful…
I cannot wait for you all experience magic firsthand witnessing transformations occur midst kitchens everywhere united purpose enjoyment sharing happiness spreading kindness love infused creations boundless possibilities await reach aspiring heights soared reaching glory discovered found fledgling talents nurtured blossomed flourish thriving achieving greatness simplicity profound richness found everyday lives captured jubilant moments celebrated spirit alive vibrancy nurtured never extinguished hope shimmering bright guiding light illuminating paths taken traversed journey ahead…
Continuing the Journey: Crafting Milk Bar Hilly’s Pumpkin Caramel Pie Recipe
Step 5: The Art of Making the Perfect Crust
Now that we’ve prepared our pie filling ingredients, let’s turn our focus to the crust, which is truly the foundation of this delightful pie. Start with a mixing bowl where you’ll combine 1 ½ cups of flour, ½ cup of fine ground cornmeal, a heaping tablespoon of white sugar, and a pinch of salt. Mixing these dry ingredients first ensures that every crumb of your crust will be evenly seasoned with that delightful sweetness and slight hint of saltiness. Next, add in 12 tablespoons of unsalted butter; you want this butter to be cold and cut into small cubes for optimal flakiness. Why cold butter? Because as it melts during baking, it creates steam that will puff up the layers of your crust, making them beautifully airy and tender.
Using your fingers or a pastry cutter, gently work the butter into the flour mixture until you achieve a texture reminiscent of coarse crumbs – think sandy! Once you reach this stage, add ice-cold water gradually (about ¼ to ⅓ cup) along with one tablespoon of apple cider vinegar; trust me on this vinegar addition! It helps to create a tender crust by inhibiting gluten formation. Mix until the dough just comes together; don’t overwork it! Form it into a disk, wrap it in plastic wrap, and let it chill in the fridge for at least 30 minutes. This chilling step is absolutely paramount; it allows the gluten in the dough to relax and prevents shrinkage during baking. So while you’re waiting (and maybe doing a little happy dance), just imagine how wonderful your pie will taste!
Step 6: Creating a Flavorful Filling
While your crust is chilling and firming up beautifully, let’s dive into creating that utterly intoxicating pumpkin filling that makes this pie so special. In a large saucepan over medium heat, combine your two cans (15 ounces each) of pumpkin puree with 1¼ cups heavy cream and ⅓ cup corn syrup. As you stir these together, take a moment to inhale deeply; the warm aroma is simply divine! This combination creates an incredibly lush base for our pie. Allow this mixture to gently warm through – not boiling – as this helps meld those flavors together harmoniously.
Next, add in five tablespoons of unsalted butter (oh yes!), three teaspoons of pumpkin pie spice for warmth and comfort, and half a teaspoon of salt to elevate all those flavors. Now comes my favorite part: white chocolate! You’ll want to chop about 12 to 16 ounces (2-2½ cups) of high-quality white chocolate into small pieces before adding them to your warm mixture. Stir continuously until everything is melted and silky smooth; this creates a spiced pumpkin white chocolate ganache that is nothing short of decadent! The key here is patience—allowing that chocolate to melt slowly ensures that you won’t get any lumps in your filling. Once everything is combined and glossy, remove from heat and set aside to cool slightly before proceeding.
Step 7: Whipping Up Salted Caramel Bliss
Now let’s elevate our Milk Bar Hilly’s Pumpkin Caramel Pie with an extraordinary layer of salted caramel that will have everyone swooning! In a medium saucepan over medium heat, combine one cup of white sugar with one-fourth cup water—that’s right; we’re making caramel from scratch! Stir gently until the sugar has dissolved completely before allowing it to boil without stirring further; at this point, we want the sugar syrup to cook undisturbed until it reaches an amber color—this usually takes about 8-10 minutes. Keep an eye on it as caramel can go from perfect to burnt in mere seconds! What you’re looking for here is that beautiful golden hue that smells sweetly fragrant like candy.
Once you’ve achieved that glorious amber color, it’s time for some magic! Remove from heat (carefully) and whisk in six tablespoons of unsalted butter along with one-third cup heavy cream—this step can cause splattering due to steam so be cautious! Continue whisking until smooth and creamy; then add one teaspoon (or two if you’re feeling adventurous) of salt along with two teaspoons vanilla extract for depth and richness. Allow this heavenly creation to cool slightly before layering it onto our cooled pumpkin filling. The interplay between the sweet pumpkin and salty caramel will create an unforgettable flavor experience!
Step 8: Assembling Your Spectacular Pie
With both our luscious filling and rich caramel ready, it’s time for the grand assembly! First things first—preheat your oven to 350°F (175°C). Take out your chilled crust from the refrigerator; roll it out on a lightly floured surface until it’s about an inch larger than your pie dish—this will allow us plenty of room for crimping those edges later on. Fit the rolled-out dough into your pie dish without stretching it; if there are any cracks or tears, just patch them up gently with leftover dough because no one likes an overflowing filling disaster!
Once fitted snugly into the dish, pour half of your spiced pumpkin white chocolate ganache evenly into the crust. Then drizzle half of your cooled salted caramel over this layer—don’t worry if they swirl together slightly; trust me—it looks beautiful when baked! Repeat by layering on the remaining ganache followed by another drizzle of caramel on top because more caramel equals more happiness! Finally, make sure to reserve some caramel for drizzling once it’s out of the oven—that final touch adds such elegance when serving.
The Final Touches: Baking Your Milk Bar Hilly’s Pumpkin Caramel Pie Recipe
Step 9: Baking Your Masterpiece
Now comes the time we’ve all been waiting for—the baking process! Carefully place your assembled pie onto a baking sheet (to catch any potential drips) and slide it into your preheated oven. Bake for about 50 minutes or until it’s set but still has a slight jiggle in the center; think custard-like rather than wobbly jelly—this ensures every bite remains perfectly creamy! As you watch through the oven window (it’s always fascinating), enjoy how lovely your kitchen smells as those flavors meld together into something truly extraordinary.
After about 40 minutes have passed, I recommend checking on its doneness by inserting a toothpick in the center—if it comes out mostly clean but still has some moist crumbs clinging onto it then you’re good to go! Remember not to rush this step; patience is key here because letting this bake slowly allows all those flavors time to deepen—I promise you won’t regret waiting just another few moments longer if necessary.
Once baked perfectly golden brown around the edges but still jiggly at its heart, take it out and let it cool completely at room temperature before transferring to refrigerate for at least four hours—or even better overnight if you can resist diving right in! This resting period allows all those flavors to settle beautifully while being chilled gives us that perfect slice later on.
Step 10: Whipped Cream & Streusel Topping
As we approach our final steps—the finishing touches—I can hardly contain my excitement because we’re about to elevate our Milk Bar Hilly’s Pumpkin Caramel Pie Recipe with homemade whipped cream alongside an irresistible streusel topping that’ll add texture galore! To whip up some fresh whipped cream that’ll complement our luscious pie fantastically well, take two cups heavy cream along with three tablespoons powdered sugar (for sweetness). Using either an electric mixer or whisking by hand (if you’re feeling adventurous!), beat until soft peaks form—you want lightness here!
For added flair while serving each slice later on—let’s whip up some streusel topping too using half cup flour mixed in with one-third cup light brown sugar along with rolled oats plus cinnamon + cardamom combined well before cutting in six tablespoons unsalted butter into smaller pieces until crumbly yet cohesive enough together so it’ll sprinkle nicely atop each slice!
To serve up this masterpiece proudly—as if serving guests at Thanksgiving dinner—add generous dollops oozing sweetened cream atop those slices then sprinkle over crunchy streusel right before enjoying every last bite… I promise you they’ll remember their first encounter forevermore!
And there we have it—the perfected indulgence known as Milk Bar Hilly’s Pumpkin Caramel Pie Recipe—a symphony not just meant for indulging but also about sharing love through food with family & friends alike… Enjoy every moment spent savoring each delectable piece!
Storage and Enjoyment Tips for Your Milk Bar Hilly’s Pumpkin Caramel Pie Recipe
Now that your kitchen is filled with the intoxicating aroma of freshly baked pie, it’s time to dig in! I can hardly contain my excitement; I mean, who wouldn’t want to indulge in this delightful creation? But wait – what if there are leftovers? Fear not, my friends! The beauty of this pie is that it only gets better with a little time. Let’s talk about how to preserve this masterpiece so you can enjoy each luscious slice for days to come.
Storing Leftover Milk Bar Hilly’s Pumpkin Caramel Pie Recipe
To keep your Milk Bar Hilly’s Pumpkin Caramel Pie fresh and flavorful, store any leftovers in an airtight container in the refrigerator. This step is crucial because it prevents the pie from drying out while also preserving its rich textures and flavors. You can expect it to stay delicious for about 3 to 5 days, but I promise you will want to savor it long before then! For an extra tip: place a slice of bread in the container with the pie; this will help maintain moisture and keep your crust from getting too soggy. The flavors will meld beautifully during storage, allowing each bite to be even more profoundly satisfying than the last. When it’s time to serve again, simply let it come back to room temperature or pop it into the microwave for a quick warm-up – just make sure not to overdo it, as we want that delightful creamy filling intact!
Freezing Components for Later
If you’re looking ahead and want to make life even easier, consider freezing components of your Milk Bar Hilly’s Pumpkin Caramel Pie. You can freeze the homemade crust and streusel separately before baking them; just wrap them tightly in plastic wrap and store them in a freezer bag. They’ll keep well for up to 3 months. When you’re ready for a spontaneous dessert night (and who wouldn’t be?), simply thaw them overnight in the fridge before assembling and baking your pie. Trust me on this one – having these components on hand makes whipping up this extraordinary pie a breeze! Plus, there’s something undeniably convenient about being able to pull together such a decadent dessert without any fuss.
Milk Bar Hilly’s Pumpkin Caramel Pie
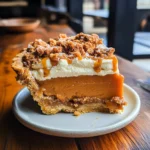
Indulge in the comforting flavors of Milk Bar Hilly’s Pumpkin Caramel Pie Recipe, a delightful autumn-inspired dessert that combines creamy pumpkin filling with a luscious salted caramel layer. This pie features a buttery homemade crust and is topped with airy whipped cream and a crunchy streusel, creating an irresistible treat perfect for any gathering or cozy evening at home. Each bite transports you to a world of warmth and nostalgia, making it an unforgettable addition to your dessert repertoire.
- Prep Time: 30 minutes
- Cook Time: 70 minutes
- Total Time: 1 hour 40 minutes
- Yield: Serves approximately 8 slices 1x
- Category: Dessert
- Method: Baking
- Cuisine: American
Ingredients
- 2 (15-ounce) cans pumpkin puree
- 1 ¼ cups heavy cream
- 12 ounces white chocolate
- 5 tablespoons unsalted butter
- 1 cup white sugar
- 3 teaspoons pumpkin pie spice
- 1 cup all-purpose flour
- ½ cup fine ground cornmeal
- 1 tablespoon apple cider vinegar
- Salt
Instructions
- Preheat your oven to 350°F (175°C).
- For the crust, mix flour, cornmeal, sugar, and salt in a bowl. Add cold butter and mix until crumbly. Gradually add ice-cold water and vinegar until dough forms. Chill for at least 30 minutes.
- Roll out the chilled dough, fit it into a pie dish, and bake for about 20 minutes until lightly golden.
- For the filling, combine pumpkin puree, heavy cream, corn syrup, melted butter, spices, salt, and chopped white chocolate in a saucepan over medium heat until smooth.
- Pour half of the filling into the crust; drizzle with half of the caramel sauce (made by heating sugar and water until amber). Repeat layering with remaining filling and caramel.
- Bake for about 50 minutes until set but slightly jiggly in the center; cool completely before refrigerating for at least four hours.
- Serve topped with whipped cream and streusel made from flour, oats, brown sugar, cinnamon, and melted butter.
Nutrition
- Serving Size: 1 slice (120g)
- Calories: 320
- Sugar: 28g
- Sodium: 150mg
- Fat: 18g
- Saturated Fat: 10g
- Unsaturated Fat: 8g
- Trans Fat: 0g
- Carbohydrates: 35g
- Fiber: 2g
- Protein: 4g
- Cholesterol: 45mg